
Apache Solr Succinctly®

CHAPTER 6
Indexing
Making Your Content Searchable
When you hear the word “indexing” in the context of Solr—or other search engines for that matter—it basically means taking content, tokenizing it, modifying it if necessary, adding it to the index, and then making it searchable. Solr retrieves results very fast because it searches an inverted index, instead of searching text directly.
But what exactly is an inverted index? It is a data structure that stores a mapping from content, like words or numbers, to its location in a set of documents. Because of this, searching becomes very fast, as the price is paid at indexing time instead of at query time. Another way of referring to an inverted index is as a postings file or inverted file. So if you hear any of these three terms, they mean the same thing.
During indexing, Solr inverts a page-centric data structure to a keyword-centric data structure. A word can be found in many pages. Solr stores this index in a directory called index in the data directory. There are many ways of indexing your content; in this chapter, I'll introduce you to a couple of them.
Indexing is nothing new—humanity has been doing it for centuries! This is something that we do all the time in our busy lives. The index at the back of a book for example, or a TV guide telling you which programs are on your TV stations, are both perfect examples of indexing in action.
You use them by quickly scanning a predefined list, looking for some meaningful keyword or topic. Once the keyword or topic is found, the entry will contain some kind of a pointer (for example, a page number) that allows you to go straight to the information you seek.

- A textbook index
Indexing Techniques
We've already indexed some data using the post.jar tool, but there are many more options:
- You can use the Solr cell framework built on Apache Tika for binary files, like PDF, Word, Excel, and more.
- It is also possible to upload XML files by sending them via HTTP requests.
- The DataImportHandler allows accessing a database to retrieve data, but it is not limited to databases. The DataImportHandler can also read from RSS feeds or many other data sources.
- You can also build your custom Java application via Solr's Java client API, SolrJ.
- And for those of you who love .NET like I do, you have SolrNet.
- As I mentioned before, there are other content processing pipeline tools like the Search Technologies ASPIRE post-to-Solr tool.
- And finally, you can build your own on top of Solr’s RESTful interface.
Indexing the Succinctly Series
In this section, we will play around with data by indexing, updating, and deleting. The focus here is to do things in a few different ways so that you can improve your skills.
Here is what we will do:
- Start by indexing using CSV and the post.jar tool.
- Then, learn how to update documents using the Admin UI.
- Next, we go into how to delete documents.
- Next, we’ll cover the Solr XML format.
- Finally, we’ll be indexing with two useful tools, cURL and Fiddler.
Indexing Documents Using CSV
Indexing documents is very easy if you have structured and properly escaped CSV files of your data. We've already defined the static fields in our Schema.xml, so next we need to get our data imported.
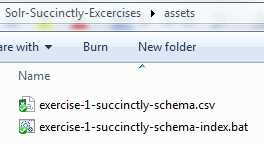
Start by opening the assets folder in our samples located in GitHub. Please review the repository you have cloned and confirm it looks like the following:

- GitHub repository
Now from the assets folder, using Windows Explorer, please copy exercise-1-succinctly-schema.csv and exercise-1-succinctly-schema.csv to our exampledocs folder in C:\solr-succinctly\succinctly\exampledocs.
- Exercise 1
You might be wondering why we are copying the CSV and BAT files to exampledocs. This is because that is where post.jar is located, and even though you can set the correct paths, it is easier this way.
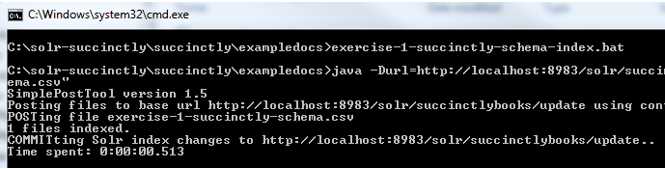
The next step is to execute index the files. For this purpose, we will open a command prompt and navigate to the exampledocs folder. You can just run the exercise-1-succinctly-schema.bat file, which will execute the following command:
java -Durl=http://localhost:8983/solr/succinctlybooks/update -Dtype=text/csv -jar post.jar "exercise-1-succinctly-schema.csv" |
Read the response in the command window. If all went well, it will prompt “1 files indexed.”
- Sample file indexed
Excellent! Let’s run a query now in succinctlybooks for *:*. You can do it from the Admin UI.
If you do not get this response, please make sure that the exercise files are within the exampledocs folder, right next to post.jar. Also, run post.jar /? from exampledocs to confirm that it is able to execute.
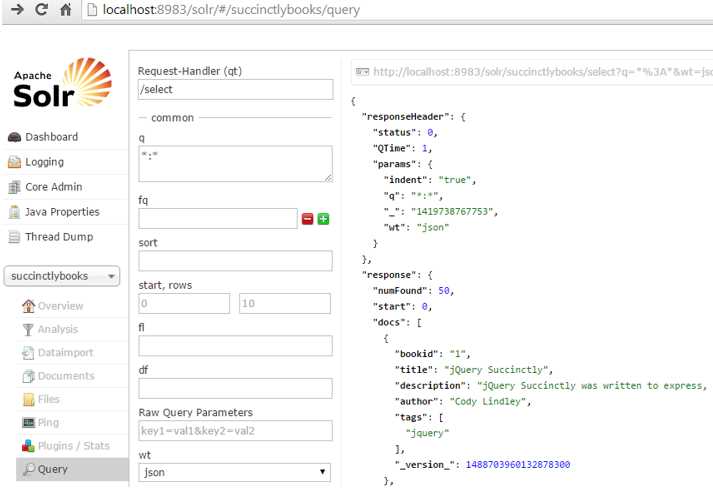
- Query with all books
Everything looks great. We have 50 documents and our data seems ok. Let’s analyze one record:
- Single record
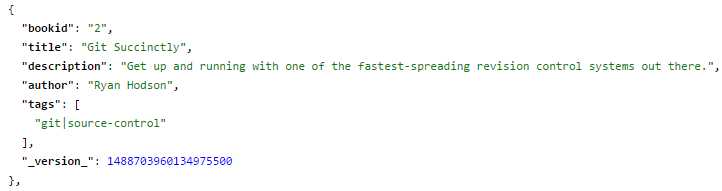
Something doesn’t look right. Can you pinpoint what it is? Look at tags. You probably noticed by now, but let’s make it a bit more obvious. Within tags, there is only one entry with “git|source-control”. It is a multivalued field, but it is treating git and source-control as part of the same tag. For this example to be correct, they should be two separate values.
To review further, please click the link below for the response, with xml as wt (response writer):
Note: If you have modified Solr’s location, please use your current location.
Let’s look at the same record for Git Succinctly.

- Document with error on tags
You should be able to see from the previous figure that the tags field has been indexed as a single field, not multiple fields, even though we declared as multivalued. The reason this happened is very simple: we did not tell post.jar which field we want to separate, and which one is the separator.
We can easily fix this by running the following command:
java -Durl="http://localhost:8983/solr/succinctlybooks/update?f.tags.split=true&f.tags.separator=|" -Dtype=text/csv -jar post.jar "exercise-1-succinctly-schema.csv" |
I've also included the fix in the following file in our assets folder: exercise-1-succinctly-schema-index-fixseparator.bat.
Once we've made this change, try re-running the previous queries; you should see a difference.

- Correct multivalue tags
Whenever you have to specify multivalue inputs as a single string, you must ensure that you tell Solr it needs to split the input up, using the following parameter:
f.tag.encapsulator='<separator character here>' |
Indexing via Admin UI
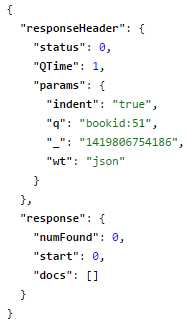
You can also create and amend indexes using the Admin UI in the Documents section. For our first example, let’s prove that the record that I am about to add does not already exist. Open the Core Selector, click on Query, and in the q input field, type in bookid:51 and execute the query. No documents found. We will add book number 51, which is this one you are reading right now.
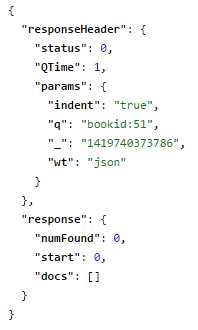
- No book with ID 51
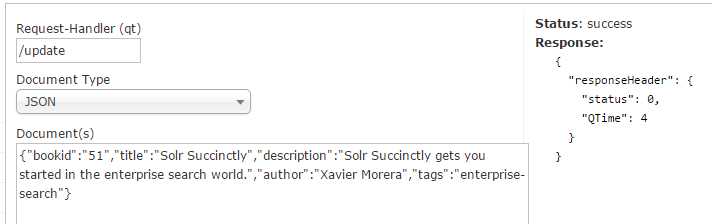
Now select Documents and type in the following text within Document(s) input field:
{"bookid":"51","title":"Solr Succinctly","description":"Solr Succinctly gets you started in the enterprise search world.","author":"Xavier Morera","tags":"enterprise-search"} |
Click Submit Document, and you should get a success status in the right-hand section. Leave this window open, as we will use it in the upcoming two sections, and open a new tab in the same location to continue testing.
- Document submitted
Now the book is available in the index, and is searchable.
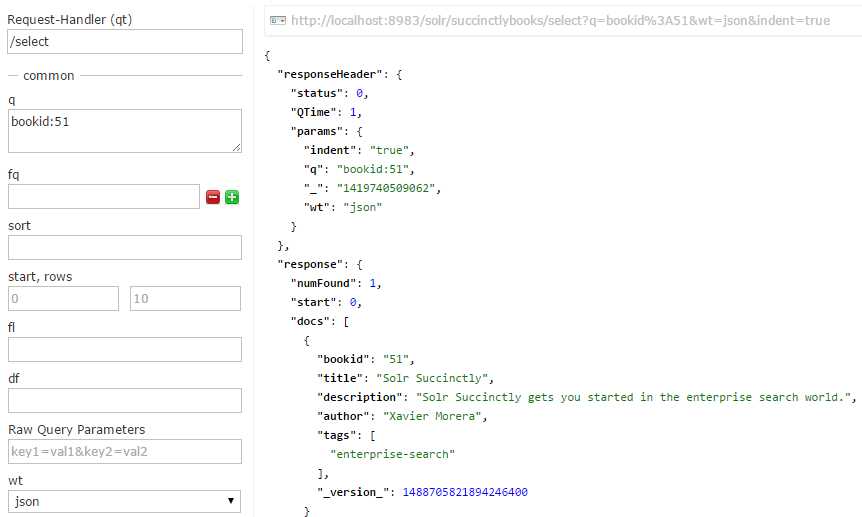
- Book with ID 51 available
If you were to try and run this as a singular query all on its own as follows:
http://localhost:8983/solr/succinctlybooks/select?q=Solr&wt=xml&indent=true |
You may be surprised to find that you don't get any results. I'll leave the explanation to this until a little bit later; for now, I want to show you a little more about how Solr searches its indexes.
Updating via Admin UI
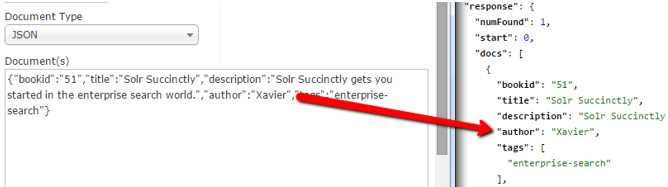
We just added one document. But what if we wanted to update a document? It’s very simple—you just add the document again. Remove my last name and leave “author”:”Xavier”. Click Submit Document and the run the query again. You will see that my name has been updated, sans last name.
- Author modified
If you look just below the document input field, you'll see an input parameter called Overwrite; initially this will be set to true. Its purpose with this default setting is to ensure that it updates where needed and doesn't insert a new record. Set it to false, and try changing the author name again, and you should find that it now adds a new record instead:
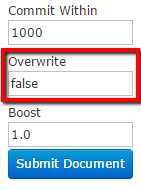
- Overwrite option
Partial Updates
Partial updates is a feature people have been requesting for years in Solr; however, it was not until Solr 4.0 that it became available. Put simply, partial updating involves updating a single field within a document without the need for indexing the full document. This may not sound like much, but if you have big documents (and a lot of them) that require a huge amount of processing just for a simple single field change, you can quickly see how much processing time would be wasted. This along with the sheer number of documents can make a big difference.
Let me share with you a story that happened to me a few years ago. I was working on a project for a patent searching application. It basically had a double digit TB index, made up of about 96MM patents containing every patent application and grant filed for all patent authorities worldwide. Document sizes ranged from a few bytes to many megabytes; we had thousands of fields, and indexing a document meant consuming a lot of processing power due to field normalization and many other required operations.
Each patent entry has one or many classification codes that basically specify the content of each patent; these codes used USPC, ECLA, and many others, depending on the owning authority.
From January 1, 2013 on, the Cooperative Patent Classification started to use as the official new classification, a scheme jointly developed by the United States Patent and Trademark Office and the European Patent Office.
This meant that all patents suddenly needed to be reclassified, the upshot of which was basically to add a new field for the new CPC classification code. In technical terms, this wasn't a huge task by any stretch of the imagination. We received a CSV file that contained the patent canonical number and the CPC codes, so we knew exactly what needed to be matched to which records. All patents needed to be searchable with the new CPC code, and this is where our problems began. We did not have the ability to perform partial updates, meaning we had to fully reprocess about 80 million+ documents for every single update—a task that took weeks to do.
A partial update could’ve reduced the amount of time needed to a couple of days. The moral of the story is simple: use partial updates where possible, and you'll quickly realize how invaluable they are.
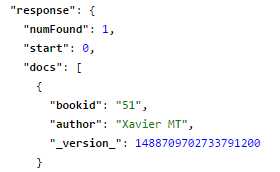
Let’s do a partial update now. If you recall, here is what we have to index my book document:
{"bookid":"51","title":"Solr Succinctly","description":"Solr Succinctly gets you started in the enterprise search world.","author":"Xavier Morera","tags":"enterprise-search"} |
Leave only bookid and author, changing author to Xavier Partial Update, and click Submit Document.
{"bookid":"51","author":"Xavier MT"} |
Now run the query to retrieve this document. What happened? Basically, when you did the update, it added the full record with the fields you specified. Full update is not what we need; we need partial update.
- Full update
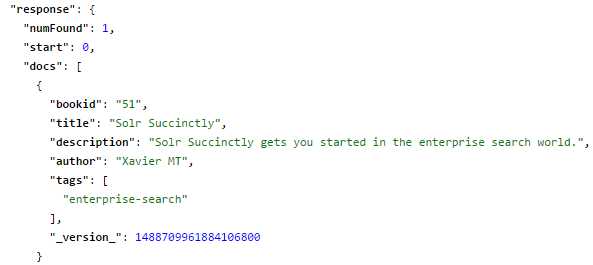
Let’s try again. Start by resetting the document to its original state. Run the query to confirm.
{"bookid":"51","title":"Solr Succinctly","description":"Solr Succinctly gets you started in the enterprise search world.","author":"Xavier Morera","tags":"enterprise-search"} |
Once you reset things, try to submit a partial update again. Specify which field you want to update by using the key word set within {}, as follows:
{"bookid":"51","author":{"set":"Xavier MT"}} |
Run the query again for bookid. Now you will have a partial update on author.
- Partial update
One last thing you need to be aware of: for a partial update to work correctly, you must have all your fields set to stored=true. This can be an issue if you wanted to manage your index size by not having all fields stored, but if not specified, you won’t be able to do a partial update on that field.
Deleting Data
Now that we know how to insert and update documents, the next step is to learn how to delete documents. You can delete documents by ID and by Query. For example, to delete this book from the index, you could use either of the two following ways:
The first is to delete by ID. This is the command that will tell Solr which ID it needs to delete:
<delete> <id>51</id> </delete> |
The URL that you should use to execute this is as follows:
http://localhost:8983/solr/succinctlybooks/update?stream.body=<delete><id>51</id></delete>&commit=true |
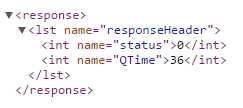
The response obtained should look like the following. A status of 0 means no errors were returned.
- Document deleted
However, it does not indicate the number of records, or if records were actually deleted. For this purpose, you would need to run a query to confirm. From the Admin UI, please select the succinctlybooks core, click on the Query section, add in q the following bookid:51, and execute.
- Query to confirm record deleted
To delete by query, you can try the following command:
<delete> <query>author:"Xavier Morera"</query> </delete> |
The URL to execute it is as follows:
By this point, you should be able to see that it's possible to delete the entire index, simply by using the following URL:
http://localhost:8983/solr/succinctlybooks/update?stream.body=<delete><query>*:*</query></delete>&commit=true |
Specifying a wildcard is way more efficient than specifying each index individually, something which is not always possible, as Solr may have files locked.
It is worth noting that you need to set commit to true, or else it won't be committed to the index. If you are deleting multiple documents, it is preferred if you don’t do a commit on every single operation.
Also, you can delete documents that match multiple fields. Any query that you can build for searching can also be used for deleting. Then, if you're using SolrNet or SolrJ, you can do a call to their API using the function Solr.deleteByQuery*:*. We will not be covering the API of SolrJ or SolrNet in this book, but I believe it is worth mentioning.
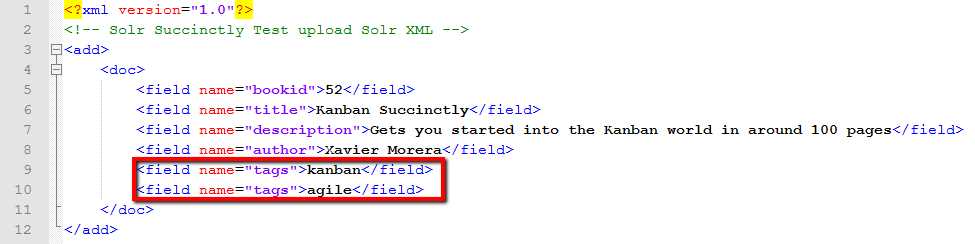
Solr XML Format
Solr has its own XML format, which is very specific and verbose, yet easy to read. It deals better with multi-valued optional fields, complex strings, and real-life requirements. I’ve participated in multiple projects where using Solr XML format is preferred, as document processing is done separately and potentially in parallel, generating millions of XML files that then are indexed in Solr as a separate process.
In the example files, you should find exercise-2-solr-xml.xml. If you open this file in a text editor, you should see that it basically has the add command, the document, and then all the fields that I'll be adding for this specific document. This book is not really in progress right now, but I just finished a course on it for Pluralsight, so it makes a good example subject.
- Indexing Solr XML sample data
Using one or both of the methods we learned earlier, perform a query for a book with an ID equal to 52; you can use the following URL, or enter it into the Admin UI query input:
http://localhost:8983/solr/succinctlybooks/select?q=bookid%3A52&wt=json&indent=true |
The next step is to add the document in the same way as we did with the CSV files. For ease of use, you'll find a batch file along with the XML; if you run this the document will be indexed.

- Copy sample files
If you’re not on Windows, or cannot run batch files, then the command you need is as follows:
java -Dauto -Durl=http://localhost:8983/solr/succinctlybooks/update -jar post.jar "exercise-2-solr-xml.xml" |
Notice how I used –Dauto instead of specifying the file extension. The tool is able to process multiple extensions as depicted in the command line response.

- Index Solr XML file
Now run the query again for bookid 52. It will return one document.
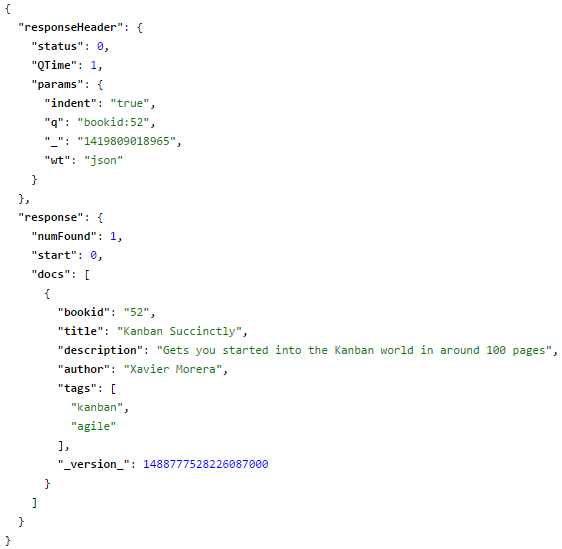
- Query for bookid 52
If you get this far, give yourself a pat on the back—you’re well on your way to understanding how Solr works and creating your own search indexes.
Using cURL
cURL is a command line tool for transferring data using various protocols, one which typically needs admin access in a shell-based scope, but is simple and easy to use. When it comes to working with Solr, I can say that cURL is your friend. It is great because it is easy to use, and you can easily post binary files. A training on cURL is beyond the scope of this book, but I will show you a quick demo of how it can be used. Also, if you are in an environment where you can’t use cURL, you can achieve similar results using plugins like Chrome’s Postman plugin.
To get started, you need to download cURL, which is very simple to install.
You actually use cURL from the command line. It allows you to post information and even post files. It lets you add, update, and delete documents.
To invoke it, type cURL in the command line, and then the location of your update handler. You also need to include which core you're actually committing it to.
Regarding parameters, I am passing commit equals true, which means the information should be committed to the index once I issue the command. Then I’m passing -H for the header, with a content type of text/XML.
Next is the command for the Solr. In this case, I'm doing an add command, which is exactly the same as in the Solr XML format, with the fields that I want included in this document.
The cURL command to complete all of these operations is as follows:
curl http://localhost:8983/solr/succinctlybooks/update?commit=true -H "Content-Type: text/xml" --data-binary "<add><doc><field name=\"bookid\">53</field><field name=\"title\">Scrum Succinctly</field><field name=\"author\">Xavier Morera</field><field name=\"tags\">scrum</field></doc></add>" |
To make your life easier, I have also included exercise-3-curl.bat to the exampledocs folder in succinctlybooks and run it. You must ensure that your system can find and run the cURL program for the batch file to work.
![]()
- Bat File for cURL Exercise

- Indexed via cURL
You should be able to see that the status of the previous operation is 0, which, as you now know, means no errors. If you subsequently run a query for a book with ID = 53, you should see one document appear within your results.
The document I indexed does not have all fields. Only bookid is required, but it is possible that if you copy pasted the field definitions and left required=“true”, then Solr will prompt an exception message like this:
<str name="msg">[doc=53] missing required field: description</str> |
If this scenario occurs, please make sure that only bookid contains a required=“true” attribute within Schema.xml.
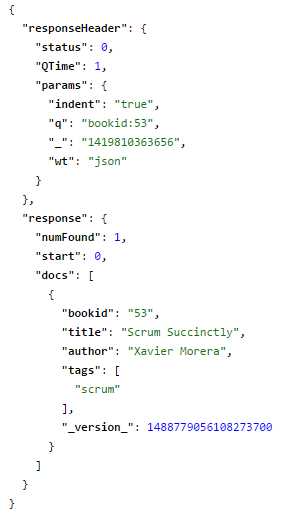
- Bookid 53
You can also issue any other command you wish. For example, a delete command would look like this:
curl http://localhost:8983/solr/succinctlybooks/update?commit=true -H "Content-Type: text/xml" --data-binary "<delete><query>courseid:getting-started-enterprise-search-apache-solr*:*</query></delete>" |
Fiddler
If you are used to web development, you are probably aware of Fiddler. If not, then Fiddler is a debugging proxy that logs all HTTP traffic into your computer. It's an excellent tool if you have problems, or if you want to debug the requests as you are working with Solr. Use it to inspect, reissue, and compose requests. To get Fiddler, visit http://getfiddler.com.
Once it is installed, open Fiddler. It starts monitoring all traffic within your computer, so I recommend you set a filter so that it only picks up local requests. To do so:
- Go to Filters
- Select Show only Intranet Hosts
- Choose No Host Filter
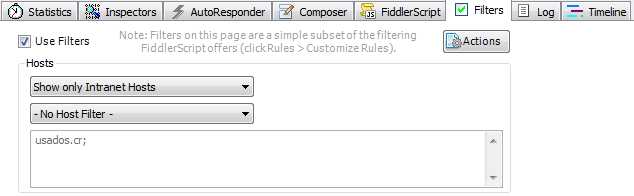
- Fiddler filter
Besides monitoring, Fiddler can also issue requests. Let’s learn how to issue a request.
Go to the Composer tab. You have the option of specifying which verb you want to use, such as GET or POST. In this case, I'm going to do a POST to the update handler, specifically to the succinctlybooks core. This is the URL:
The next step is to add the headers. Don’t worry about the content length; Fiddler adds it automatically.
User-Agent: Fiddler Content-Type: application/json Host: localhost:8983 Content-Length: 241 |
And now add the body:
{"add": { "doc":{ "bookid":"54", "title":"dotTrace Succinctly", "description":"dotTrace in around 100 pages", "author":"Xavier Morera", "tags":"profiling" }, "boost":1.0, "overwrite":true, "commitWithin":100 } } |
Your Composer tab should appear as shown in Figure 101. Click Execute.
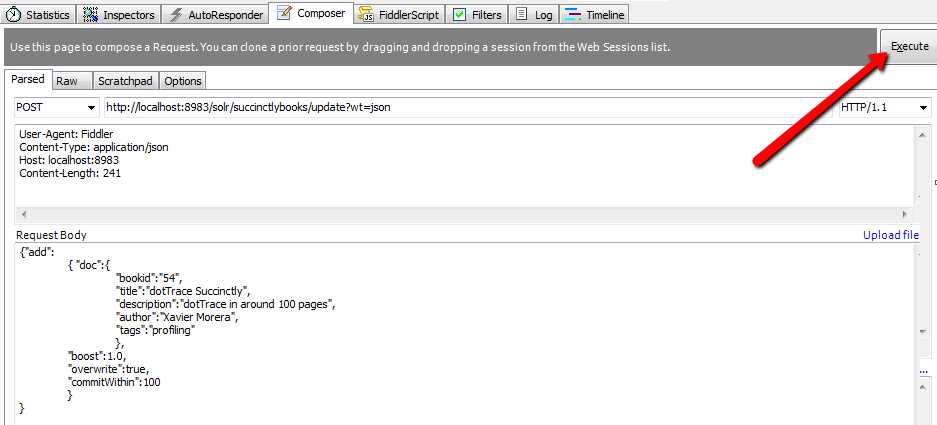
- Execute in Fiddler composer
As soon as the request is issued, Fiddler will log it in the left panel. Result 200 means all went well. If this is your first time using Fiddler, make a mistake on purpose to see an HTTP 500 response.
![]()
- A Fiddler response
Now double-click on the request, and Fiddler will open the details.
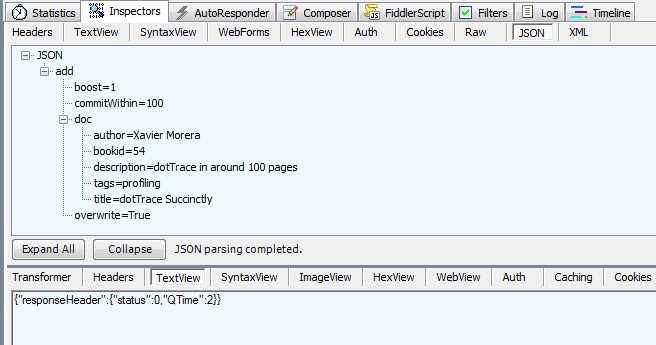
- Response in Fiddler Inspector
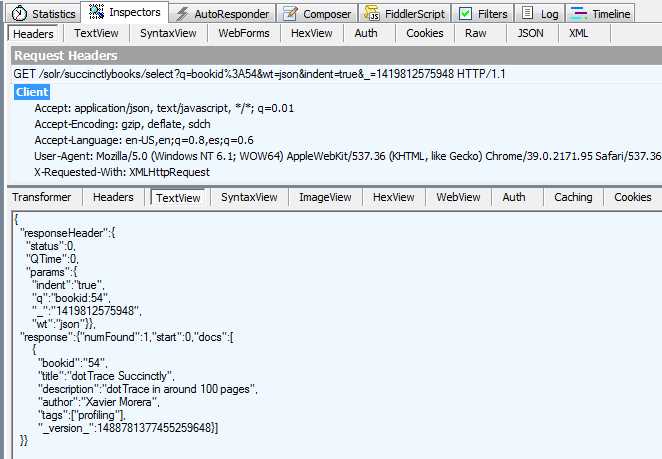
You can also run queries:

- Query Solr using Fiddler
You can then analyze the results:
- Analyze a Solr response in Fiddler
As you can see, this is a very powerful tool.
Re-indexing in Solr
When you are running Solr in either your production or development environments, at some point you’ll need to re-index. One scenario that requires re-indexing is when there is a schema change due to a new field being added. While it's true that you can make partial updates, there are some cases you need full updates, and performing a re-index is the only way to go.
Depending on the type of schema change, you may need to delete all your documents and then start re-indexing again from scratch. In this case, it's advantageous to have a full secondary set of Solr servers so you don’t lose search capabilities while re-indexing takes place. The point is that while you are reindexing because of a schema change, you need to point your application to an exact copy of the original Solr index, and once reindexing is complete, you point your application to the new Solr index.
What exactly does re-indexing mean? Basically, it’s the process of indexing every single document again, just as you did when you originally added them to the index.
In some cases, re-indexing can be painfully slow, because accessing the original data sources is not very efficient. If you run into a scenario like this, I suggest you set up an intermediate store, or another Solr that serves as a cache to help you re-index in a much quicker way.
Summary
In this chapter, you’ve learned how to index data, which is one of the most basic operations of Solr; it’s how you insert data into the search engine. You learned how to index by using the included post.jar, a command line tool called cURL, and Fiddler. You also learned how to delete and update data. Regarding updates, we learned the difference between full and partial updates, a feature that not all search engines have.
And now it is time to learn how to configure Solr’s core via Solrconfig.xml.
- 1800+ high-performance UI components.
- Includes popular controls such as Grid, Chart, Scheduler, and more.
- 24x5 unlimited support by developers.