
Ansible Succinctly®

CHAPTER 15
Ansible Roles
In Chapter 9, we saw how to work with the Ansible Playbook and how to utilize tasks. We are able to automate a large number of processes in this way.
In a more complex environment, we are automating and managing multiple environments or different products, which will undoubtedly increase code redundancy and complexity. At that point, it becomes quite difficult to manage everything in one Ansible playbook file.
Another cool feature that exists in other programming and scripting languages is code reuse, and Ansible in that sense is not any different. When writing code to automate webservers or databases, or managing another kind of host, we would also like to be able to share this work with others.
Ansible has created the concept of a role to help solve these issues. Each role is basically limited to a particular functionality or desired output, with all the necessary steps to provide that result. You might think of it as a library or module in other programming languages.
The Ansible role:
- Allows code reuse and makes the Ansible projects more manageable.
- Allows the creation of generic code that can be shared between teams or projects.
- Contains a set of (pre)packaged tasks.
- Has to be used within playbook.
- Has a predefined directory structure.
- Is written in YAML, as is the case for playbook or tasks.
Note: The concept of the Ansible role is simple: it is a group of variables, tasks, files, and handlers that are stored in a standardized file structure.
Role’s directory structure
The Ansible role has a predefined and standardized directory structure where files are organized into subdirectories for placing items such as variables, tasks, and handlers.
There are two ways of creating such a structure: manually, or by using the ansible-galaxy command. As we like automation, we will utilize the command to generate a skeleton folder structure for a role called webservice.
Code Listing 94: Initializing a role skeleton structure
$ ansible-galaxy init webserver |
When we run the command, a predefined directory structure will be created for us. Figure 49 shows the directory hierarchy.
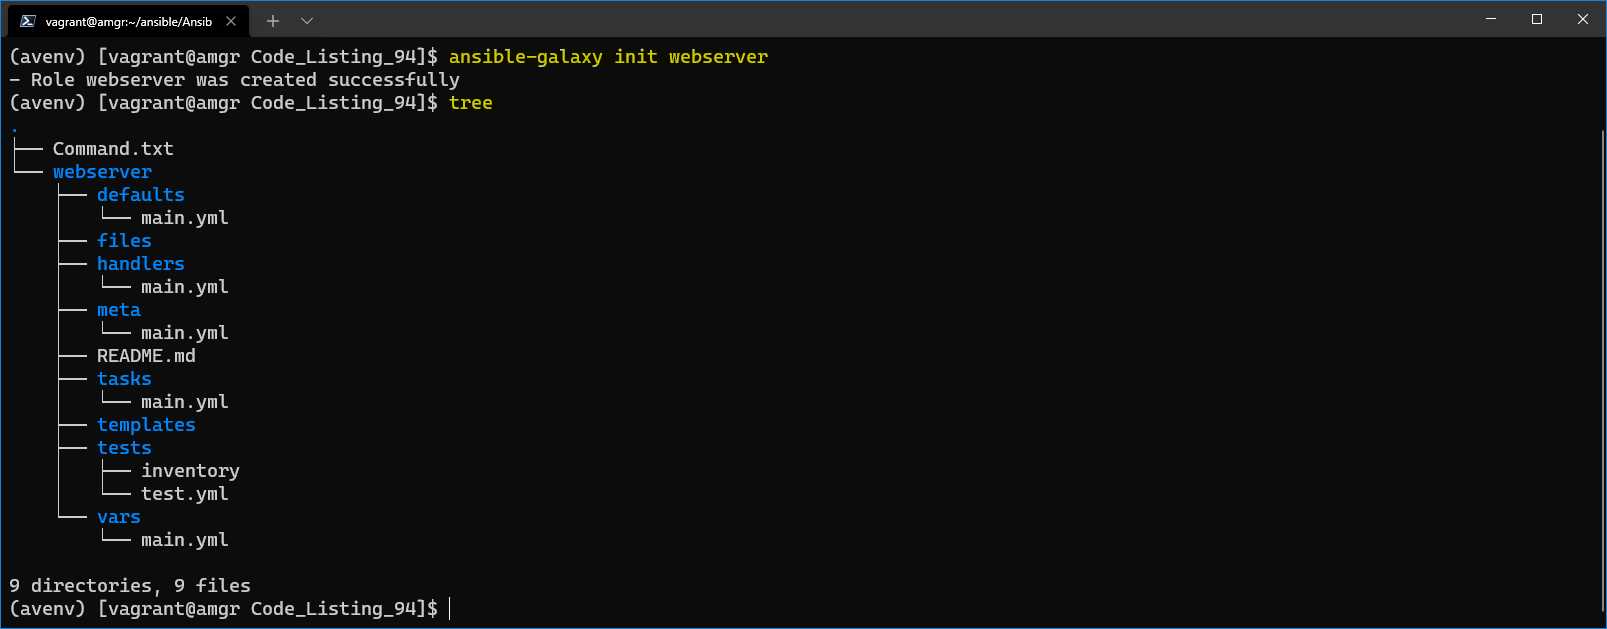
Figure 49: Role Skeleton creation
We can see that the command has created the skeleton with a few subfolders and files.
Table 13: Role directory structure explained
Directory | Description |
|---|---|
\ | The root directory is named after the role name. |
defaults | Contains default variables for the role. Variables in this directory have the lowest priority, so they are easy to override. |
files | Contains (static) files that are to be copied to the remote host. |
handlers | Contains handler definitions to be used by the role. |
meta | Contains the general information about the role itself, such as author, description, and license, as well the dependencies to other roles. |
README.md | Can contain information/documentation about the role. |
tasks | Contains the main list of steps (tasks) to be executed by the role. Similar to what we define in a playbook. |
templates | Jinja2 templates referenced by the role tasks. |
Tests
| The inventory file and test.yml playbook that can be used for testing. |
vars | Variables (with high precedence) used internally by the role. |
All of the subdirectories contain a main.yml file, which is the default file to be included in the execution pipeline.
There are three ways to start working with roles:
- Create a playbook first, and when it’s getting too complex, start translating and porting this code to a role.
- Start working on and creating the role from the beginning. This comes with the experience and the actual need of the application.
- Reuse an already available role, something we will explore in Chapter 16.
MongoDB custom role
In this section, we will automate the MongoDB installation with some prerequisites for a newly created role. The goal of this exercise is to install the MongoDB on the db server and install the MongoDB client on the two available webservers (web161, web162).
MongoDB is a NoSQL database, and it’s often used as the backend of web applications. The procedure to follow to install the MongoDB on the CentOS server is described on the MongoDB website.
What is important to understand in general is that Ansible just gives a means of automation, but not the actual recipe of how exactly each application works. So, looking into the official documentation is crucial to understanding what to automate.
By reading the official MongoDB documentation, we will see that we need to perform the following operations:
- Add the yum repository, as CentOS doesn’t have MongoDB available by default.
- Install MongoDB.
- Open Firewall ports to be able to access it from other servers (web server).
- Start the service.
While there are many other operations that could be added, such as configuring the ulimit and other settings for better performance, we will omit those for the sake of brevity.
Let’s start by creating the inventory file. In our case, the hostname is called db (192.168.3.199).
Code Listing 95: Inventory file
[database] db ansible_host=192.168.3.199 [webservers] web160 ansible_host=192.168.3.160 web161 ansible_host=192.168.3.161 |
In the following ansible.cfg code, we can see that there is a roles_path property being set to the local folder called roles. The role_path is defining where Ansible is going to look for the roles by default.
Code Listing 96: ansible.cfg with roles defined
[defaults] inventory = ./inventory roles_path = ./roles |
With this information, we are now ready to create our role by using the command line tool ansible-galaxy.
Role creation
The mongodb role is going to contain two types of automation: one for installing the mongodb server, and another one to install the mongodb client.
Let’s create the role called mongodb and place it under the ./roles folder as defined in the argument --init-path. This code should be executed in the root folder, where the ansible.cfg or playbook.yml files are placed; otherwise, please do specify the full path to the roles directory.
Code Listing 97: Code to initiate a skeleton of a role called mongodb
$ ansible-galaxy role init mongodb --init-path ./roles |
As shown in the following figure, we can see that the skeleton of the role has been successfully created under the roles folder.
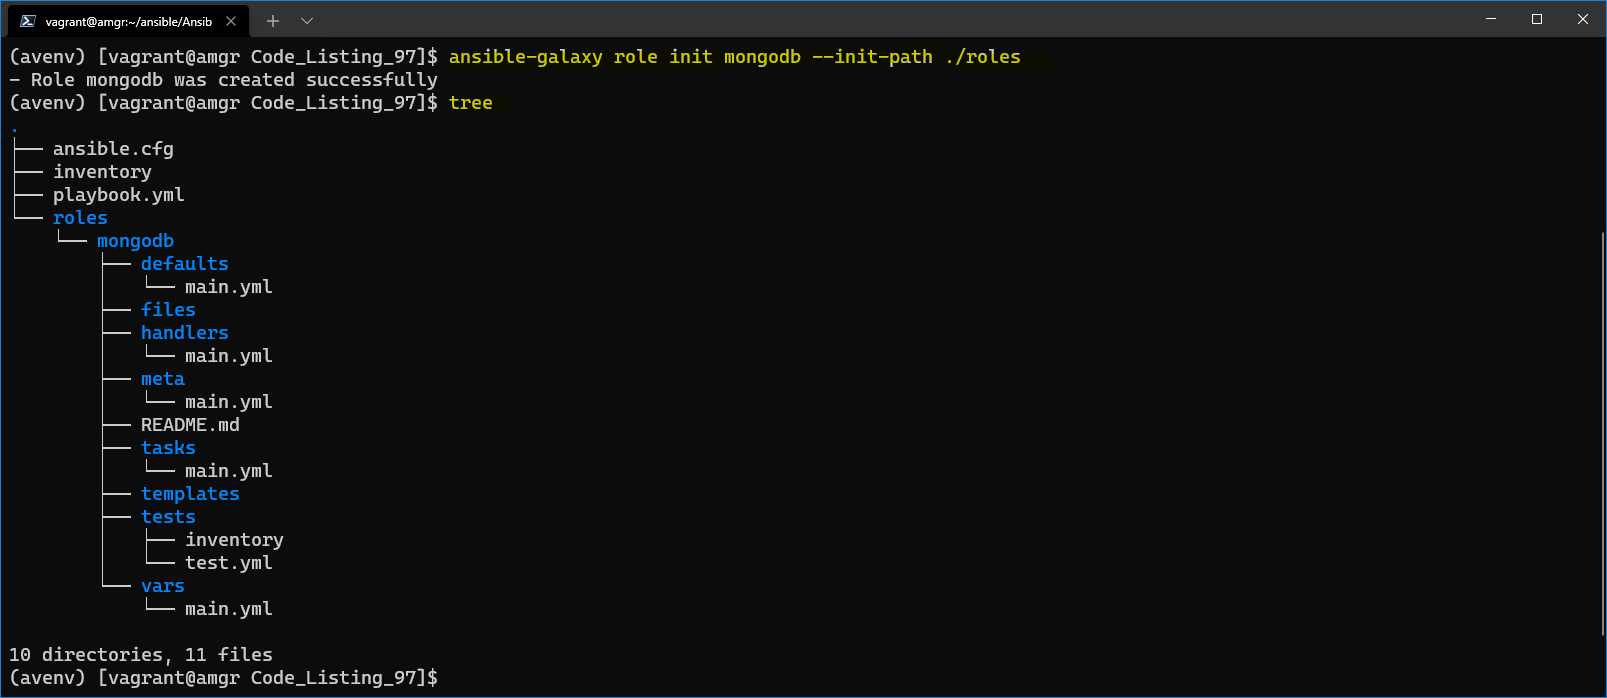
Figure 50: Creation of the mongodb role
Variables
Under the vars folder, let’s open the main.yml file and set the following variables.
Code Listing 98: Content of vars/main.yml
--- # vars file for mongodb mongo_db_version: "4.4" mongo_db_journal_enabled: "false" mongo_db_server_port: 27017 |
Here we are defining the version of the MongoDB we would like to install, and two more configuration options to be set after the MongoDB installation.
Tasks
Now we can start filling out the tasks by opening the main.yml file under the tasks folder. This task is just a bit longer, but we will go through each task and explain it.
Code Listing 99: Main.yml under tasks folder
--- - name: Add yum MongoDB repository ansible.builtin.template: src: mongodb-org.repo.j2 dest: /etc/yum.repos.d/mongodb-org-{{ mongo_db_version }}.repo mode: 0644 tags: [never, mongodbclient, mongodbserver] - name: Install MongoDB server ansible.builtin.yum: name: mongodb-org update_cache: yes state: present tags: [never, mongodbserver] - name: Install MongoDB client ansible.builtin.yum: name: mongodb-org-shell update_cache: yes state: present tags: [never, mongodbclient] - name: Change the MongoDB configuration file ansible.builtin.template: src: mongod.conf.j2 dest: /etc/mongod.conf mode: 0644 notify: restart_mongo_db tags: [never, mongodbserver] - name: Start MongoDB service ansible.builtin.systemd: name: mongod state: started tags: [never, mongodbserver] - name: Open Firewall Port 27017 ansible.posix.firewalld: zone: public rich_rule: > rule family="ipv4" source address="{{ hostvars[item].ansible_host }}" port protocol="tcp" port="{{ mongo_db_server_port }}" accept permanent: yes immediate: yes state: enabled with_items: "{{ groups['webservers'] }}" tags: [never, mongodbserver] |
The first thing to notice is the file indentation. There is no need to specify the tasks keyword like we were doing in the playbook, as Ansible will automatically assume that the file under the tasks\main.yml file contains tasks.
We can see six tasks defined. Let’s explain what they do in detail.
Add yum MongoDB repository
As the CentOS yum package manager doesn’t have the MongoDB repository predefined, we have to add it to the list of available repositories. To achieve this, we are using a template file located in the templates folder called mongodb-org.repo.j2. The transformed file is then going to be sent to the default yum configuration location, which is /etc/yum.repos.d.
Code Listing 100: Content of the file templates/mongodb-org.repo.j2
[mongodb-org-{{ mongo_db_version }}] name=MongoDB Repository baseurl=https://repo.mongodb.org/yum/redhat/$releasever/mongodb-org/{{ mongo_db_version }}/x86_64/ gpgcheck=1 enabled=1 gpgkey=https://www.mongodb.org/static/pgp/server-{{ mongo_db_version }}.asc |
This file internally uses the variable called mongo_db_version. This variable is defined in the vars/main.yml file. This file contains the variables defined for the given role.
After executing the playbook, we should see a transformed file to be delivered into the /etc/yum.repos.d folder on the database server.
Install MongoDB server
This task is responsible for installing the MongoDB (mongodb-org) package. We do this only after the repository location has been added to yum. With the state present, we are telling Ansible to install the package.
This code corresponds as if we were executing the following command on the managed server:
$ sudo yum install -y mongodb-org
This command will install all of the necessary components of MongoDB.
Install MongoDB client
This task is responsible for installing the MongoDB client package. We do this only after the repository location has been added to yum. With state present, we are telling Ansible to actually install the package.
This code corresponds as if we were executing the following command on the managed server:
$ sudo yum install -y mongodb-org-shell
This command will install all of the necessary components of MongoDB shell.
Change the MongoDB configuration file
After installing MongoDB, and before starting it to run as a service, we are going to perform just a few customizations in the MongoDB configuration file.
Again, we are using a template located under templates/mongod.conf.j2 that, once transformed, will be sent to the database server at the location /etc/mongod.conf.
One thing to notice here is that the change in the configuration file triggers a handler called restart_mongo_db, which is defined in the handlers/main.yml file as follows.
Code Listing 101: Content of the file handlers/main.yml
--- # handlers file for mongodb - name: restart_mongo_db ansible.builtin.systemd: name: mongod state: restarted tags: [never, mongodbserver] |
Open Firewall Port 27017
This task is supposed to run after MongoDB has been installed. The task is responsible for opening the port 27017 on the database server to allow only connections from the web server(s), hence the use of groups[‘webservers’]. This is important, as in general it’s a good practice to secure the system to only those hosts that need to communicate to the database.
The variable mongo_db_server_port is defined in the vars/main.yml file.
Code Listing 102: Content of mongod.conf.j2
# mongod.conf # for documentation of all options, see: # http://docs.mongodb.org/manual/reference/configuration-options/ # where to write logging data. systemLog: destination: file logAppend: true path: /var/log/mongodb/mongod.log # Where and how to store data. storage: dbPath: /var/lib/mongo journal: enabled: {{ mongo_db_journal_enabled }} # engine: # wiredTiger: # how the process runs processManagement: fork: true # fork and run in background pidFilePath: /var/run/mongodb/mongod.pid # location of pidfile timeZoneInfo: /usr/share/zoneinfo # network interfaces net: port: 27017 bindIp: 127.0.0.1, {{ ansible_all_ipv4_addresses.0 }} # Enter 0.0.0.0,:: to bind to all IPv4 and IPv6 addresses or, alternatively, use the net.bindIpAll setting. #security: #operationProfiling: #replication: #sharding: ## Enterprise-Only Options #auditLog: #snmp: |
Some attention has to be paid to the ansible_all_ipv4_addresses.0 variable. If there are multiple network adapters, this might not work. Make sure to readapt the value to ansible_all_ipv4_addresses.0 or .1, depending on where the public IP address is kept.
Playbooks
We are going to have two playbooks to be placed in the root directory of our project: database.yml and webservers.yml. The first will be responsible for the installation and setup of the mongodb on the db server, while the other will be responsible for installing the MongoDB client application on the web server, so that we query the database and test what have we done so far.
Code Listing 103: Content of the database.yml playbook
--- - name: Installation of the MongoDB database hosts: database become: yes gather_facts: yes roles: - mongodb |
We can see that the playbook now is quite simple to read, as we have eliminated the tasks and handlers.
The new keyword we use is roles. Under the roles, in general, we can specify more than one role. Roles would be executed in exactly the same order we place them in a list. In our case, we only have one, so we are specifying the mongodb role.
To run the code against the db server, however, we will be using the tag to specify that we only want to install the server (without the client).
Code Listing 104: Execution of the database.yml playbook
$ ansible-playbook database.yml -t mongodbserver |
We can see that by running this code, we only install the mongodb server.
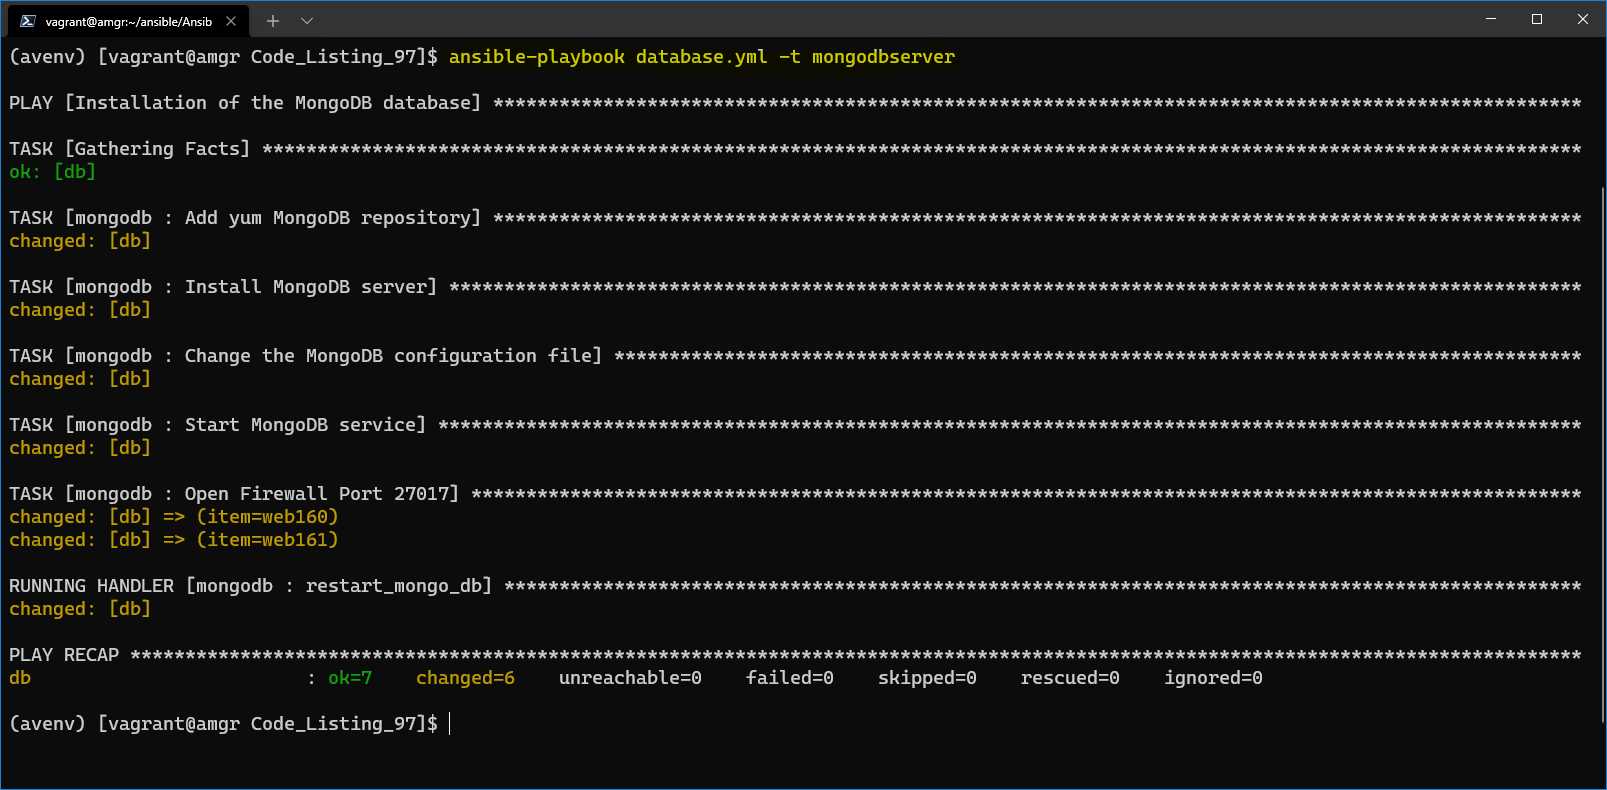
Figure 51: Result of the execution of the database.yml playbook
To test that the database has been properly installed, we can directly log in on the db server and run the mongo command. The mongo command is the MongoDB client tool that gets installed with the server.
After launching the mongo command without any parameter, we will automatically log into the localhost MongoDB instance. If this is successful, this would mean that MongoDB is up and running.
We are showing an additional command, show dbs, which will list all of the currently available databases.
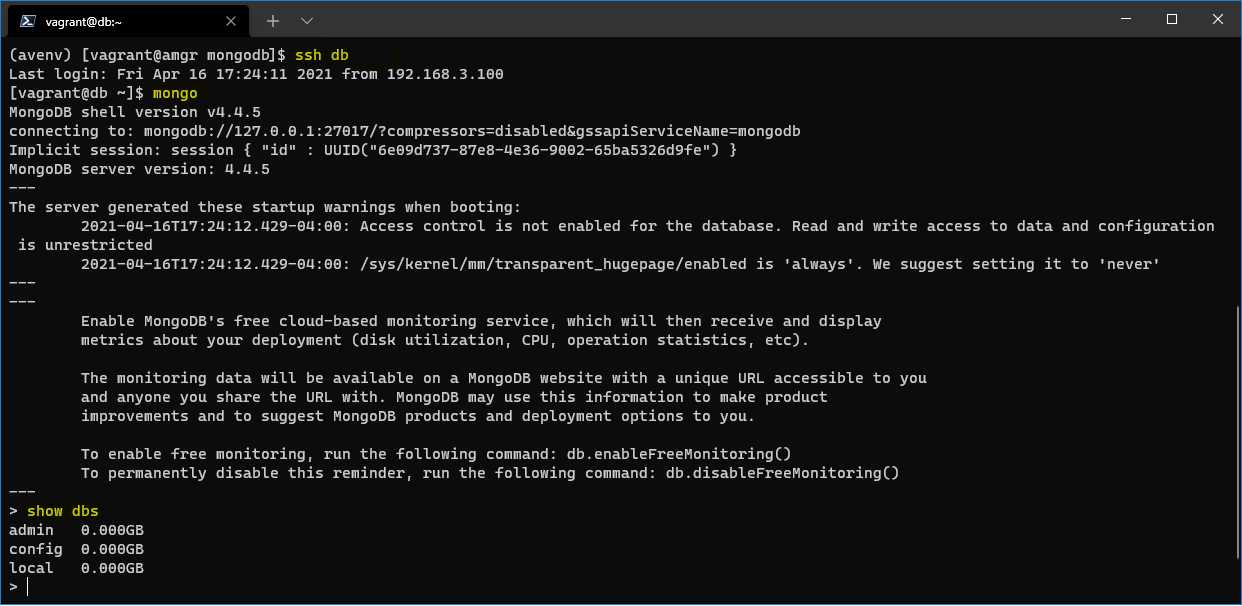
Figure 52: Checking on the server if MongoDB runs
The next playbook is about installing the webservers.
Code Listing 105: Content of webservers.yml playbook
--- - name: Installation of the MongoDB client hosts: webservers become: yes gather_facts: yes roles: - mongodb |
We can run the playbook:
$ ansible-playbook webservers.yml -t mongodbclient
And see that both configured web servers were updated, as shown in the following figure.
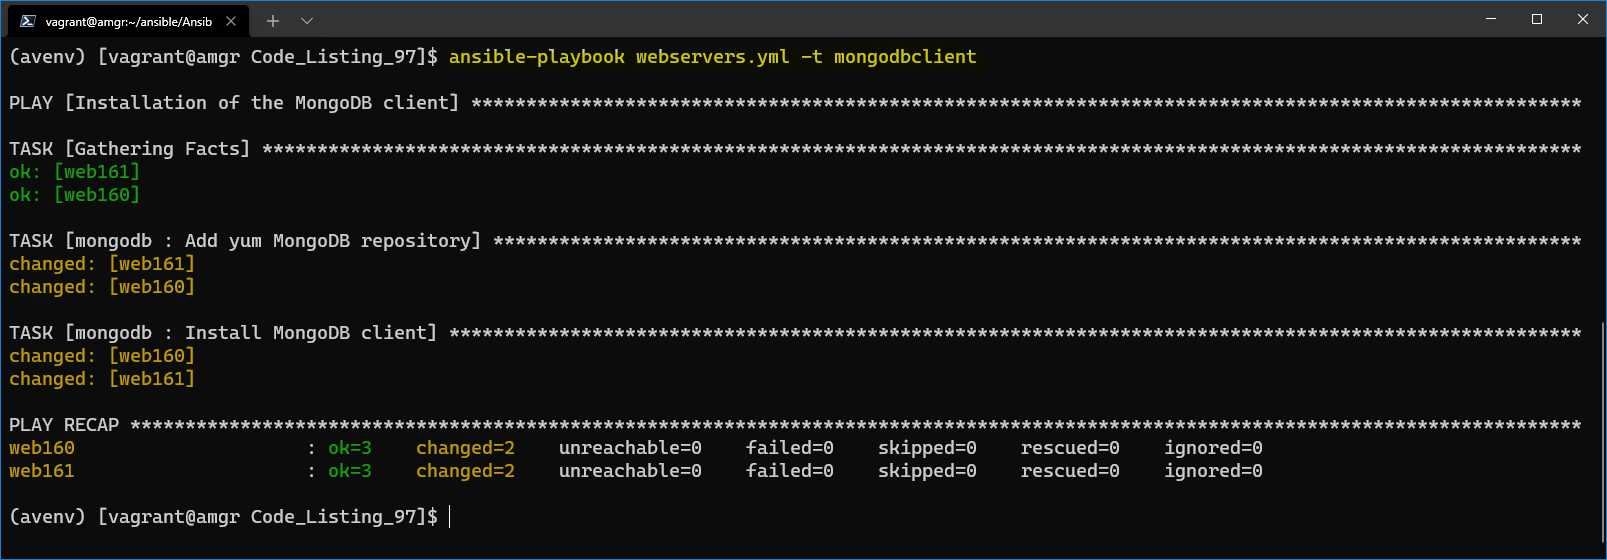
Figure 53: MongoDB client installed on webservers
We can now finally test that we can run queries from the web server against the db-installed MongoDB.
We need to log in on one of the webservers, let’s say web160, and run the following command.
Code Listing 106: Mongo client connection
$ mongo --host db |
We can see that we are successfully logged in to the MongoDB server and getting the result by executing a query.
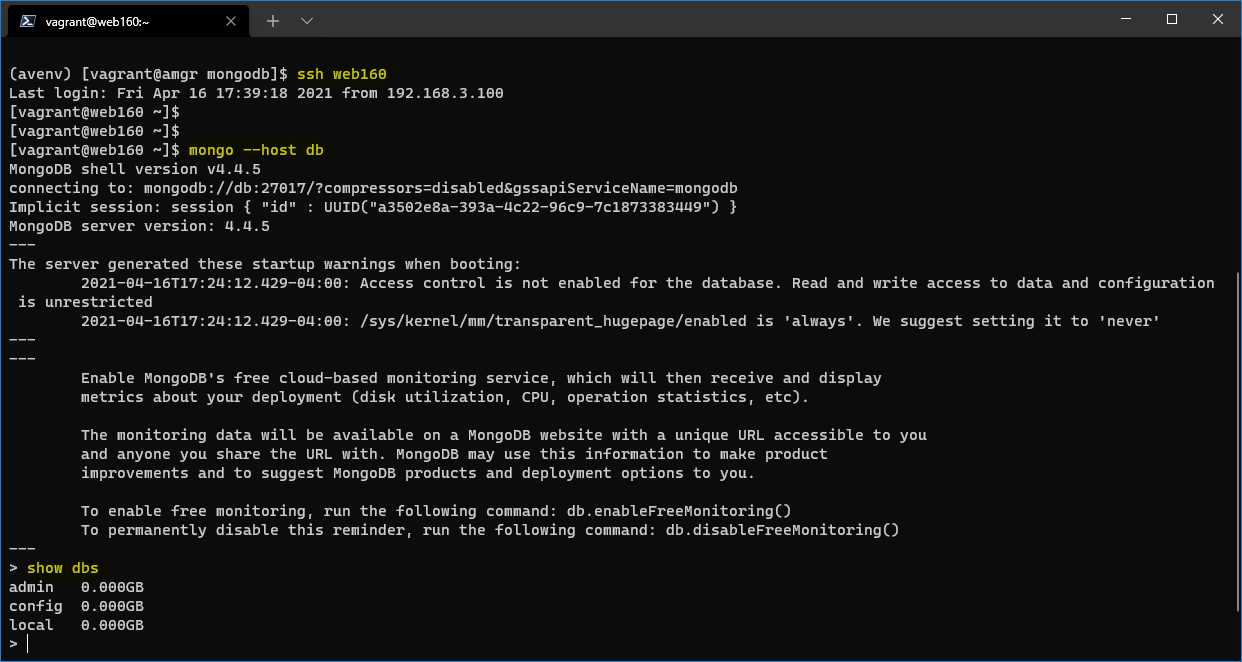
Figure 54: MongoDB client connecting to db
- 1800+ high-performance UI components.
- Includes popular controls such as Grid, Chart, Scheduler, and more.
- 24x5 unlimited support by developers.