
AngularDart Succinctly®

CHAPTER 3
Base UI Component
Overview
Throughout this chapter, we will focus on how to build the base component, which will host our application’s main screen. By building this component, we will not only see how to create the main UI, but also dive deep into AngularDart. Let’s dive right in!
Component structure
My approach when developing applications is to first create the UI and then add all the necessary logic to make it work. This is exactly how we are going to proceed.
Based on my experience, this approach can save valuable development time, as it allows us to define how the application will look and feel, driving how the logic around it will behave.
But before we dive into the HTML markup for the base component, let’s have a look at the following diagrams, which illustrate how the finished UI relates to the markup we will shortly explore.
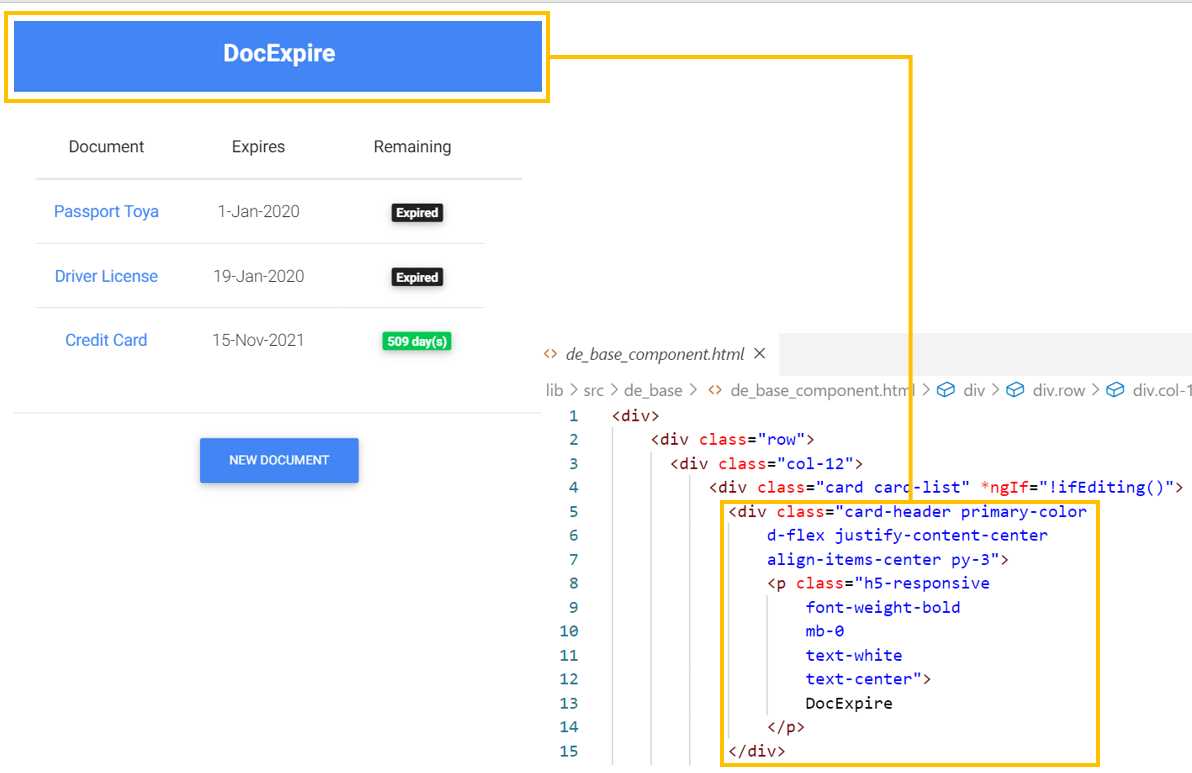
Figure 3-a: App Title—Base Component
We can see in Figure 3-a that the div element, highlighted in yellow, corresponds to the header of the app’s title. Let’s keep exploring the finished UI.
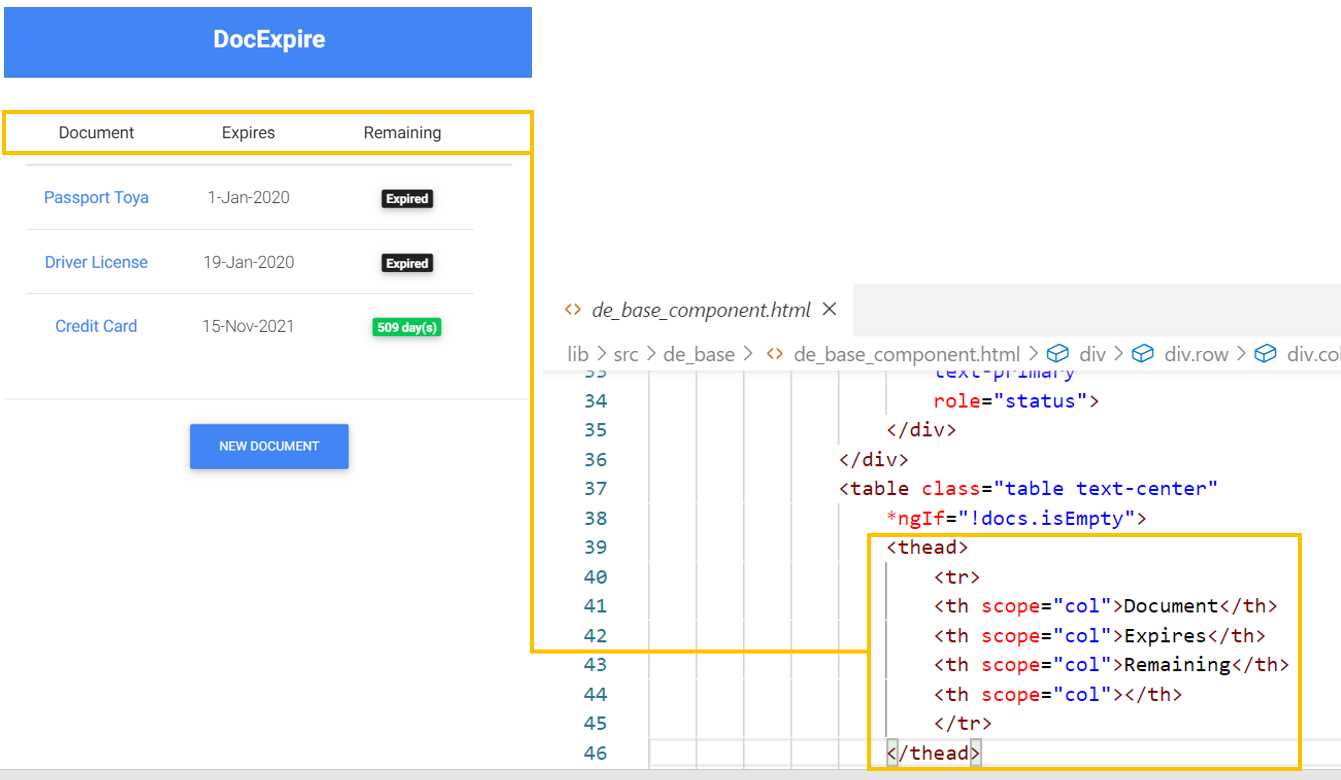
Figure 3-b: Table Header—Base Component
In Figure 3-b, we can see how the table header element thead is displayed within the finished UI. Let’s continue to explore.
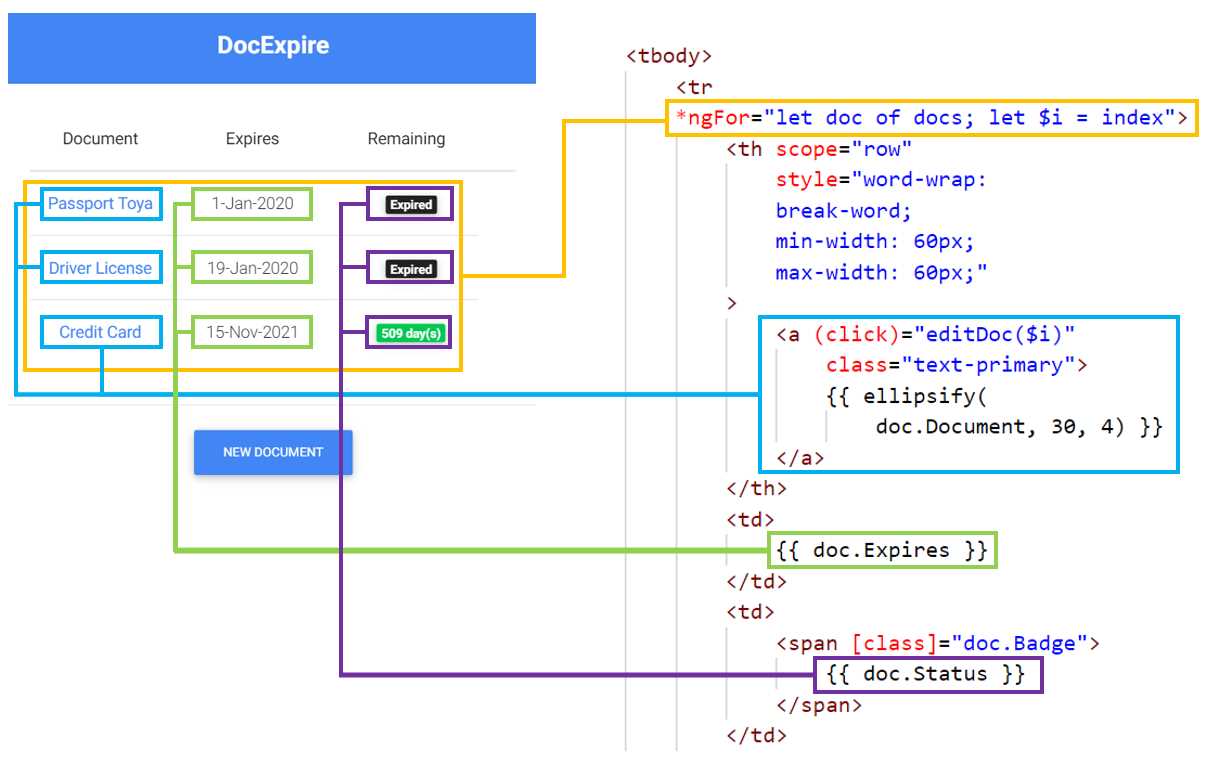
Figure 3-c: Table Items—Base Component
Figure 3-c is slightly more challenging to understand. We can see four distinctive areas, each highlighted with a different color.
The area highlighted in yellow corresponds to a dynamic list of documents, which in AngularDart is achieved by looping through the docs list using the *ngFor directive.
Each table row corresponds to a doc object, which has three distinctive properties: doc.Document, doc.Expires, and doc.Status.
The doc.Document property, highlighted in light blue, indicates the name of the document. By clicking on it, the user will be able to open and view details and edit or delete a document.
The doc.Expires property, highlighted in light green, represents the document’s expiration date.
The doc.Status property, highlighted in purple, indicates how many days remaining the document has before it expires.
Let’s continue to explore the remaining parts of the base component’s UI.
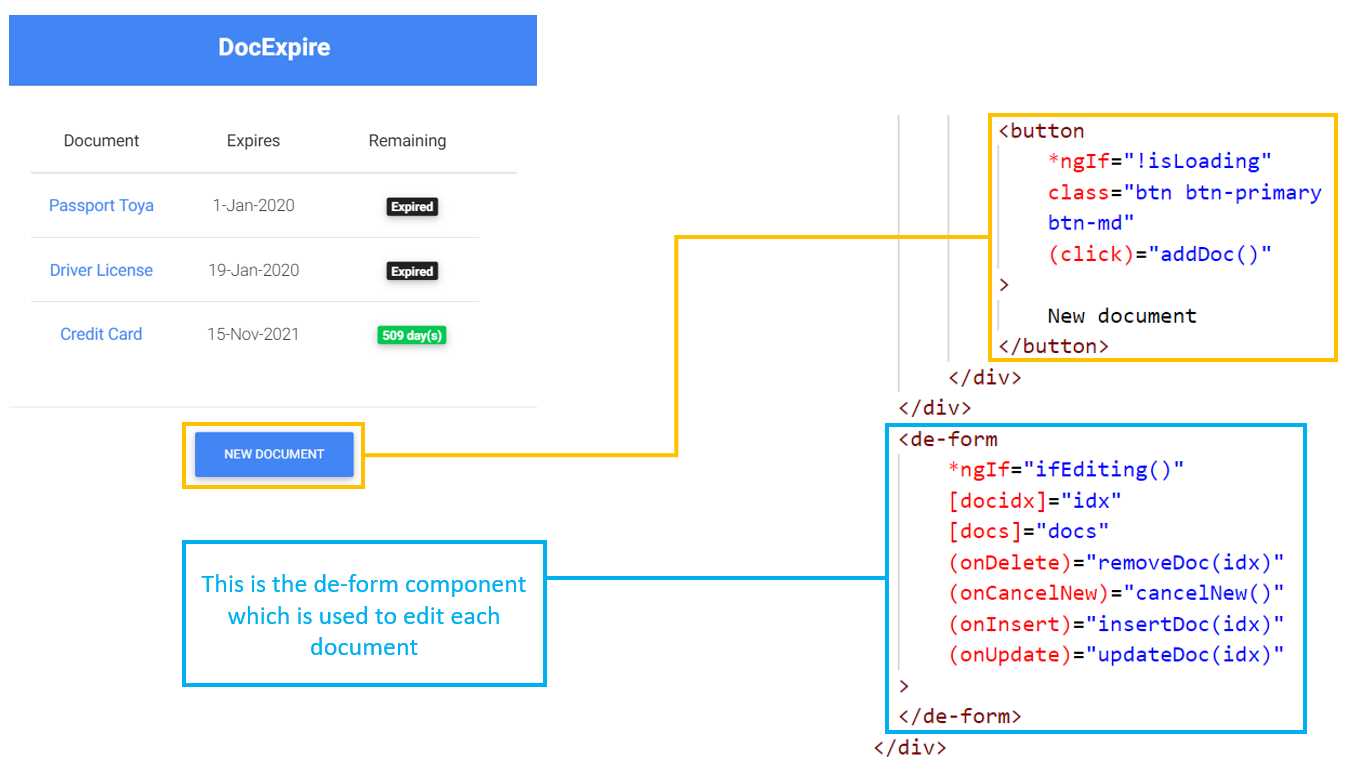
Figure 3-d: Footer—Base Component
The last part of the base component’s UI is the footer section, which contains the button that can be used to create a new document, and is highlighted in yellow in Figure 3-d.
It also includes the de-form component markup, which is highlighted in light blue. The de-form component is going to be used for editing any of the documents in the list or adding a new one. The de-form component is not visible by default and will only be shown when the ifEditing function returns true. We will check what this function does later.
Notice as well that two values are passed to the de-form component, as well as four events that are triggered. We’ll explore these later.
Component markup
Now that we have explored how the de-base component is structured and how the UI elements relate to the markup, let’s have a look at the full HTML markup of the component.
Within VS Code, open the de_base_component.html file and add the following code from Code Listing 3-a.
This markup uses regular Bootstrap classes, which have a Material Design look and feel. As you will see, it’s very easy to read, even though you might not have had any exposure to Boostrap before.
Code Listing 3-a: de_base_component.html (Full Code)
<div> <div class="row"> <div class="col-12"> <div class="card card-list" *ngIf="!ifEditing()"> <div class="card-header primary-color d-flex justify-content-center align-items-center py-3"> <p class="h5-responsive font-weight-bold mb-0 text-white text-center"> DocExpire </p> </div> <div class="card-body"> <div class="text-center"> <h5 *ngIf="docs.isEmpty && !isLoading" class="card-title"> No documents... </h5> <p *ngIf="docs.isEmpty" class="card-text"> <template [ngIf]="!isLoading"> Feel free to add a new one :) </template> <template [ngIf]="isLoading"> Loading documents... </template> </p> <div *ngIf="isLoading" class="spinner-border text-primary" role="status"> </div> </div> <table class="table text-center" *ngIf="!docs.isEmpty"> <thead> <tr> <th scope="col">Document</th> <th scope="col">Expires</th> <th scope="col">Remaining</th> <th scope="col"></th> </tr> </thead> <tbody> <tr *ngFor="let doc of docs; let $i = index"> <th scope="row" style="word-wrap: break-word; min-width: 60px; max-width: 60px;" > <a (click)="editDoc($i)" class="text-primary"> {{ ellipsify( doc.Document, 30, 4) }} </a> </th> <td> {{ doc.Expires }} </td> <td> <span [class]="doc.Badge"> {{ doc.Status }} </span> </td> </tr> </tbody> </table> </div> <div class="card-footer white py-3 d-flex justify-content-center"> <button *ngIf="!isLoading" class="btn btn-primary btn-md" (click)="addDoc()" > New document </button> </div> </div> <de-form *ngIf="ifEditing()" [docidx]="idx" [docs]="docs" (onDelete)="removeDoc(idx)" (onCancelNew)="cancelNew()" (onInsert)="insertDoc(idx)" (onUpdate)="updateDoc(idx)" > </de-form> </div> </div> </div> |
As you might have noticed, the markup is annotated with some AngularDart directives and specific syntax.
The *ngIf directive is used within AngularDart to display (or not) a specific section of the markup, given a condition.
The template tag is used to avoid code repetition. Within it, the *ngIf directive is written as [ngIf] instead.
The *ngFor directive is used within AngularDart to loop through a list of objects—in this case, the list of documents—docs.
The double curly braces are used for displaying the value of AngularDart objects fields and properties by injecting them into the markup’s Document Object Model (DOM). So {{ doc.Expires }} shows the document’s expiry date, and {{ doc.Status }} shows the document's status (the number of days remaining before expiration).
On the other hand, the {{ ellipsify(doc.Document, 30, 4) }} instruction passes the name of the document (doc.Document) to the ellipsify method, which shortens the document’s description by adding an ellipsis (…) if the document’s description is too long.
Events in AngularDart are annotated with parentheses. This means that (click), (onDelete), (onCancelNew), (onInsert), and (onUpdate) all represent events that get triggered.
Values get passed as properties (using two-way binding) to components by using square brackets. Therefore, [docidx] and [docs] are values that get passed to the de-form component.
Two-way data binding means that if those values are changed within the de-form component, those changes will get passed back to the parent component—de-base.
The rest of the markup syntax is regular HTML decorated with Material Design for Bootstrap CSS classes, which give the UI a nice and responsive look and feel. From this code, there were some functionalities we didn’t mention when we were reviewing the component’s structure.
First, we have docs.isEmpty, which indicates that the document list is empty (that there are no documents to expire) if its value is true. When docs.isEmpty is false, this indicates that the list of documents to expire is not empty.
If the value of isLoading is true, it indicates if the application is busy loading the list of documents from Firebase. If the document data has already been fetched from Firebase, then the value of isLoading will be false.
Therefore, based on the values of docs.isEmpty and isLoading, two UI sections can be shown or hidden, depending on the values of these properties, which are highlighted in bold in Code Listing 3-e.
When document data is being retrieved from Firebase—independently of whether or not there are documents—the following markup is shown.
<p *ngIf="docs.isEmpty"
class="card-text">
<template [ngIf]="isLoading">
Loading documents...
</template>
</p>
On the other hand, when document data has been retrieved from Firebase and there are no documents to display, the following markup is shown.
<h5 *ngIf="docs.isEmpty && !isLoading"
class="card-title">
No documents...
</h5>
<p *ngIf="docs.isEmpty"
class="card-text">
<template [ngIf]="!isLoading">
Feel free to add a new one :)
</template>
</p>
That’s all the HTML markup required for the base component. Let’s now explore the component’s logic.
Component logic
To bring to life our base component UI, we need to add some logic to it. We’ll add this logic to the de_base_component.dart file. Within VS Code, open the de_base_component.dart file and add the following code.
Code Listing 3-b: de_base_component.dart (Full Code)
import 'dart:async'; import 'package:angular/angular.dart'; import '../de_form/de_form_component.dart'; import '../model/docs.dart'; import '../services/docs_service.dart'; @Component( selector: 'de-base', templateUrl: 'de_base_component.html', directives: [coreDirectives, DocForm], providers: [ClassProvider(DocsService)] ) class DocExpireBase implements OnInit { int idx; Doc cDoc; bool isLoading = true; List<Doc> docs = [];
final DocsService _docsService; DocExpireBase(this._docsService); void sort() async { await Future.delayed( const Duration(seconds : 1)); Doc.sortDocs(docs); } @override Future<Null> ngOnInit() async { docs = await _docsService.getDocs(); isLoading = false; sort(); } bool ifEditing() { var r = false; if (docs != null) { for (var i = 0; i < docs.length; i++) { if (docs[i].Edit) { r = true; break; } } } return r; } void addDoc() { docs.add(Doc( ID: '-1', Document: '', Year: '', Month: '', Day: '', Expires: '', Status: 'No rush', Badge: 'badge badge-success', Edit: true, Alert12: false, Alert6: false, Alert3: false, Alert1: false )); idx = docs.length - 1; } void editDoc(int index) { idx = index; cDoc = Doc( ID: docs[index].ID, Document: docs[index].Document, Year: docs[index].Year, Month: docs[index].Month, Day: docs[index].Day, Expires: docs[index].Expires, Status: docs[index].Status, Badge: docs[index].Badge, Edit: docs[index].Edit, Alert12: docs[index].Alert12, Alert6: docs[index].Alert6, Alert3: docs[index].Alert3, Alert1: docs[index].Alert1 ); docs[index].Edit = true; } void removeDoc(int index) async { // Firebase await _docsService.removeDoc(docs[index]); docs.removeAt(index); sort(); } void insertDoc(int index) async { // Firebase var fbId = await _docsService.addDoc(docs[index]);
docs[index].ID = fbId; await _docsService.updateDoc(docs[index]); sort(); } void updateDoc(int index) async { // Firebase await _docsService.updateDoc(docs[index]); sort(); } void cancelNew() { if (docs != null) { if (docs[idx].ID != '-1') { docs[idx] = cDoc; } for (var i = 0; i < docs.length; i++) { if (docs[i].ID == '-1') { docs.removeAt(i); break; } } } } String ellipsify(String t, int max, int before) { var r = '';
if (t.length >= max) { for (var i = 0; i < t.length; i++) { if (i < max - before) { r += t[i]; } else { r += '...'; break; } } } else { r = t; } return r; } } |
To understand what this code does, let’s break it into smaller pieces and analyze each one individually.
Component initialization
First, we have the import statements, where we reference the modules that our component will be using. The following two import statements make use of Dart’s asynchronous library and the AngularDart core library, respectively.
import 'dart:async';
import 'package:angular/angular.dart';
Then, we import the de-form component, the application’s data model (docs.dart), and the service responsible for interacting with Firebase (docs_service.dart).
import '../de_form/de_form_component.dart';
import '../model/docs.dart';
import '../services/docs_service.dart';
Then we have the DocExpireBase class @Component annotation, which makes the class an AngularDart component, rather than a regular Dart class.
@Component(
selector: 'de-base',
templateUrl: 'de_base_component.html',
directives: [coreDirectives, DocForm],
providers: [ClassProvider(DocsService)]
)
The selector property of the annotation tells AngularDart that the DocExpireBase class will be described within the markup as the de-base component.
The templateUrl property tells AngularDart that the HTML markup for the de-base component is described within the de_base_component.html file.
The directives property indicates that the DocExpireBase class will use the AngularDart coreDirectives, which include *ngIf and *ngFor. It also indicates that the DocExpireBase class will also use the DocForm class—which, as we will see later, corresponds to the de-form component.
The providers property indicates that the DocsService class will be used as the service ClassProvider of the DocExpireBase class. A service ClassProvider in AngularDart is mostly responsible for making the connection to the backend database, fetching data, and performing inserts and updates on the database.
Next, we have the declaration of the DocExpireBase class. It implements the ngOnInit method, which will be used to perform a few initializations, as we’ll see shortly.
class DocExpireBase implements OnInit
Within the DocExpireBase class itself, we find a few variable declarations and initializations—let’s explore them.
int idx;
Doc cDoc;
bool isLoading = true;
First, we have the idx variable, which we will use to know the document number (the index within the list) when a document is edited. The value of idx will be passed to the de-form component.
Next, we find cDoc, an instance of the Doc class that is contained within the app’s data model and represents a document object. The variable cDoc stands for the current document.
The isLoading Boolean variable, when set to true, will be used to indicate if the app is busy fetching documents from Firebase.
A very important variable is docs, which is a List of Doc objects that will contain all the documents retrieved from Firebase by the ClassProvider service. This list is declared as follows:
List<Doc> docs = [];
The _docsService object is an instance of the ClassProvider service (DocsService), which is used for interacting with Firebase. This is declared with the final keyword, meaning that it won’t change.
final DocsService _docsService;
Finally, we have the DocExpireBase class constructor, to which we inject the ClassProvider service instance (_docsService).
DocExpireBase(this._docsService);
With all the variables and initialization out of the way, we can focus on the class methods and functionality.
Component methods
Let’s start by exploring the sort method. As its name implies, this method is used to sort the list of documents by the number of days remaining until expiration.
Code Listing 3-c: de_base_component.dart (The sort Method)
void sort() async { await Future.delayed( const Duration(seconds : 1)); Doc.sortDocs(docs); } |
The documents expiring soon will appear at the top of the list, whereas the documents expiring later will appear at the bottom of the list. Essentially, documents are sorted in ascending order based on the number of days remaining until expiration.
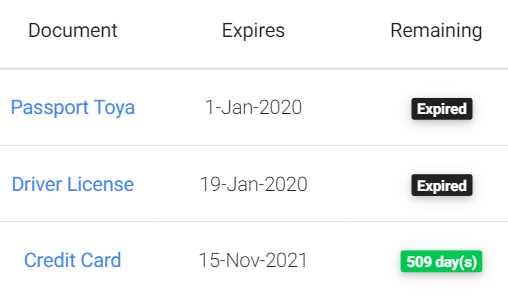
Figure 3-e: Document List—Ordered by Days Remaining
The sort method can perform document sorting by invoking the sortDocs method from the Doc instance, which belongs to the data model.
To give enough time for the documents to be retrieved successfully from Firebase by the ClassProvider service instance (_docsService), we pause the execution of the code for one second before invoking sortDocs. This is achieved by executing the following instruction:
await Future.delayed(const Duration(seconds : 1));
Next, we have the ngOnInit method, which the DocExpireBase class explicitly implements. This method, which returns a potential value or promise (known in Dart as a Future), is used for retrieving the list of documents from Firebase.
Code Listing 3-d: de_base_component.dart (The ngOnInit Method)
@override Future<Null> ngOnInit() async { docs = await _docsService.getDocs(); isLoading = false; sort(); } |
The documents are fetched from Firebase using the ClassProvider service instance (_docsService) by invoking its getDocs method. As this is a Dart asynchronous operation, the await keyword is used; therefore, the ngOnInit method is marked as async.
Once the documents have been retrieved, the isLoading variable is set to false, and after, the sort method is invoked.
Adding and editing
Next, we have the ifEditing method, which determines whether one of the documents from the list is being edited.
Code Listing 3-e: de_base_component.dart (The ifEditing Method)
bool ifEditing() { var r = false; if (docs != null) { for (var i = 0; i < docs.length; i++) { if (docs[i].Edit) { r = true; break; } } } return r; } |
To determine if one of the documents is being edited, the method loops through each of the documents and checks the value of the Edit property of each one. If one of the documents has its Edit property set to true, it would indicate that the document is being edited. In that case, the method breaks the loop and return true; otherwise, false is returned.
The ifEditing method is key to determine if the de-form component needs to be displayed or hidden.
Next, let’s have a look at the addDoc method, which will be responsible for adding a new and empty Doc instance to the list of documents (docs).
Code Listing 3-f: de_base_component.dart (The addDoc Method)
void addDoc() { docs.add(Doc( ID: '-1', Document: '', Year: '', Month: '', Day: '', Expires: '', Status: 'No rush', Badge: 'badge badge-success', Edit: true, Alert12: false, Alert6: false, Alert3: false, Alert1: false )); idx = docs.length - 1; } |
As you can see, the new Doc instance is initialized with default values, and its ID property is set to -1. Only when the Doc instance is saved—which occurs within the de-form component—does the ID property value get updated, as well as the rest of the Doc instance properties.
The value of idx is updated to reflect the new Doc instance added to the docs list.
When we need to edit a specific document (instead of creating one) we need to create a Doc instance by assigning to its properties the values of the current document. Let’s have a look at how this is done.
Code Listing 3-g: de_base_component.dart (The editDoc Method)
void editDoc(int index) { idx = index; cDoc = Doc( ID: docs[index].ID, Document: docs[index].Document, Year: docs[index].Year, Month: docs[index].Month, Day: docs[index].Day, Expires: docs[index].Expires, Status: docs[index].Status, Badge: docs[index].Badge, Edit: docs[index].Edit, Alert12: docs[index].Alert12, Alert6: docs[index].Alert6, Alert3: docs[index].Alert3, Alert1: docs[index].Alert1 ); docs[index].Edit = true; } |
The first thing this method does is assign the value of the current document index, to the idx variable, which is internally responsible for keeping track of the document that is being edited.
Next, to the cDoc object, we assign a Doc instance—which has been assigned the values of the selected document, from the docs list—docs[index]. The selected document is the one that is clicked using the UI. This is achieved by using the following markup.
<a (click)="editDoc($i)"
class="text-primary">
{{ ellipsify(doc.Document, 30, 4) }}
</a>
So, $i represents the index of the document from the list that is clicked. The value of $i is derived from the *ngFor directive’s condition, as follows.
*ngFor="let doc of docs; let $i = index"
Therefore, the value of $i is passed as a parameter to the editDoc method, which becomes the method’s index parameter, which then gets assigned to the variable idx.
Finally, for the editing process to work, and the de-form component to be displayed, the Edit property of the selected document is set to true.
docs[index].Edit = true;
Remove, cancel, insert, and update
Now that we know how to add a new document and assign the instance properties when editing a document, let’s explore how we can remove, cancel, insert, and update a document.
If you recall, within the de-base component’s markup, the de-form component is referenced as follows.
<de-form
*ngIf="ifEditing()"
[docidx]="idx"
[docs]="docs"
(onDelete)="removeDoc(idx)"
(onCancelNew)="cancelNew()"
(onInsert)="insertDoc(idx)"
(onUpdate)="updateDoc(idx)"
>
</de-form>
The de-form component triggers the execution of four events: onDelete, onCancelNew, onInsert, and onUpdate.
As their names imply, these events execute the actions when a document is deleted, when adding or editing a new document, when the operation is canceled, when a document is inserted, and when a document is updated, respectively.
Each event executes a DocExpireBase method when triggered. The onDelete event executes the removeDoc method, the onCancelNew event executes the cancelNew method, the onInsert event executes the insertDoc method, and the onUpdate event executes the updateDoc method.
Let’s start by looking at the removeDoc method to understand what it does.
Code Listing 3-h: de_base_component.dart (The removeDoc Method)
void removeDoc(int index) async { // Firebase await _docsService.removeDoc(docs[index]); docs.removeAt(index); sort(); } |
The removeDoc method invokes the method with the same name from the ClassProvider service instance (_docsService), which deletes the document from Firebase. We’ll explore those details later.
All Firebase operations are asynchronous; this is why the await keyword is used when calling the removeDoc method from the service instance. Because the await keyword is used, the method is marked as async.
After the document has been removed from Firebase, the document itself is removed from the list of documents. This is what docs.removeAt(index) does.
Once the document has been removed from the list of documents, we call the sort method, so all the existing documents can be sorted by the number of days remaining before expiration.
Next, we have the insertDoc method, which is responsible for adding a new document into Firebase.
Code Listing 3-i: de_base_component.dart (The insertDoc Method)
void insertDoc(int index) async { // Firebase var fbId = await _docsService.addDoc(docs[index]);
docs[index].ID = fbId; await _docsService.updateDoc(docs[index]); sort(); } |
The insertDoc method is used for adding a document to Firebase. This is done by invoking the addDoc method from the ClassProvider service instance (_docsService), to which the document being added (docs[index]) is passed.
As previously mentioned, all Firebase operations are asynchronous. This is why the await keyword is used when calling the addDoc method from the service instance, and the method is marked as async.
Once the document has been added to Firebase, the document’s Firebase ID (fbId) is returned and assigned to the ID property of the document within the docs list. This is what docs[index].ID = fbId does.
Then, that same value is updated to the document’s ID property stored in Firebase—which is what _docsService.updateDoc(docs[index]) does.
Once the document has been added from the list of documents, we call the sort method.
Next, we have the updateDoc method, which is responsible for updating a document that has been edited to Firebase.
Code Listing 3-j: de_base_component.dart (The updateDoc Method)
void updateDoc(int index) async { // Firebase await _docsService.updateDoc(docs[index]); sort(); } |
The updateDoc method is very simple. All it does is to invoke the method with the same name from the ClassProvider service instance (_docsService).
Once the document has been updated in Firebase, then the sort method is invoked. Here, the await keyword is used when calling the updateDoc method from the service instance, and the method is marked as async.
Now we know how the de-base component can remove, insert, and update documents. Let’s have a look at how we can perform a cancelation operation on a document being inserted or edited.
Code Listing 3-k: de_base_component.dart (The cancelNew Method)
void cancelNew() { if (docs != null) { if (docs[idx].ID != '-1') { docs[idx] = cDoc; } for (var i = 0; i < docs.length; i++) { if (docs[i].ID == '-1') { docs.removeAt(i); break; } } } } |
A cancelation operation can be performed when the list of documents (docs) is not null.
If the ID of the document being canceled is different than -1, it means the document already exists within the document list, so its reference is updated on the list of documents. This is what docs[idx] = cDoc does.
For a new (unsaved) document that has been added to the document list, and whose operation has been canceled (its ID still has a value of -1), the cancelation process occurs, and the unsaved document is removed from the list. This is what docs.removeAt(i) does.
Awesome—now we know how the cancelation of an unsaved (new or existing) document works.
Adding ellipsis
Given that a document description is a string, and some descriptions might be lengthy, there is a possibility that such descriptions might not fit on the screen. This is why adding an ellipsis is a nice workaround to display the document’s description without breaking the UI.
Let’s suppose we have a document with the following description.

Figure 3-f: A Document with a Lengthy Description
On a smaller screen, such as a mobile device, this description could break the UI. Let’s have a look.
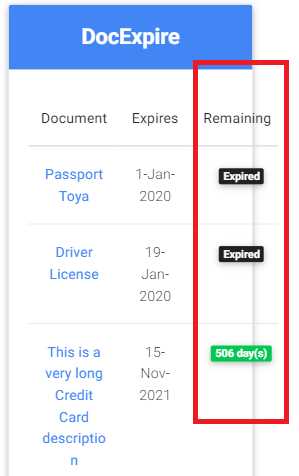
Figure 3-g: Broken UI
As you can see, the lengthy description overruns the app’s UI. To prevent this, we can use the ellipsify method to shorten the description on the UI only by adding an ellipsis.
This is how the same screen would look when using the ellipsify method.
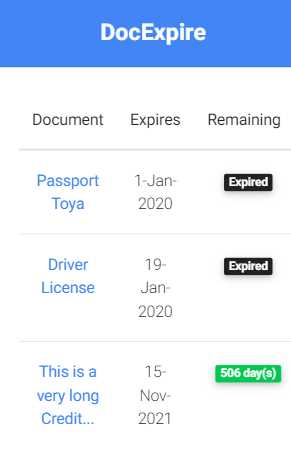
Figure 3-h: Using the ellipsify Method
As you can see, the description no longer overflows the screen and fits nicely within three lines on the main screen.
Notice that at the end of the description, an ellipsis has been added to avoid displaying the complete description. This is what the ellipsify method does. Let’s have a look at how this achieved.
Code Listing 3-l: de_base_component.dart (The ellipsify Method)
String ellipsify(String t, int max, int before) { var r = '';
if (t.length >= max) { for (var i = 0; i < t.length; i++) { if (i < max - before) { r += t[i]; } else { r += '...'; break; } } } else { r = t; } return r; } |
This method loops through the string and counts a number (max) of characters that it will return (which will be displayed on the screen).
An ellipsis is added when the character count reaches max – before. At that point, the method finishes looping through the characters of the string and returns the string with an ellipsis that will be displayed on the screen.
Besides the ellipsify method, the document’s description adjustment to the UI (screen resolution) is enhanced by using the CSS classes and attributes (highlighted in bold in the following code) within the de-base markup.
<th scope="row"
style="word-wrap:
break-word;
min-width: 60px;
max-width: 60px;"
>
Summary
We now have ready the app’s main component, which is responsible for rendering the application's main screen, and the logic that governs its behavior.
We’ve seen that using some HTML with Material Design for Bootstrap, along with a few AngularDart directives and Dart logic, wasn’t as intimidating as originally thought—as combining all these technologies seemed quite a task.
In the next chapter, we’ll explore in depth the markup and logic behind the de-form component, which is used for editing or deleting existing documents, and adding new ones.
- 80+ high-performance Angular components, including DataGrid, Diagram, and Scheduler.
- Support for AOT compilation and tree shaking.
- Lightweight and user-friendly.