
Angular Succinctly®

CHAPTER 13
Menu Navigation
Typical applications have multiple views and some sort of navigation method to move between them. The Router module is used to handle the navigation between views. For our Soccer Dashboard, we will need three components: a Standings page, a Scoring page, and an Admin page.

Figure 13: Sample Menu
We are going to use Twitter Bootstrap as our primary UI system and Font Awesome for some icons. Be sure to include these in your Angular CLI configuration file (see Chapter 5 for details).
Base href
HTML5 browsers provide support for browser history modification through new methods like pushState() and replaceState(). These methods allow Angular to create URLs for in-app navigation. In order to support this navigation, there are a few steps you need to follow. The first is to declare a base reference in your main page (index.html). The following line should be added in the head section.
Code Listing 92
<base href="/"> <!-- Used to compose navigation URLs --> |
Note: The Angular CLI application will already include the href line for you.
App component
The app component that we created in prior pages will be adapted to become a navigation component now, so we need a new component with a template focused on menus or buttons to navigate to different components.
Views folder
You can design your folder structure in any fashion you’d like. I place my template views into a folder called Views. It is a preference, not a requirement, but it makes my separation of business logic and display easier to manage. Here is our main application component for the Soccer Dashboard:
Code Listing 93: app.component.ts
<!-- Main application component --> import { Component } from '@angular/core'; @Component({ selector: 'app-root', templateUrl: '../views/Main.html' }) export class AppComponent { title = 'Soccer Dashboard'; } |
Main menu
Our main menu view code, shown in Code Listing 94, is a Twitter Bootstrap navbar setup. The systems use <a> tags to indicate the menu links. However, rather than the standard href property, we will use the Angular property called routerLink. This property will serve to tell the navigation page which “link” to go to when a menu item is selected. We will define these links later in this chapter.
Code Listing 94: app/views/main.html
<!-- Main menu view --> <nav class="navbar navbar-expand-sm bg-light"> <div class="container-fluid"> <a class="navbar-brand" href="#"> <i class="fa fa-futbol-o"> </i>{{ title }} </a> <ul class="nav navbar-nav"> <li class="nav-item"> <a class="nav-link active" routerLink="/Standings" routerLinkActive="active" >Standings</a> </li> <li> <a class="nav-link" routerLink="/Scoring" >Scoring</a> </li> <li class="nav-item float-xs-right "> <a class="nav-link" routerLink="/Admin">Admin</a> </li> </ul> </div> </nav> <router-outlet></router-outlet> |
The final line, <router-outlet>, is a placeholder for where the router output will be written.
Placeholder components
To create and test the menu, we will create simple placeholder components using the same code.
Code Listing 95: app.standings.ts
/* Standings component */ import { Component } from '@angular/core'; // Component metadata import { ViewEncapsulation } from '@angular/core'; // Encapsulation enum @Component({ encapsulation: ViewEncapsulation.Native, // Use Shadow DOM template: '<h3>Standings</h3>' }) export class AppStandings {} |
Notice that there is no selector specified in this component, since the router system will determine where to put the generated output when this component is used. Create a similar component for the AppScoring and AppAdmin menu items.
Route definitions
To configure the routing, you will first need to define a series of route definitions. The definition contains at least two elements:
- path: The name users see in the address bar.
- component: The component that is called when we navigate to this route.
Path
The path is the name of the “URL” that the router system will use to link to our component. There are no slash marks in the path name; the router will handle the name resolution.
Component
The component itself is the name of the existing component that should be used when a path is chosen.
For example, we might use the following construct for the link to the Standings page.
Code Listing 96
{ path: "Standings", component: AppStandings } |
app-routing.module.ts
The app-routing.module.ts file is created to build and configure your Routes to various application components.
Code Listing 97: app-routing.module.ts
Import { NgModule } from '@angular/core'; import { Routes, RouterModule } from '@angular/router'; import { AppStandings } from './app.standings'; import { AppScoring } from './app.scoring'; import { AppAdmin } from './app.admin'; |
The first section of the code imports the routing module from Angular and all of the components you will need in your application. Next is the construction of the application routes.
Code Listing 98
const routes: Routes = [ { path: "Standings",component: AppStandings }, { path: "Scoring",component: AppScoring }, { path: "Admin",component: AppAdmin }, ]; |
The final section creates a public constant of the array of routes we build. We will access this array in our app.module.ts file.
A couple things about the routes to keep in mind:
- You can pass a parameter to the routes using the :parameter syntax, as shown in the following code.
Code Listing 99
{ path: 'game/:id', component: GameDetails } |
- You can use '**' as a wildcard path name, the default component (such as a 404 error page) to use if the router cannot match any path.
Code Listing 100
{ path: '**', component: PageNotFound } |
Note: One thing to keep in mind is that the order of the array is important, since the router searches the array until it finds the first match. If you put a wildcard element in your first array, it would never reach any of the other paths in the route.
App module
The app.module.ts module will provide the link between the routing we defined in our application.
Code Listing 101: app.module.ts
import { BrowserModule } from '@angular/platform-browser'; import { NgModule } from '@angular/core'; import { AppRoutingModule } from './app-routing.module'; import { AppComponent } from './app.component'; import { AppStandings } from './app.standings'; import { AppScoring } from './app.scoring'; import { AppAdmin } from './app.admin'; @NgModule({ declarations: [ AppComponent,AppStandings,AppScoring,AppAdmin ], imports: [ BrowserModule,AppRoutingModule ], providers: [], bootstrap: [ AppComponent ] }) export class AppModule { } |
We import our various modules (both the Angular code modules and the application modules), and then we set up the declarations to organize our application. We import our routes from the app-routing.module file we created.
Default route
You can add a path to the route table to provide an action to take if no route is specified. In this case, if you open the site and do not specify a page, we want to redirect the user to the Standings page.
The following snippet shows the additional route table option to redirect. The redirectTo parameter is a slash, followed by the name of the page to go to in the route table.
Code Listing 102
{ path: '', redirectTo:'/Standings', pathMatch: 'full' } |
You should provide a default path, else the code will fall to the final route, and report a Page Not Found error.
Page not found
You can add a route using the following syntax that will be called if the page is not found.
Code Listing 103
{ path: '**', component: PageNotFound } |
This allows you to display an error message if the user enters an invalid URL. An example PageNotFound component is shown in the following code.
Code Listing 104
// Angular modules import { Component } from '@angular/core'; // Component metadata import { ViewEncapsulation } from '@angular/core'; // Encapsulation Enum // Component metadata, defining the template code @Component({ encapsulation: ViewEncapsulation.Native, // Shadow DOM template: '<h3>Page not found</h3>' }) export class PageNotFound { } |
You could add code to the component to log the URL failures to see if a user might be trying to hack into the website, or if a link on the site might be invalid.
In my opinion, explicitly using the public keyword is good programming style.
Tip: The PageNotFound condition is not an actual condition, but simply a default of what to do if all the routes are exhausted. Be sure to add the route definition to the end of your Routes collection.
Navigation
With routing defined and integrated into our application, the main menu will now load our components into the <router-output> section, as shown in Figure 14. Notice that the URL also changes to reflect our route name.
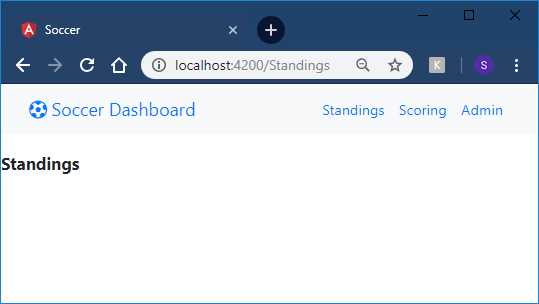
Figure 14: Routing in Action
Summary
By setting up the router system and routes, we can now provide the navigation links to move between our application’s views. In the next chapter, we will begin to add some actual code to the views, instead of our simple placeholder components.
- 80+ high-performance Angular components, including DataGrid, Diagram, and Scheduler.
- Support for AOT compilation and tree shaking.
- Lightweight and user-friendly.