
Android Programming Succinctly®

CHAPTER 3
The Activity Lifecycle
Once you have the basic structure of an Android application down, the next step is to understand the intricacies behind constructing and destroying Activity objects. We already saw how onCreate() can be used to initialize an Activity, but this is only one aspect of managing an activity’s lifecycle. In this chapter, we’ll learn how to minimize CPU, memory, and battery usage, handle phone call interruptions, save user state, and switch between landscape and portrait orientations by properly implementing an activity’s lifecycle. This is a very important aspect of Android app development, as a failure to do so will cause your application to regularly crash (and that’s a very bad user experience). The following figure shows you the activity lifecycle of an application.
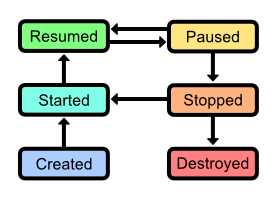
- The activity lifecycle
An activity lifecycle consists of the following six states:
- Created: The activity has been created and is ready to be displayed.
- Started: The activity is visible, but the user cannot interact with it yet. This state is typically followed immediately by the resumed state.
- Resumed: The activity is running in the foreground and the user can interact with it.
- Paused: The activity has been interrupted by a phone call or dialog message (e.g., a low-battery alert). This often leads immediately into the stopped state. The activity is usually still visible while paused, but obscured by a dialog so the user cannot interact with it.
- Stopped: The activity has been moved to the background and is no longer visible, but the instance still exists in memory. An activity can be re-launched from this state without re-creating it.
- Destroyed: The activity has been released by the system and no longer exists. This will happen automatically when the Android operating system deems it necessary.
When an activity is being created, it passes through the first three states, and when it is being destroyed, it passes through the latter half of the states. However, this rarely happens in a strictly linear fashion. The typical application will switch between the started, resumed, paused, and stopped state as the user interacts with the other activities in your application and gets interrupted by important alerts.
To manage the transitions between these states, the Activity class provides several methods. To define custom startup and teardown behavior, all you have to do is override these methods in an Activity subclass. All of the Activity transition methods are listed below, along with common examples of when they should be used:
- onCreate() – Called when the activity is entering the created state. As we saw in the last chapter, this is where you want to initialize UI elements and otherwise prepare the activity for use.
- onStart() – Called when the activity is entering the started state. This is a good place to load data that needs to be displayed to the user, though this can also be done in onResume() depending on the type of data and how you’re using it.
- onResume() – Called when the activity is entering the resumed state. This is the best place to initialize sensor input (e.g., GPS, cameras) and begin any animations required by your user interface.
- onPause() – Called when the activity is entering the paused state. This is where you should stop using scarce system resources (e.g., animations, GPS, cameras) to maximize the device’s battery life and to reduce your application’s memory footprint. This is the teardown counterpart to the onResume() method.
- onStop() – Called when the activity is entering the stopped state. This is called right before the application enters the background, so it’s a good place to save user data that needs to be re-used later on (e.g., an email draft). Note that onPause() can also be an appropriate time to do this, as it is always called immediately before onStop(). Whether you want to use onPause() or onStop() largely depends on your specific application requirements. onStop() is the teardown counterpart to the onStart() method.
- onDestroy() – Called when the activity is entering the destroyed state. This is the last chance you have to clean up any resources that would otherwise leak when your application is destroyed. This is the teardown counterpart to the onCreate() method; however, the system will automatically release class references when the activity is destroyed, so you usually won’t need to implement onDestroy() unless you started a background thread or created a memory buffer in onCreate().
As you can see, there is a symmetry between the above transition methods. Anything that happens in onStart() should be undone in onStop(), and anything done in onResume() should be undone in onPause().
When overriding any of the above methods, remember that you must call the superclass’s version for your application to work correctly.
Common Activity Transition Events
If you’re feeling a little confused about all of these transitions, it might help to discuss them from the perspective of the user. In this section, we’ve included a few of the most common events that can trigger an activity state transition below. Again, all of these occur frequently in the normal usage of an application, so it’s imperative to ensure that the corresponding transition methods consume and release system resources efficiently.
Pressing the Power Button
When the user presses the device’s power button to put it in standby, the current activity will be moved to the background (that is, it will pause, then stop). As you might expect, the opposite process occurs when they exit standby: the current activity will start, then resume.
If you think about how many times you’ve entered standby on your own Android device while in the middle of an activity, you’ll quickly understand how important it is to properly manage the onPause(), onStop(), onStart(), and onResume() methods. For example, if you left the accelerometer sensor running after the device entered standby, the user would find their battery unexpectedly low when they turned their phone back on.
Rotating the Device
The way the Android system handles device orientation changes can be somewhat counterintuitive, especially for new developers. When the screen rotates, the foreground activity is actually destroyed and re-created from scratch. This is because some layouts need to load different resources for portrait vs. landscape modes, and using the same instance is potentially wasteful.
Tapping the Back Button
When the user taps the Back button, the operating system interprets this as no longer needing the current activity, so it destroys it instead of just sending it to the background. This means that if the user navigates back to the destroyed activity, it will be created from scratch. If you’re trying to record the user’s progress in the destroyed activity, this means that you need to store that information outside of the activity and reload it in onCreate(), onStart(), or onResume(). If you try to store any data as instance variables, it will be lost when the activity is destroyed.
Recreating Destroyed Activities
An activity that is destroyed when the user taps the Back button or when it manually terminates itself is gone forever; however, this is not the case when an activity is destroyed due to system constraints. For example, if an activity is about to be destroyed because the Android OS needs the memory, it first archives the instance state of the Activity in a Bundle object, saves it to disk, and associates the Bundle with the Activity subclass.
This Bundle object can then be used to create a new Activity object with the same state as the destroyed one. Essentially, this makes it appear as though the original Activity instance is always in a stopped state without consuming any resources whatsoever.
Restoring Instance State
If there is an associated Bundle for an Activity, it gets passed to its onCreate() method. For instance, if you were developing an email client and stored the email body in an instance variable called message, your onCreate() method might look something like the following:
@Override
protected void onCreate(Bundle savedInstanceState) {
super.onCreate(savedInstanceState); setContentView(R.layout.activity_main);
if(savedInstanceState != null) {
// Restore the archived instance state
this.message = savedInstanceState.getString(STATE_MESSAGE);
} else {
// Initialize with default values
this.message = "Hello, World!";
}
}
This would also require the following two lines at the top of the class:
private static final String STATE_MESSAGE = "MainActivityMessageState";
public String message;
STATE_MESSAGE is a constant that defines the key to use when archiving the message instance variable in the bundle. This is similar to the key-value pattern for storing information in an Intent object.
Saving Instance State
To archive custom instance variables, all you need to do is override the onSaveInstanceState() method defined by Activity. For example, to save the above message state, you would use something like this:
@Override
public void onSaveInstanceState(Bundle savedInstanceState) {
savedInstanceState.putString(STATE_MESSAGE, this.message);
super.onSaveInstanceState(savedInstanceState);
}
As with the Activity state transition methods, it’s important to call the superclass version of onSaveInstanceState() when overriding it.
View States
The Android framework will automatically save the state of the entire view hierarchy, which means that every text field, button, and image will look exactly as it did before it was destroyed by the system. For many activities, this is the only state that really needs to be saved—one of the few times you’ll actually need to implement a custom onSaveInstanceState() is when the Activity has multiple steps and the user’s progress is recorded in instance variables.
Example Project
The ActivityLifecycle-transitions project in the resource package for this book is a simple application demonstrating all of the transition methods discussed above. It has two activities that you can switch between, and both of them use Log.d() to inform you when they have changed states. When you run the project in the emulator and click the buttons, you should see the following messages in LogCat:
05-23 12:27:41.178: D/MainActivity(4042): Created Main Activity
05-23 12:27:41.178: D/MainActivity(4042): Started Main Activity
05-23 12:27:41.178: D/MainActivity(4042): Resumed Main Activity
// Click the "Next Activity" button
05-23 12:27:44.788: D/MainActivity(4042): Paused Main Activity
05-23 12:27:45.018: D/SecondActivity(4042): Created Second Activity
05-23 12:27:45.018: D/SecondActivity(4042): Started Second Activity
05-23 12:27:45.018: D/SecondActivity(4042): Resumed Second Activity
05-23 12:27:45.728: D/MainActivity(4042): Stopped Main Activity
Also notice that if you press the Power button on the emulator (which emulates the physical power button on an actual device), you’ll see the current activity pause and then stop. You can also see the current activity get destroyed when you press the emulator’s Back button.
Of course, you’ll generally want to do more than just log a message in onCreate(), onStart(), and the other activity transition methods, but this project does give you a convenient place to start experimenting with the various states of an Activity. We’ll see some more practical versions of these methods later in the book after we learn how to create animations and save user data.
Summary
In this chapter, we introduced the lifecycle on an Activity object. As the user navigates an application, each Activity object passes through a created, started, resumed, paused, stopped, and destroyed state, often cycling between the middle four states several times before being destroyed. Since these state transitions happen so frequently, and mobile devices have such scarce system resources, properly transitioning between these states is an essential component for a satisfying user experience.
This chapter focused more on the conceptual aspects on the Activity lifecycle because the concrete implementation of transition methods like onResume() is so application-specific. What you should take away from this chapter is a high-level understanding of how the Android framework manages its Activity objects. Once you understand that, it’s easy to adapt these concepts to your real-world application requirements.
In the next two chapters, we’ll shift gears a bit and focus on configuring the front end of an Android application. First, we’ll learn how to arrange UI elements into user-friendly layouts, then in the following chapter, we’ll explore the API for buttons, text fields, spinners, and the other common input controls.
- 1800+ high-performance UI components.
- Includes popular controls such as Grid, Chart, Scheduler, and more.
- 24x5 unlimited support by developers.