
Android Programming Succinctly®

CHAPTER 2
Hello, Android
In this chapter, we’ll discover the fundamental design patterns of all Android applications. We’ll learn how to work with activities, display UI elements by editing XML layout files, handle button clicks, and switch between activities using intent objects. We’ll also learn about best practices for representing dimension and string values for maximum portability.
Each screen in an Android app is represented by a custom subclass of Activity. The subclass defines the behavior of the activity, and it’s also responsible for loading user interface from an XML layout file. Typically, this XML layout file is where the entire interface for a given activity is defined. To display text fields, buttons, images, and other widgets to the user, all you need to do is add XML elements to the layout file.
Intent objects are used to switch between the various activities that compose your app. For example, when the user clicks a button to navigate to another screen, you create an Intent object and pass the destination activity to it. Then, you “execute” the intent to tell Android to switch to the next page. This is the general pattern for building up a multi-screen application.
This chapter explains how all these android architecture components interact using hands-on examples. You can follow along with the empty Android project that you created in the previous chapter, or you can view the completed code in the HelloAndroid application included with the sample code for this book.
App Structure Overview
Let’s start by taking a look at the files and directories our template project created for us. It may look like there are a lot of files in Eclipse’s Package Explorer, but don’t be overwhelmed—there are only three items that you need to worry about:
AndroidManifest.xml – This file declares everything about your app that the Android operating system needs to launch it. This includes the classes composing the application, the permissions required by your app, meta information like the minimum Android API for your app, and the libraries that your app depends on. This must be in the root directory of your project. Typically, the SDK will update this file for you automatically, so you shouldn’t have to edit it directly.
src/ – This directory contains all of your app’s source files. This is where all of your Java source code will reside.
res/ – This folder contains application resources, which are the images, videos, and strings that will be displayed to the user. By abstracting resources from your application code, it’s trivial to add support for new screen resolutions, orientations, and languages.
The manifest and source directory are relatively straightforward, however the resource folder calls for a bit more explanation. If you expand this folder in the Package Explorer, you’ll find three types of subdirectories: drawable/, layout/, and values/. The drawable/ folders contain all of the graphics for your application, which can be either image files or special XML files defining shapes. The layout/ directory stores the UI of each screen displayed by your application, and the values/ folder contains lists of strings that are utilized by the UI.
Now, the interesting part is what comes after the hyphen. This portion of the folder name is a qualifier that tells the system when to use the contained resources. For example, images in drawable-hdpi/ will be displayed when the host device has a high-density screen (~240dpi), whereas devices with low-density screens (~120dpi) will use the images in drawable-ldpi/.
By simply placing high-resolution images and low-resolution images in the appropriate folders, your app will be available to both types of devices with no changes to your code. Similarly, your app can be ported to other languages by appending en, es, fr, ar, or any other language code after the values/ subdirectory. In this way, the res/ directory makes it very easy to support new devices and reach new audiences.
Creating a User Interface
Android apps use XML to define their user interfaces. Each XML element in a layout file represents either a ViewGroup or a View object. ViewGroups are invisible containers for other View objects, and their main job is to arrange child views (or nested view groups) into a pleasing layout. View objects are visible UI components like text fields, buttons, and tables. To configure the properties of a view or view group, you edit the attributes of the corresponding XML element.
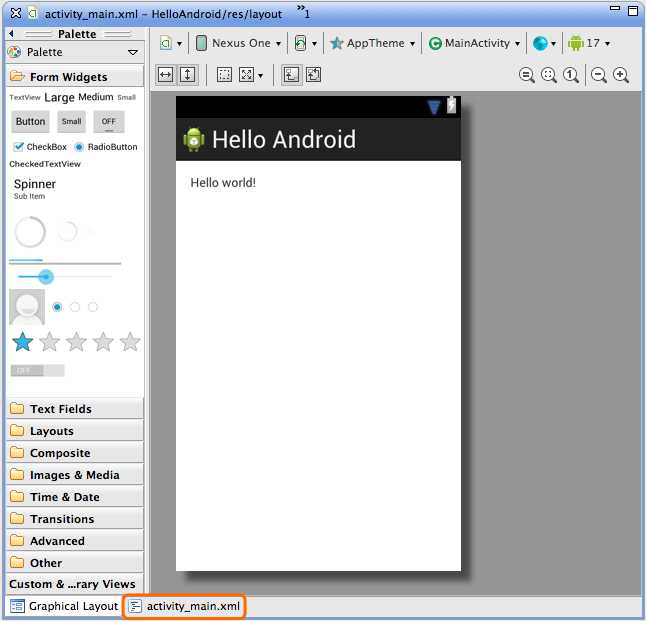
The template project we used comes with a default layout called activity_main.xml, which you should find in the res/layout/ directory. When you double-click the file, ADT displays the graphical UI editor by default. While you can use this to visually edit the underlying XML, for this book, we’ll be directly editing the XML markup to gain an in-depth understanding of how Android user interfaces work. To display the raw XML, click the activity_main.xml tab in the bottom-left of Eclipse’s editing area, highlighted in orange as you can see in the following figure:
- The raw XML tab for the main layout
After clicking this tab, you’ll find the XML that defines the current layout. It should look something like the following:
<RelativeLayout xmlns:android="http://schemas.android.com/apk/res/android"
xmlns:tools="http://schemas.android.com/tools"
android:layout_width="match_parent"
android:layout_height="match_parent"
android:paddingBottom="@dimen/activity_vertical_margin"
android:paddingLeft="@dimen/activity_horizontal_margin"
android:paddingRight="@dimen/activity_horizontal_margin"
android:paddingTop="@dimen/activity_vertical_margin"
tools:context=".MainActivity" >
<TextView
android:layout_width="wrap_content"
android:layout_height="wrap_content"
android:text="@string/hello_world" />
</RelativeLayout>
As you can see, this defines two elements: <RelativeLayout> and <TextView>. RelativeLayout is a subclass of ViewGroup that defines the position of its children relative to each other. TextView is a subclass of View that represents a standard text field component. We’ll survey the most common UI elements and later in this book.
All of the attributes in the android namespace determine various properties of the associated element. For example, android:layout_width="match_parent" makes the RelativeLayout stretch to the same size as its parent (in this case, the main window of the app). The available attributes and values for each type of element are listed in the documentation for the corresponding class (e.g., View, ViewGroup, RelativeLayout, TextView). The value of android:text is a reference to a string resource, which we’ll explain in a moment.
Adding a Button
But first, we’re going to simplify the default layout a bit and change it to a single button, centered on the screen. Replace the existing activity_main.xml with the following:
<RelativeLayout xmlns:android="http://schemas.android.com/apk/res/android"
xmlns:tools="http://schemas.android.com/tools"
android:layout_width="match_parent"
android:layout_height="match_parent"
android:gravity="center"
tools:context=".MainActivity" >
<Button
android:layout_width="wrap_content"
android:layout_height="wrap_content"
android:text="@string/button_next" />
</RelativeLayout>
We’ve done two things here. First, we replaced the <RelativeLayout>’s padding attributes with android:gravity. This tells it to center all of its child views. Second, we changed the <TextView> element to a <Button> and gave a new value to its android:text attribute.
Unfortunately, you won’t be able to compile the project to see the button just yet. Instead, you’ll see an error message next to the android:text attribute saying something about a missing resource, which can be seen in the following figure:

Defining String Resources
When designing layouts for Android, you’ll rarely want to hardcode the value of button titles, labels, and other text fields into the layout’s XML file. Instead, you define string resources in a separate file and link to it from within the layout. This extra layer of abstraction makes it possible to reuse the same layout file with different string resources. For instance, you can display shorter instructions when in portrait mode versus landscape mode, or display English, German, Arabic, or Chinese instructions based on the device’s locale.

- Displaying different string resources in the same layout
Whenever you want to link to any external resource, you use the following format: @<type>/<identifier>. For example, the android:text="@string/button_text" attribute in activity_main.xml references a string resource with an identifier of button_text. But, since we haven’t created that resource yet, the compiler can’t find it, so it gives us an error. Let’s fix this now.
In the res/values/ directory, open up the strings.xml file. This is the conventional place to define strings that will be displayed to the user (the filename is actually arbitrary, as the resource is fully defined by the contained XML). You’ll find a few <string> elements inside of a <resource> element. Go ahead and add the following element:
<string name="button_next">Next Page</string>
The name attribute defines the identifier for the resource. Eclipse should stop complaining about the missing resource, and you should now be able to successfully compile your project. In the emulator, you should see a button in the center of the screen with Next Page as its title:

- Adding a button to the UI
Separating UI strings from layout construction may seem like an unnecessary hassle, but once you start working with more complicated user interfaces and want to support multiple languages, you’ll really appreciate the convenience of having all of your strings in one place.
Detecting Button Input
So, we have a button that the user can interact with, and it even has the iconic blue highlight when you tap it. The next step is to detect the tap. This is accomplished via the android:onClick attribute, which tells the system to call a method of the associated activity whenever the button is tapped. This binds the layout layer with the behavior one, as you can see in the following figure.
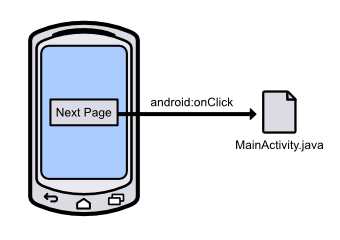
- Detecting button clicks with the android:onClick attribute
In activity_main.xml, change the <Button> element to the following. This will hook up the button to the nextPage() method of MainActivity.java (which we still need to implement).
<Button
android:layout_width="wrap_content"
android:layout_height="wrap_content"
android:text="@string/button_next"
android:onClick="nextPage" />
Logging Output
To figure out if our button is working, let’s log a message to the console whenever the button is tapped. Instead of Java’s conventional System.out.println(), we’ll use the Log class that is included with the Android platform. This is the preferred way to output messages to the console in Android apps due to its well-defined priority levels, which let you easily filter different types of messages. The most common Log methods are listed below from highest priority to lowest:
- Log.e(String tag, String msg) – Log an error message.
- Log.w(String tag, String msg) – Log a warning message.
- Log.i(String tag, String msg) – Log an informational message.
- Log.d(String tag, String msg) – Log a debug message.
Having several levels of message logging makes it possible to filter certain messages depending on your compile target. For example, debug messages are stripped at runtime from production apps, making them the best choice to use during development. Errors, warnings, and informational messages are always logged, even in production apps.
The first parameter of all these methods is a string that identifies the source of the log message. You’ll typically want this to be the name of the class that’s doing the logging, and the conventional way to define this value is with a private static final variable in the class itself. So, in MainActivity.java, add the following line at the beginning of the class definition:
private static final String TAG = "MainActivity";
And, as with any other Java class, we need to import the Log class before we can use it, so add the following import statements to the top of MainActivity.java (we’ll need the View class, too):
import android.util.Log;
import android.view.View;
Then, implement the nextPage() method to output a debug message, like so:
public void nextPage(View view) {
Log.d(TAG, "Switching to next page");
}
Remember that this is the name of the method that we hooked up in activity_main.xml, so it should get called every time the user clicks the button. Any method used as an android:onClick target needs to have the above signature (that is, it must be public, return void, and accept a single View object as a parameter). The parameter is a reference to the UI component that initiated the call, which in this case is the button that the user pressed.
You should now be able to compile your project, tap the button, and see the above message in the LogCat panel at the bottom of the IDE. This is where all log messages will be displayed when launching your application from within Eclipse. To display the LogCat panel, click Window, Show View, Android, and select LogCat.

- The LogCat panel in Eclipse
Creating Another Activity
Logging is a convenient way to make sure UI components are working properly, but you’re probably going to want most of your buttons to do more than just display a message to the console. To extend our example, we’ll switch to another activity when the user presses the button.
The first step is to create another class for the second activity. In Eclipse, press Cmd+N (or Ctrl+N if you are on a PC) to open the New Document wizard and select Android Activity to add a new class to the current project. Choose Blank Activity for the template. In the next window, use SecondActivity for the Activity Name field, activity_second for Layout Name, and Second Activity for the Title field. Your configured activity should look like the following:
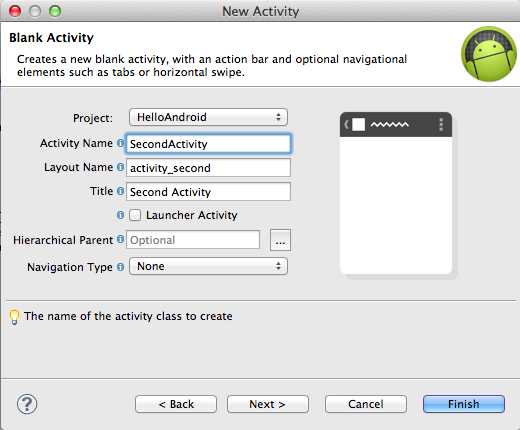
- Configuring a new Activity class
Clicking Finish will create the SecondActivity.java and activity_second.xml files, add them to the manifest, and add a string resource defining the activity title in res/values/strings.xml. This is everything that needs to happen for a new activity to be ready to use.
Linking Activities With An Intent
The user experience of a single Android application is typically made up of several different activities (e.g., browsing the user’s contact list, editing a contact, and viewing a contact are all separate activities, but are all part of the People app). Each activity is implemented as a completely independent component, even if they are part of the same application. This makes it possible for any activity to be initiated by any other activity, including ones from other applications. For example, if your application needs to add a new contact to the user’s contact list, it can jump directly to the People app’s activity for creating new entries.
To glue all of these independent activities together into a coherent app, Android provides an Intent class, which represents an arbitrary action to be performed. The general pattern is to create an Intent object, specify the destination class, and pass in any data required for the destination class to perform the action. The following figure shows you how the intent object links two activities.
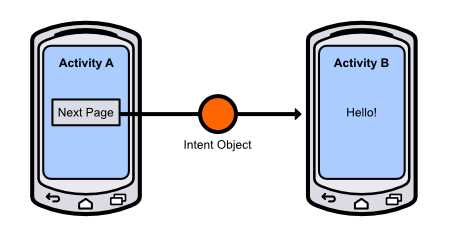
- Switching from one activity to another using an Intent object
This loose-coupling between activities makes for a very modular application architecture with flexible code reuse opportunities.
In our example, we want to create an intent inside the MainActivity class and use SecondActivity as the destination. We’ll worry about the data passing portion at the end of the chapter. First, import the Intent class into MainActivity.java:
import android.content.Intent;
Then, change the nextPage() method to the following:
public void nextPage(View view) {
Intent intent = new Intent(this, SecondActivity.class);
startActivity(intent);
}
After creating the intent, we can pass it to the built-in startActivity() function to execute it. The result should be a transition to the second activity when you click the Next Page button in the first activity. Right now, the second activity is just a static text field that says "Hello world!", but we’ll change that in the upcoming section.
Another Button
In this section, we’ll add another button to the main activity, then we’ll pass the selected button to the second activity for display. Change activity_main.xml to the following:
<LinearLayout xmlns:android="http://schemas.android.com/apk/res/android"
xmlns:tools="http://schemas.android.com/tools"
android:layout_width="match_parent"
android:layout_height="match_parent"
android:orientation="horizontal"
tools:context=".MainActivity" >
<Button
android:layout_width="wrap_content"
android:layout_height="wrap_content"
android:text="@string/button_red"
android:onClick="nextPage" />
<Button
android:layout_width="wrap_content"
android:layout_height="wrap_content"
android:text="@string/button_blue"
android:onClick="nextPage" />
</LinearLayout>
Note that both buttons will call the same nextPage() method when the user taps them. This requires two new string resources: button_red and button_blue. In strings.xml, go ahead and add these resources:
<string name="button_red">Red Pill</string>
<string name="button_blue">Blue Pill</string>
You can delete the button_next element since we’ll no longer be using it. Before we start passing data with Intent objects, lets make sure we can tell which button was pressed using a simple Log message. In MainActivity.java, change the nextPage() method to the following:
public void nextPage(View view) {
Intent intent = new Intent(this, SecondActivity.class);
Button button = (Button)view;
String message = button.getText().toString();
Log.d(TAG, message);
startActivity(intent);
}
All this does is fetch the title of the button via the getText() method and displays it via a Log.d() call. You’ll also need to import the Button class at the top of the file:
import android.widget.Button;
Now, when you compile the app, you should see two buttons in the top-left corner.

- Adding another button to the main activity
When you tap one of the buttons, you should see the corresponding title displayed in the LogCat panel.
Passing Data with Intents
Next, we’re going to pass this information along to the next activity using our existing Intent object. You can store data in an Intent instance by calling its putExtra() method, which takes two parameters: a name and a string. You can think of this as creating a key-value pair on the Intent object. For example:
public void nextPage(View view) {
Intent intent = new Intent(this, SecondActivity.class);
Button button = (Button)view;
String message = button.getText().toString();
intent.putExtra(EXTRA_MESSAGE, message);
startActivity(intent);
}
The intent.putExtra(EXTRA_MESSAGE, message); line adds the button’s title to the Intent object, which we can later retrieve via the EXTRA_MESSAGE constant. We still need to define this constant, so be sure to include the following at the top of the MainActivity class:
public static final String EXTRA_MESSAGE = "com.example.helloandroid.MESSAGE";
We’ve now successfully encoded some data to send from the main activity to the second activity. Next, we need to allow the second activity to receive this information. This requires two steps:
1. Get the Intent instance that was sent to the second activity.
2. Use the EXTRA_MESSAGE key to return the associated value.
To do both of these, add the following method to SecondActivity.java:
@Override
protected void onCreate(Bundle savedInstanceState) {
super.onCreate(savedInstanceState);
setContentView(R.layout.activity_second);
Intent intent = getIntent();
String message = intent.getStringExtra(MainActivity.EXTRA_MESSAGE);
Log.d(TAG, message);
}
The onCreate() method is a special method defined by the Activity class. The Android framework invokes onCreate() whenever an Activity is started, and by overriding it in subclasses, we can add custom initialization behavior. For now, you can think of it as the constructor method for an Activity instance, but we’ll refine this concept a little bit in the next chapter.
The last three lines fetch the Intent data we sent from MainActivity.java and display it with Log.d(). The getIntent() method is another method defined by the Activity class which simply returns the Intent instance that started the activity. Then, we use the Intent class’s getStringExtra() method to find the value associated with the MainActivity.EXTRA_MESSAGE key. Note that defining the key as a constant in MainActivity.java is a best practice, as it lets the compiler make sure the key is typed correctly. There are similar methods for other data types (e.g., getFloatExtra() returns a float value).
The above method still needs access to the Intent and Log classes, so add the following lines to the top of SecondActivity.java:
import android.content.Intent;
import android.util.Log;
We also need to define another TAG variable in SecondActivity.java:
private static final String TAG = "MainActivity";
You should now be able to compile the project. Click either of the buttons, and have SecondActivity log the selected button title:

- Logging the selected button’s title
For completeness, let’s make the text field in SecondActivity display the value instead of just displaying it in LogCat. First, add an id attribute to the TextView in activity_second.xml:
<TextView
android:id="@+id/selected_title"
android:layout_width="wrap_content"
android:layout_height="wrap_content"
android:text="@string/hello_world" />
The id attribute is necessary when you want to access a UI element from elsewhere in the application. The plus sign in @+id is only necessary when first defining the UI element (if you wanted to reference it from another UI file, you would not need it). The selected_title portion defines the unique ID of the element, which can be used as follows (define this in SecondActivity.java):
protected void onCreate(Bundle savedInstanceState) {
super.onCreate(savedInstanceState);
setContentView(R.layout.activity_second);
Intent intent = getIntent();
String message = intent.getStringExtra(MainActivity.EXTRA_MESSAGE);
TextView textField = (TextView)findViewById(R.id.selected_title);
textField.setText(message);
}
The global findViewById() method is defined by the Activity class, and it returns a View instance that has the supplied ID. Note that we have to cast the return value to a TextView so we can use the setText() method to display the selected button. The R.id.selected_title snippet is the conventional way to refer to UI components defined in XML files. The R class is generated automatically when you compile your project, and the framework populates it with constants for each element with an android:id attribute. This method of using static constants to refer to UI elements eliminates the possibility of referencing undefined elements (e.g., from a misspelled or omitted ID in the layout file).
Note that you’ll have to import the TextView class for the above onCreate() method to compile:
import android.widget.TextView;
One common mistake for Android beginners is to call findViewById() before calling setContentView(). The latter must be called first, otherwise findViewById() will return null.
The second view should now display either “Red Pill” or “Blue Pill” depending on which button you tapped in the main activity page. To switch between buttons, use the Back button on the device to return to the main page and select the one you want to test. As you can see in the following image, selecting the Blue Pill button will display its text.

- Displaying the selected button title in the second activity
Summary
In this chapter, we learned about the basic structure on an Android application, how to create user interfaces with XML files, define media resources, handle user input, and switch between activities using an Intent object. We also acquired some practical debugging skills by taking a brief look at the Log class.
This is almost everything you need to know to develop basic Android apps. The next chapter explains the lifecycle of an Activity in more detail, which is important to properly manage the memory footprint of your application. The rest of this book explores the intermediate functionality that makes apps more interactive, data-driven, and user-friendly.
- 1800+ high-performance UI components.
- Includes popular controls such as Grid, Chart, Scheduler, and more.
- 24x5 unlimited support by developers.