
Android Programming Succinctly®

CHAPTER 6
Fragments
A fragment is an encapsulated portion of an activity. Fragments let you configure UI components and behaviors into a reusable entity, then embed that entity in several different activities. This opens up all sorts of layout and navigation opportunities for Android applications. You can think of them as “fragments” of an activity than can be combined in different ways to form a complete activity. The following figure shows you the different fragments you can use, while developing an Android application.

- Reusing master and detail fragments in smartphone and tablet layouts
One of the most common use cases for fragments is to implement the master-detail UI pattern. For example, an email app contains a list of messages (the master interface) and a separate place to view the message body (the detail interface). By using one fragment for the list of messages and another for the message body, you can easily support multiple screen dimensions by combining the fragments in different ways. On a tablet, you might display both fragments in a single activity to make the most of your screen real estate, while on a smartphone, you would probably want to display them in dedicated activities that both take up the whole screen. Since the master and detail fragments are reusable, all you have to do is combine them differently based on the screen dimensions—all of their UI components and behaviors are reusable.
It’s also possible to seamlessly swap fragments into and out of an activity. This lets you display different kinds of interfaces and behaviors within a single activity, which enables two common navigation patterns: swipe views and tabbed navigation.
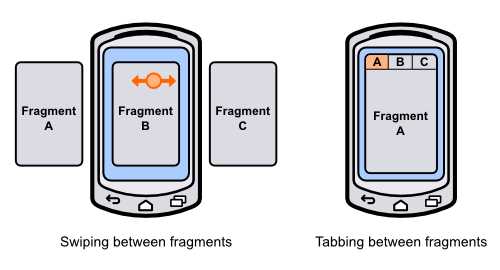
- Swiping and tabbing between fragments
Swipe views are designed to let the user navigate between sibling detail items in a master-detail application. For example, in an email app, the user can swipe the screen to move forwards and backwards through their messages without being forced to navigate back to the master list. It’s also possible to use the swipe gesture to navigate between tabs, which we’ll explore later on in this chapter.
Tabbed navigation lets the user switch between fragments using labeled tabs at the top of the screen. Tabs are meant for switching between the top-level sections of your application, so there shouldn’t be more than three or four tabs displayed at any given time. For example, an email app might have tabs for switching between the inbox, your starred messages, and your email settings.
This chapter provides a basic introduction to fragments. We’ll learn how to create them, embed them in activities, and use them to implement swipe views and tabbed navigation. You should walk away with an understanding of how to encapsulate functionality into a fragment and reuse that functionality in various activities. The Fragments project included in the sample code for this book demonstrates everything that we’re about to discuss.
Creating a Fragment
Fragments are made up of two parts: an XML layout file that defines what the fragment looks like, and a class to load that layout and define its behavior. Notice that these are the exact same components required for an activity.
The Fragments example project includes two fragments: a HomeFragment and an ArticlesFragment. Both of them display a text field with their name and a colored background so you can see their dimensions once we load them into an activity. The XML for each fragment looks exactly like that of an activity. For example, home_view.xml is defined as follows:
<RelativeLayout xmlns:android="http://schemas.android.com/apk/res/android"
android:layout_width="match_parent"
android:layout_height="match_parent"
android:background="#FFDDFFDD">
<TextView
android:layout_width="wrap_content"
android:layout_height="wrap_content"
android:layout_centerInParent="true"
android:textSize="32sp"
android:textColor="#FF009900"
android:text="Home Fragment" />
</RelativeLayout>
Next, we need to define a subclass of Fragment to load this layout. The Fragment class was only added in Android 3.0 (API 11). If you don’t need to support anything below API 11, you can import the Fragment class from android.app.Fragment, but it’s possible to support back to Android 1.6 by importing Fragment from the support library with android.support.v4.app.Fragment. The example code for this chapter uses the latter method.
The HomeFragment.java class defines the behavior of the home fragment. The onCreateView() is the only method that must be overridden in a Fragment subclass, as it returns the root View that represents the fragment. In this case, all we need to do is inflate the XML layout:
import android.os.Bundle;
import android.support.v4.app.Fragment;
import android.view.LayoutInflater;
import android.view.ViewGroup;
import android.view.View;
public class HomeFragment extends Fragment {
@Override
public View onCreateView(LayoutInflater inflater, ViewGroup container,
Bundle savedInstanceState) {
// Inflate the layout for this fragment
return inflater.inflate(R.layout.home_view, container, false);
}
}
Fragments follow the same lifecycle pattern as activities. You can define custom onCreate(), onPause(), onResume(), and all of the other activity lifecycle callback methods that we discussed earlier in this book in a Fragment subclass. When one of the lifecycle methods is called on a host activity, it passes that along to any fragments it contains. This is part of what makes fragments so modular—they act just like activities, but are completely self-contained.
Embedding Fragments in Activities
Fragments must be be hosted by an activity. It’s not possible to display fragments on their own, although it can be the only element in an activity. If you change activity_main.xml to the following, you’ll see how to embed a fragment in an activity:
<LinearLayout xmlns:android="http://schemas.android.com/apk/res/android"
xmlns:tools="http://schemas.android.com/tools"
android:layout_width="match_parent"
android:layout_height="match_parent"
android:orientation="vertical"
tools:context=".MainActivity" >
<fragment android:name="com.example.fragments.HomeFragment"
android:id="@+id/homeFragment"
android:layout_width="match_parent"
android:layout_height="0dp"
android:layout_weight="1" />
<fragment android:name="com.example.fragments.ArticlesFragment"
android:id="@+id/articlesFragment"
android:layout_width="match_parent"
android:layout_height="0dp"
android:layout_weight="1" />
</LinearLayout>
This includes both the HomeFragment and the ArticlesFragment in the main activity, and the result is shown in the screenshot below. As you can see, fragments are embedded with the <fragment> tag. The most important attribute is android:name, which should be an absolute path to the class that defines the fragment (including the application package).
Remember that the goal of a fragment is to be a reusable piece of UI. This means that it should be able to stretch or shrink to match whatever size is defined by the host activity. This is why the root element of the fragment uses match_parent for its android:layout_width and android:layout_height. The above code makes each fragment half of the screen:

- Displaying two fragments in a single activity
Right now, fragments might seem like just an abstraction for layout files (which they are), but they enable all sorts of other navigation options. Since they are reusable, we can display both of them in the same activity (like we’ve done here), display them in separate activities, paginate them with swipe views, or let the user access them via tabs.
Swipe Views
Fragments can be paginated using swipe views, which are implemented with the ViewPager class. Swipe views are recommended for only a small number of screens, and each of those screens should be self-contained. If you’re letting the user swipe through a collection of data items, you should also provide a master list as an alternative means of navigation, and you shouldn’t use swipe views to paginate long articles.
To add a swipe view to the main activity, replace the <fragment> elements in activity_main.xml with the following:
<android.support.v4.view.ViewPager
android:id="@+id/fragmentPager"
android:layout_width="match_parent"
android:layout_height="match_parent" />
This adds a ViewPager that is supported back to Android 1.6. The ViewPager will be populated in MainActivity.java using an adapter, much like ListViews and GridViews are populated. First, it needs to define a subclass of FragmentPagerAdapter, called SimplePagerAdapter in the following code. Its getItem() method returns the fragment associated with page. In this case, it returns HomeFragment for the first page and ArticlesFragment for the second one. Of course, it’s possible to dynamically generate these pages from a data set if you’re trying to swipe through a collection. To populate the ViewPager, all we need to do is set its adapter property to the SimplePagerAdapter.
import android.os.Bundle;
import android.support.v4.app.Fragment;
import android.support.v4.app.FragmentActivity;
import android.support.v4.app.FragmentManager;
import android.support.v4.app.FragmentPagerAdapter;
import android.support.v4.view.ViewPager;
import android.view.Menu;
public class MainActivity extends FragmentActivity {
@Override
protected void onCreate(Bundle savedInstanceState) {
super.onCreate(savedInstanceState);
setContentView(R.layout.activity_main);
SimplePagerAdapter adapter = new SimplePagerAdapter(getSupportFragmentManager());
ViewPager pager = (ViewPager) findViewById(R.id.fragmentPager);
pager.setAdapter(adapter);
}
public static class SimplePagerAdapter extends FragmentPagerAdapter {
public SimplePagerAdapter(FragmentManager fragmentManager) {
super(fragmentManager);
}
@Override
public int getCount() {
return 2;
}
@Override
public Fragment getItem(int position) {
switch (position) {
case 0:
return new HomeFragment();
case 1:
return new ArticlesFragment();
default:
return null;
}
}
}
@Override
public boolean onCreateOptionsMenu(Menu menu) {
// Inflate the menu; this adds items to the action bar if it is present.
getMenuInflater().inflate(R.menu.main, menu);
return true;
}
}
Each fragment should now take up the whole screen, and you should be able to swipe between them. Note that MainActivity.java extends FragmentActivity instead of Activity. This is necessary if you want to support anything before Android 3.0. If you don’t need to do this, you only have to extend Activity.
Adding Tabs
Tabs work in conjunction with the ActionBar, which is the bar at the top of all the examples we’ve been working with thus far. You create new tabs by requesting one from the ActionBar using its newTab() method, set its title, give it a listener to respond to events, and then add it to the ActionBar with its addTab() method. This is all demonstrated in the following snippet, which should go in the onCreate() method of MainActivity.java:
final ActionBar actionBar = getActionBar();
actionBar.setNavigationMode(ActionBar.NAVIGATION_MODE_TABS);
TabListener tabListener = new TabListener() {
public void onTabSelected(Tab tab,
android.app.FragmentTransaction ft) {
pager.setCurrentItem(tab.getPosition());
}
public void onTabReselected(Tab arg0,
android.app.FragmentTransaction arg1) {
// TODO Auto-generated method stub
}
public void onTabUnselected(Tab arg0,
android.app.FragmentTransaction arg1) {
// TODO Auto-generated method stub
}
};
actionBar.addTab(actionBar.newTab().setText("Home").setTabListener(tabListener)); actionBar.addTab(actionBar.newTab().setText("Articles").setTabListener(tabListener));
The onTabSelected() callback method gets called whenever a tab is selected. To display the associated fragment, all we need to do is tell the ViewPager to change its currentItem property. You should now be able to select tabs to change the fragments, but the tabs aren’t updated when you swipe between them. To fix this, we need to listen for page changes and update the tabs when the user swipes, like so:
pager.setOnPageChangeListener(new ViewPager.SimpleOnPageChangeListener() {
public void onPageSelected(int position) {
actionBar.setSelectedNavigationItem(position);
}
});
Tabs and swiping should now be working properly.

- Using tabs to navigate between fragments
Summary
In this chapter, we learned how to encapsulate reusable sections of a user interface with Fragment subclasses and display them using swipe views and tabs. This is a common use case for fragments, but they also enable other navigation patterns, like the master-detail pattern, flexible user interfaces, and complex multi-panel layouts.
The next chapter moves away from Android’s user interface frameworks and explains how to save and load the data that your application collects.
- 1800+ high-performance UI components.
- Includes popular controls such as Grid, Chart, Scheduler, and more.
- 24x5 unlimited support by developers.