
Akka.NET Succinctly®

CHAPTER 14
Akka.NET Remoting
In the previous chapters, we saw the creation of actors belonging to only one ActorSystem and the communication between them. Being part of one ActorSystem automatically means that the application is hosted and running as part of one single process, which is a single application space.
While this is perfect for some kinds of applications, it might not be for others that need to scale out in order to increase the overall processing capabilities. This is where we need Akka.NET Remoting.
Remoting overview
Akka.NET remoting enables communication between ActorSystems deployed on different application processes. This might include a different process on a single machine, or a completely different server.
Let’s see an example. As shown in Figure 45, we have two actor systems deployed: one running on the client host, and one on the server host.
The communication between the two will happen via the network, and all of the messages sent across the wire will be serialized and deserialized. In order for the serialization to work, both actor systems should have the common definition of the messages (for instance, by sharing a library with message classes).
In addition to this, the communication between actors on two hosts will happen by using the full Path, which comprehends the protocol, address, port, and actor’s path. We have discussed the actor path in previous chapters.

Figure 45: Akka.NET remoting enables communication
The client host (as shown in Figure 45) would typically be responsible for initiating the communication with the server host. The client host is also responsible for the creation of new actor instances.
With the use of remoting, the client host can choose where to instantiate new actors: either on the client (the local machine) or on the server host (remotely). To specify where the actor is going to be created, we use either the HOCON notation in the configuration file, or do that directly in the code.
The great thing about this is that the IActorRef returned upon creating an actor will not change its behavior, which means that our code will work in the same way as if the actor were running locally. This ability of the IActorRef to abstract the location of the actor is also known as the location transparency.
Transport
By default, Akka.NET uses the DotNetty library for the TCP transport. The responsibilities of the transport in Akka.NET are as follows:
- IP addressing and ports: All Akka.NET endpoints (client and servers) have to be accessible by an IP address and port.
- Message delivery: Should enable the delivery of messages from ActorSystem A to ActorSystem B.
- Message framing: Distinguishes individual messages within a network stream.
- Disconnect and error reporting: Tells Akka.Remote when a disconnect or transport error occurred.
- Preserving message order (optimal): Some transports (like UDP) make no such guarantees, but in general, it's recommended that the underlying transport preserve the write order of messages on the read side.
- DNS resolution (optional): Be able to resolve the DNS.
Remoting demo application
Let’s build an example to demonstrate the remote instantiation of the actors.
As the demo application, we will expand the previously built ASP.NET Core calculator web application by changing it a bit, as follows:
- We will add a new Console Application project that will be used to host the remote ActorSystem, and execute the code as requested by the client.
- We will create a new Common Code library, which is a library that will be shared by the two other applications.

Figure 46: Physical structure of the remoting demo
Let’s start by creating the two needed projects, which are to be added to the already existing ASP.NET Core solution.

Figure 47: Adding a common library
As we can see in Figure 47, we are creating a .NET Core Library project called Akka.Net.Succinctly.Core.Common, and in addition to that, we need to create a .NET Core Console Application project called Akka.Net.Succinctly.Core.Server.
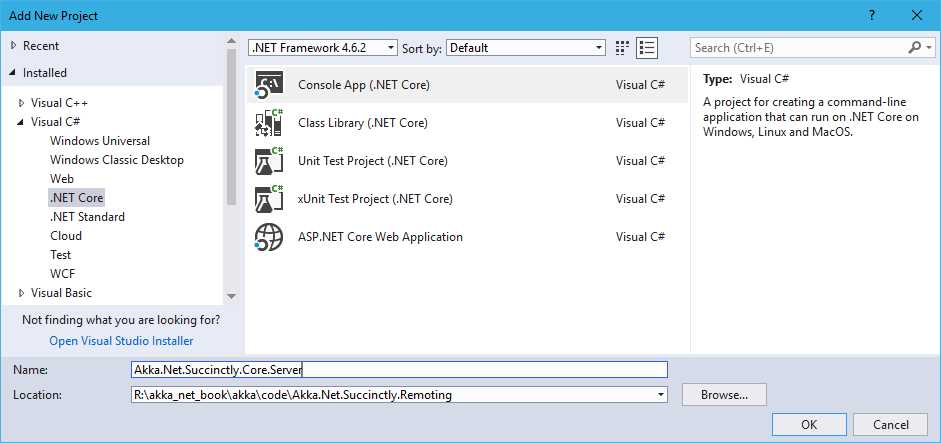
Figure 48: Creation of the Server
Now our Visual Studio Solution should contain three projects.

Figure 49: Three projects in Visual Studio
Akka.NET common library
We will start by defining the content of the common library. The common library at this point will contain the actor, messages, and other shared code. In production systems, we would probably like to separate the concerns better and not put everything into one bucket (library), but what we do here is good enough for a simple demo project.
We will start by adding the reference to the Akka library from NuGet.
Code Listing 83: Installing Akka package from NuGet
PM> Install-Package Akka |
We also add the following code, which defines our CalculatorActor, AddMessage, and AnswerMessage classes. In bold, we have added the console logging of the currently processing message, which is important for debugging purposes, in order to see if the server received any message to be processed.
Code Listing 84: CalculatorActor and messages redefined
public class AddMessage { public AddMessage(double term1, double term2) { Term1 = term1; Term2 = term2; } public double Term1; public double Term2; } public class AnswerMessage { public AnswerMessage(double value) { Value = value; } public double Value; } public class CalculatorActor : ReceiveActor { public CalculatorActor() { Receive<AddMessage>(add => { Console.WriteLine($"{DateTime.Now}: Sum {add.Term1} + {add.Term2}"); Sender.Tell(new AnswerMessage(add.Term1 + add.Term2)); }); } } |
We will add another class that will be shared across the two solutions (client, server) and is responsible for reading out the Akka.NET configuration from the file. The HoconLoader class is a very simple class that reads the content of a file and returns the Akka.Configuration.Config object, which contains the object model for the HOCON string.
Code Listing 85: HOCON configuration file loader class
public static class HoconLoader { public static Config FromFile(string path) { var hoconContent = System.IO.File.ReadAllText(path); return ConfigurationFactory.ParseString(hoconContent); } } |
Akka.NET server
External references
The server is probably the simplest of the three projects, as it only hosts the ActorSystem.
We will start by adding the references to Akka and Akka.Remote from NuGet.
Code Listing 90: Installing NuGet packages required for Akka remoting
PM> Install-Package Akka PM> Install-Package Akka.Remote |
In addition to this, we reference the already-created Akka.Net.Succinctly.Common project.
Configure remoting
The next step is to configure Akka to allow remote connections. In order to do this, we will create a new file in the console application and call it akka.net.hocon, where we place the necessary HOCON configuration for the remoting.
Do not forget to set the properties for this file in Visual Studio as:
- Build action = “Content”
- Copy to Output directory = “Copy always”
Code Listing 86: Content of the akka.net.hocon (server) config file
akka { actor { provider = "Akka.Remote.RemoteActorRefProvider, Akka.Remote" } remote { dot-netty.tcp { port = 8888 # bound to a specific port hostname = localhost } } } |
Notice that we have to specify the actor -> provider settings to Akka.Remote.RemoteActorRefProvider. This provider enables the actors to be deployed and instantiated remotely.
The next section to be configured is remote. Here we have to define the protocol supported for accessing this server application, the port, and the hostname. Dot-netty.tcp is the library that supports the remoting channel on the TCP protocol and the creating of sockets, in effect enabling the communication between the two actor systems. If you’d like to know a bit more about DotNetty, visit the official website.
Port = 8888 defines the port at which the server will be responding. Being a server, this port has to be well known, and the client calling the server has to be aware of it.
Server’s entry point
We are now ready to start the ActorSystem and inject the configuration previously defined.
The entry point for the Server application simply loads the content of the akka.net.hocon file and injects the configuration settings into the ActorSystem at the time of the creation (Create method).
Code Listing 87: Server’s main function definition
static void Main(string[] args) { var hocon = HoconLoader.FromFile("akka.net.hocon"); ActorSystem system = ActorSystem.Create("server-system", hocon); Console.WriteLine("Server started"); Console.Read(); system.Terminate().Wait(); } |
Now we can run the Server (start the server application by pressing F5). As we can see in Figure 50, the application now listens to Port 8888, just as we have configured it.
Another important thing to notice is that the full path to the actor system is mentioned, which is akka.tcp://server-system@localhost:8888. This is very important because the client will need to know the full address as defined by the server.

Figure 50: Server is running, allowing remote connections
Akka.NET client
We have already mentioned that the client is our ASP.NET Core application, which we also have to configure to allow remoting.
External references
As we did for the Server, we need to reference the Akka and Akka.Remote libraries from NuGet.
Code Listing 93
PM> Install-Package Akka PM> Install-Package Akka.Remote |
And in addition to this, reference the already-created Akka.Net.Succinctly.Common project.
Configure remoting
The next step is to configure Akka to allow remote connections. In order to do this, we will add a file to the project and call it akka.net.hocon. As we did for the Server, this file will contain the configuration of the client ActorSystem.
In Visual Studio, do not forget to set the properties for this file as:
- Build action = “Content”
- Copy to Output directory = “Copy always”
Code Listing 88: Content of the akka.net.hocon (client) config file
akka { actor { provider = "Akka.Remote.RemoteActorRefProvider, Akka.Remote" deployment { /calculator { remote = "akka.tcp://server-system@localhost:8888" } } } remote { dot-netty.tcp { port = 0 # bound to a dynamic port assigned by the OS hostname = localhost } } } |
The actor provider part looks exactly the same as when we configured the server by setting the RemoteActorRefProvider as actor provider.
The interesting part is the fact that we have to configure the deployment section. In the deployment section, we can place the configuration per actor (name) and define where remotely we would like to run this actor. So, /calculator is the name of the actor (no need to specify /user before it), and we are instructing Akka to instantiate this actor on a remote system defined by the path. We can also specify multiple actors to point to multiple servers.
Code Listing 89: Specifying more than one actor in deployment section
actor { provider = "Akka.Remote.RemoteActorRefProvider, Akka.Remote" deployment { /calculator { remote = "akka.tcp://server-system@localhost:8888" } /actorXXX{ remote = "akka.tcp://server-system@system2:8888" } } } |
The next section to be configured is remote. Again, as we did for the Server, we are configuring dot-netty.tcp as the transport protocol, with the difference of the Port. We don’t have to specify the port for the client, since the port will be automatically assigned by Akka and transmitted to Server so that Server knows where to answer back. So, port = 0 means dynamic address.
Client’s entry point
In respect to the previous solution, as defined in Chapter 13, we don’t have to make any changes to the CalculatorController, CalculatorActorInstance, and ICalculatorActorInstance definitions. Since we now have the CalculatorActor in the Common library, the only part that will change is the using section in the previously mentioned classes.
The only part that really changes—and this is the beauty of this solution—is the configuration of the actor system. We need to change the ConfigureServices method in the Startup class so that it includes the reading of the HOCON configuration, and inject that into the ActorSystem creation method.
The changed parts are highlighted in bold.
Code Listing 90: Configuration of the client—Injecting HOCON config into the ActorSystem
public void ConfigureServices(IServiceCollection services) { var hocon = HoconLoader.FromFile("akka.net.hocon"); var actorSystem = ActorSystem.Create("calculator-actor-system", hocon);
services.AddSingleton(typeof(ActorSystem), (serviceProvider) => actorSystem); services.AddSingleton(typeof(ICalculatorActorInstance), typeof(CalculatorActorInstance)); services.AddMvc(); } |
Before running the application, we have to Visual Studio up so that it starts the server before starting the client project. To do so, right-click on the solution name, and choose Properties. As shown in Figure 51, we select the Multiple startup projects option and set Akka.Net.Succintly.Core.Server and Akka.Net.Succinctly.Core.WebApi to Start.
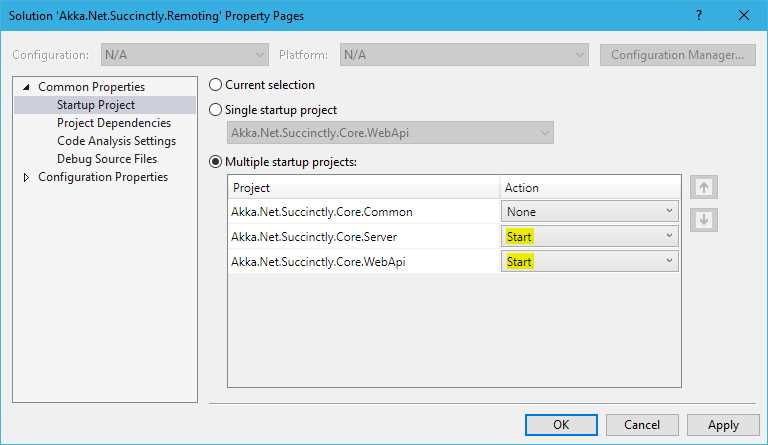
Figure 51: Setting up multiple starting projects
Now we are ready to run the application—press F5 in Visual Studio. The server and the browser will open, and we will be ready to query our Calculator controller.
By placing the console application (server) and the browser (client) side by side, we can see that every time we query the browser, the console will show an entry. This is evidence that communication between the two systems is working properly.
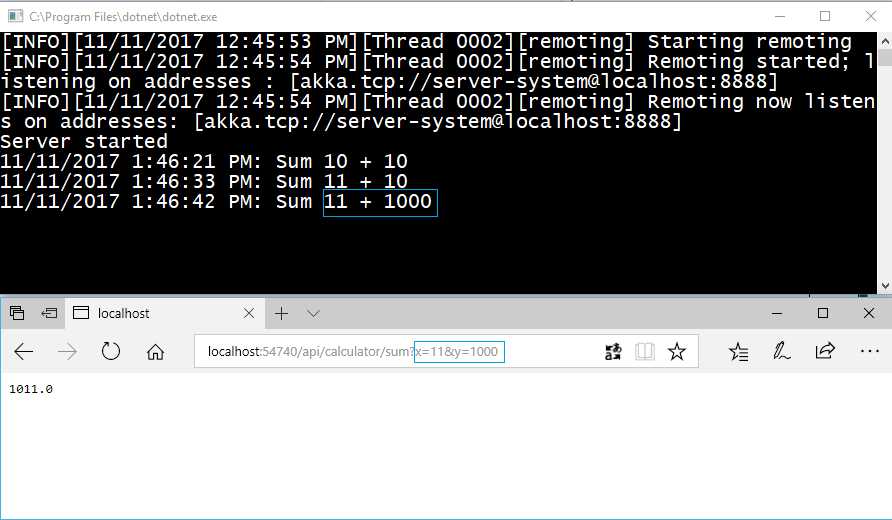
Figure 52: Communication between the client and the server
Final Words
In this book, which was a great challenge for me, we have touched upon some of the most important aspects of the Akka.NET framework:
- Introduction to the actor model.
- Working with actors.
- Testing actors.
- Remoting actors and applying different strategies for routing.
Unfortunately, the format of this book didn’t allow me to talk about Akka.NET persistence, Akka.NET clustering, and Akka.NET streams, which are some more advanced topics that would enable the creation of real enterprise-scale applications, fully scalable and persisted. That said, with the baseline provided in this book, you can learn those topics without big issues, since they are based on the same concepts we have already seen.
As with other books in the Syncfusion Succinctly series, what is mentioned in this book should give you a good starting point not only for designing an application, but also to start exploring more advanced options on your own.
Thank you for reading this book—I hope I’ve managed to fulfill the expectations you might have had when you started it. It certainly helped me to clear up some ideas of my own about the framework: I learned a lot about this fantastic framework during this journey.
- 1800+ high-performance UI components.
- Includes popular controls such as Grid, Chart, Scheduler, and more.
- 24x5 unlimited support by developers.