
Akka.NET Succinctly®

CHAPTER 13
Actors in ASP.NET Core
The integration of Akka.NET with an ASP.NET Core application is relatively simple. As you might expect, ASP.NET Core is needed to expose an HTTP endpoint to the actor system, and we then can place all of the business logic inside actors, as we have seen in various examples.
Since ASP.NET Core is a relatively new framework built to run on multiple platforms, it’s a perfect fit for our example, as we are going to demonstrate that it’s possible to use Akka.NET in a .NET Core application.
Our application won’t be too difficult, but good enough to demonstrate the integration between the two frameworks. We are going to reuse one of the actors we already created, the CalculatorActor, and expose the addition as a RESTful service.
We won’t be going into the details of ASP.NET Core, as the expectation is that you already know the basics.
Visual Studio project creation
Let’s start by opening Visual Studio 2017 and adding a new project of type: .NET Core -> ASP.NET Core Web Application. You may call the project whatever you like, but in my case, this is Akka.Net.Succinctly.Core.WebApi.

Figure 41: Add a new .NET Core project
The next step is to choose which kind of .NET Core application we want to create. In our case, this is Web API. We will also choose .NET Core and ASP.NET Core 2.0 as the running framework.
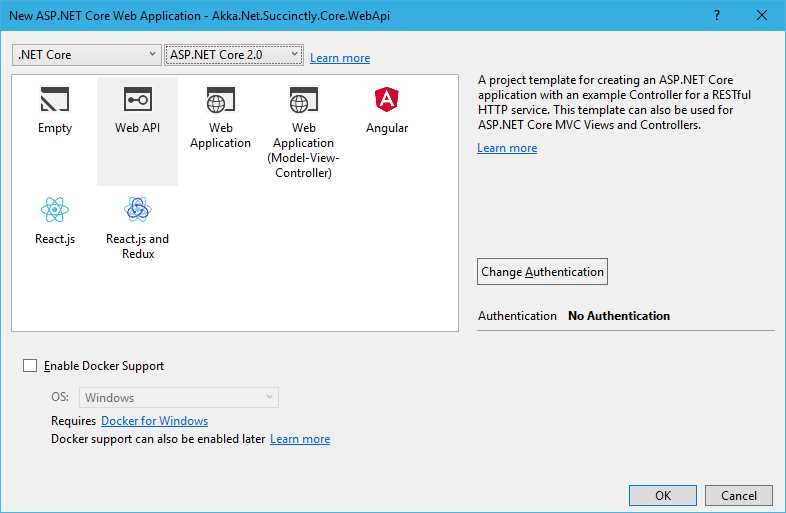
Figure 42: Choosing the right .NET Core project
First, we should reference Akka.NET from NuGet. So, let’s run the following command in the Package Manager Console:
Code Listing 76: Installing Akka.NET in ASP.NET Core project
PM> Install-Package Akka |
The Package Manager Console should look similar to the following:
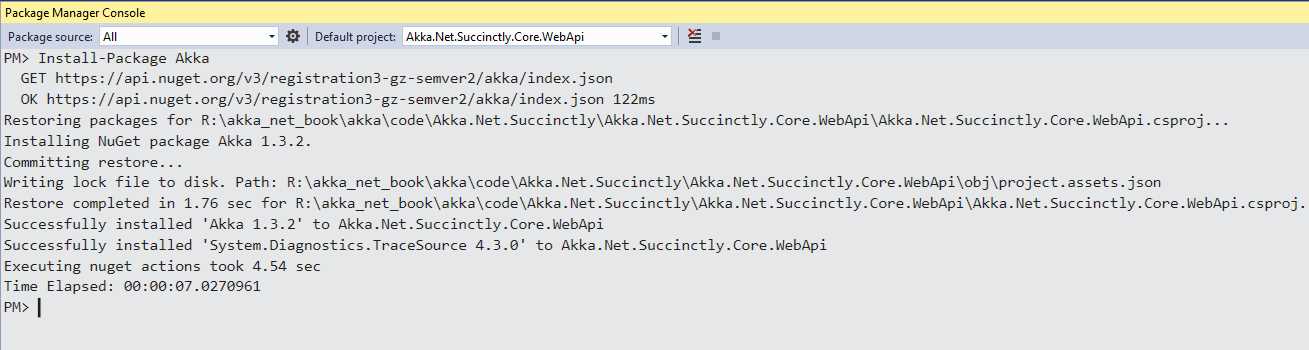
Figure 43: Package Manager: Installing Akka.NET
Now the project should be properly set up and ready to be changed!
Actor definition
Let’s remind ourselves of what our actor looks like. The actor receives the AddMessage, and it sends back to the Sender the AnswerMessage, which is the result of the calculation.
Code Listing 80: CalculatorActor definition
public class CalculatorActor : ReceiveActor { public CalculatorActor() { Receive<AddMessage>(add => { Sender.Tell(new AnswerMessage(add.Term1 + add.Term2)); }); } } public class AddMessage { public AddMessage(double term1, double term2) { Term1 = term1; Term2 = term2; } public double Term1; public double Term2; } public class AnswerMessage { public AnswerMessage(double value) { Value = value; } public double Value; } |
ActorSystem integration
First, we need to find a place to instantiate the ActorSystem. We know that the creation of the ActorSystem is not cheap in terms of time and resource usage, so we want to do it only once, and reuse it throughout the whole application.
In order to do this, we can use the Startup.cs, which is an integral part of the ASP.NET Core template, and has already been created for us.
We will register the ActorSystem with the Service collection. The Startup class contains the ConfigureService method. After creating an instance of the ActorSystem, we will add it to the list of services, but as a singleton (AddSingleton method).
The statement (serviceProvider) => actorSystem means that every time the instance is requested, the actorSystem instance that we already created will be used.
Code Listing 77: Registering the ActorSystem in the service collection
public class Startup { public void ConfigureServices(IServiceCollection services) { var actorSystem = ActorSystem.Create("calculator-actor-system"); services.AddSingleton(typeof(ActorSystem), (serviceProvider) => actorSystem); /* the rest of configuration */ } } |
Controller definition
We are going to create a new controller called CalculatorController. CalculatorController only has one method, called Sum, which can be accessed by using the GET HTTP method. The Sum method has two parameters, x and y, which correspond to the two numbers we would like to sum up. The content of the Sum method is already familiar. We instantiate the CalculatorActor, construct the AddMessage, and Ask the actor to return the result of type AnswerMessage.
As we have registered the ActorSystem as part of services, we can now inject it to the controller via a constructor.
Code Listing 78: CalculatorController definition
[Route("api/[controller]")] public class CalculatorController : Controller { private ActorSystem _actorSystem; public CalculatorController(ActorSystem actorSystem) { _actorSystem = actorSystem; } [HttpGet("sum")] public async Task<double> Sum(double x, double y) { var calculatorActorProps = Props.Create<CalculatorActor>(); var calculatorRef = _actorSystem.ActorOf(calculatorActorProps); AddMessage addMessage = new AddMessage(x, y); AnswerMessage answer = await calculatorRef.Ask<AnswerMessage>(addMessage); return answer.Value; } } |
When running the application in the browser (by pressing F5 in Visual Studio), we can now navigate to the <host>:<port>/api/calculator/sum?x=1&y=2 page to see if the method returns the correct answer. As we can see in Figure 44, the correct answer is returned.

Figure 44: Invoking the Sum method via browser
One thing to pay attention to is the following: In the previous example, we are creating a new actor instance every time the Sum method is called, which is not that great, as it will consume memory, and those actors will be simply hanging around.
One workaround would be to try to get the instance of the actor via ActorSelection, but this also might lead to issues in a highly concurrent environment. A naïve implementation using ActorSelection would be:
Code Listing 79: Definition of the Sum method
[HttpGet("sum")] public async Task<double> Sum(double x, double y) { IActorRef calculatorRef; try { calculatorRef = await _actorSystem.ActorSelection("/user/calculator") .ResolveOne(TimeSpan.FromMilliseconds(100)); } catch (ActorNotFoundException exc) { var calculatorActorProps = Props.Create<CalculatorActor>(); calculatorRef = _actorSystem.ActorOf(calculatorActorProps,"calculator"); } AddMessage addMessage = new AddMessage(x, y); AnswerMessage answer = await calculatorRef.Ask<AnswerMessage>(addMessage); return answer.Value; } |
In this example, we are trying to get an instance of the actor via ActorSelection by specifying the path, and if not found, we would create one and carry on. But, as I mentioned, there is a possibility that two concurrent ASP.NET Core threads will attempt to perform the actor selection at the same time, and to create an instance of the new calculator, which then would lead to errors. So, even though the version in Code Listing 83 would work, there is a potential risk that it would fail.
If we want to have only one actor serving all the requests, a better implementation would be the following:
Code Listing 80: CalculatorActor wrapper
public interface ICalculatorActorInstance { Task<AnswerMessage> Sum(AddMessage message); } public class CalculatorActorInstance : ICalculatorActorInstance { private IActorRef _actor; public CalculatorActorInstance(ActorSystem actorSystem) { _actor = actorSystem.ActorOf(Props.Create<CalculatorActor>(), "calculator"); } public async Task<AnswerMessage> Sum(AddMessage message) { return await _actor.Ask<AnswerMessage>(message); } } |
We will create a wrapper class around the actor itself. The logic stays the same as we had it previously in the controller. This new class will be registered in the ASP.NET Core services list as a singleton item, as follows:
Code Listing 81: Registering the ICalculatorActorInstance as singleton
public class Startup { public void ConfigureServices(IServiceCollection services) { var actorSystem = ActorSystem.Create("calculator-actor-system"); services.AddSingleton(typeof(ActorSystem), (serviceProvider) => actorSystem); services.AddSingleton(typeof(ICalculatorActorInstance), typeof(CalculatorActorInstance)); /* the rest of configuration */ } } |
Now we need to change the controller in order to inject the actor itself, rather than the ActorSystem.
The new version of the controller is much simpler, and it contains less code.
Code Listing 82: Injecting ICalculatorActorInstance
[Route("api/[controller]")] public class CalculatorController : Controller { private readonly ICalculatorActorInstance CalculatorActor; public CalculatorController(ICalculatorActorInstance calculatorActor) { CalculatorActor = calculatorActor; } [HttpGet("sum")] public async Task<double> Sum(double x, double y) { var answer = await CalculatorActor.Sum(new AddMessage(x, y)); return answer.Value; } } |
Now we are pretty certain that there will be only one actor serving the requests. This will also allow us to better control the number of actor instances. We can choose to create not one instance of the CalculatorActor within the ICalculatorActorInstance implementation, but many, and have a pool of actors to serve the Sum method.
- 80+ high-performance ASP.NET Core controls, including DataGrid, Charts, and Scheduler.
- Lightweight and responsive.
- Modular and touch-friendly.
- Built-in themes.