- Home
- Forum
- LightSwitch HTML
- CheckBox & Radio Button widget is missing ?
CheckBox & Radio Button widget is missing ?
Hi Nurkmez,
Thanks for using Syncfusion products.
We would like to let you know that, we have included the controls which are suitable for Essential studio LightSwitch HTML application. Also we can create CheckBox and RadioButton widgets by adding Custom Control in the LightSwitch application.
Follow the below steps to add the Custom Control in LightSwitch application.
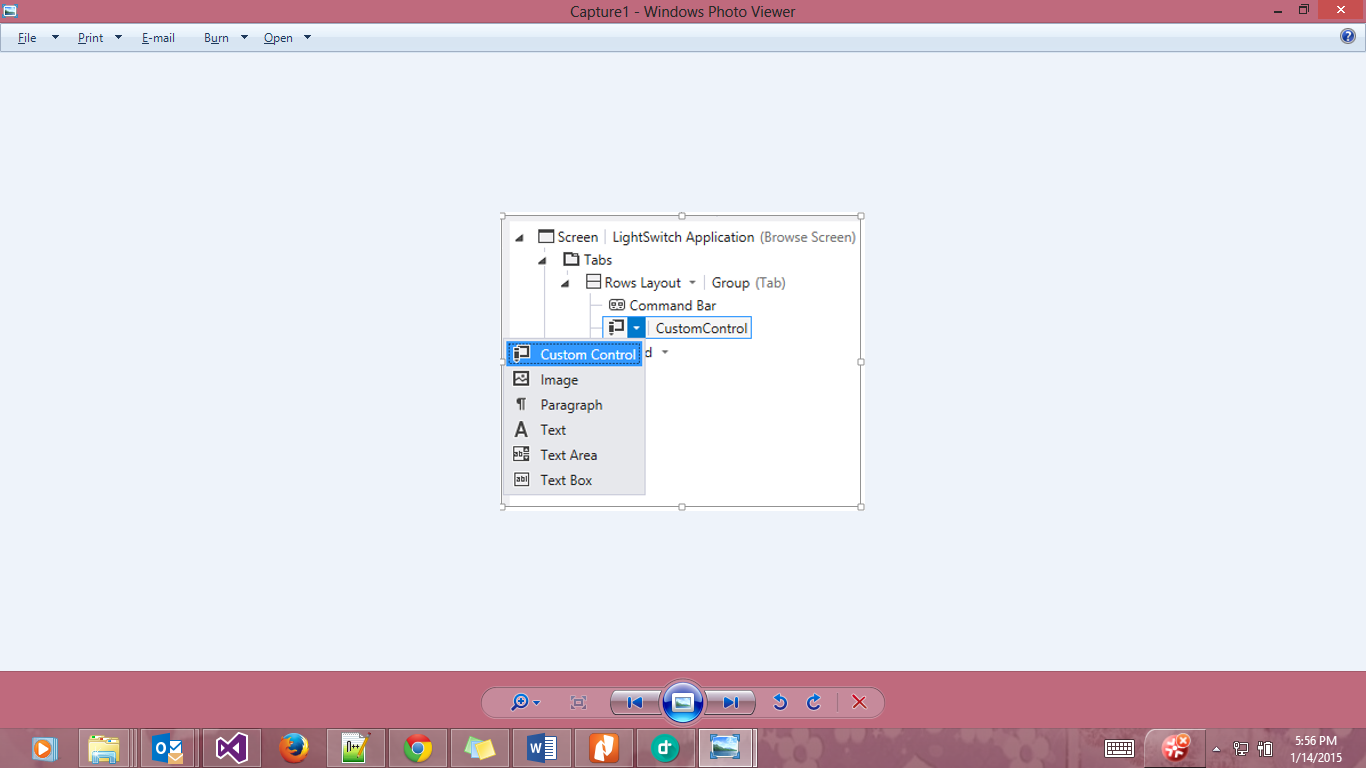
Step 1: Select the CustomControl property in the designer and change its control type as Custom Control as shown below.
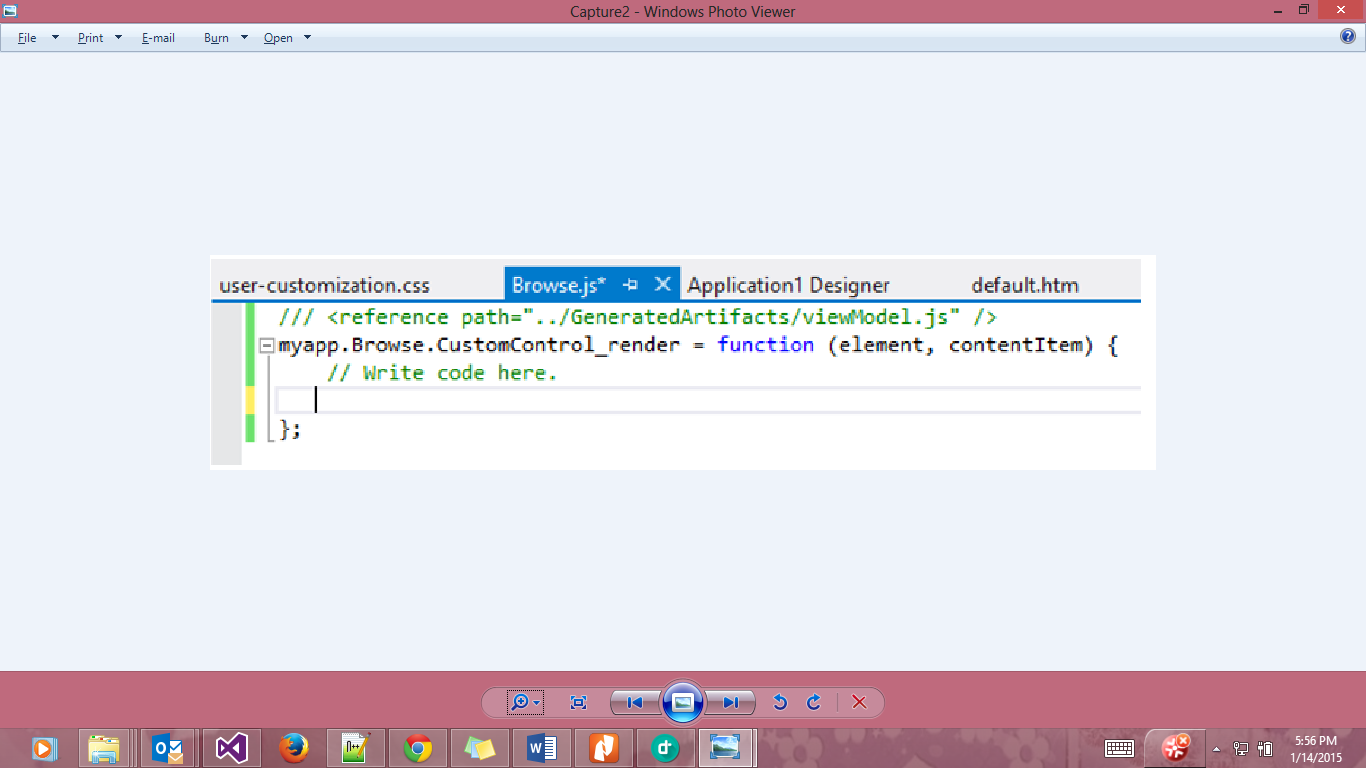
Step 2: Then click on the Edit Render Code which is in the properties panel. This will open Browser.js file like the following image.
Step 3: In this file add our widgets as shown in the following code snippet.
| [Browse.js] myapp.Browse.ScreenContent_render = function (element, contentItem) { // Write code here. var itemRadio = $("<input type='radio'id='radio' data-role='none'/>"); itemRadio.appendTo($(element)); var item1 = $("<label id='radiolabel' for='radio' data-role='none'> Radiobutton </label>"); item1.appendTo($(element)); var itemTemplate = $("<input type='checkbox'id='check' data-role='none'/>"); itemTemplate.appendTo($(element)); var item = $("<label id='checklabel' for='check' data-role='none'> Checkbox </label>"); item.appendTo($(element)); itemTemplate.ejCheckBox(); itemRadio.ejRadioButton(); }; |
For your convenience we have prepared the sample based on your requirement, and the same can be downloaded from the following location.
Sample Location: Sample
Please let us know if you have further concern.
Regards,
Saranya.S
Hi Nurkmez,
Thanks for using Syncfusion products.
We would like to let you know that, we have included the controls which are suitable for Essential studio LightSwitch HTML application. Also we can create CheckBox and RadioButton widgets by adding Custom Control in the LightSwitch application.
Follow the below steps to add the Custom Control in LightSwitch application.
Step 1: Select the CustomControl property in the designer and change its control type as Custom Control as shown below.
Step 2: Then click on the Edit Render Code which is in the properties panel. This will open Browser.js file like the following image.
Step 3: In this file add our widgets as shown in the following code snippet.
| [Browse.js] myapp.Browse.ScreenContent_render = function (element, contentItem) { // Write code here.
var itemRadio = $("<input type='radio'id='radio' data-role='none'/>");
itemRadio.appendTo($(element));
var item1 = $("<label id='radiolabel' for='radio' data-role='none'> Radiobutton </label>");
item1.appendTo($(element)); var itemTemplate = $("<input type='checkbox'id='check' data-role='none'/>");
itemTemplate.appendTo($(element));
var item = $("<label id='checklabel' for='check' data-role='none'> Checkbox </label>");
item.appendTo($(element)); itemTemplate.ejCheckBox(); itemRadio.ejRadioButton(); }; |
For your convenience we have prepared the sample based on your requirement, and the same can be downloaded from the following location.
Sample Location: Sample
Please let us know if you have further concern.
Regards,
Kasithangam
Hi Nurkmez,
Thanks for your update.
Please let us know if you have further queries.
Regards,
Saranya.S
Thanks for the update,
We can enable tri state in checkbox control using enableTriState property. In this state, we can get the checked state of the checkbox using “checkState” property. In this checkState property we have some issues in 13.2.0.29 version when we enable the tri state. Now we have fixed this issue internally. Please get the updated source file from below location
Script file
Please refer the below code snippet to enable the tri state in check box.
myapp.AddEditpassengerItem.Seniorcitizen_render = function (element, contentItem) { // Write code here. var itemTemplate = $("<input type='checkbox'id='check' data-role='none'/>"); itemTemplate.appendTo($(element)); itemTemplate.ejCheckBox({ enableTriState:true, change: function (args) { contentItem.value = args.isChecked; } }); |
To know more about available properties please refer the below link
https://help.syncfusion.com/js/overview
To know about API configuration to our JS controls Please refer the below link
https://help.syncfusion.com/js/api-configuration
Also, we have logged an issue in change event’s isChecked argument (isChecked return true for intermediate state also instead of returns the null) in our database. A new support incident (142433) to track the status of this issue has been created under your account. Please follow incident for further queries related to this feature.
Please let us know if you have further queries,
Regards,
Sasikala Nagarajan
- 6 Replies
- 5 Participants
-
NU Nurkmez
- Jan 13, 2015 01:26 PM UTC
- Aug 7, 2015 07:02 PM UTC
