
Visual Studio 2017 Succinctly®

CHAPTER 8
Visual Studio 2017 for Mobile Development
Enabling developers to build apps for any platform and any device is a major goal of Visual Studio 2017. This certainly includes mobile app development. With the 2016 Microsoft acquisition of Xamarin, and with improvements to the Universal Windows Platform and to the tools for Apache Cordova, Microsoft makes Visual Studio 2017 the ultimate development environment for building apps that run on Android, iOS, and Windows with shared codebases. This chapter is not intended to be a guide to mobile development with Visual Studio 2017, rather it will highlight what’s new in the most popular tools for cross-platform development with Microsoft’s IDE. Links to the documentation for each tool are provided where appropriate.
Visual Studio 2017 and the Universal Windows Platform
Tip: Documentation to get started with Universal Windows Platform is available at developer.microsoft.com/en-us/windows/apps/getstarted.
Note: Building Universal Windows apps requires selecting the Universal Windows Platform development workload in the Visual Studio Installer.
The Universal Windows Platform (UWP) offers an incredibly rich set of APIs for building apps that run on Windows 10 and on equipment such as PCs, tablets, smartphones, Xbox, HoloLens, and Internet of Things (IoT) devices. In most cases, you code once and your UWP app will run on all the aforementioned devices; in some cases, you will need to make adjustments for specific SDKs.
In March 2016, Microsoft announced the Anniversary Update for Windows 10, a major update delivered in July 2016 that added new features and improvements to the operating system and included some goodies for developers via the Windows 10 Anniversary Update SDK. The latter is already included in Visual Studio 2017 through the UWP development workload. The SDK contains integrated tools for development with Visual Studio 2017 and emulators that support the Anniversary Update. You can still choose the target version and minimum version for your UWP apps when creating a new project. For example, select File > New > Project, then select the Blank App (Universal Windows) project template in the Windows Universal folder of the C# and VB languages. Before generating the solution, Visual Studio will ask you to specify the target and minimum versions with the dialog shown in Figure 73.

Figure 73: Selecting Target and Minimum Versions for UWP Apps
In most cases, leaving the default selection is the best choice. When you click OK, Visual Studio generates a solution that supports the specified Windows 10 versions. Do not delete the new project—keeping it enables the new project to serve as a test environment for future topics. Along with support for the Anniversary Update, Visual Studio 2017 includes the following improvements for UWP.
Note: The Universal Windows Platform also receives all the improvements described in Chapter 4, “XAML improvements.”
Updates to .NET Native
As you might know, compiling a Universal Windows app in Release mode involves the .NET Native tool chain. Think of .NET Native as a compiler that directly produces a native image of the app instead of generating intermediate language (IL) that would need a just-in-time compilation. As a consequence, starting up a Universal Windows app is much faster than a .NET application or a Windows Phone app. With Visual Studio 2017, the .NET Native tool chain is updated with more than 600 bug fixes, runtime performance optimization, and overall improvements to the entire tool.
Note: If you have ever written a UWP app, you know that compiling in Release mode requires much more time than in Debug mode because for Release, Visual Studio 2017 invokes .NET Native. Behind the scenes, .NET Native is generating IL from your C# or VB code, then converting the IL into C++—finally producing native binaries. This is why it takes so long, but this is also why universal apps are so efficient.
Updated NuGet packages
Universal Windows apps rely on the Microsoft.NETCore.UniversalWindowsPlatform NuGet package. For full alignment with the Anniversary Update, .NET Core, and Visual Studio 2017, the aforementioned NuGet package is updated to version 5.2.2. This version mostly addresses issues reported by developers, and existing apps can be easily updated with the NuGet Package Manager tool in Visual Studio 2017.
XAML improvements for UWP
Visual Studio 2017 introduces some improvements to XAML that target only UWP. The first improvement addresses UI elements you create by using drag-and-drop from the Toolbox. Visual Studio 2017 now reduces the number of auto-generated XAML tags, which means the resulting markup is clearer and more readable. The second improvement addresses the XAML Designer—Visual Studio 2017 introduces a new button called Device Preview Settings, which can be found in the upper bar of the Designer. Double-click the MainPage.xaml file to open the XAML Designer if it is not already available. The new button is represented by a gear icon and allows for quick changes to contrast and theme settings. When you click it, the Device Preview Settings dialog appears (see Figure 74).

Figure 74: Changing Contrast and Theme Settings at Design Time
You can choose among a number of possible contrast settings and between the Light and Dark themes. This makes it easy to see how the UI of your app behaves with different settings at design time. The third improvement addresses the Properties window. You can now assign properties with basic mathematical equations that will be evaluated immediately, and the resulting value will be assigned to the selected control in XAML. Figure 75 shows an example in which the Width property of a Button control is assigned the sum of 60 + 40.

Figure 75: Basic Equations—Evaluated and Assigned to UI Elements’ Properties
In this case, the evaluation result (100) will be assigned to the Button.Width property and will be visible in the XAML code. It supports sums, subtractions, multiplications, and divisions. Why is this feature useful? Think of the Button.Width with a starting value of 60, then suppose you wish to see how the button appears by increasing the width by 40. Instead of calculating the new value in your head, you can simply write the expression 60 + 40.
Updated Manifest Designer
Probably the most important update for UWP, from the IDE perspective, addresses the Manifest Designer, which you enable by double-clicking the Package.appxmanifest file in Solution Explorer. More specifically, the Visual Assets tab now has a new feature called Asset Generator, which can automatically generate all the required assets starting from a single source image.
Note: The Visual Assets Generator in Visual Studio 2017 is only available for Visual Basic and C#. Support for C++ and JavaScript is planned for a future release.
You simply need to supply an image file then click Generate and the Asset Generator will create tiles, logos, icons, and splash screens at any or all scales to fit every type of device your app targets. Figure 76 shows how the Visual Assets tab appears in Visual Studio 2017, with a sample image supplied as the source.

Figure 76: The New Asset Generator in Visual Studio 2017
When you click Generate, Visual Studio generates all the required assets, as you can see by scrolling down the window (see Figure 77). All the generated image files will be listed in Solution Explorer. By default, the Visual Assets tab shows all the available visual assets, but you can also select a specific asset category from the list on the left.

Figure 77: The Auto-Generated Assets
Visual Studio 2017 generates assets, making sure they adhere to all the design guidelines suggested for Windows 10 apps, such as padding and background colors. This feature is extremely useful and will help you save a huge amount of time because you will no longer need to supply individual assets separately.
Tip: The Badge Logo (for lock screen notifications) and Package Logo assets must be generated individually by selecting the corresponding items in the assets list. You will still supply a single source image, and you will click the Generate button. Visual Studio will then generate the required assets according to the Windows 10 guidelines. For instance, for the Badge Logo, the generator will automatically reduce colors as appropriate.
UI Analysis tool
The Diagnostic Tools window in Visual Studio 2017 introduces a special analysis tool for UWP apps called UI Analysis. This tool analyzes an app for accessibility and performance issues while debugging. UI Analysis is not enabled by default, which means that the first time you start debugging an app in the Diagnostic Tools window, you must click Select Tools, then select the UI Analysis item (see Figure 78).

Figure 78: Enabling UI Analysis
Once enabled, UI Analysis will be available only the next time you start debugging the app, which means you must first stop the execution and then restart it. In order to understand how this feature works, let’s introduce a couple intentional issues. In the XAML markup of the MainPage.xaml file, insert the code shown in Code Listing 6 inside the default Grid.
Code Listing 6
<ListView> <ListView.ItemsPanel> <ItemsPanelTemplate> <StackPanel/> </ItemsPanelTemplate> </ListView.ItemsPanel> </ListView> |
This code has two issues: first, the ListView is not virtualized because it is using a StackPanel container instead of an ItemsStackPanel, so the ListView can have performance problems when bound to a collection of objects. Second, its Name property has not been assigned, which means there is no chance to interact with it in code. At this point, start debugging by pressing F5, then keep an eye on the Diagnostic Tools window. In the Summary tab you will see two UI Analysis Events, and if you click the Events tab, you will see the full list with details for each event (see Figure 79).
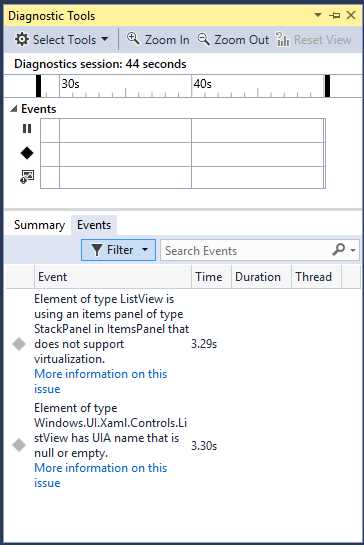
Figure 79: The List of UI Analysis Events with Details
As you can see, the list of UI Analysis events shows detailed information for each event. If you double-click an event, you will be redirected to the line of XAML code that caused the issue. You can also click the More information on this issue hyperlink to open the documentation for an issue, as shown in Figure 80.
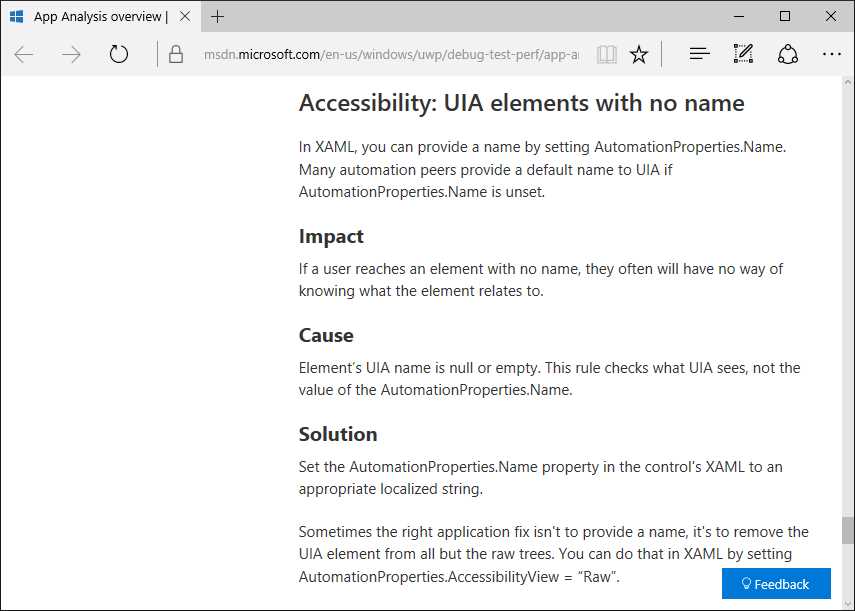
Figure 80: The Documentation of a UI Analysis Issue
The documentation also offers a page called App Analysis overview that contains the full list of issues the UI Analysis tool can detect. The UI Analysis tool is an extremely useful addition because it allows you to discover a large number of potential problems before you submit the app to the Windows Store for approval and publication.
Cross-platform development with Apache Cordova
Note: Building apps with Apache Cordova requires selecting the Mobile development with JavaScript workload in the Visual Studio Installer. Also, the Chrome browser is required for new features such as Cordova Simulate.
Apache Cordova is a development platform that allows us to create cross-platform apps for Android, iOS, and Windows using HTML and JavaScript. Visual Studio 2017, as well as its predecessor, includes the Tools for Apache Cordova (TACO) so that you can use your favorite powerful IDE to write, debug, and publish apps. Also, VS 2017 supports Ionic, a popular front-end JavaScript framework that works with Cordova. There are a number of changes and improvements in TACO for Visual Studio 2017 that enhance performance and productivity. These new additions will be demonstrated using the WeatherApp sample application included in the official Microsoft examples for Cordova. You can download these from GitHub as a .zip archive. The weather-app folder contains the solution you can open in Visual Studio 2017. Of course, you can also use any other Cordova project.
Tip: When opening any Cordova solutions built with previous versions of Visual Studio, VS 2017 needs to perform a one-time upgrade. It will ask you to reload the solution after the upgrade process.
Supported versions and platforms
In Visual Studio 2017, Tools for Apache Cordova no longer support Windows 8.1. Existing projects should be updated to target Windows 10. This release adds support for iOS 10 and Xcode 8 on the iOS development side. Finally, the minimum supported version for Cordova is 6.0.0. At the time of writing, Visual Studio 2017 ships with Cordova 6.1.3. Existing projects built with previous versions will need a one-time upgrade when the solution is opened.
In-browser simulation with Cordova Simulate
If you’ve already used Cordova, you might know it offers a number of plugins that can be thought of as libraries that provide shared APIs to access device capabilities such as GPS, sensors, battery status, and so on. Visual Studio 2017 introduces a new feature called Cordova Simulate that allows you to simulate and control the behavior of plugins on Android apps by simulating the Android environment inside the Chrome browser without installing emulators or using physical devices. As a consequence, Visual Studio 2017 can now debug JavaScript code running in Chrome. When you press F5, Visual Studio 2017 launches an instance of Chrome, attaches the debugger, and shows a new tool window called Cordova Simulate. Figure 81 shows an example based on an app that uses the Geolocation plugin.

Figure 81: Controlling Plugins with Cordova Simulate
The Cordova Simulate window not only allows you to control the in-browser Android simulation (see the Device group), but it also allows you to manage any plugins your app is using with a convenient user interface. Additionally, you can simulate specific actions by using the Fire Event button in the Events group. For instance, you can simulate pressing the hardware Back button. In Figure 81, you can see how Cordova Simulate allows for controlling the Geolocation plugin by changing the position on the map, simulating navigation. This tool window works with many other plugins—for instance, you can control the battery status or simulate sensors such as the compass. For each plugin, Cordova Simulate will show a specific group of properties that you will be able to change to simulate different situations.
Message colorization
Cordova tools produce very verbose output messages, and it is often difficult to distinguish between important messages, errors, and compilation messages. Because the latter can often end up ignored, Visual Studio 2017 introduces message colorization for relevant messages that are now shown in blue. Figure 82 shows an example based on the build output of the WeatherApp sample.

Figure 82: Message Colorization in Tools for Apache Cordova
In-product acquisition of development tools
In Visual Studio 2017, selecting the Mobile development with JavaScript workload does not automatically include build tools for Android and Windows, which are now optional. This makes sense for two reasons: the product installation is faster, and now you have the choice of installing the tools you actually need according to how development continues. Though you can still select the build tools as individual components in the Visual Studio Installer, you can also take advantage of a new feature called In-product acquisition. In the drop-down near the Start button on the toolbar, you will find a new option labeled Install build tools referring to the current platform. Figure 83 shows an example based on Android.
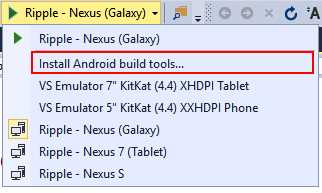
Figure 83: Installing the Required Tools at Build Time
This option allows you to install specific build tools only when and if you need them.
Tip: In-product acquisition is not specific to Cordova. In fact, the IDE can generally suggest SDKs and tools based on languages and platforms you are working with.
Cross-platform development with Xamarin
Note: Building apps with Xamarin requires selecting the Mobile development with C# and .NET workload in the Visual Studio Installer. Note that Xamarin development is not available for Visual Basic.
Xamarin is the name of both a company and a very popular development platform that allows building native iOS, Android, and Windows apps via writing and sharing C# code. Microsoft recently acquired Xamarin and is making significant investments in order to increase productivity with the Xamarin tools for Visual Studio. As with other platforms, my goal here is not to describe what you can do with Xamarin. Instead, you will find a thorough explanation of what’s new with Xamarin tools in Visual Studio 2017. If you need a place to get started, you can visit the official developer portal, which includes all the resources you need for both Visual Studio and Xamarin Studio. The first important update is that Visual Studio 2017 supports Xamarin 4.3, which significantly improves the XAML editing experience in Xamarin.Forms and introduces the features detailed in the sections that follow.
Tip: Features described in this section are offered by version 4.3 of the Xamarin tools for Visual Studio, and they are not exclusive to Visual Studio 2017. This means they will also be available for previous versions (such as Visual Studio 2015 Update 3 and Visual Studio 2013 Update 2) if you upgrade the Xamarin tools. At the time of writing, Xamarin 4.3 is available as a preview release through the Alpha Updater Channel.
Automatic fix for missing Android dependencies
When you create a Xamarin project, some components required by the Android platform might not be detected. If this happens, the Error List window shows an error message describing which components are missing (typically JavaScript dependencies). In Visual Studio 2015, you were required to download these components and extract them manually into the proper locations. In Visual Studio 2017, the Error List window offers to download and install the missing components by double-clicking the error message. At this point, the IDE will download and install the required components in the appropriate way. Note that this might take a few minutes.
Updates to project templates
Xamarin 4.3 brings updated project templates to Visual Studio 2017. You can easily see this new feature when you select File > New Project. In the New Project dialog, select Visual C# > Cross-Platform. As you can see in Figure 84, the New Project dialog now shows only three templates.

Figure 84: Updated Project Templates for Xamarin
The Class Library and UI Test App templates are taken from past versions, while the Cross Platform App template is a new addition. If you double-click this template, you will access the New Cross Platform App dialog (see Figure 85).
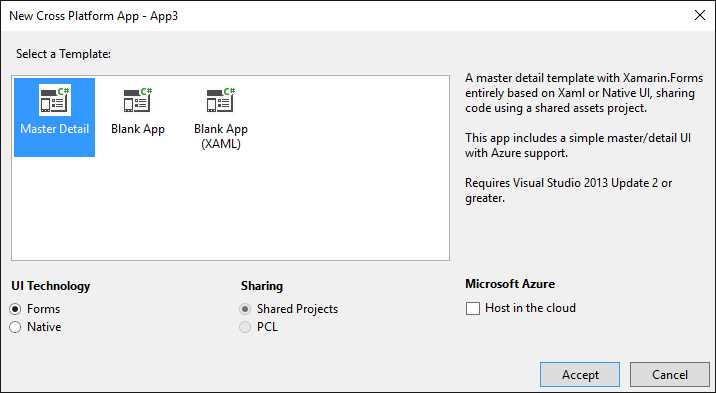
Figure 85: The New Dialog for Creating Xamarin Projects
Here you have three templates:
- Master Detail, which generates a master–detail user interface with either XAML (Xamarin.Forms) or native UI. It’s based on shared projects and is ready to be hosted on Microsoft Azure.
- Blank App, which allows for generating a blank project based on either Xamarin.Forms or native APIs. You can choose between a Portable Class Library (PCL) and Shared Projects to share your C# code across platforms.
- Blank App (XAML). This is the project template you want to use for Xamarin.Forms development using XAML for the user interface (see Figure 86). You can choose between PCL and Shared Projects, but in most cases you will use the PCL option.

Figure 86: Creating a Project Based on Xamarin.Forms and XAML
Note: Microsoft has invested heavily in .NET Standard libraries, which share the same APIs across a number of platforms. It is no secret that Xamarin should provide fully integrated support for .NET Standard in the future, so keep in mind that the PCL support might be replaced by .NET Standard in the future. This blog post from Xamarin provides more information on this topic.
When you have made your choice, click Accept and wait for Visual Studio 2017 to generate your solution. In addition to cross-platform templates, Xamarin 4.3 introduces new project templates for native iOS development that you can find in the iOS and tvOS nodes of the New Project dialog, under Visual C#. There are new templates for the Apple Watch, Apple TV, and iOS extensions.
Unified .plist editor for iOS
Note: This section assumes you are somewhat familiar with iOS development with Xamarin.
In iOS development, you supply app metadata, assets, capabilities, and requirements with .plist files such as info.plist and entitlements.plist. In Visual Studio, most of these settings can be provided through the project Properties window, then the IDE will bundle the specified information into the proper .plist files. In addition to the Properties window, the Xamarin tools for Visual Studio have always offered built-in, specific editors for .plist files that allow fine tuning settings with a convenient user interface. Xamarin 4.3 integrates a new hierarchical, unified editor that provides better organization of all the information and allows for working with all .plist files in one place. Assuming you have either a Xamarin.Forms or a Xamarin.iOS project opened in Visual Studio 2017, double-click the info.plist file in Solution Explorer to call up the new editor. Figure 87 shows how it will appear.

Figure 87: The New .plist Editor for iOS in Xamarin 4.3
As you can see, the new editor provides a unified view of your app settings and allows for making edits quickly. You can easily add custom settings by clicking the + icon at the bottom of each group. You can also filter the list using the drop-down at the top—the filter options are iOS InfoPList (full view), iOS Entitlements (only entitlements information), and iOS Settings Bundle (only information related to bundle signing). Notice that this editor works with any .plist file, so if you double-click entitlements.plist in Solution Explorer, you will get the same editor but the view will be restricted to entitlements. If you want to change the view, just change the selected item in the drop-down.
Chapter summary
Mobile development is crucial for Microsoft’s strategies, and Visual Studio 2017 introduces important improvements to the development experience for any supported platform. For the Universal Windows Platform, you have a faster .NET Native compiler, updated NuGet packages, better design-time and diagnostic tools, and an updated Manifest Designer that automatically generates assets from a single image file. Regarding Tools for Apache Cordova (TACO), Visual Studio 2017 allows for simulating the Android environment inside the Chrome browser, which is useful for debugging apps that use plugins. The IDE also provides message colorization and in-product acquisition so that you can install the required tools only when and if you need them. For Xamarin, you get updated project templates and an enhanced XAML editing experience, a new editor for .plist files in iOS, plus many fixes in all platform-specific projects.
- 1800+ high-performance UI components.
- Includes popular controls such as Grid, Chart, Scheduler, and more.
- 24x5 unlimited support by developers.