
Flutter Succinctly®

CHAPTER 1
Setup
Project overview
The application that we’ll be building throughout this book is one that we can use to keep track of important personal documents that have an expiration date, such as passports, driver’s licenses, or credit cards.
This type of application is handy to have so we know when we need to renew these important documents before they expire. If you have read my other book, Electron Succinctly, this is the same application concept we explored back then.
Using the Dart programming language with Flutter, we will take our application one step further—we’ll also explore how to use a local SQLite database.
Awesome—let’s get our engines ready so we can start setting up our development environment straight away.
Installation
The Flutter setup is incredibly easy, with all the installation steps well documented within the official Flutter documentation site.
I’ll be using Windows 10, so I’ll be describing setup steps and information related to this operating system; however, there are also easy-to-follow setup guidelines for both macOS and Linux.
On Windows, there are some essential system requirements that need to be in place, which include having PowerShell 5.0 (or later) and Git for Windows 2.X (or later) installed.
Even though you can write Flutter apps in any editor of your choice—personally, I’m a big fan of Visual Studio Code—Flutter relies on a full installation of Android Studio to supply its Android platform dependencies. You’ll also need to set up an Android device emulator. These steps are described in the official documentation.
With the prerequisites in place for Windows, all we need to do is download the installation bundle of the Flutter SDK—at the time of writing, it is Flutter’s 1.0.0 stable version for Windows.
Once you’ve downloaded the zip file, extract it to a desired folder within your drive, such as C:\Flutter. Don’t extract the Flutter files to C:\Program Files or C:\Program Files (x86), which require elevated or admin permissions.
Once the files are in the desired folder, locate the file Flutter_console.bat file—this is how it looks on my machine.
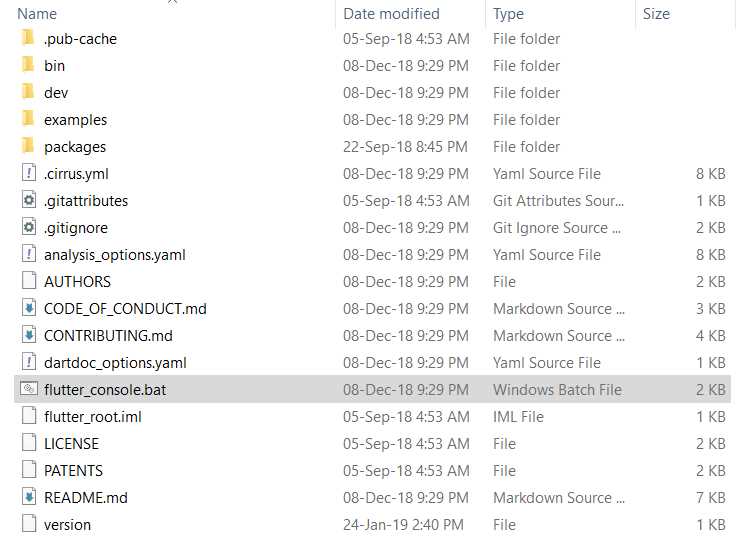
Figure 1-a: The Flutter SDK files
In principle, you are now ready to run the Flutter console by executing the Flutter_console.bat file. It’s recommended—although not strictly necessary—to add the Flutter\Bin folder to the System Path Environment variable in Windows.
If you are unsure how to add a folder to the Windows Path variable, please refer to this nice article that explains how to do it, step by step, with screenshots.
In my machine, this looks as follows.
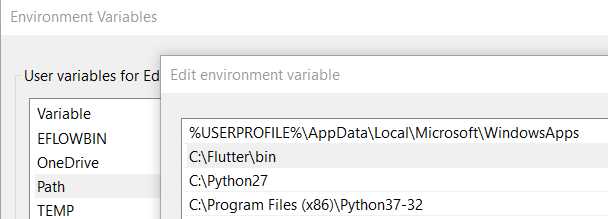
Figure 1-b: Flutter added to the Path variable in Windows
With the SDK file in place, we can now run the Flutter_console.bat file—this is what you should see.
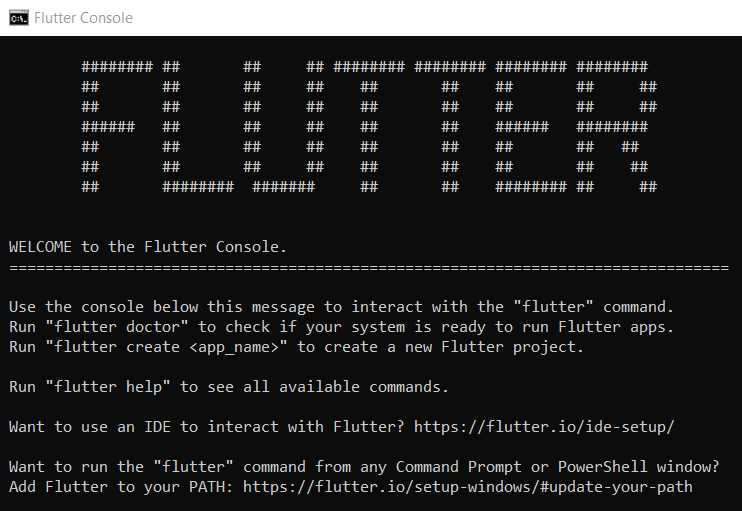
Figure 1-c: The Flutter console running
On the prompt, type the following command to check if Flutter is fully operational.
Code Listing 1-a: The “flutter doctor” command
flutter doctor |
After you execute this command, you will get a result with any issues found—in my case, because I had previously installed Android Studio and Visual Studio Code, I get the following information.
When you run the Android Studio installer, please make sure you follow the official documentation so that you end up with a successful Android Studio and SDK setup.
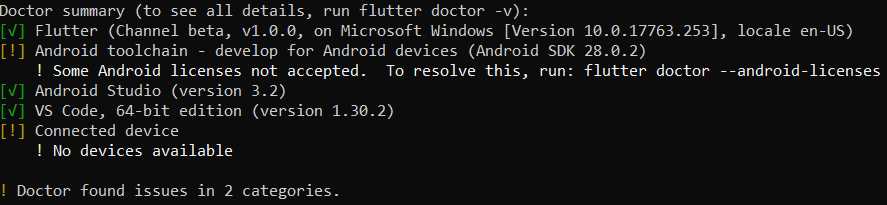
Figure 1-d: Results from running the flutter doctor command
In my case, Flutter is telling me that I need to run the flutter doctor --android-licenses command to resolve an issue with some Android licenses not being accepted.
It also highlighted that I don’t have a physical device connected, which is fine for now.
Make sure that you resolve all the conflicts highlighted by the flutter doctor command before proceeding.
Setting up an editor
Once you have completed all the installation steps, it is necessary to set up Flutter to work with your editor of choice. Although I usually use Visual Studio Code for my projects, this time I decided to use Android Studio to code our Flutter application—to me, it felt more natural, and a better fit for mobile development.
The official Flutter documentation describes how to configure Android Studio (IntelliJ) and Visual Studio Code to work with Flutter—please follow these steps.
If you will also be using Android Studio, once you have followed the steps described, you should see the Dart and Flutter plugins installed. On my machine, this looks as follows.
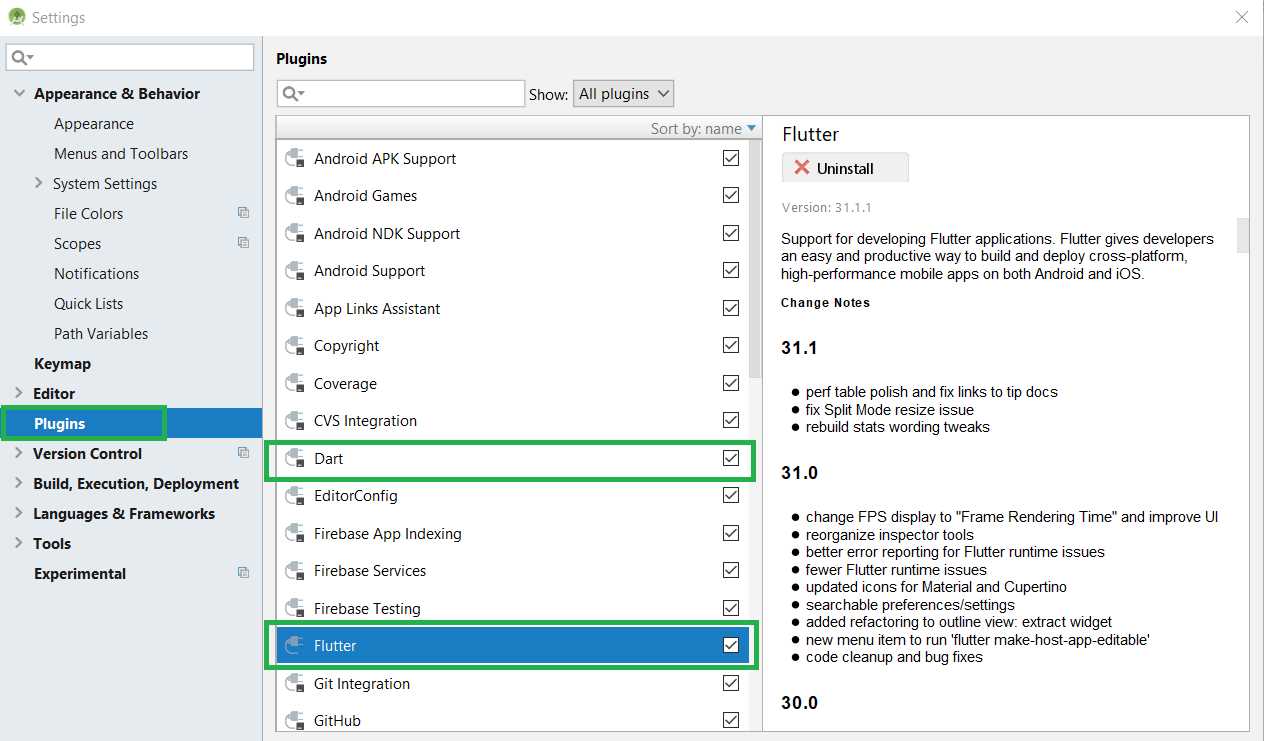
Figure 1-e: The Dart and Flutter plugins installed on Android Studio
Creating the app
Once your editor of choice has been correctly set up following the official documentation guidelines and my previous suggestions, it’s time to perform a quick test. We’ll create a demo application from one of the predefined templates, and then experience the “hot reload” mechanism after making a change to the app.
The official documentation, which covers the steps that are described and explained in this section, is worth checking.
Open Android Studio and navigate to File > New > New Flutter Project. The following screen will be displayed.
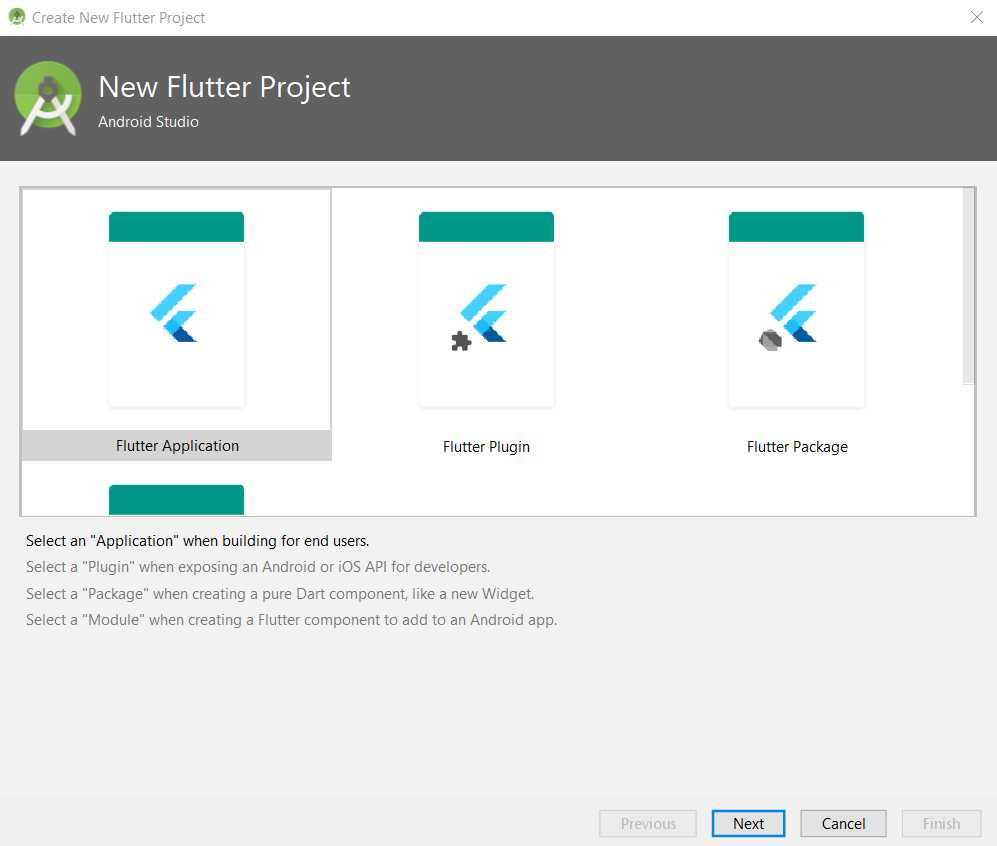
Figure 1-f: Create new Flutter project option (step 1)
Choose the Flutter Application option, and then click Next. We’ll then be presented with a screen where we can enter the Project name, Flutter SDK path, Project location, and a Description for the application—we can see this as follows.
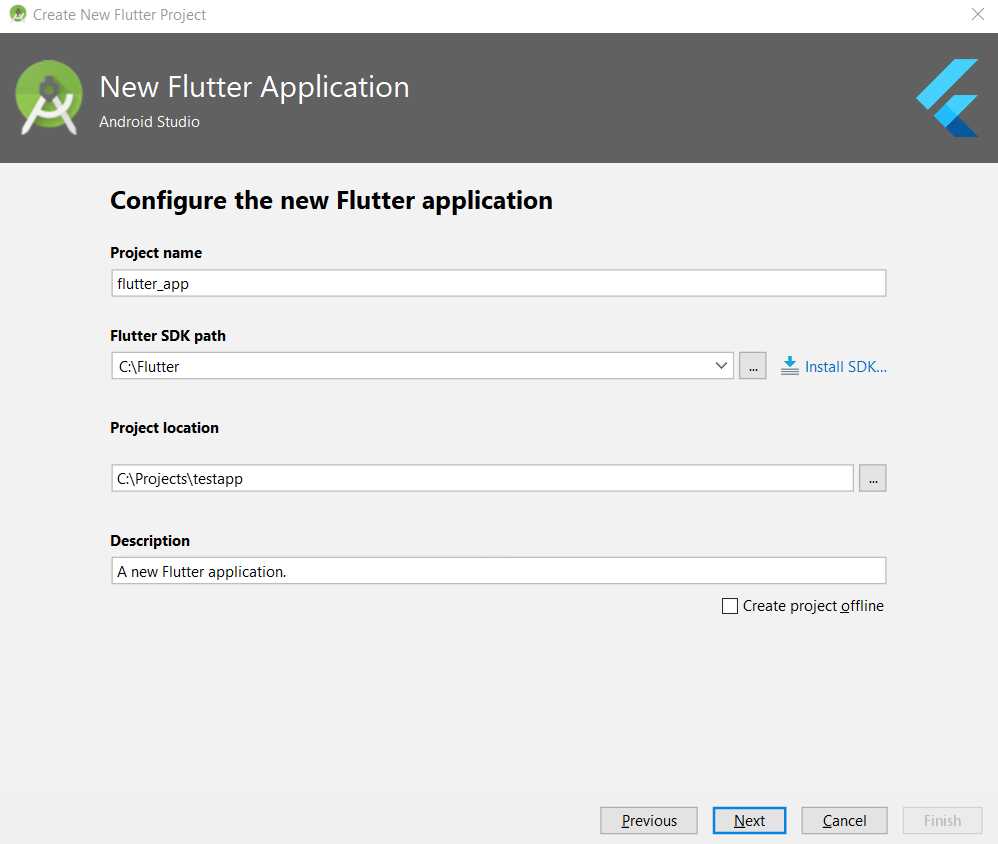
Figure 1-g: Create new Flutter project option (step 2)
Make sure the Flutter SDK path text field specifies the correct folder location of the SDK, as previously explained. With those options entered, click Next.
In the final step of the app creation process, we are asked to enter the Company domain and include (if applicable) Kotlin support for Android code and Swift support for iOS code—in our case, there’s no need to include these options.
The following figure shows the final step of the application creation screen.
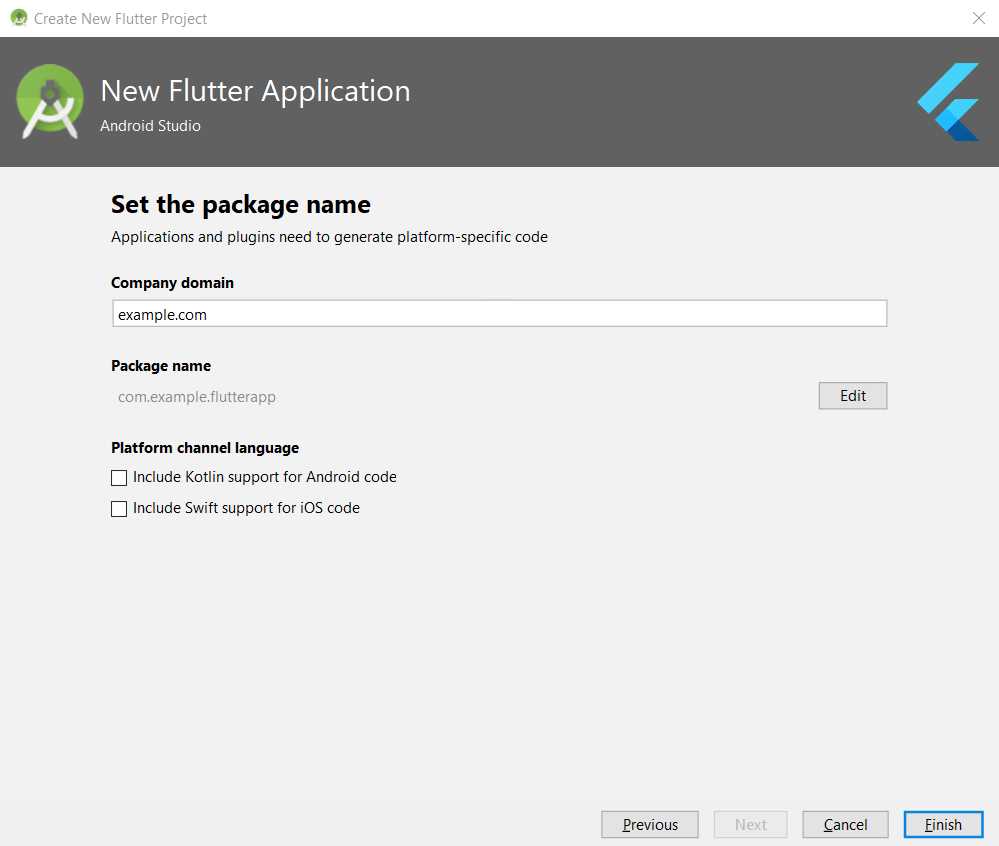
Figure 1-h: Create new Flutter project option (step 3)
To finalize the creation of the demo application, click Finish. With the demo application created, make sure you have a virtual device created and ready so we can quickly test the app.
Creating a virtual device
Let’s quickly go over the steps required to create a virtual device. With Android Studio opened, go to the Tools menu and click on the AVD Manager option, which will display the following screen.
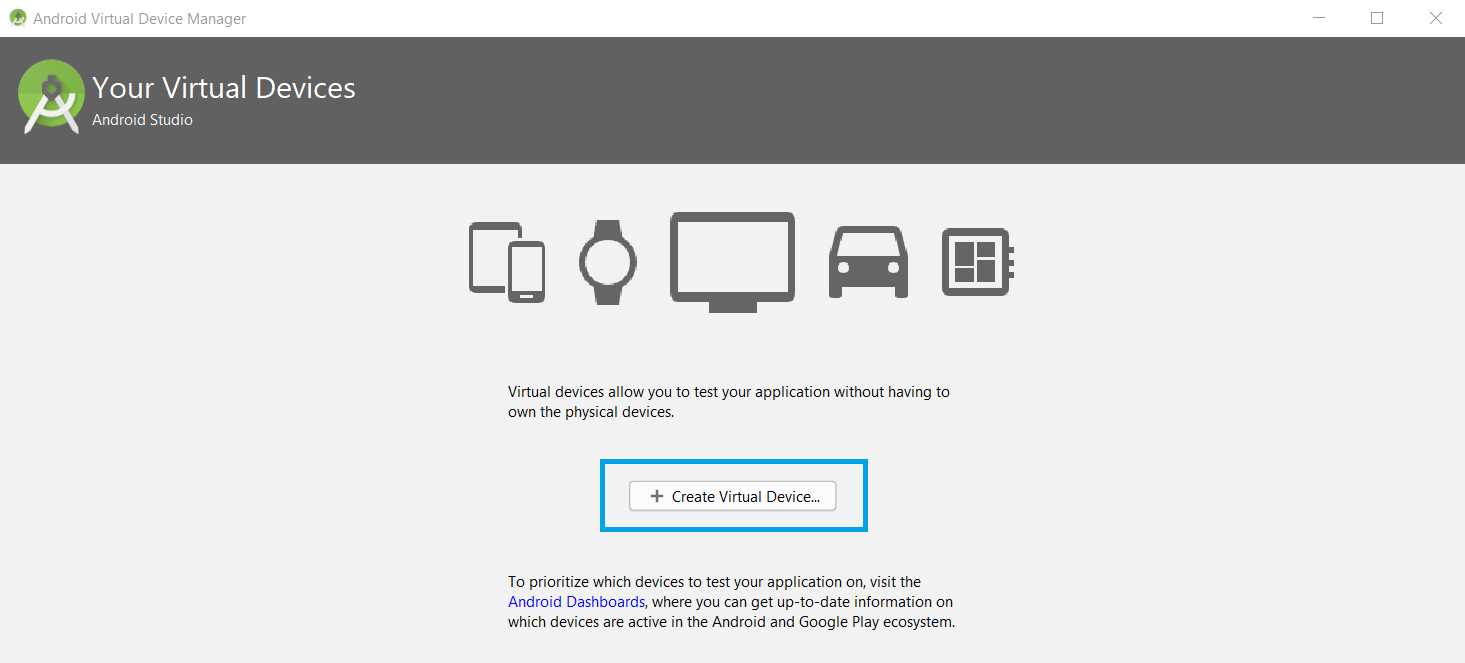
Figure 1-i: Creating a virtual device (step 1)
Then, click Create Virtual Device, which will display the following window with all the available virtual devices that can be created for different categories, such as: phones, TV, tablets, and wearable devices.
I’m going to select the Nexus 6 model from the Phone category, but feel free to choose any other.
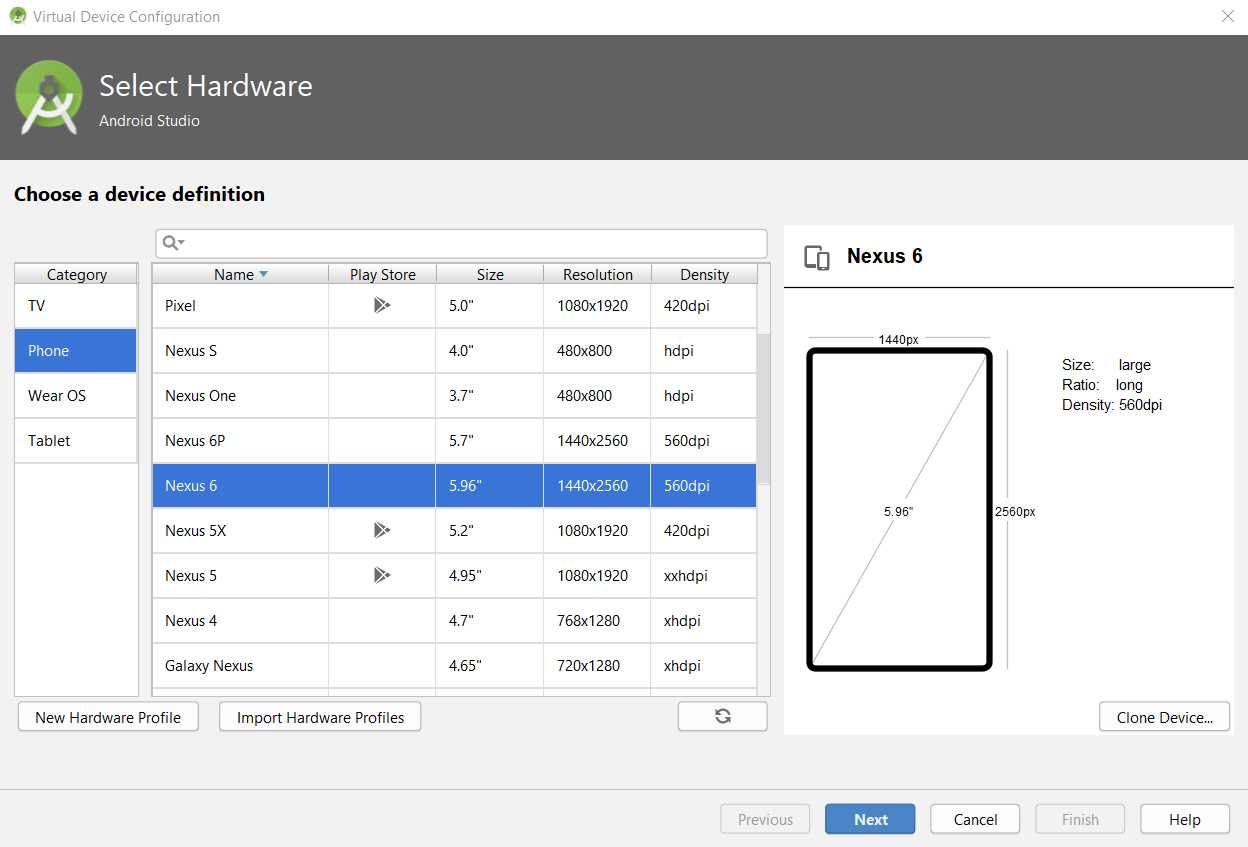
Figure 1-j: Creating a virtual device (step 2)
Once you have your model selected, click Next. You will be prompted to select one of the available device images.
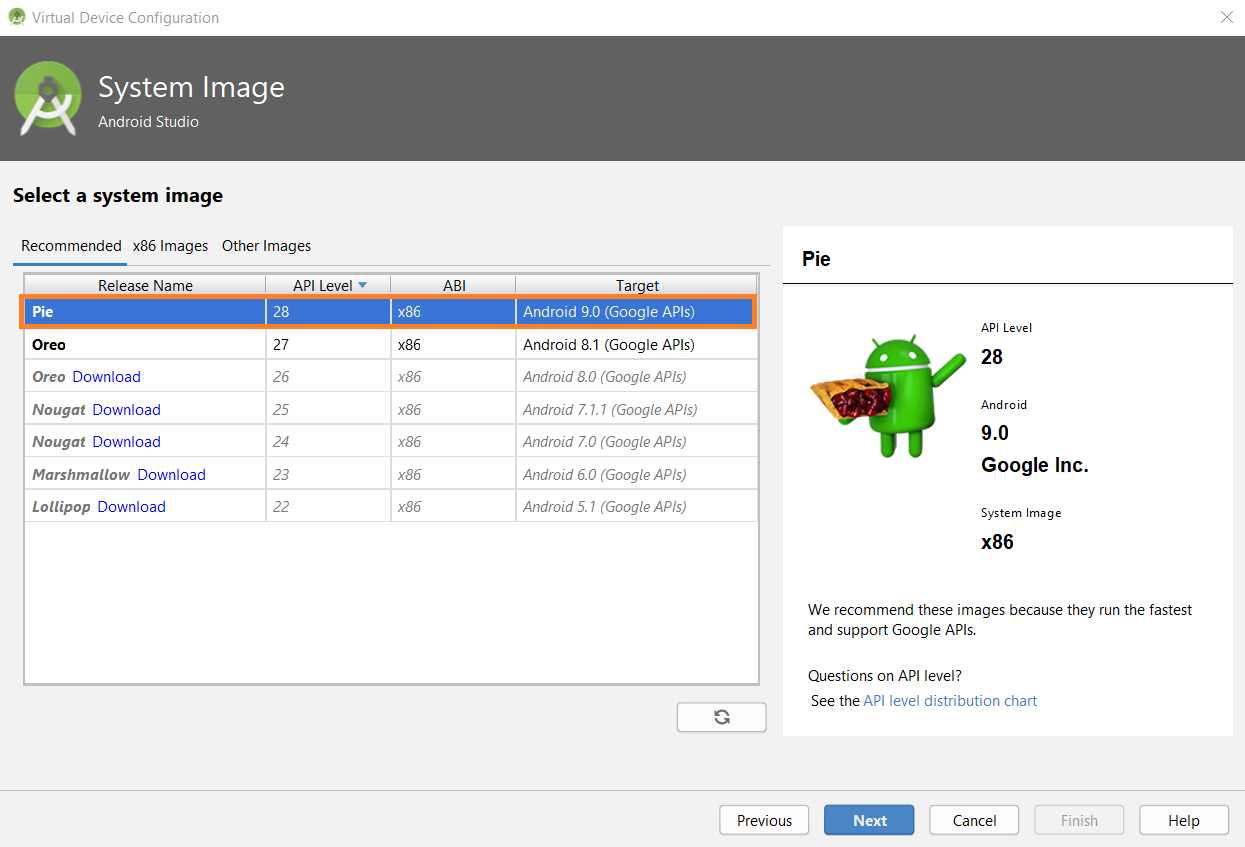
Figure 1-k: Creating a virtual device (step 3)
I’m going with the first recommended option from the available list; however, you can choose any other. It’s important to choose an image that plays well with your computer’s host operating system. In essence, for emulator performance reasons, it’s not recommended to choose an ARM-based image if your computer’s host operating system is based on a x86 architecture.
If you’ve chosen a different image than the one highlighted in Figure 1-k you might have to download the image, using the Download link next to the image Release Name field.
Once the image has been selected (and downloaded, if applicable), click Next to continue to the last step.
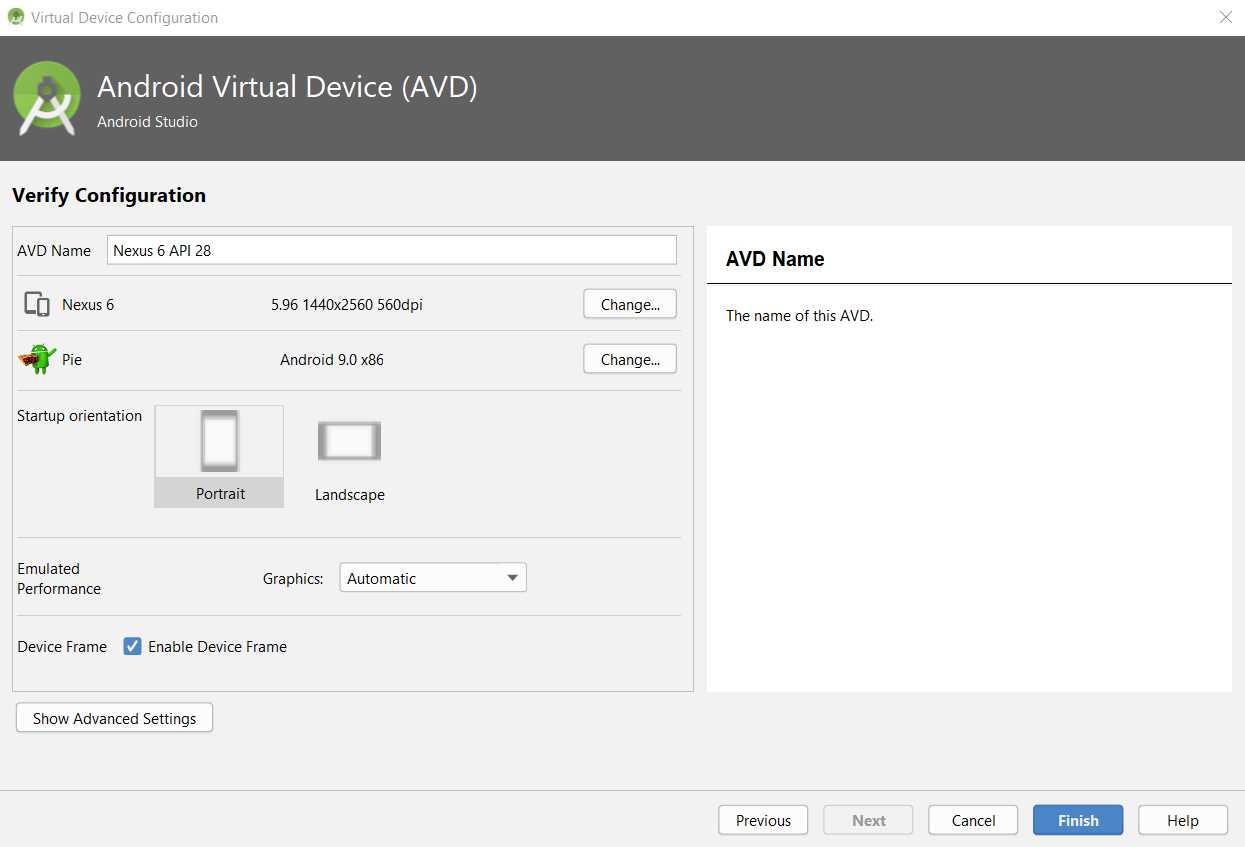
Figure 1-l: Creating a virtual device (step 4)
The last step contains the configuration details for the virtual device image, which you can normally leave to the default options, and then simply click Finish.
Awesome—you now have created a virtual device. You can create more than one if you wish, as it might help you test your application with multiple devices. In my case, I’ve also created another virtual device for a Pixel 2 XL phone API 28, which looks as follows.
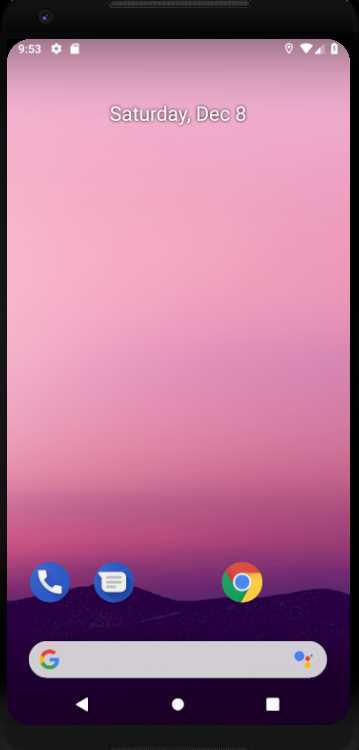
Figure 1-m: Virtual device—Android emulator
Testing our setup
With our virtual device in place, it’s now time to run the application we have created and see what it does.
To do that, select the Open Android Emulator option from the Android SDK built for x86 drop-down list, which is next to the run button. Once the Android emulator is opened, you’ll be able to execute the application when you click run.

Figure 1-n: The emulator drop-down and run button
Try to run the application to see what happens—in my case, I get the following Android Studio console output.
Code Listing 1-b: Console output when running the application
Launching lib\main.dart on Android SDK built for x86 in debug mode... Initializing gradle... Resolving dependencies... * Error running Gradle: ProcessException: Process "C:\Projects\test\flutter_app\android\gradlew.bat" exited abnormally: > Configure project :app Checking the license for package Android SDK Build-Tools 28.0.3 in C:\Users\EdFreitas\AppData\Local\Android\sdk\licenses Warning: License for package Android SDK Build-Tools 28.0.3 not accepted. FAILURE: Build failed with an exception. * Where: Build file 'C:\Projects\test\flutter_app\android\build.gradle' line: 24 * What went wrong: A problem occurred evaluating root project 'android'. > A problem occurred configuring project ':app'. > Failed to install the following Android SDK packages as some licences have not been accepted. build-tools;28.0.3 Android SDK Build-Tools 28.0.3 To build this project, accept the SDK license agreements and install the missing components using the Android Studio SDK Manager. Alternatively, to transfer the license agreements from one workstation to another, see http://d.android.com/r/studio-ui/export-licenses.html Using Android SDK: C:\Users\EdFreitas\AppData\Local\Android\sdk * Try: Run with --stacktrace option to get the stack trace. Run with --info or --debug option to get more log output. Run with --scan to get full insights. * Get more help at https://help.gradle.org BUILD FAILED in 1s Command: C:\Projects\test\flutter_app\android\gradlew.bat app:properties Finished with error: Please review your Gradle project setup in the android/ folder. |
If you didn’t get this console output message after running your application, awesome—you may skip the rest of this section and go directly to the “Hot reloading” section.
If you did, then by carefully reviewing this output information, we find a reference to this http://d.android.com/r/studio-ui/export-licenses.html URL that redirects to here. This article explains how Gradle can automatically download packages that might be missing, and that are required when running an application.
We can also see that the last line of the message indicates to review the Gradle project setup in the Android project folder—which refers to the Build.gradle file found within the Android folder of our application. We can see this in the following screenshot.
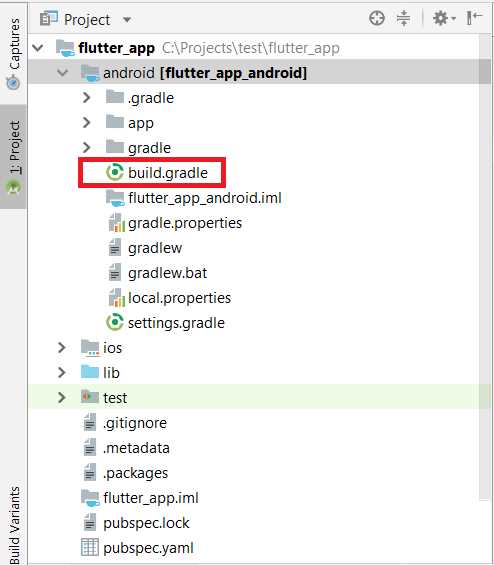
Figure 1-o: The project structure
Let’s open the Build.gradle file and inspect its content. Notice in my case how it depends on com.android.tools.build:gradle:3.2.1—we can see this in the screenshot that follows.
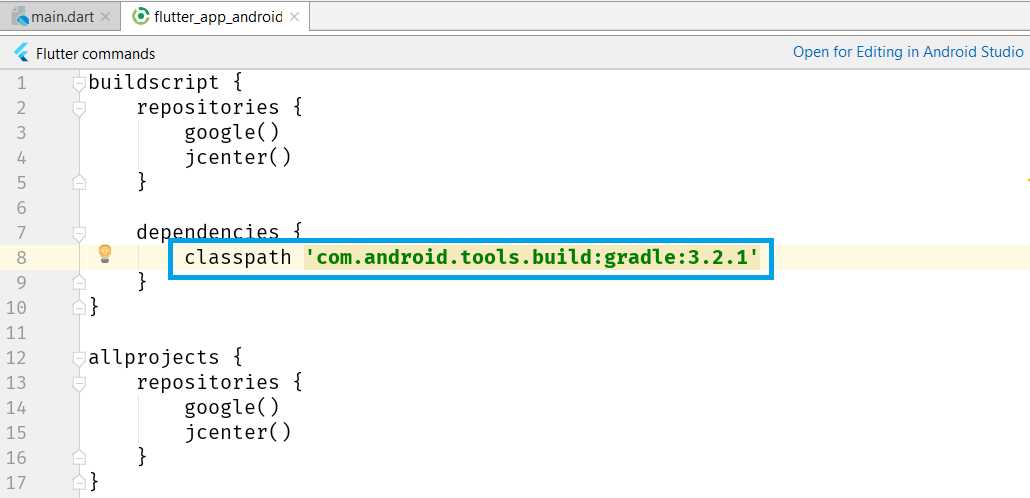
Figure 1-p: The Build.gradle file contents
The previous console output gives us a hint of what the problem might be: License for package Android SDK Build-Tools 28.0.3 not accepted.
What this is telling us is that it wasn’t able to run the application with this com.android.tools.build:gradle:3.2.1 dependency, because I have no license for it.
In other words, that specific com.android.tools.build:gradle version probably didn’t get installed when I went through the Android Studio setup process.
In that case, the solution is to use a version of the com.android.tools.build:gradle dependency that was installed during the Android Studio setup process—which can be one version lower than the one mentioned on the Build.gradle file.
To resolve the problem, all I need to do is change that line on the Build.gradle file from com.android.tools.build:gradle:3.2.1 to com.android.tools.build:gradle:3.2.0.
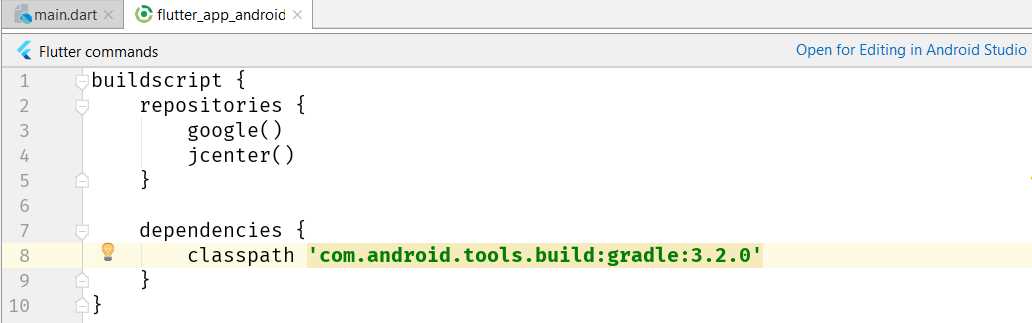
Figure 1-q: The Build.gradle file contents edited
After saving the change to the Build.gradle file, if I now click Run, I’ll get the following build console output within Android Studio.
Code Listing 1-c: Console output when running the application (after updating Build.gradle)
Launching lib\main.dart on Android SDK built for x86 in debug mode... Initializing gradle... Resolving dependencies... Gradle task 'assembleDebug'... Built build\app\outputs\apk\debug\app-debug.apk. |
Awesome—that’s so much better! The application has been built, and it is running. We can see this on the Android emulator as follows.
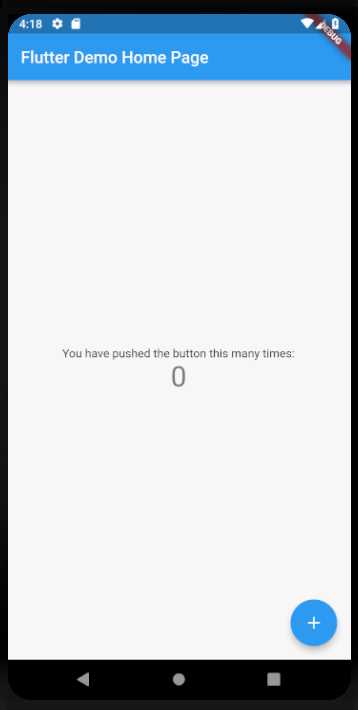
Figure 1-r: The demo app running
With the building issues sorted, let’s now explore how Flutter’s “hot reload” mechanism works, and what it does.
Hot reloading
Hot reloading is one of the coolest features of Flutter, and basically means that if a change to the code is made while the application is running, that change is almost immediately reflected within the running application.
Let’s give hot reloading a try. With the application running, let’s go to the main.dart file under the lib folder of our demo application, and locate the following code.
Code Listing 1-d: Snippet of code of main.dart
Text( 'You have pushed the button this many times:', ) |
Let’s replace the word pushed with the word clicked. The code should now look as follows.
Code Listing 1-e: Snippet of code of main.dart
Text( 'You have clicked the button this many times:', ) |
Figure 1-s shows the source code and the application running before the change.
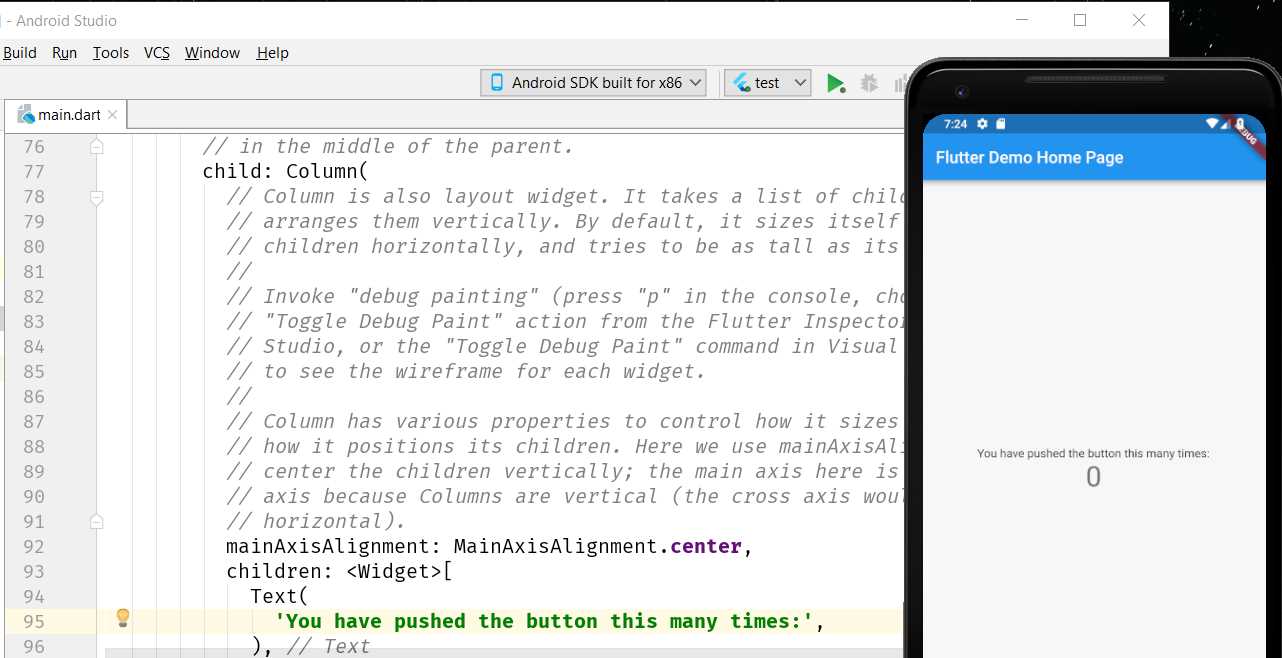
Figure 1-s: App running (before the change)
Figure 1-t shows the source code and the application running after the change.
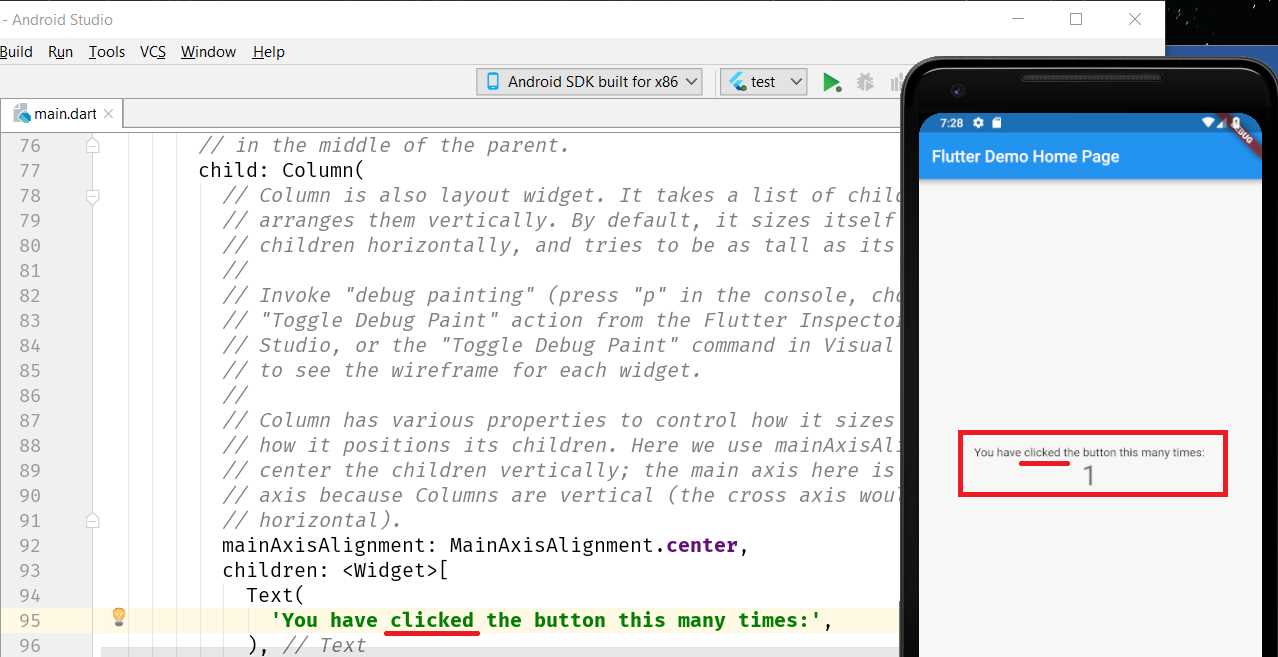
Figure 1-t: App running (after the change)
As you can clearly see, hot reloading worked. Something to notice about hot reloading is that the changes take a few seconds to propagate and become effective, as the application is basically redeployed to the emulator or device when changes take place.
Web developers will notice that hot reloading in Flutter is slower than when developing web applications. This is because during web development, hot reloading only applies to the HTML, CSS, or JavaScript being modified, whereas with Flutter, the actual application runtime needs to be synced to the device.
Nevertheless, Flutter’s hot-reloading mechanism is impressive and very useful, as it helps us avoid having to stop the app and restart it.
Summary
The goal of this chapter was to set up Flutter and get started—that’s exactly what we managed to achieve.
Next, we’ll dive straight into the code and start writing the fundamental pillars of our app. It’s going to be a lot of fun, as we’ll look at how to design our app’s UI and implement its essential logic.
- Advanced custom widgets and file-format libraries.
- Built from scratch.
- Dart-powered widgets for extraordinary apps.
- A wide range of products and hassle-free licensing.