
Akka.NET Succinctly®

CHAPTER 4
Working with Actors
In the first three chapters, we mentioned some basic building blocks and the theory around actor model programming and Akka.NET. In this chapter, we will finally start implementing the mentioned concepts, starting from the very simple aspects, and end up building a live system.
Type of actors
Akka.NET offers two kinds of actor base types: ReceiveActor and UntypedActor. The difference between the two, as we are going to see, is the signature for receiving messages. One is strongly typed, while the other is not. The usage of one or the other would most probably depend on the use case and handling of types of incoming messages.
An actor in Akka.NET is implemented as a class that inherits from one of the aforementioned base types.
UntypedActor
As shown in Code Listing 9, implementing an actor is quite straightforward. In the case of an UntypedActor, we have to override the OnReceive method (please note that the OnReceive method accepts a generic object). The OnReceive method will be the entry point for all the messages sent to the actor, and the implementation of this method should handle all kinds of message types that are expected.
Code Listing 9: UntypedActor declaration
public class MyUntypedActor : UntypedActor { protected override void OnReceive(object message) { /* some code goes here */ } } |
ReceiveActor
On the other hand, the ReceiveActor has a bit of a different structure. There is no OnReceive method to be overridden anymore, and the mapping to the message handlers is done directly in the actor’s constructor. The mapping is done through one of the many Receive methods to which we have to specify the type and the actual handler.
Code Listing 10: ReceiveActor example
public class MyTypedActor : ReceiveActor { public MyTypedActor() { /* some code goes here */ } } |
Actor instantiation
Creating a new instance of an actor can only be done through the ActorSystem. The ActorSystem offers two methods: ActorOf and ActorOf<T>, which are responsible for the actor’s creation.
In order to be identified, an ActorSystem has to have a name. This is mainly needed in order to ensure the actor’s location, as we are going to see later on. In our case, the name of the ActorSystem is my-first-akka. The name can be any string.
By using the generic version of the ActorOf method, we can only specify the name of the actor. The name is optional, and if it’s not specified, one will be assigned automatically by the system. Usually the name given is in the form of “$a”, “$b”, etc.
Code Listing 11: Creation of an Actor through ActorSystem by using generic ActorOf<T>
static void Main(string[] args) { ActorSystem system = ActorSystem.Create("my-first-akka"); IActorRef typedActor = system.ActorOf<MyTypedActor>(); IActorRef untypedActor = system.ActorOf<MyUntypedActor>(); } |
Note: The two IActorRef objects: typedActor and untypedActor, are actor references, through which we can communicate with the actor.
The alternative to ActorOf’s generic version is to use the nongeneric version, which accepts different parameters: we have to supply a parameter of type Props. Props is a configuration class to specify options for the creation of actors. By using Props, we can define a SupervisionStrategy, create the actor by its constructor attributes, or specify a Factory for it. Let’s see an example of using Props when creating our previously defined actors.
Code Listing 12: Instantiating actors using props
static void Main(string[] args) { ActorSystem system = ActorSystem.Create("my-first-akka"); Props typedActorProps = Akka.Actor.Props.Create<MyTypedActor>(); Props untypedActorProps = Akka.Actor.Props.Create<MyUntypedActor>(); IActorRef typedActor = system.ActorOf(typedActorProps); IActorRef untypedActor = system.ActorOf(untypedActorProps); } |
There are several ways of using Props, as we can see in the following code snippet.
Code Listing 13: Various ways of using the Create method
Props props1 = Props.Create(typeof(MyTypedActor)); Props props2 = Props.Create(() => new MyTypedActor("arg")); Props props3 = Props.Create<MyTypedActor>(); Props props4 = Props.Create(typeof(MyTypedActor), "arg"); |
ReceiveActor construction
In this book, we will only be using the ReceiveActor, for the simplicity and as a matter of preference. In this section, we will be looking at the various methods that the ReceiveActor offers, and will expand on those.
The configuration of message handlers always happens in the actor’s constructor. So, often you will be writing code similar to the following:
Code Listing 14: Handler message methods are declared in the constructor
public class MyTypedActor : ReceiveActor { public MyTypedActor() { Receive<GreetingMessage>(message => GreetingMessageHandler(message)); Receive<string>(message => GreetingMessageHandler(message)); } } public class GreetingMessage { public GreetingMessage(string greeting) { Greeting = greeting; } public string Greeting { get; private set;} } |
We use the constructor of an actor to define which message types it accepts (GreetingMessage and string, in our example).
The Receive method is defined in the base (ReceiveActor) class, and it registers a handler (method) for a particular type of message that the actor receives.
It’s worth pointing out that there are several Receive methods available, such as Receive, Receive<T>, ReceiveAsync<T>, ReceiveAsync, ReceiveAny, and ReceiveAnyAsync. Let’s go through some of them.
Receive
The Receive method, being strongly typed, will ensure that the defined message is handled by a predefined handler (method).
Since the Receive<T> method in question has several overloads, and may accept the Func<T, bool>, Action<T>, or Predicate<T> objects as arguments, it’s possible to write either an inline declaration of the code to be executed, or a pointer to an actual method that implements such an interface.
Code Listing 15: Typed Actor declaration
public class MyTypedActor : ReceiveActor { public MyTypedActor() { Receive<string>(message => Console.WriteLine(message)); } } |
Alternatively, you can use another method to handle the message—Code Listing 15 is equivalent to Code Listing 16.
Code Listing 16: Receiving messages using a handler method
public class MyTypedActor : ReceiveActor { public MyTypedActor() { Receive<string>(message => HandleStringMessage(message)); }
private void HandleStringMessage(string message) { Console.WriteLine(message); } } |
An important thing to note here is that the messages an actor receives will be processed one-by-one in a synchronous manner. This means no new messages will be processed until the HandleStringMessage has finished processing the current message.
It is not a good practice (and will actually cause issues) to use the async/await pattern inside a Receive method, as this would break the order of messages—the Receive method will exit before the actual processing is finished. This is a very important concept, and to handle this scenario, Akka.NET has implemented the ReceiveAsync method.
ReceiveAsync
ReceiveAsync<T> and ReceiveAsync enable the async/await pattern when defining handlers.
Even though the ReceiveAsync handles asynchronous messages, it will process one message at a time in order to preserve the ordering of messages—so don’t expect parallel processing of messages inside an actor by using the ReceiveAsync. Getting new messages from the actor’s mailbox in this method will therefore behave exactly as the normal Receive method: one-by-one, and in an ordered fashion.
In the following example, we attempt to build an actor (DownloadHtmlActor) that downloads data from the Internet in an asynchronous fashion by using DownloadStringTaskAsync. This method can be awaited, so let’s see how we can construct the actor around it.
Code Listing 17: Download HTML via async method
public class DownloadHtmlActor : ReceiveActor { public DownloadHtmlActor() { ReceiveAsync<string>(async url => await GetPageHtmlAsync(url)); } private async Task GetPageHtmlAsync(string url) { var html = await new System.Net.WebClient().DownloadStringTaskAsync(url); Console.WriteLine("\n====================================="); Console.WriteLine($"Data for {url}"); Console.WriteLine(html.Trim().Substring(0, 100)); } } static void Main(string[] args) { ActorSystem system = ActorSystem.Create("html-download-system"); IActorRef receiveAsyncActor = system.ActorOf<DownloadHtmlActor>("html-actor "); receiveAsyncActor.Tell("https://www.agile-code.com"); receiveAsyncActor.Tell("https://www.microsoft.com"); receiveAsyncActor.Tell("https://www.syncfusion.com"); } |
The first thing to note is that the ReceiveAsync signature can now mark the method as an async method and await it (async url => await GetPageHtmlAsync(url)).
When running the code in Code Listing 17, we can clearly see that the order of messages will be maintained.

Figure 7: Output of invoking the DownloadHtmlActor
ReceiveAny
The ReceiveAny and ReceiveAnyAsync methods will handle all or any type of message, if the type of a particular message is not already handled by one of the other Receive methods. This can be used as a catch-all in case we don’t support some messages, in order to have a managed handling of improperly registered messages. So, it is a good practice to put the ReceiveAny at the end of the list of Receive methods; otherwise, you will get the following exception:
System.InvalidOperationException: 'A handler that catches all messages has been added. No handler can be added after that.'
Note: ReceiveAny is equivalent to Receive<object>(…).
In Code Listing 18, we can see an example of how to use the ReceiveAnyAsync by following the previous example of the HTML page download actor. We can see that now the GetPageHtmlAsync method accepts an object rather than a string.
Code Listing 18: Definition of the DownloadAnyHtmlActor
public class DownloadAnyHtmlActor : ReceiveActor { public DownloadAnyHtmlActor() { ReceiveAnyAsync(async obj => await GetPageHtmlAsync(obj)); } private async Task GetPageHtmlAsync(object obj) { if (obj is string || obj is Uri) { var url = obj.ToString(); var html = await new System.Net.WebClient().DownloadStringTaskAsync(url); Console.WriteLine("\n====================================="); Console.WriteLine($"Data for {url}"); Console.WriteLine(html.Trim().Substring(0, 100)); } else throw new ArgumentNullException("Actor doesn't accept this kind of message"); } } |
We can also see that the GetPageHtmlAsync also checks for the type of the object passed. In case of a string, or if a System.Uri object is passed, the actor would download the page, and otherwise will throw an exception.
Also in the client code, we can clearly see that we pass three types of messages to the actor: a string, a System.Uri, and a GreetingMessage (which is not currently being handled).
Code Listing 19: Client code calling DownloadAnyHtmlActor
static void Main(string[] args) { ActorSystem system = ActorSystem.Create("html-download-system"); IActorRef receiveAsyncActor = system.ActorOf<DownloadAnyHtmlActor>(); receiveAsyncActor.Tell("https://www.agile-code.com"); receiveAsyncActor.Tell(new Uri("https://www.syncfusion.com")); receiveAsyncActor.Tell(new GreetingMessage("hi")); Console.Read(); system.Terminate(); } |
The output is as we may expect: two successfully downloaded pages, and one exception thrown.

Figure 8: Output of DownloadAnyHtmlActor execution
IActorRef
One thing you have probably already noticed is that when we create a new instance of an actor, what is being returned is an implementation of an IActorRef rather than an instance of the actor itself. We spoke in Chapter 3 about actor references, and this is how they are represented.
IActorRef is a handle to an actor. Having a reference to an actor guarantees that the actor is alive, or that it existed in the past. Unfortunately, this handle doesn’t answer the question of whether or not the actor is still alive.
Among others, it contains three methods that enable communication between actors, being local or remote: Ask, Tell, and Forward. In addition to this, it is possible to see the full Path of an actor.
Tell
The Tell method uses the fire-and-forget pattern; using Tell, one actor simply sends a message to another actor and doesn’t wait for any response back, and it returns immediately (it is a nonblocking call).
When we send a message using Tell, it might seem as if we are doing nothing more than sending a simple plain-old CLR object (POCO). This is not fully the case. When you invoke Tell, the information about the Sender of the message tags along. Within a given Actor, there is an implicit property called Context. We can use Context to determine the parent of the Actor, and Context.Parent. Context.System can be used to access the root ActorSystem, under which the Actor resides. You can get a reference to the Actor itself using Context.Self.
Forward
Forward is a special method of Tell, where the sender information will be carried as part of the message context, which means that even if the message goes through several actors, the original actor that sent the message will be preserved in this context.
Ask
Ask is a request/response-based communication pattern: it sends a message to another actor, expecting it to respond with another message, and returns a Task, asynchronously notifying when the response will come back.
In general, there are performance implications for using Ask, since under the hood there is quite some work to be done in order to enable the mechanics of mapping the request with the response, etc. So, you should prefer using Tell for performance, and only use Ask if you have no other choice.
As an alternative of Ask, we can always use Tell or Forward, and return back the message in a fluent manner, as depicted in Figure 9.

Figure 9: Ask implemented as Tell/Forward
In the first section, we can see that in order to communicate between Actors A and D, we have to block several actors (B and C) in order to get the response back.
In the second part, we can see that by simply passing the message, and maintaining the context, it is possible to have an asynchronous response by combining Tell and Forward.
Messages and immutability
One very important aspect of the data (messages) being passed to actors is that those messages should be immutable. Immutable messages are crucial because we can send the same message to many actors concurrently, and if each one of those actors makes a modification to the state of the message, all of those state changes are local to each actor. Obviously, we want to avoid this, so the preferred way of creating messages sent to actors would be to avoid using public setters, which automatically force us to pass and set properties via constructors.
In this way, we can be completely sure that there will be no side effects if this exact instance of a message is used by multiple actors at the same time. An example of an immutable message is defined in the following code:
Code Listing 20: Example of an immutable message
public class GreetingMessage { public GreetingMessage(string greeting) { Greeting = greeting; } public string Greeting { get; private set;} } |
Dependency injection
Akka.NET supports dependency injection, which is supported by the DependencyResolver class that can create Props using the dependency injection (DI) container.
There are several containers supported out of the box by Akka.NET, and there are libraries ready to be referenced and used. A few examples are Ninject, AutoFac, Microsoft Unity, SimpleInjector, and StructureMap.
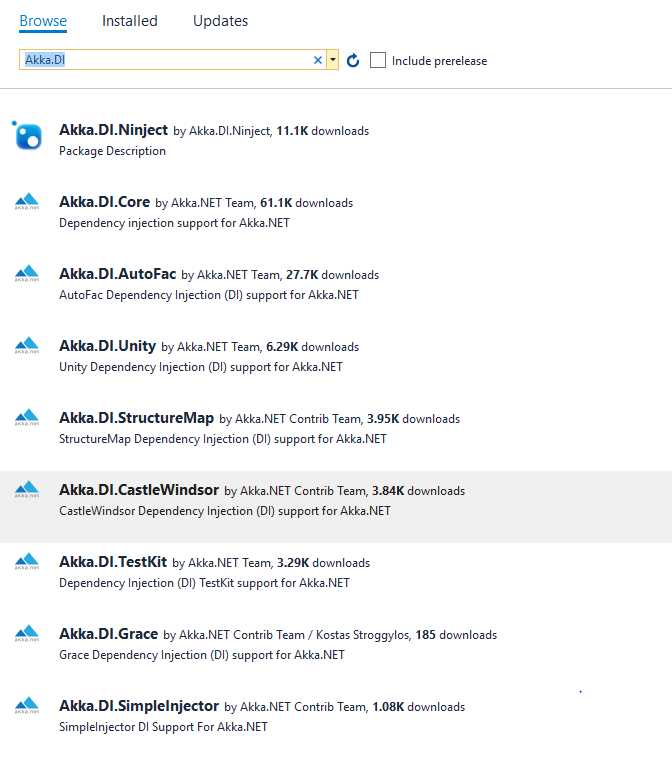
Figure 10: Dependency injection libraries
The steps needed to instantiate an actor via DI are as follows:
- Instantiate the DI container of preference and register all of the dependencies.
- Create the actor system (as we always do).
- Create an instance of the actor by using Props (as we have seen previously).
In the example we are going to show, we are creating an actor MusicActor that has MusicSongService as a dependency. We are keeping things very simple here just to demonstrate the plumbing of the various parts.
First things first. When creating a new Visual Studio project, if we want to use the DI, then we need to reference the library that will enable us to do so. In our example, we are using AutoFac.
Therefore, our project has to install the following NuGet packages:
Code Listing 21: Installing Akka–AutoFac dependencies
PM> Install-Package Akka PM> Install-Package Akka.DI.Core PM> Install-Package Akka.DI.AutoFac |
In reality, installing only Akka.DI.AutoFac would autoinstall the two other libraries and the AutoFac container library itself.
Let’s start with defining the service that our MusicActor depends upon:
Code Listing 22: MusicSongService definition
public interface IMusicSongService { Song GetSongByName(string songName); } public class MusicSongService : IMusicSongService { public Song GetSongByName(string songName) { return new Song(songName, new byte[0]); } } public class Song { public Song(string songName, byte[] rowFormat) { SongName = songName; RowFormat = rowFormat; } public string SongName { get; } public byte[] RowFormat { get; } } |
Nothing too difficult here: our service MusicSongService has one method and returns an object of type Song. To keep the example simple, there is no real implementation of the song retrieval, which isn’t really relevant for our example.
The following is the implementation of the actor. In bold, we can see that the MusicActor requires that an object of type IMusicSongService gets injected at creation time. Our actor receives a message of type string, and the HandleSongRetrieval method will be responsible for using the service to retrieve the song.
Code Listing 23: MusicActor definition
public class MusicActor : ReceiveActor { private IMusicSongService SongService { get; } public MusicActor(IMusicSongService songService) { SongService = songService; Receive<string>(s => HandleSongRetrieval(s)); }
public void HandleSongRetrieval(string songName) { var song = SongService.GetSongByName(songName); /* do something with this song*/ } } |
Now that we have all the moving parts defined, let’s see how to inject the IMusicSongService into the actor upon creation effectively.
Code Listing 24: Client code for DI actor's generation
using Akka.Actor; using Akka.DI; using Akka.DI.AutoFac; using Akka.DI.Core; using Autofac; static void Main(string[] args) { //1. Create and build the container by registering types. var builder = new Autofac.ContainerBuilder(); builder.RegisterType<MusicSongService>().As<IMusicSongService>(); builder.RegisterType<MusicActor>().AsSelf(); var container = builder.Build(); //2. Create the ActorSystem and Dependency Resolver. var system = ActorSystem.Create("MySystem"); var propsResolver = new AutoFacDependencyResolver(container, system); //3. Create an Actor reference. IActorRef musicAct = system.ActorOf(system.DI().Props<MusicActor>(), "MusicActor"); musicAct.Tell("Bohemian Rhapsody"); Console.Read(); system.Terminate(); } |
We can see that the first part of the program is the creation and configuration of the AutoFac container system, where we have to register all the dependencies. Don’t forget to register the MusicActor, which is the actor itself. This is no different from what we got used to when working with inversion of control containers. ContainerBuilder will return the actual container after the builder.Build() method has been called.
One important thing to notice here is that the DependencyResolver has to be instantiated and attached to the ActorSystem. This is done behind the scenes by the AutoFacDependencyResolver.
DependencyResolver will be eventually used by the system.DI() extension method (for this, we need to include Akka.DI.Core in the using section). system.DI().Props<MusicActor>() is equivalent to the Props we have already seen, with the only difference being that it will use the dependency injection framework to create the actor.
From there on, everything works as with normal actors.
First Akka.NET application
Let’s create a console application that will create and instantiate the two actors, and send them a message—the classic “Hello world.” Not too exciting, but the simplicity will illustrate the basic principles of how the system works.
In order to do this, let’s create a new Console Application in Visual Studio (it’s fine if you want to use the .NET Core or the full .NET, as both are supported by Akka.NET). Don’t forget to reference the Akka base library from NuGet by running the following:
Code Listing 25: Install Akka NuGet package
PM> Install-Package Akka |
Example using Tell
The aim of the application is to instantiate an object of type GreetingMessage, set a greeting, and pass this to the typed and untyped actor. We won’t be doing much more than confirming that the message has been received by writing this into the console window.
Code Listing 26: Definition of the GreetingMessage class
|
public class GreetingMessage { public GreetingMessage(string greeting) { Greeting = greeting; } public string Greeting { get; } } |
Let’s create our actors, which will implement a bit more than we have previously seen. Upon receiving a message, we will display some information about the context as well as the message being sent.
Code Listing 27: Definition of the ReceiveActor
public class MyTypedActor : ReceiveActor { public MyTypedActor() { base.Receive<GreetingMessage>(message => GreetingMessageHandler(message)); } private void GreetingMessageHandler(GreetingMessage greeting) { Console.WriteLine($"Typed Actor named: {Self.Path.Name}"); Console.WriteLine($"Received a greeting: {greeting.Greeting}"); Console.WriteLine($"Actor's path: {Self.Path}"); Console.WriteLine($"Actor is part of the ActorSystem: {Context.System.Name}"); } } |
The UntypedActor’s logic is exactly the same, except that we have to handle the actual message type, as we can get any type of message.
Code Listing 28: UntypedActor example
public class MyUntypedActor : UntypedActor { protected override void OnReceive(object message) { var greeting = message as GreetingMessage; if (greeting != null) { GreetingMessageHandler(greeting); } } private void GreetingMessageHandler(GreetingMessage greeting) { Console.WriteLine($"Untyped Actor named: {Self.Path.Name}"); Console.WriteLine($"Received a greeting: {greeting.Greeting}"); Console.WriteLine($"Actor's path: {Self.Path}"); Console.WriteLine($"Actor is part of the ActorSystem: {Context.System.Name}"); } } |
And finally, in Code Listing 29 Listing 29 is the main method that wires everything together by assigning specific names to the actual actors. Please note that we are assigning names, such as untyped-actor-name and typed-actor-name, just to be able to identify the instance of the actor when the data is displayed in the console windows.
In this method, we can also see the usage of the method Tell, where the GreetingMessage is being passed as an argument.
Code Listing 29: Main method sending messages to actors
static void Main(string[] args) { ActorSystem system = ActorSystem.Create("my-first-akka"); IActorRef untypedActor = system.ActorOf<MyUntypedActor>("untyped-actor-name"); IActorRef typedActor = system.ActorOf<MyTypedActor>("typed-actor-name"); untypedActor.Tell(new GreetingMessage("Hello untyped actor!")); typedActor.Tell(new GreetingMessage("Hello typed actor!")); Console.Read(); } |
If we run the application, the following output will be shown:
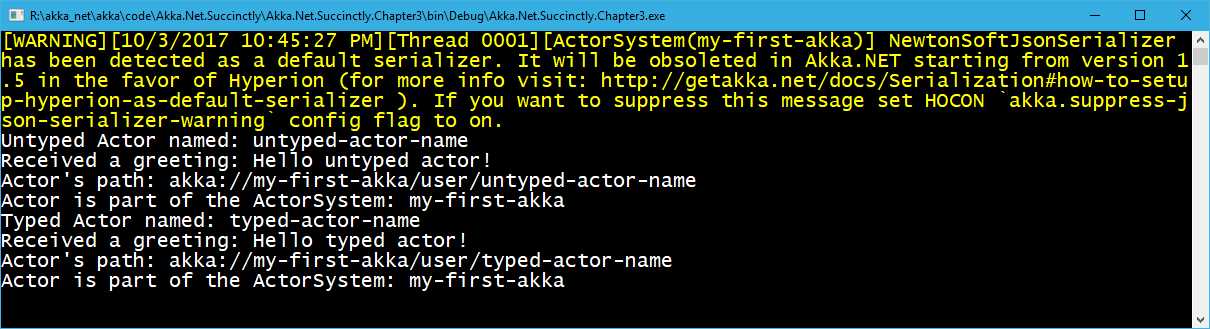
Figure 11: Output of the first application
As we can see, the two actors were able to receive a message, and to display the information about the message received. At the same time, more information about the Context has been displayed, too.
Example using Ask
We are going to create a very simple calculator application that will demonstrate the usage of the Ask method.
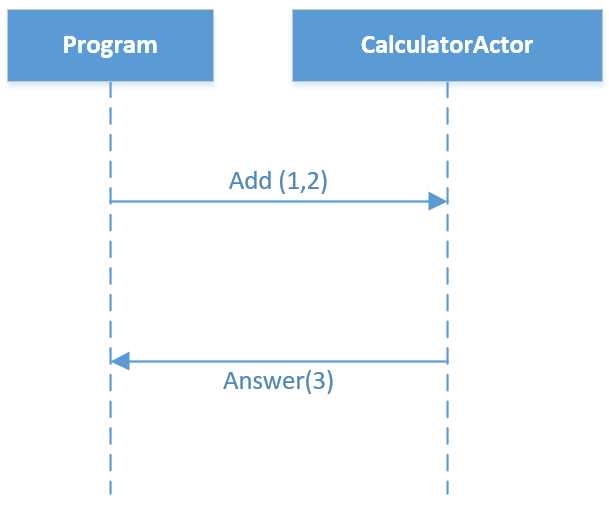
Figure 12: Sequence diagram depicting communication with CalculatorActor
Let’s start with the definition of the CalculatorActor and the two messages that we are going to exchange, Add and Answer:
Code Listing 30: CalculatorActor definition
public class CalculatorActor : ReceiveActor { public CalculatorActor() { Receive<Add>(add => Sender.Tell(new Answer(add.Term1 + add.Term2))); } } public class Answer { public Answer(double value) { Value = value; } public double Value; } public class Add { public Add(double term1, double term2) { Term1 = term1; Term2 = term2; } public double Term1; public double Term2; } |
We can see that the CalculatorActor accepts a message of type Add, and returns an object of type Answer to the sender. Sender is a special object that represents the producer of the original message. The message is returned to the sender via the Tell method.
In Code Listing 31, we can see how to send a message to the CalculatorActor:
Code Listing 31: Sending Messages to the Calculator Actor
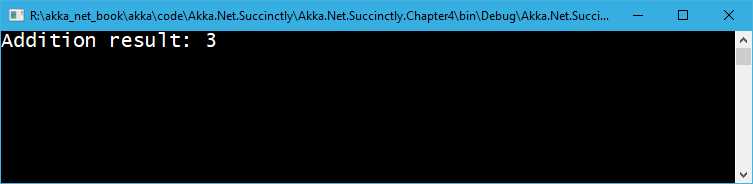
static void Main(string[] args) { ActorSystem system = ActorSystem.Create("calc-system"); IActorRef calculator = system.ActorOf<CalculatorActor>("calculator"); Answer result = calculator.Ask<Answer>(new Add(1,2)).Result;
Console.WriteLine("Addition result: " + result.Value); system.Terminate(); } |
The main part of this piece of code is the calculator.Ask method. Ask, as we have already mentioned, returns a Task object. In our case, we define the return object as part of the generic signature of the call calculator.Ask<Answer>. The Add message is being sent as a parameter to Ask. In order to return the result, we use .Result, as we would normally do in .NET. As the Main method is not marked as async, we are forced to call .Result; otherwise, we would use the async/await pattern.
The output of this call is, without much surprise, as shown in Figure 13.
Serialization
You have probably noticed the warning yellow message at the top of the output. Currently, Akka.NET uses NewtonsoftJsonSerializer as the default serializer, but the decision has been made to change it in favor of the Hyperion library. Therefore, you may want to install Hyperion from the Visual Studio package manager. Hyperion has some advantages over the NewtonsoftJsonSerializer.
As the url provided in the warning didn’t work for me, here we can take a look at the basic changes needed to make the warning disappear and, obviously, to set up Hyperion as the default serialization library.
The first thing to do is install the Akka.Serialization.Hyperion package. This version is still in beta at the time of writing, but is stable enough to be used.
Code Listing 32: Installing Akka.Serialization.Hyperion NuGet package
PM> Install-Package Akka.Serialization.Hyperion -pre |
The second step is to change the app.config file in order to instruct Akka.NET to use Hyperion as the default serializer.
For those familiar with .NET configurations, there is nothing fancy about this, apart from the fact that Akka.NET uses the HOCON object model in order to set up properties. For the time being, we won’t discuss all of the possible configurations available.
Code Listing 33: HOCON configuration in the app.config
<configSections> <section name="akka" type="Akka.Configuration.Hocon.AkkaConfigurationSection, Akka" /> </configSections> <akka> <hocon> <![CDATA[ akka { actor { serializers { hyperion = "Akka.Serialization.HyperionSerializer, Akka.Serialization.Hyperion" } serialization-bindings { "System.Object" = hyperion } } } ]]> </hocon> </akka> |
Conclusion
In this chapter, we have seen how to create actors with or without Props. We have also seen the basic building blocks when it comes to the creation and instantiation of an ActorSystem, created instances of actors, and just scratched the surface of passing a message to an actor.
Even though we didn’t get into details about HOCON configuration, we have seen that Akka.NET supports this way of setting up the configuration properties, and that it’s quite easy to configure a default serializer.
We’ve covered quite a lot of concepts in such a small amount of code.
- 1800+ high-performance UI components.
- Includes popular controls such as Grid, Chart, Scheduler, and more.
- 24x5 unlimited support by developers.