

The WPF TreeView control is a list view that represents hierarchical data in a tree-like structure with expand and collapse node options. This control provides an optimized resource reuse strategy, a smooth scrolling experience, and virtualization. It helps illustrate an office hierarchy, organizational structure, or nested relationships in an application. This TreeView control in WPF (.NET Framework and also .NET Core) is now available in our 2020 Volume 2 release.
Let’s have a look at the key features of WPF TreeView in detail!
Data binding
The data binding support in WPF TreeView control allows users to bind the hierarchical data. You can also populate nodes and add them to the TreeView.
Populate nodes by data binding: bound mode
TreeView nodes can be populated in bound mode by binding a collection of hierarchical data models to the ItemsSource property.
Populating nodes without data source: unbound mode
You can create and manage the TreeViewNode objects by yourself to display the data in a hierarchical view. You can also create the node hierarchy by adding one or more root nodes to the TreeView.Nodes collection. Each TreeViewNode can have more than one node added to its Children collection. You can nest tree view nodes to whatever depth you require.
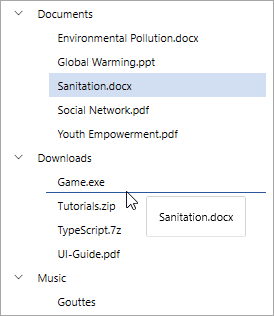
Selection
TreeView lets you select a node or multiple nodes with the following built-in selection modes:
- Single: Only one node can be selected.
- Single deselect: Only one node can be selected, and it can be deselected by tapping again on that node.
- Multiple: Multiple nodes can be selected and deselected.
- Extended: Multiple nodes can be selected and deselected using the common modified keys.
Refer to the following screenshot.

On-demand loading
TreeView has a load-on-demand option that allows you to load huge amounts of data dynamically with a loading indicator, which improves the control’s performance.

Animation
This feature provides default animation support while expanding or collapsing the TreeView nodes.

Template
The TreeView control allows you to customize an entire tree’s nodes by hosting any image or custom view using a template. The control supports customizing each node (both parent and child nodes) through dynamic selection of the UI using a data template selector.
Auto-size tree nodes
This feature automatically resizes the tree node’s height based on the node’s content to enhance content readability. Additionally, you can set the height of the tree node to one level or one node conditionally.

Drag and drop
This feature provides built-in drag-and-drop support to allow end users to rearrange the nodes. It also supports dragging and dropping nodes between TreeViews or another external control.
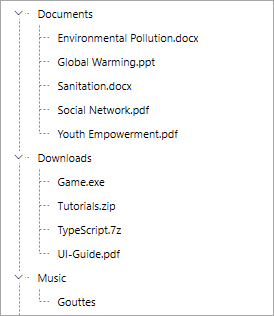
Tree lines
This feature shows a line between the tree nodes. You can decide where the lines should be drawn between the tree nodes at the root of the TreeView control.
Getting started with TreeView
We have seen the primary features of the WPF TreeView control. This section will explain the steps to add the WPF TreeView to your application and use its basic features.
Step 1: Create a simple WPF project.
Create a new WPF project in Visual Studio to work with TreeView.
Step 2: Add dependent assembly reference of TreeView control.
The Syncfusion WPF control libraries are available in nuget.org. To add SfTreeView to your project, open the NuGet package manager in Visual Studio, search for Syncfusion.SfTreeView.WPF, and then install it.
Step 3: Create a data source for the application.
Create a simple data source for the TreeView, as shown in the following code example.
Here, we are giving the file details as data.
public class Folder : INotifyPropertyChanged
{
    private string fileName;
    private ImageSource imageIcon;
    private ObservableCollection<File> files;

    public Folder()
    {
    }

    public ObservableCollection<File> Files
    {
        get { return files; }
        set
        {
            files = value;
            RaisedOnPropertyChanged("SubFiles");
        }
    }

    public string FileName
    {
        get { return fileName; }
        set
        {
            fileName = value;
            RaisedOnPropertyChanged("FileName");
        }
    }

    public ImageSource ImageIcon
    {
        get { return imageIcon; }
        set
        {
            imageIcon = value;
            RaisedOnPropertyChanged("ImageIcon");
        }
    }

    public event PropertyChangedEventHandler PropertyChanged;

    public void RaisedOnPropertyChanged(string _PropertyName)
    {
        if (PropertyChanged != null)
        {
            PropertyChanged(this, new PropertyChangedEventArgs(_PropertyName));
        }
    }
}

public class File : INotifyPropertyChanged
{
    private string fileName;
    private ImageSource imageIcon;
    private ObservableCollection<SubFile> subFiles;

    public File()
    {
    }

    public ObservableCollection<SubFile> SubFiles
    {
        get { return subFiles; }
        set
        {
            subFiles = value;
            RaisedOnPropertyChanged("SubFiles");
        }
    }

    public string FileName
    {
        get { return fileName; }
        set
        {
            fileName = value;
            RaisedOnPropertyChanged("FileName");
        }
    }

    public ImageSource ImageIcon
    {
        get { return imageIcon; }
        set
        {
            imageIcon = value;
            RaisedOnPropertyChanged("ImageIcon");
        }
    }

    public event PropertyChangedEventHandler PropertyChanged;

    public void RaisedOnPropertyChanged(string _PropertyName)
    {
        if (PropertyChanged != null)
        {
            PropertyChanged(this, new PropertyChangedEventArgs(_PropertyName));
        }
    }
}

public class SubFile : INotifyPropertyChanged
{
    private string fileName;
    private ImageSource imageIcon;

    public SubFile()
    {
    }

    public string FileName
    {
        get { return fileName; }
        set
        {
            fileName = value;
            RaisedOnPropertyChanged("FolderName");
        }
    }

    public ImageSource ImageIcon
    {
        get { return imageIcon; }
        set
        {
            imageIcon = value;
            RaisedOnPropertyChanged("ImageIcon");
        }
    }

    public event PropertyChangedEventHandler PropertyChanged;

    public void RaisedOnPropertyChanged(string _PropertyName)
    {
        if (PropertyChanged != null)
        {
            PropertyChanged(this, new PropertyChangedEventArgs(_PropertyName));
        }
    }
}
Step 4: Creating an ItemsSource for TreeView
Create the view model with the collection of FileManager and initialize the collection with required number of data objects like in the following code example.
public class FileManagerViewModel
{
    public ObservableCollection<Folder> Folders { get; set; }

    public ObservableCollection<File> Files { get; set; }

    public ObservableCollection<SubFile> SubFiles { get; set; }

    public FileManagerViewModel()
    {
        this.Folders = GetFiles();
    }

    private ObservableCollection<Folder> GetFiles()
    {
        var nodeImageInfo = new ObservableCollection<Folder>();
        Assembly assembly = typeof(NodeWithImage).GetTypeInfo().Assembly;

        var doc = new Folder() { FileName = "Documents", ImageIcon = ImageSource.FromResource("SampleBrowser.SfTreeView.Icons.NodeWithImage.treeview_folder.png", assembly) };
        var download = new Folder() { FileName = "Downloads", ImageIcon = ImageSource.FromResource("SampleBrowser.SfTreeView.Icons.NodeWithImage.treeview_folder.png", assembly) };
        var mp3 = new Folder() { FileName = "Music", ImageIcon = ImageSource.FromResource("SampleBrowser.SfTreeView.Icons.NodeWithImage.treeview_folder.png", assembly) };
        var pictures = new Folder() { FileName = "Pictures", ImageIcon = ImageSource.FromResource("SampleBrowser.SfTreeView.Icons.NodeWithImage.treeview_folder.png", assembly) };
        var video = new Folder() { FileName = "Videos", ImageIcon = ImageSource.FromResource("SampleBrowser.SfTreeView.Icons.NodeWithImage.treeview_folder.png", assembly) };

        var pollution = new File() { FileName = "Environmental Pollution.docx", ImageIcon = ImageSource.FromResource("SampleBrowser.SfTreeView.Icons.NodeWithImage.treeview_word.png", assembly) };
        var globalWarming = new File() { FileName = "Global Warming.ppt", ImageIcon = ImageSource.FromResource("SampleBrowser.SfTreeView.Icons.NodeWithImage.treeview_ppt.png", assembly) };
        var sanitation = new File() { FileName = "Sanitation.docx", ImageIcon = ImageSource.FromResource("SampleBrowser.SfTreeView.Icons.NodeWithImage.treeview_word.png", assembly) };
        var socialNetwork = new File() { FileName = "Social Network.pdf", ImageIcon = ImageSource.FromResource("SampleBrowser.SfTreeView.Icons.NodeWithImage.treeview_pdf.png", assembly) };
        var youthEmpower = new File() { FileName = "Youth Empowerment.pdf", ImageIcon = ImageSource.FromResource("SampleBrowser.SfTreeView.Icons.NodeWithImage.treeview_pdf.png", assembly) };

        var games = new File() { FileName = "Game.exe", ImageIcon = ImageSource.FromResource("SampleBrowser.SfTreeView.Icons.NodeWithImage.treeview_exe.png", assembly) };
        var tutorials = new File() { FileName = "Tutorials.zip", ImageIcon = ImageSource.FromResource("SampleBrowser.SfTreeView.Icons.NodeWithImage.treeview_zip.png", assembly) };
        var typeScript = new File() { FileName = "TypeScript.7z", ImageIcon = ImageSource.FromResource("SampleBrowser.SfTreeView.Icons.NodeWithImage.treeview_zip.png", assembly) };
        var uiGuide = new File() { FileName = "UI-Guide.pdf", ImageIcon = ImageSource.FromResource("SampleBrowser.SfTreeView.Icons.NodeWithImage.treeview_pdf.png", assembly) };

        var song = new File() { FileName = "Gouttes", ImageIcon = ImageSource.FromResource("SampleBrowser.SfTreeView.Icons.NodeWithImage.treeview_mp3.png", assembly) };

        var camera = new File() { FileName = "Camera Roll", ImageIcon = ImageSource.FromResource("SampleBrowser.SfTreeView.Icons.NodeWithImage.treeview_folder.png", assembly) };
        var stone = new File() { FileName = "Stone.jpg", ImageIcon = ImageSource.FromResource("SampleBrowser.SfTreeView.Icons.NodeWithImage.treeview_png.png", assembly) };
        var wind = new File() { FileName = "Wind.jpg", ImageIcon = ImageSource.FromResource("SampleBrowser.SfTreeView.Icons.NodeWithImage.treeview_png.png", assembly) };

        var img0 = new SubFile() { FileName = "WIN_20160726_094117.JPG", ImageIcon = ImageSource.FromResource("SampleBrowser.SfTreeView.Icons.NodeWithImage.treeview_img0.png", assembly) };
        var img1 = new SubFile() { FileName = "WIN_20160726_094118.JPG", ImageIcon = ImageSource.FromResource("SampleBrowser.SfTreeView.Icons.NodeWithImage.treeview_img1.png", assembly) };

        var video1 = new File() { FileName = "Naturals.mp4", ImageIcon = ImageSource.FromResource("SampleBrowser.SfTreeView.Icons.NodeWithImage.treeview_video.png", assembly) };
        var video2 = new File() { FileName = "Wild.mpeg", ImageIcon = ImageSource.FromResource("SampleBrowser.SfTreeView.Icons.NodeWithImage.treeview_video.png", assembly) };

        doc.Files = new ObservableCollection<File>
            {
                pollution,
                globalWarming,
                sanitation,
                socialNetwork,
                youthEmpower
            };

        download.Files = new ObservableCollection<File>
            {
                games,
                tutorials,
                typeScript,
                uiGuide
            };

        mp3.Files = new ObservableCollection<File>
            {
                song
            };

        pictures.Files = new ObservableCollection<File>
            {
                camera,
                stone,
                wind
            };

        camera.SubFiles = new ObservableCollection<SubFile>
            {
                img0,
                img1
            };

        video.Files = new ObservableCollection<File>
            {
                video1,
                video2
            };

        nodeImageInfo.Add(doc);
        nodeImageInfo.Add(download);
        nodeImageInfo.Add(mp3);
        nodeImageInfo.Add(pictures);
        nodeImageInfo.Add(video);
        return nodeImageInfo;
    }
}
Step 5: Bind to the hierarchical data source.
Set a hierarchical data collection to the ItemsSource property, and then set the TargetType and ChildPropertyName property values in the HierarchyPropertyDescriptors like in the following code example.
<Window x:Class="WpfApp1.MainWindow"
        xmlns="http://schemas.microsoft.com/winfx/2006/xaml/presentation"
        xmlns:x="http://schemas.microsoft.com/winfx/2006/xaml"
        xmlns:d="http://schemas.microsoft.com/expression/blend/2008"
        xmlns:mc="http://schemas.openxmlformats.org/markup-compatibility/2006"
        xmlns:local="clr-namespace:WpfApp1"
        xmlns:syncfusion="http://schemas.syncfusion.com/wpf"
        xmlns:treeViewEngine="clr-namespace:Syncfusion.UI.Xaml.TreeView.Engine;assembly=Syncfusion.SfTreeView.WPF"
        mc:Ignorable="d"
        Title="MainWindow" >

	<Window.DataContext>
        <local:FileManagerViewModel/>
        </Window.DataContext>

    <Grid>
        <syncfusion:SfTreeView x:Name="treeView" ItemsSource="{Binding ImageNodeInfo}">
            <sfTreeView:SfTreeView.HierarchyPropertyDescriptors>
                <treeviewengine:HierarchyPropertyDescriptor TargetType="{x:Type local:Folder}" ChildPropertyName="Files"/>
                <treeviewengine:HierarchyPropertyDescriptor TargetType="{x:Type local:File}" ChildPropertyName="SubFiles"/>
            </sfTreeView:SfTreeView.HierarchyPropertyDescriptors>
        </syncfusion:SfTreeView>
    </Grid>
</Window>
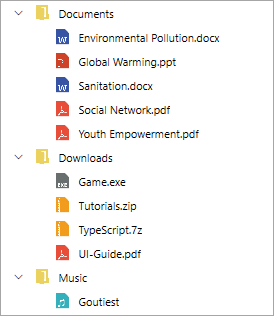
On executing this code example, we will get output like in the following screenshot.
Conclusion
In this blog post, we have walked you through the features of the Syncfusion WPF TreeView control and the steps to get started with it. This control is available in our 2020 Volume 2 release. With this control, you can easily add a TreeView UI to your application and visualize your organization’s hierarchy in an elegant manner.
You can always download our free evaluation to see all our controls in action. Learn about the control’s advanced features in our documentation.
If you have any questions, please let us know in the comments section below. You can also contact us through our support forum, Direct-Trac, or feedback portal. We are always happy to assist you.


 No spam, just valuable updates.
Comments (1)
The example given is wrong and does not work.