

TL;DR: Struggling to make your PDFs accessible and compliant with modern standards? This blog introduces PDF/UA-2, the latest ISO standard for accessible PDFs, and shows how to create well-tagged, inclusive documents using the Syncfusion® .NET PDF library. Learn how to implement semantic tagging, support screen readers, and future-proof your digital content, all with just a few lines of code.
PDFs are everywhere, but not everyone can access them equally. For users relying on screen readers or keyboard navigation, poorly structured PDFs are a barrier. In this blog, we explore how the new PDF/UA-2 standard and Syncfusion’s .NET PDF library empower developers to create inclusive, accessible documents with ease.
What is PDF/UA? (Universal Accessibility)
PDF/UA, which stands for Portable Document Format/Universal Accessibility, is the ISO standard (ISO 14289) for accessible PDF documents. Its main purpose is to ensure that PDFs can be read and navigated by people using assistive tools like screen readers, braille displays, or keyboard navigation. PDF/UA sets specific requirements around document structure, tagging, alternate text, and navigation to make sure nobody is left out.
From PDF/UA-1 to PDF/UA-2
The first release of the PDF/UA standard, PDF/UA-1, laid the foundation for accessible PDF creation. However, advancements in both the PDF format and accessibility technologies led to the need for an updated standard: PDF/UA-2.
What’s new in PDF/UA-2?
PDF/UA-2 includes several key enhancements:
- Alignment with PDF 2.0 features: Improved support for metadata, digital signatures, and advanced navigation structures.
- Stricter tagging rules: Enhanced semantic tagging requirements to help assistive technologies better interpret content.
- Support for rich media: Better accessibility for PDFs containing video, audio, and interactive forms.
- Updated conformance requirements: Clearer criteria for accessibility validation.
Well-tagged PDF: A complementary standard
While PDF/UA addresses overall accessibility, the well-tagged PDF standard focuses on best practices for applying structure to PDF content. This involves using proper tags for headings, lists, tables, and figures so that assistive technologies can present content logically and meaningfully.
Proper tagging ensures that users can navigate documents easily, understand content relationships, and interact with forms or media effectively.
Key features of PDF/UA-2
PDF/UA-2 addresses several important aspects of PDF accessibility:
- Semantic tagging: Correct use of structural tags for elements such as headings, paragraphs, and tables.
- Alternate text: Descriptive text alternatives (alt text) for images, charts, and other non-text elements.
- Logical reading order: Content should follow a meaningful sequence, regardless of layout.
- Language specification: Declare document languages to improve screen reader pronunciation and context.
- Navigation aids: Use bookmarks, headings, and links for enhanced keyboard and assistive tool navigation.
- Accessible forms and media: Interactive elements should be properly labeled and fully operable via assistive technologies.
Benefits of adopting PDF/UA-2 and well-tagged PDF standards
Implementing these standards benefits both users and organizations:
- Legal compliance: Meet global accessibility regulations.
- Broader reach: Make content usable by a wider audience.
- Enhanced user experience: Improve clarity and navigation for all users.
- SEO advantages: Semantic structure helps search engines better index your content.
- Future-proofing: Stay aligned with evolving accessibility requirements.
Creating a PDF/UA-2 document using Syncfusion® PDF library
The Syncfusion® .NET PDF library supports creating a PDF/UA-2 document programmatically. You can refer to the following steps and code examples for creating PDF/UA-2 documents.
1. Create a PDF Document with PDF 2.0 Version.
// Create a new PDF document
using (PdfDocument document = new PdfDocument())
{
    // Set the PDF file version to 2.0
    document.FileStructure.Version = PdfVersion.Version2_0;
}
2. Enable auto tagging.
// Enable the auto tag property as true
document.AutoTag = true;
3. Add the document title and content.
// Set the document title
document.DocumentInformation.Title = "PDF/UA-2";

// Add a new page to the document
PdfPage page1 = document.Pages.Add();

// Load the image from the disk
FileStream imageStream = new FileStream("data/page1.jpg", FileMode.Open, FileAccess.Read, FileShare.ReadWrite);
PdfBitmap image = new PdfBitmap(imageStream);

// Draw the image to page 1
page1.Graphics.DrawImage(image, 0, 0, page1.GetClientSize().Width, page1.GetClientSize().Height - 20);
4. Save the document.
// Save the document
using (FileStream outputFileStream = new FileStream("PDF_UA_2.pdf", FileMode.Create, FileAccess.ReadWrite))
{
    // Save the document
    document.Save(outputFileStream);
}
Complete code example:
// Create a new PDF document
using (PdfDocument document = new PdfDocument())
{
    // Set the PDF file version to 2.0
    document.FileStructure.Version = PdfVersion.Version2_0;

    // Enable the auto tag property as true
    document.AutoTag = true;

    // Set the document title
    document.DocumentInformation.Title = "PDF/UA-2";

    // Add a new page to the document
    PdfPage page1 = document.Pages.Add();

    // Load the image from the disk
    FileStream imageStream = new FileStream("data/page1.jpg", FileMode.Open, FileAccess.Read, FileShare.ReadWrite);
    PdfBitmap image = new PdfBitmap(imageStream);

    // Draw the image to page 1
    page1.Graphics.DrawImage(image, 0, 0, page1.GetClientSize().Width, page1.GetClientSize().Height - 20);

    // Create a second page
    PdfPage page2 = document.Pages.Add();

    // Read the font from the disk
    FileStream fontStream = new FileStream("data/arial.ttf", FileMode.Open, FileAccess.Read);

    // Create a font object for adding content text
    PdfTrueTypeFont contentFont = new PdfTrueTypeFont(fontStream, 9);

    // Create a font object for adding title text
    PdfTrueTypeFont TitleFont = new PdfTrueTypeFont(contentFont, 22);

    // Create a font object for adding header text
    PdfTrueTypeFont headerFont = new PdfTrueTypeFont(contentFont, 16);

    PdfLayoutResult result = null;

    // Draw the title text
    DrawText("Chapter 1 Conceptual Overview", TitleFont, page2, new RectangleF(100, 0, page2.GetClientSize().Width - 100, 40), out result);

    // Draw the title paragraph text
    DrawText(pdfChapter, contentFont, result.Page, new RectangleF(0, result.Bounds.Bottom + 10, result.Page.GetClientSize().Width, 70), out result);

    // Draw the remaining texts
    DrawText("1.0 Header", headerFont, result.Page, new RectangleF(0, result.Bounds.Bottom + 30, result.Page.GetClientSize().Width, 40), out result);
    DrawText(header, contentFont, result.Page, new RectangleF(0, result.Bounds.Bottom + 10, result.Page.GetClientSize().Width, 40), out result);
    DrawText("1.2 Body", headerFont, result.Page, new RectangleF(0, result.Bounds.Bottom + 30, result.Page.GetClientSize().Width, 40), out result);
    DrawText(body, contentFont, result.Page, new RectangleF(0, result.Bounds.Bottom + 10, result.Page.GetClientSize().Width, 120), out result);
    DrawText("1.3 Cross-reference Table", headerFont, page2, new RectangleF(0, result.Bounds.Bottom + 30, result.Page.GetClientSize().Width, 40), out result);
    DrawText(crossRef, contentFont, result.Page, new RectangleF(0, result.Bounds.Bottom + 10, result.Page.GetClientSize().Width, 50), out result);
    DrawText("1.4 Trailer", headerFont, result.Page, new RectangleF(0, result.Bounds.Bottom + 30, result.Page.GetClientSize().Width, 40), out result);
    DrawText(trailer, contentFont, result.Page, new RectangleF(0, result.Bounds.Bottom + 10, result.Page.GetClientSize().Width, 110), out result);

    // Save the document
    using (FileStream outputFileStream = new FileStream("PDF_UA_2.pdf", FileMode.Create, FileAccess.ReadWrite))
    {
        // Save the document
        document.Save(outputFileStream);
    }
}
DrawText helper method:
void DrawText(string text, PdfFont font, PdfPage page, RectangleF bounds, out PdfLayoutResult result)
{
// Draw text
PdfTextElement textElement = new PdfTextElement(text, font, PdfBrushes.Black);
result = textElement.Draw(page, bounds);
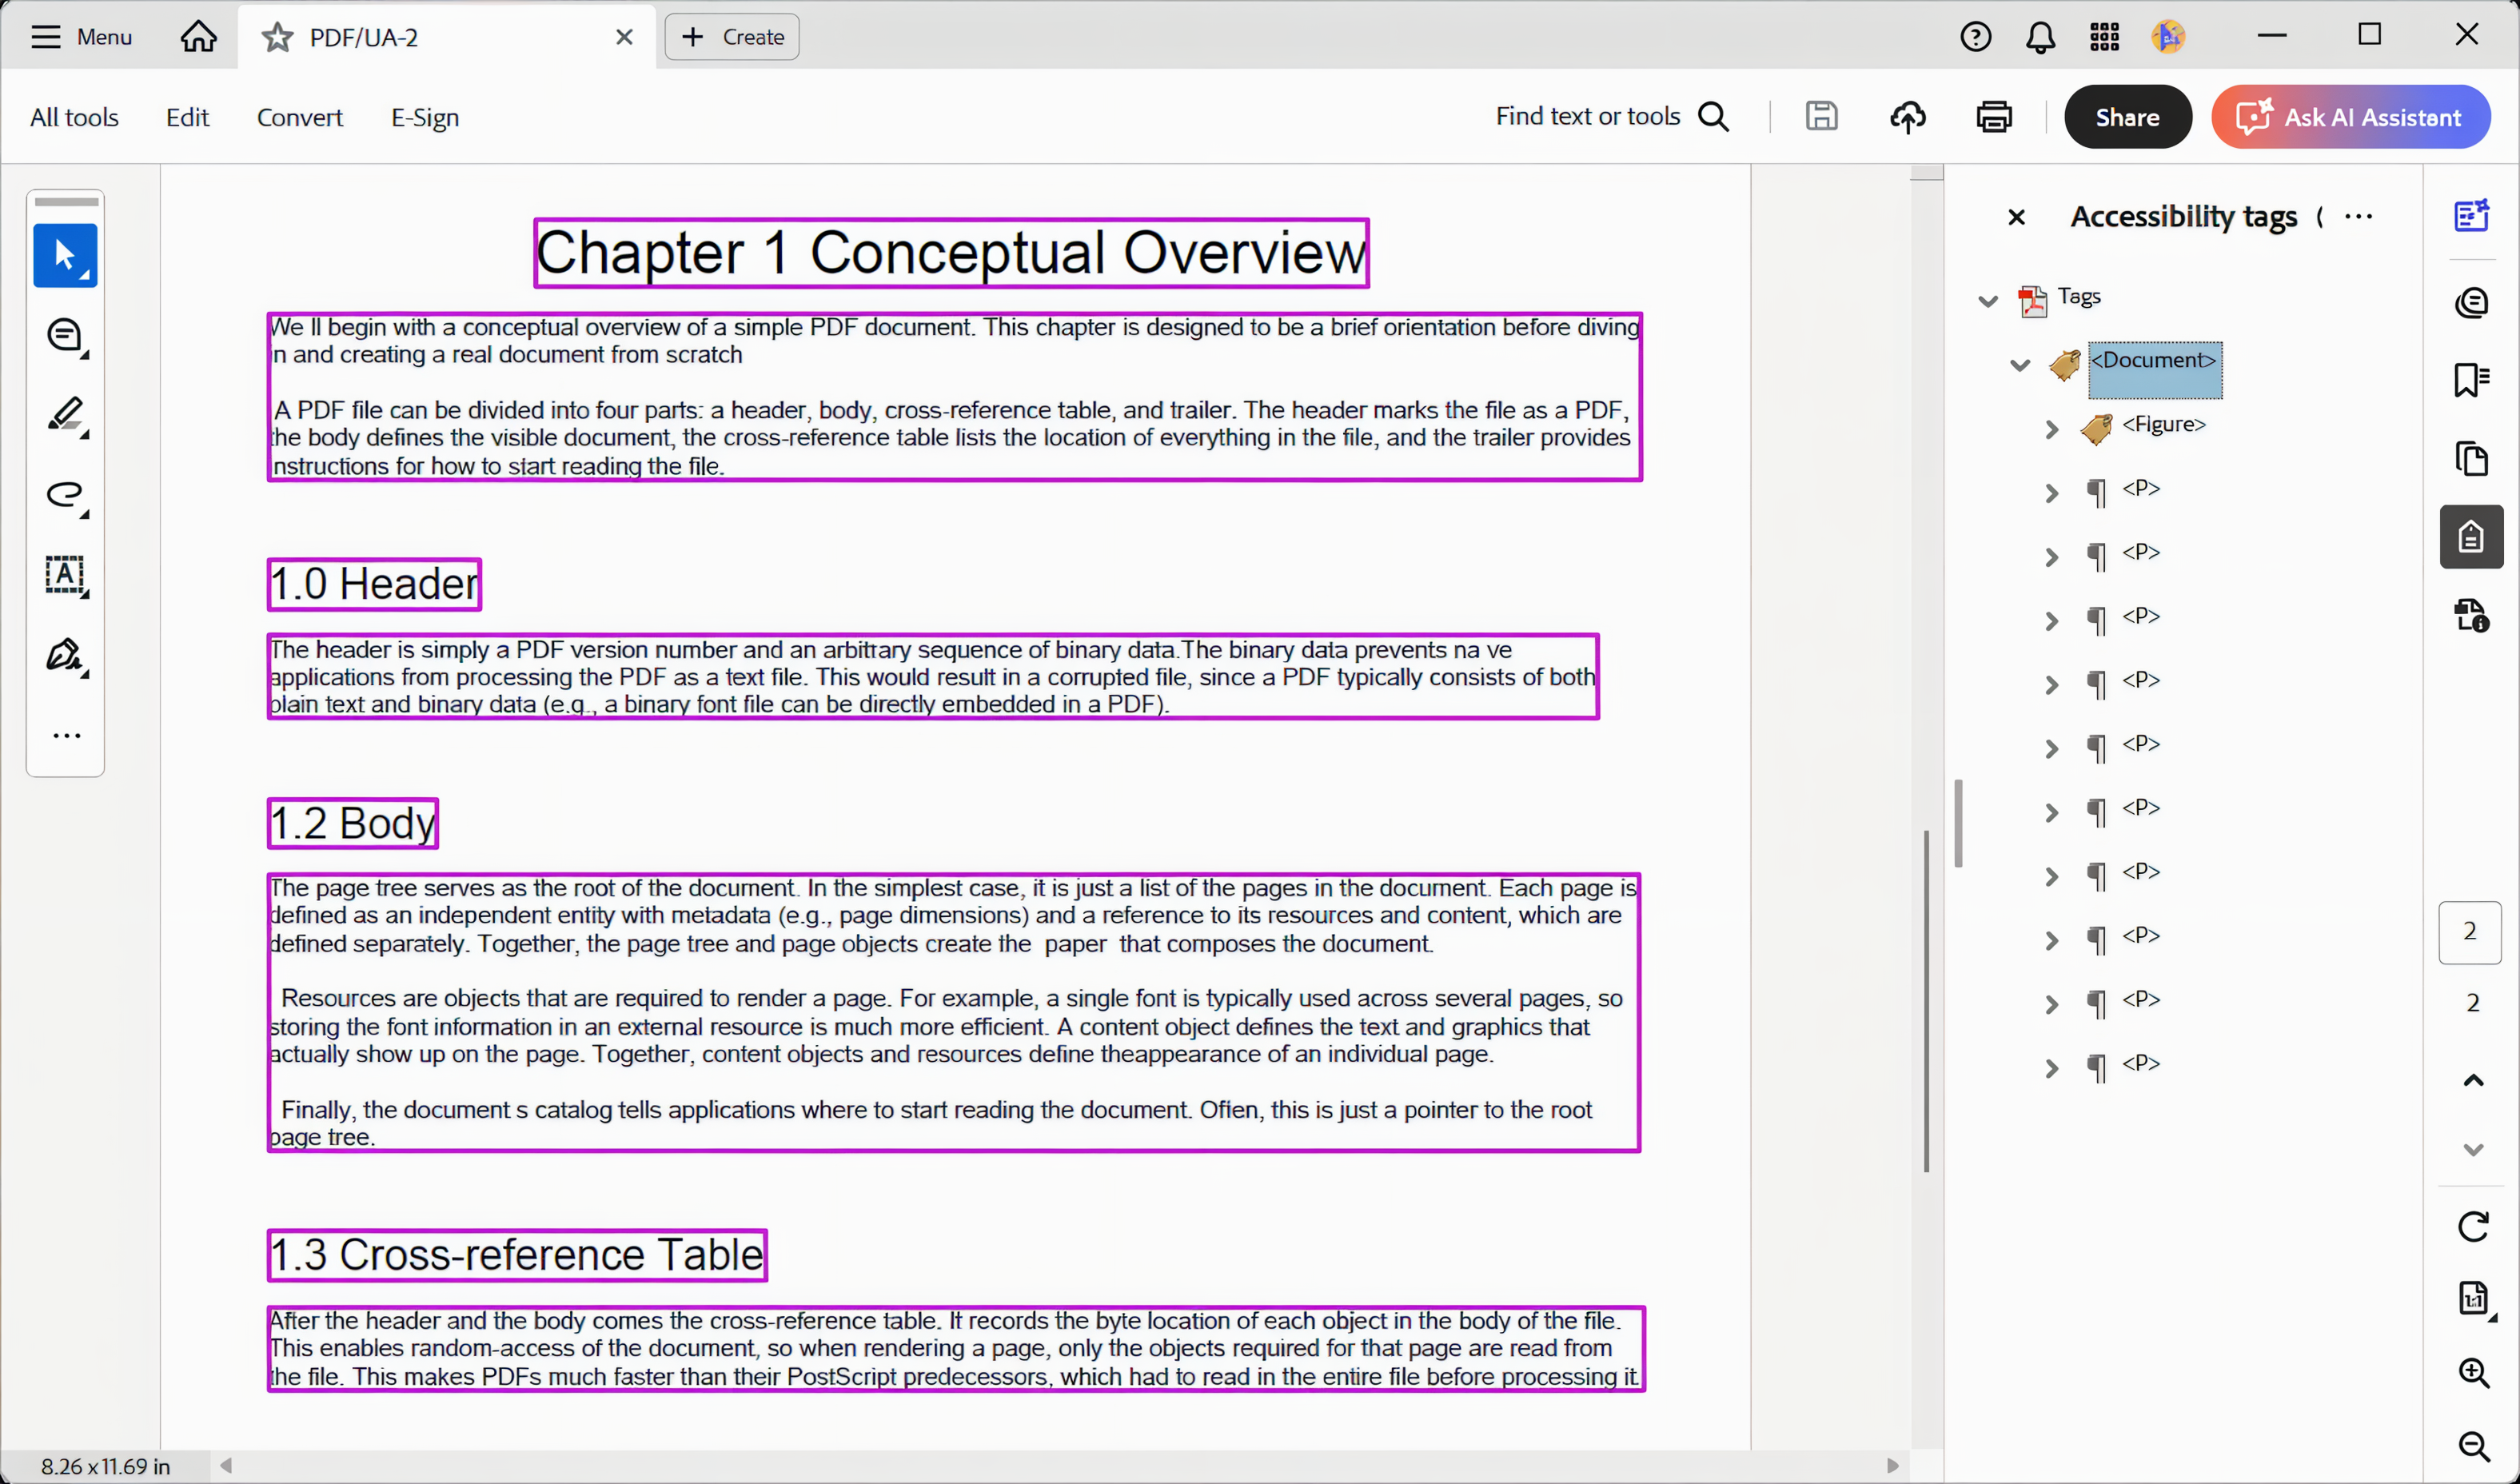
}After executing the above code, you will get the output document as follows.

Validation
You can validate the output PDF/UA-2 document using a PDF/UA validator such as the BFO Validator.

Creating a well-tagged PDF document using Syncfusion® PDF library
PDF documents with well-structured tags help users navigate content easily using assistive technologies. The Syncfusion® .NET PDF library provides a simple way to create such tagged PDF files conforming to modern accessibility standards like PDF/A-4.
Steps to create a well-tagged PDF document
1. Create a new PDF document with PDF/A-4 conformance.
// Create a new PDF document
using (PdfDocument document = new PdfDocument(PdfConformanceLevel.Pdf_A4))
2. Set file version (PDF 2.0) and enable AutoTag property.
// Set the PDF file version to 2.0
document.FileStructure.Version = PdfVersion.Version2_0;

// Enable the auto tag property as true
document.AutoTag = true;
3. Set document information and add content.
// Set the document title
document.DocumentInformation.Title = "WTPDF";

// Add a new page to the document
PdfPage page1 = document.Pages.Add();

// Load the image from the disk
FileStream imageStream = new FileStream("data/page1.jpg", FileMode.Open, FileAccess.Read, FileShare.ReadWrite);
PdfBitmap image = new PdfBitmap(imageStream);

// Draw the image to page 1
page1.Graphics.DrawImage(image, 0, 0, page1.GetClientSize().Width, page1.GetClientSize().Height - 20);
4. Save the PDF document.
// Save the PDF to disk
using (FileStream outputStream = new FileStream("WellTaggedPDF.pdf", FileMode.Create, FileAccess.Write))
{
    document.Save(outputStream);
}
Complete code example:
// Create a new PDF document
using (PdfDocument document = new PdfDocument(PdfConformanceLevel.Pdf_A4))
{
    // Set the PDF file version to 2.0
    document.FileStructure.Version = PdfVersion.Version2_0;

    // Enable the auto tag property as true
    document.AutoTag = true;

    // Set the document title
    document.DocumentInformation.Title = "WTPDF";

    // Add a new page to the document
    PdfPage page1 = document.Pages.Add();

    // Load the image from the disk
    FileStream imageStream = new FileStream("data/page1.jpg", FileMode.Open, FileAccess.Read, FileShare.ReadWrite);
    PdfBitmap image = new PdfBitmap(imageStream);

    // Draw the image to page 1
    page1.Graphics.DrawImage(image, 0, 0, page1.GetClientSize().Width, page1.GetClientSize().Height - 20);

    // Create a second page
    PdfPage page2 = document.Pages.Add();

    // Read the font from the disk
    FileStream fontStream = new FileStream("data/arial.ttf", FileMode.Open, FileAccess.Read);

    // Create a font object for adding content text
    PdfTrueTypeFont contentFont = new PdfTrueTypeFont(fontStream, 9);

    // Create a font object for adding title text
    PdfTrueTypeFont TitleFont = new PdfTrueTypeFont(contentFont, 22);

    // Create a font object for adding header text
    PdfTrueTypeFont headerFont = new PdfTrueTypeFont(contentFont, 16);

    PdfLayoutResult result = null;

    // Draw the title text
    DrawText("Chapter 1 Conceptual Overview", TitleFont, page2, new RectangleF(100, 0, page2.GetClientSize().Width - 100, 40), out result);

    // Draw the title paragraph text
    DrawText(pdfChapter, contentFont, result.Page, new RectangleF(0, result.Bounds.Bottom + 10, result.Page.GetClientSize().Width, 70), out result);

    // Draw the remaining texts
    DrawText("1.0 Header", headerFont, result.Page, new RectangleF(0, result.Bounds.Bottom + 30, result.Page.GetClientSize().Width, 40), out result);
    DrawText(header, contentFont, result.Page, new RectangleF(0, result.Bounds.Bottom + 10, result.Page.GetClientSize().Width, 40), out result);
    DrawText("1.2 Body", headerFont, result.Page, new RectangleF(0, result.Bounds.Bottom + 30, result.Page.GetClientSize().Width, 40), out result);
    DrawText(body, contentFont, result.Page, new RectangleF(0, result.Bounds.Bottom + 10, result.Page.GetClientSize().Width, 120), out result);
    DrawText("1.3 Cross-reference Table", headerFont, page2, new RectangleF(0, result.Bounds.Bottom + 30, result.Page.GetClientSize().Width, 40), out result);
    DrawText(crossRef, contentFont, result.Page, new RectangleF(0, result.Bounds.Bottom + 10, result.Page.GetClientSize().Width, 50), out result);
    DrawText("1.4 Trailer", headerFont, result.Page, new RectangleF(0, result.Bounds.Bottom + 30, result.Page.GetClientSize().Width, 40), out result);
    DrawText(trailer, contentFont, result.Page, newწ

    System: new RectangleF(0, result.Bounds.Bottom + 10, result.Page.GetClientSize().Width, 110), out result);
}
After executing the above steps, the resulting PDF will be tagged with the required structural semantics, enabling better support for screen readers and compliance with accessibility standards.
We can also validate these PDF files using the BFO validator.
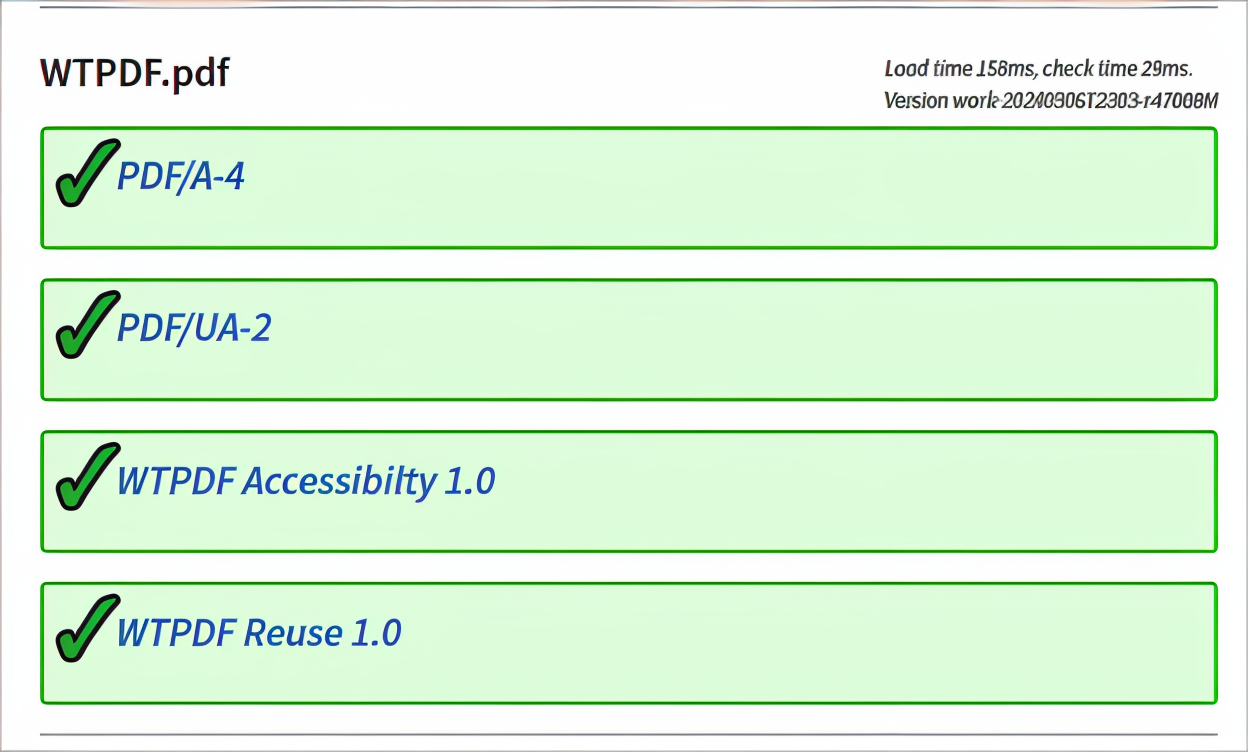
Note: The recent version of the BFO validator removes the WTPDF Accessibility checker.
GitHub reference
For more details and complete implementation, please refer to the GitHub repository.
Conclusion
Accessibility isn’t optional, it’s essential. With Syncfusion’s .NET PDF library, developers can easily create PDF/UA-2-compliant documents that meet global standards and serve all users. PDF/UA-2 and Well-Tagged PDF mark a pivotal advancement in the effort to make digital documents accessible and future-ready. By combining rich semantic structure, modern accessibility techniques, and robust PDF 2.0 features, these specifications ensure that PDFs are not just readable but truly inclusive.
The Syncfusion® .NET PDF Library provides a powerful, developer-friendly toolkit to effortlessly create PDF/UA-2-compliant, well-tagged PDFs, modernizing your accessibility work and ensuring all users have equal access to your content.
Ready to modernize your PDF workflows? Try Syncfusion® today or explore our documentation to get started.
The new version is available for current customers to download from the license and downloads page. If you are not a Syncfusion® customer, you can try our 30-day free trial for our newest features.
If you have any queries regarding these functionalities, kindly let us know by leaving a comment below or reaching out to us through our support forums, support portal, or feedback portal. We are always delighted to help you out!
 No spam, just valuable updates.