

Sooner or later, when developing an app in the real world, you will need to share variables with different components, as well as preserve their value even when changing the displayed page. Passing variables between components or pages with parameters is not the best solution in complex situations. There are various ways to solve this issue, and in this post we will see how the Model-View-ViewModel pattern can be used for state management.
First, let’s figure out the application states in Blazor.
Application state
An application state is the state of a set of variables and their values at a specific time in a specific context.
Note: By default, Blazor can handle only internal states. This means that the set of variables is closely linked to the component in which the variables have been defined. When the component is disposed of, the variables will also be lost. Just to give an example, a simple page navigation triggers this scenario.
MVVM pattern
Let’s start with a quick presentation of the Model-View-ViewModel pattern.
MVVM was developed by Microsoft to simplify event programming in Windows Presentation Foundation (WPF). The architectural pattern was first announced in John Gossman’s blog in 2005. Today it is also used with other frameworks, like Xamarin.Forms for mobile application development.
Its goal is to separate the user interface code from the business logic code, so that it is easier to write, maintain, and test applications.
Key components
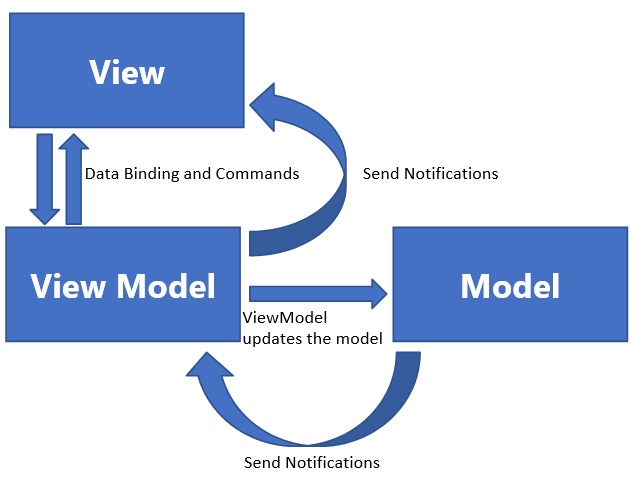
Model: An implementation of the application domain model that includes a data model along with validation logic. The model is responsible for handling the application’s data.
View: The view matches with the user interface and its code-behind. In Blazor, they are the Razor components.
ViewModel: The viewmodel provides data from the model in a way that the view can easily use it.
Binder: The binder allows the viewmodel and the view to constantly synchronize. This means that changes to the data made by the user through the view will be automatically reflected in the model, without the developer having to worry about it. Similarly, any changes made to the data in the viewmodel will be presented automatically by the view.
Please refer to the following image for a clear understanding of the MVVM pattern.
MVVM makes your application architecture loosely coupled. This means that you can change one layer without affecting the others.

The POCO classes that represent the model layer are easy to implement, nothing different from what we’re used to.
The views in Blazor pages and components must be linked to viewmodels by injection and binding. To update values in the UI from a model, something needs to be implemented in the viewmodel. That is the INotifyPropertyChanged interface.
INotifyPropertyChanged interface
This is used to notify the binding clients that a property value has been changed, in order to update them properly. This is the keystone of MVVM pattern development and in this way the pattern will be implemented properly.
The easiest way to explain this development approach is with a sample project.
Sample project
For this purpose, I developed a simple Blazor server app that implements a simple to-do list with a title, date, notes, and information about the status of the task.
Here’s the tree structure of the project.
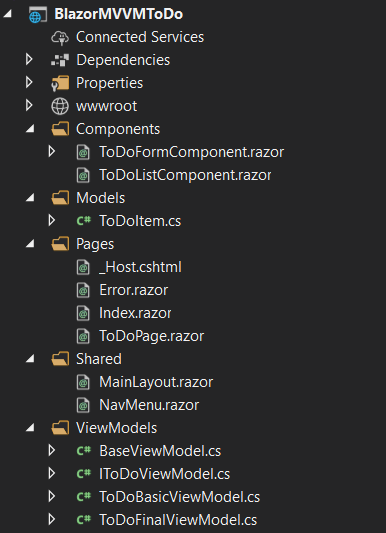
There are some differences from folder’s structure of the standard template. Here is the description of main folders:
- Components: Contains the Razor components that are used in the application. In the MVVM perspective, these are views.
- Pages: Contains the routable components. In the MVVM perspective, these are views, too.
- Model: Contains POCO classes describing the data objects.
- ViewModels: Contains all viewmodel classes and the base class from which they are inherited.
Viewmodel
Let’s talk about the most important class: viewmodel.
Step 1: First things first, implement the ToDoBasicViewModel class.
As I said before, the viewmodel should implement the INotifyPropertyChanged interface. The first line declares the PropertyChanged event, which is required by the interface.
public class ToDoBasicViewModel : INotifyPropertyChanged
{
    public event PropertyChangedEventHandler PropertyChanged;
}
In the OnPropertyChanged event handler, check if the propertyName in the argument is null. If not, trigger the event with the name of the updated property. Refer to the following code.
private void OnPropertyChanged([CallerMemberName] string propertyName = null)
{
    PropertyChanged?.Invoke(this, new PropertyChangedEventArgs(propertyName));
}
Step 2: Here, I’ve added an IsBusy property that alerts the various components that an operation is in progress and other tasks should wait for the outcome. Therefore, any other interactions should be inhibited. It is not essential but will be useful. Refer to the following code example.
private bool isBusy =  false;
public bool IsBusy
{
    get => isBusy;
    set
    {
        isBusy = value; OnPropertyChanged();
    }
}Step 3: To inject the viewmodel using dependency injection, you must declare the ViewModel class in the project’s startup.cs file and should register it as Scoped. For future improvements, we will also extract the interface of the viewmodel in order to use it for injection. Refer to the following code.
services.AddScoped<IToDoViewModel, ToDoBasicViewModel>();
Step 4: Now let’s move on to the main page, ToDoPage.razor, and its nested components. First, an instance of the viewmodel is injected.
Then, in order to successfully update the entire view, the page and its components, within the OnInitializedAsync method, we have to subscribe the PropertyChanged event and invoke the Blazor StateHasChanged method. Refer to the following code example.
protected override async Task OnInitializedAsync()
{
    ViewModel.PropertyChanged += async (sender, e) => {
        await InvokeAsync(() =>
        {
            StateHasChanged();
        });
    };
    await base.OnInitializedAsync();
}
Step 5: To avoid memory leaks, we have implemented the IDisposable interface as shown in the following code.
public void Dispose()
{
    ViewModel.PropertyChanged -= OnPropertyChangedHandler;
}
Step 6: Now, by taking advantage of CascadingValues, we can pass viewmodel as a parameter to the child components. In this way, they will also receive information about the state change from the parent component. Refer to the following code example.
<CascadingValue Value=@ViewModel Name="ViewModel">
    <ToDoListComponent />
    <ToDoFormComponent />
</CascadingValue>
The components ToDoFormComponent.razor and ToDoListComponent.razor are quite simple. The former implements a form for inserting and editing. The latter exposes the list of to-do items. Both are bound to the viewmodel elements.
Running the app, all works fine: components do their duty by sharing the state through the viewmodel and the state will never be lost even when navigating from one page to another.
Such a small application could have been developed in many other simpler ways. This is only a sample. Try to think of this architecture in applications with a much higher degree of complexity, with many nested components and many more variables: the benefits are many and relevant.
Now, let’s try to further improve our code by making it reusable.
Code re-usability
It would be nice to extrapolate the generic methods of the viewmodel and create a base class from which all viewmodels are inherited.
To do so, please refer to the following code example.
public abstract class BaseViewModel: INotifyPropertyChanged
{
    private bool isBusy = false;
    public bool IsBusy
    {
        get => isBusy;
        set
        {
            SetValue(ref isBusy, value);
        }
    }

    public event PropertyChangedEventHandler PropertyChanged;

    protected virtual void OnPropertyChanged([CallerMemberName] string propertyName = null)
    {

        PropertyChanged?.Invoke(this, new PropertyChangedEventArgs(propertyName));
    }
    protected void SetValue<T>(ref T backingFiled, T value, [CallerMemberName] string propertyName = null)
    {
    if (EqualityComparer<T>.Default.Equals(backingFiled, value)) return;
        backingFiled = value;
    OnPropertyChanged(propertyName);
    }
}
As you can see, implementing the SetValue helper has also improved the system as far as how it raises the OnPropertyChanged event.
Our new ToDoFinalViewModel will now be easier. Please refer to the following code example.
public class ToDoFinalViewModel : BaseViewModel, IToDoViewModel
{
    private List<ToDoItem> toDoItemList = new List<ToDoItem>();
    public List<ToDoItem> ToDoItemList
    {
        get => toDoItemList;
        private set
        {
            SetValue(ref toDoItemList, value);
        }
    }

    private ToDoItem toDoItem = new ToDoItem();
    public ToDoItem ToDoItem
    {
        get => toDoItem;
    set
    {
        SetValue(ref toDoItem, value);
    }
}

public int ItemsToDo
{
    get
    {
        return ToDoItemList.Where(i => i.Done.Equals(false)).Count();
    }
}

public void SaveToDoItem(ToDoItem todoitem)
{
    IsBusy = true;
    if (todoitem.Id.Equals(Guid.Empty))
    {
        todoitem.Id = Guid.NewGuid();
    }
    else
    {
        toDoItemList.Remove(todoitem);
    }

    toDoItemList.Add(todoitem);

    OnPropertyChanged(nameof(ToDoItemList));
    IsBusy = false;
}
Now, taking advantage of the Dependency Injection system, let’s edit the startup.cs file as like the following code.
services.AddScoped<IToDoViewModel, ToDoFinalViewModel>();
That’s it! No other changes are needed.
Resource
This complete application is available in this GitHub location.
Conclusion
In this post, we saw a smart way to adopt the Model-View-ViewModel pattern in Blazor projects. Blazor doesn’t have any native support for MVVM, but we’ve also shown that it’s pretty easy to use with it. By adopting this pattern, we have solved our state management problems and also improved the organization of our code. In addition, now we can write unit tests to check the behavior of our code.
Syncfusion Essential Studio® for Blazor offers over 80 high-performance, lightweight, and responsive UI components for the web, including file-format libraries, in a single package. Please take a look at our Blazor live demos, too.
If you are not yet a Syncfusion customer, you can try our 30-day free trial to check out our available features.
If you wish to send us feedback or would like to ask any questions, please feel free to post them in the comments section below, or contact us through our support forum, support portal, or feedback portal. As always, we would like to learn from you!


Related blogs
- Enhancing Data Visualization with a Nested Grid UI in Blazor TreeGrid
- Smartly Customize the Blazor Linear Gauge to Reproduce a Step Progress Bar
- Seamlessly Perform Batch CRUD Operations in Blazor Scheduler with ODATA Adaptor
- Simple Steps to Integrate OpenAI (ChatGPT) with Syncfusion’s Blazor Rich Text Editor
 No spam, just valuable updates.
Comments (12)
I really love that you’re advocating MVVM. Imo, it is a superior front end set of patterns that could benefit all javascript front-end development frameworks (angular, vue, etc.) as well.
Using event aggregators with this pattern can eliminate the need to use trendy state-store FLUX patterns and frameworks, and really clean up / simplify code. I’ve been pushing for the use of MVVM over some of the newer, trendy FLUX patterns for years now.
I hope that people continue to realize the benefits of MVVM and give it serious consideration in their current or future projects.
Very helpful article. Many thanks!
Interesting article. Great !!!
Some sample how handle with List elements? When I add an element in my ViewModel, the View not refresh. I tried with ObservableCollection but I had not lucky.
Of the top of my head what i might try to get that working is to have base view model (for example ItemsVMBase that derives from a view model base class that is described in actual blog post) for views that handle lists of some type.
That view model would have public property of type ObservableCollection named Items { get; } . Then you could have a component base that has injectable ‘[Inject]’ property or a parameter ‘[Parameter]’ property for viewmodel that derives from that ItemsVMBase “ItemsViewComponentBase where T : ItemsVMBase”.
In the ItemsViewComponentBase OnInitializedAsync() you can then subscribe to Items.CollectionChanged event and in the event handler you can do that “await InvokeAsync(() =>
{
StateHasChanged();
});”
If the injected view model is instantiated to Scoped or Singleton you should also have that dispose method in the base class so the garbage collector can properly collect the view when it is disposed. Also that items property should be instantiated in the constructor of ItemsVMBase or inline in the property declaration “Items { get; } = new ObservableCollection () to avoid null exceptions.
Thanks for great article.
Could you please provide a sample app to call api from viewmodel?
Thanks Raj for your positive comment. Calling API Rest from the viewmodel is like calling them from anywhere else in the application. There are no substantial differences. I hope I have correctly understood your question.
Thanks for the great and easy to understand article. I can’t find anything like this that works for more complex classes. Where the class doesnt only consist of ‘flat’ propertys but also of nestet List etc.
There isn’t much out there on that. Please, please do something for a class like this
public class Customer
{
string Name {get; set; }
List MyAddresses {get; set;}
}
public class MyAddress
{
string Street{get; set;}
}
….
How to subcribe/fire property changed Event when a streetname is changed in the List?!
In the ToDoPage.razor you have this method
async void OnPropertyChangedHandler(object sender, PropertyChangedEventArgs e)
{
await InvokeAsync(() =>
{
StateHasChanged();
});
}
That is only being used in the Dispose(), as unsubscribing to the method, but it is never subscribed to.
The code currently lookes like this:
protected override async Task OnInitializedAsync()
{
ViewModel.PropertyChanged += async (sender, e) =>
{
await InvokeAsync(() =>
{
StateHasChanged();
});
};
await base.OnInitializedAsync();
}
async void OnPropertyChangedHandler(object sender, PropertyChangedEventArgs e)
{
await InvokeAsync(() =>
{
StateHasChanged();
});
}
should it look like this instead?
protected override async Task OnInitializedAsync()
{
ViewModel.PropertyChanged += async (sender, e) =>
{
OnPropertyChangedHandler(sender, e)
};
await base.OnInitializedAsync();
}
async void OnPropertyChangedHandler(object sender, PropertyChangedEventArgs e)
{
await InvokeAsync(() =>
{
StateHasChanged();
});
}
The OnPropertyChangedHandler isnt used, im not sure why its there, the author was probably using it before he created the Base VM.
I wanted to know if there is a initial execution point in the ViewModel which like OnInitializedAsync() of the UI. which can be used to set the initial default settings. Also if There is a way to execute the Events in the ViewModels. I believe the commands part are missing in this demo. But correct me if I am wrong and kindly point me to the right direction.
This is great post and explained very well.
Can you please help/guide how to Map 2 View models into one Model
ViewModel1 has few properties and ViewModel2 has few properties.
Combination of both will be Model
Your Save implementation doesn’t make sense. You bind input values to the actual ToDoItem, so whenever you change input, that TODO item gets changed. So even if you change currently editing item without Save, changes will still be reflected in the item list, as you have changed the element by reference