

Xamarin.Forms uses a common API to render cross-platform mobile UIs. Therefore, the components can be rendered differently on each platform, using a renderer class. This renderer class creates a native control and translates the properties of the Xamarin.Forms control to it.
Custom renderers are used to ensure a consistency of appearance in elements across platforms for Xamarin controls like style, background color, text format, and so on.
Xamarin.Forms uses abstractions to define these elements. Then, it transforms each abstraction, offering an implementation and mechanism to each platform.
In this article, I will explain how to customize the TimePicker control with a Placeholder property to display text, since the Xamarin.Forms control does not come with this customization property.
Luckily, the native controls of Android and iOS do have this property. Therefore, we only have to extend the existing TimePicker control and create a renderer for each platform.
Let’s get started!
Extending the existing TimePicker
We will start by creating a control that inherits the Xamarin.Forms TimePicker. Then, we’ll add the desired new Placeholder property. For this, we must first create a new folder called Controls and a class named CRTimePicker inside it.
Refer to the following code.
using Xamarin.Forms;

namespace TImePicker_Render.Controls
{
    public class CRTimePicker : TimePicker
    {
        public static readonly BindableProperty EnterTextProperty =
            BindableProperty.Create(propertyName: nameof(Placeholder), returnType: typeof(string), declaringType: typeof(TimePicker), defaultValue: default(string));

        public string Placeholder { get; set; }
    }
}
The TimePicker control will be added in the view where we want to display it. For didactic reasons, I will implement it in the following way in my MainPage file.
<?xml version="1.0" encoding="utf-8"?>
<?xml version="1.0" encoding="utf-8"?>
<ContentPage xmlns="http://xamarin.com/schemas/2014/forms"
             xmlns:x="http://schemas.microsoft.com/winfx/2009/xaml"
             xmlns:d="http://xamarin.com/schemas/2014/forms/design"
             xmlns:mc="http://schemas.openxmlformats.org/markup-compatibility/2006"
             xmlns:controls="clr-namespace:TImePicker_Render.Controls"
             mc:Ignorable="d" x:Class="TImePicker_Render.MainPage">

    <StackLayout VerticalOptions="Center">

        <Label Text="TimePicker with Placeholder"
               Margin="10,0"/>

            <controls:CRTimePicker Placeholder="Hora de Inicio"
                                   Visual="Material"/>
    </StackLayout>

</ContentPage>
Now, we must create the renderer on each platform. In this example, we will be using the Visual Material, and therefore we have to inherit the renderer from the MaterialTimePickerRenderer class.
Android
First, we will create the renderer for Android. In Android, the TextInputLayout native control has a Hint property, which does exactly the work of a placeholder. Therefore, we have to create this renderer in the Android project in order to have access to the native controls.
Refer to the following code.
using Android.OS;
using Android.App;
using Xamarin.Forms;
using Android.Content;
using Android.Text.Format;
using TImePicker_Render.Controls;
using Xamarin.Forms.Material.Android;
using Xamarin.Forms.Platform.Android;

[assembly: ExportRenderer(typeof(CRTimePicker), typeof(TImePicker_Render.Droid.TimePickerRenderer), new[] {
typeof(VisualMarker.MaterialVisual) })]
namespace TImePicker_Render.Droid
{
    class TimePickerRenderer : MaterialTimePickerRenderer
    {
        public TimePickerRenderer(Context context) : base(context) { }

        protected override void OnElementChanged(ElementChangedEventArgs<TimePicker> e)
        {
            base.OnElementChanged(e);

            //Placeholder
            if (Element is Controls.CRTimePicker picker && !string.IsNullOrWhiteSpace(picker.Placeholder))
            {
                Control.HintEnabled = true;
                Control.Hint = picker.Placeholder;
            }
        }

        bool Is24HourView
        {
            get => (DateFormat.Is24HourFormat(Context) && Element.Format == (string) TimePicker.FormatProperty.DefaultValue)
                   || Element.Format == "HH:MM";
        }

        protected override TimePickerDialog CreateTimePickerDialog(int hours, int minutes)
        {
            var dialog = new TimePickerDialog(Context, Resource.Style.AppCompatDialogStyle, this, hours, minutes, Is24HourView);

            if (Build.VERSION.SdkInt >= BuildVersionCodes.Lollipop)
                dialog.CancelEvent += (s, e) => Element.Unfocus();
            return dialog;
        }
    }
}
Note: Remember that, to work with Visual Material, we must add the NuGet package Xamarin.Forms.Visual.Material to the Android and iOS projects.
More Information: Beautiful Design for Android & iOS
iOS
Now, we have to implement the renderer for the iOS platform. In this case, the control must be inherited from the IMaterialEntryRenderer interface, which has the properties to display the placeholder.
As with Android, this renderer will also have to be created in the iOS project.
Refer to the following code.
using Xamarin.Forms;
using TImePicker_Render.Controls;
using Xamarin.Forms.Material.iOS;
[assembly: ExportRenderer(typeof(CRTimePicker), typeof(TImePicker_Render.iOS.TimePickerRenderer), new[] {
typeof(VisualMarker.MaterialVisual) })]
namespace TImePicker_Render.iOS
{
class TimePickerRenderer : MaterialTimePickerRenderer, IMaterialEntryRenderer
{
public TimePickerRenderer() : base() { }
string IMaterialEntryRenderer.Placeholder
{
get
{
if (Element is CRTimePicker picker && !string.IsNullOrWhiteSpace(picker.Placeholder))
return picker.Placeholder;
return string.Empty;
}
}
}
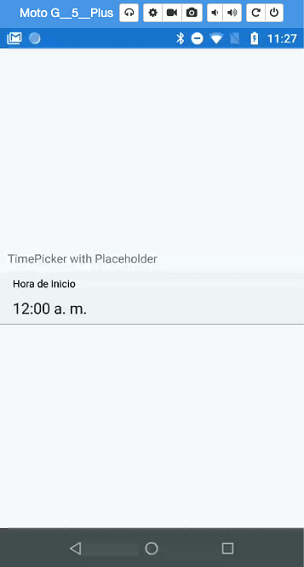
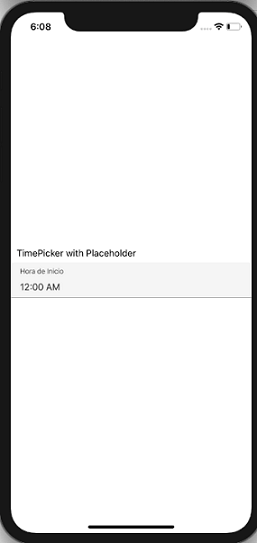
}Once the renderers are created, we can test and verify the result, where we can see the TimePicker with the Placeholder, both in iOS 13.5 and Android 10.0, like in the following screenshot.
Result
The complete code for this example can be found in this GitHub repository: TimePicker_Render
Conclusion
I hope you understood the concepts of creating custom renderers for the TimePicker control with a placeholder in Xamarin.Forms. Like this, you can also customize renderers for other controls in Xamarin.Forms. So, try them out and leave your feedback in the comments section below!
Syncfusion’s Xamarin suite offers over 150 UI controls, from basic editors to powerful, advanced controls like DataGrid, Charts, ListView, and RTE. Use them to boost your productivity!
You can reach us through our support forum, Direct-Trac, or feedback portal. We are here to help you!
Happy coding! Until next time!
 No spam, just valuable updates.