

In this blog post, we will look at the steps to create an EditForm for collecting employees’ details with data annotation validation by using Syncfusion Blazor components (Checkbox, Radio Button, etc.). You will also learn about configuring and displaying validation messages using data annotation by extending the sample with simple code examples.
What is form-validation?
Validation is very important for any application. Form validation is the process of ensuring that the provided data is in the right format in form components before submitting data to the server.
If we failed to enter our data in the correct format, we will get validation messages such as:
- “This field is required.”—On not filling in a mandatory field.
- “The data in the phone number field is not a valid phone number.”—If there is a mismatch in the format of the phone number.
- “The data in the email field is not a valid email address.”—If there is a violation in the email ID format.
- “The field range should be 0 to 20.”—If entered number exceeds the acceptable range. Both minimum and maximum values in this message are customizable.
Blazor components provide form validation using data annotation. It can add one or more attributes to a model’s property. There are many built-in data annotation attributes provided by the .NET Core framework and you can also build your own data validation attribute (custom attribute).
Let’s see how easily you can configure Syncfusion Blazor components in EditForm with data validation.
Prerequisites
- Visual Studio 2019.
- .NET Core 3.0 or above.
- Blazor templates.
Create a Blazor server application
- Create a Blazor server app and add the required model classes.
- Then create a new model class file inside the Data folder with the name EmployeeDetails.
- In this class file, add the class definitions for the Countries and Cities classes with the required properties and methods to generate appropriate data for Dropdown List, which you can reference from this GitHub
Add Data annotation attribute in Form model
The validation attributes specify the validation rules for the model properties. The EmployeeDetails model has various properties with built-in validation data annotation attributes like Required, EmailAddress, Phone, and Range.
Refer to the following code example.
public class EmployeeDetails
    {
        [Required]
        public string FirstName { get; set; }
        public string LastName { get; set; }
        [Required]
        [DataType(DataType.EmailAddress)]
        [EmailAddress]
        public string Email { get; set; }
        public bool Gender { get; set; }
        [Required]
        [DataType(DataType.PhoneNumber)]
        [Phone]
        public string PhoneNumber { get; set; }
        [Required]
        public DateTime? DOB { get; set; }
        [Required]
        public string Country { get; set; }
        [Required]
        public string City { get; set; }
        [Required]
        public string Address { get; set; }
        [Required]
        [Range(0, 20, ErrorMessage = "The Experience range should be 0 to 20")]
        public decimal? TotalExperience { get; set; }
    }
Design employee form
After creating the required model classes, access them inside the index.razor component under the pages folder, where we are going to design the EditForm with Syncfusion form components.
- Add the following code example to include the EditForm component. It creates an EditContext that tracks the fields modified in the form and tracks the validation messages.
<EditForm OnValidSubmit="@Submit">
</EditForm>
- Now, we create the EmployeeDetails class instance for the EditForm model binding.
<EditForm Model="@employeeDetails"OnValidSubmit="@Submit"> </EditForm> @code{ EmployeeDetails; protected override void OnInitialized() { employeeDetails = new EmployeeDetails(); } } - Then, add the DataAnnotationsValidator component in the EditForm to validate the input fields.
<EditForm Model="@employeeDetails" OnValidSubmit="@Submit"> <DataAnnotationsValidator/> </EditForm> - Now, we are going to design the employee detail entry form using Syncfusion form components and include validation messages like in the following.
<EditForm Model="@employeeDetails" OnValidSubmit="@Submit">
    <DataAnnotationsValidator/>
    <div class="form-row">
        <div class="form-group col-md-6">
            <label class="col-form-label">First Name :</label>
            <SfTextBox @bind-Value="@employeeDetails.FirstName"></SfTextBox>
            <ValidationMessage For="@(() => employeeDetails.FirstName)"></ValidationMessage>
        </div>
        <div class="form-group col-md-6">
            <label class="col-form-label">Last Name :</label>
            <SfTextBox @bind-Value="@employeeDetails.LastName"></SfTextBox>
            <ValidationMessage For="@(() => employeeDetails.LastName)"></ValidationMessage>
        </div>
    </div>
    <div class="form-row">
        <div class="form-group col-md-6">
            <label class="col-form-label">Email ID :</label>
            <SfTextBox @bind-Value="@employeeDetails.Email"></SfTextBox>
            <ValidationMessage For="@(() => employeeDetails.Email)"></ValidationMessage>
        </div>
        <div class="form-group col-md-6">
            <label class="col-form-label">Phone Number :</label>
            <SfTextBox @bind-Value="@employeeDetails.PhoneNumber"></SfTextBox>
            <ValidationMessage For="@(() => employeeDetails.PhoneNumber)"></ValidationMessage>
        </div>
    </div>

    <div class="form-row">
        <div class="form-group col-md-6">
            <label class="col-form-label">Date Of Birth :</label>
            <SfDatePicker @bind-Value="@employeeDetails.DOB" Max=DateTime.Now></SfDatePicker>
            <ValidationMessage For="@(() => employeeDetails.DOB)"></ValidationMessage>
        </div>
        <div class="form-group col-md-6">
            <label class="col-form-label">Total Experience :</label>
            <SfNumericTextBox @bind-Value="@employeeDetails.TotalExperience"></SfNumericTextBox>
            <ValidationMessage For="@(() => employeeDetails.TotalExperience)"></ValidationMessage>
        </div>
    </div>
    <div class="form-row">
        <div class="form-group col-md-6">
            <label class="col-form-label">Address :</label>
            <SfTextBox Multiline=true @bind-Value="@employeeDetails.Address"></SfTextBox>
            <ValidationMessage For="@(() => employeeDetails.Address)"></ValidationMessage>
        </div>
        <div class="form-group col-md-3">
            <label class="col-form-label">Gender :</label>
            <div>
                <SfRadioButton Label="Male" Name="Gender" Value="male" @bind-Checked="@employeeDetails.Gender"></SfRadioButton>
                <SfRadioButton Label="Female" Name="Gender" Value="female"></SfRadioButton>
                <ValidationMessage For="@(() => employeeDetails.Gender)" />
            </div>
        </div>

    </div>
    <div class="form-row">
        <div class="form-group col-md-6">
            <label class="col-form-label">Country :</label>
            <SfComboBox TValue="string" TItem="Countries" @bind-Value="@employeeDetails.Country" DataSource="@countries">
                <ComboBoxFieldSettings Text="Name" Value="Code"></ComboBoxFieldSettings>
                <ComboBoxEvents TValue="string" ValueChange="ChangeCountry"></ComboBoxEvents>
            </SfComboBox>
            <ValidationMessage For="@(() => employeeDetails.Country)"></ValidationMessage>
        </div>
        <div class="form-group col-md-6">
            <label class="col-form-label">City :</label>
            <SfDropDownList Enabled="@enableCityDropDown" TValue="string" TItem="Cities" @bind-Value="@employeeDetails.City" Query="@CityQuery" DataSource="@cities">
                <DropDownListFieldSettings Text="Name" Value="Code"></DropDownListFieldSettings>
            </SfDropDownList>
            <ValidationMessage For="@(() => employeeDetails.City)"></ValidationMessage>
        </div>
    </div>
    <div class="form-group">
        <button type="submit" class="btn btn-primary">Save</button>
    </div>
</EditForm>
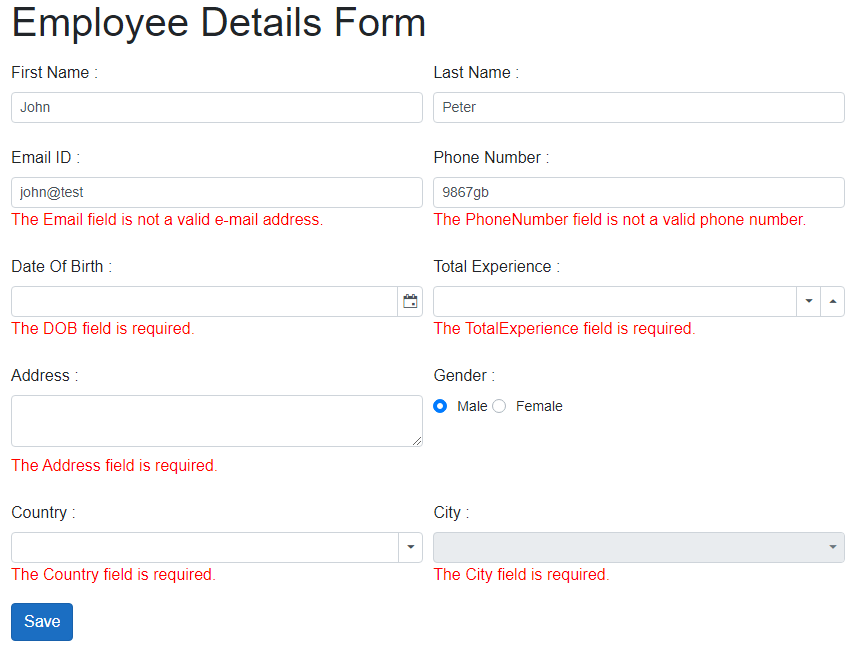
Now, the Blazor engine will validate the inputs using data annotation and list all the form validations on the submit button being clicked. Look at the following screenshot to see how a validation message will be displayed in the Employee Details Form by executing the previous code example.
Validation summary
We can also create a ValidationSummary that would display all the errors for a specific place on clicking the submit button.
<EditForm Model="@employeeDetails" OnValidSubmit="@Submit">
    <DataAnnotationsValidator/>
    <ValidationSummary />
    <div class="form-group">
        <SfButton Type="submit" IsPrimary=true>Save</SfButton>
    </div>
</EditForm>
Conclusion
I hope this blog post helped you understand how easily you can create the EditForm with data annotation. Now, you can create your own forms with validations using Syncfusion Blazor components with minimal lines of reusable code. You can download the complete source code of this example from this GitHub repository.
Try our 65+ high-performance Blazor components by downloading a free 30-day trial or our NuGet package. Have a look at our online examples and documentation to explore other available features.
If you have any questions or some other feedback about EditForm, please let us know in the comments section below. You can also contact us through our feedback portal, support forum or Direct-Trac. We are always happy to assist you!


 No spam, just valuable updates.
Comments (6)
Do you know how to set default values into the form?
Or do it when you initialize the new class variable, like in the OnInitialized event. I like doing it there as I can business logic to it, rather than in the class definition.
Hello Bernardo,
Yes, you can add a default value in the model class.
[Required]
public DateTime? DOB { get; set; } = DateTime.Now;
Regards,
Saravanan G
Hi. How can one add pagination to an editform when you have many form components in ?
so you can have sections of the form components on multiple pages where they can be navigated to and from using a next and previous button on the same @page and
which all data in the form components will be saved with the OnValidSubmit button
Note that bootstrap 5 does not include form-group, form-row etc. anymore.
https://getbootstrap.com/docs/5.0/migration/#forms
“Breaking change: Dropped form-specific layout classes for our grid system. Use our grid and utilities instead of .form-group, .form-row, or .form-inline.”
Hello Greg,
Thank you for your update, In the GitHub sample we have used Bootstrap v4.3.1 version CSS if you have upgraded the bootstrap 5 please do the respective breaking changes in your end.
Regards,
Saravanan G