
Introduction
The Essential JavaScript Gantt control has been designed to visualize and edit a project schedule and track project progress. It helps to organize and schedule projects, and also update project schedules by editing, dragging, and resizing them.
Key Features
· Sorting· Editing
· Task Relationships
· Striplines
· Baseline
· Localization
· Resource Display
Getting Started
The following steps illustrate how to create the Gantt control for JavaScript.
Gantt Creation
1. Create an HTML file and add the following template to the HTML file.
<title>Getting Started with Gantt Control for JavaScript</title>
<!-- Style sheet for default theme(flat azure). -->
<link href="http://cdn.syncfusion.com/js/web/flat-azure/ej.web.all-latest.min.css " rel="stylesheet" />
<!--scripts-->
<script src="http://code.jquery.com/jquery-1.10.2.min.js"></script>
script src="http://borismoore.github.io/jsrender/jsrender.min.js"></script>
<script src="http://ajax.aspnetcdn.com/ajax/globalize/0.1.1/globalize.js"></script>
<script src="http://cdnjs.cloudflare.com/ajax/libs/jquery-easing/1.3/jquery.easing.min.js"></script>
<script src="http://cdn.syncfusion.com/js/ej.widgets.all-latest.min.js"></script>
2. Add a Div element within the Body element of the HTML file as follows.
3. Create a data source for the Gantt control.
//…
4. Finally, initialize the Gantt control with the data source created in the previous step.
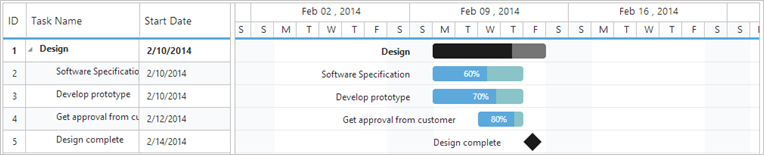
A Gantt chart is created as shown in the following screen shot.
Concepts and Features
Sorting
You can turn on Sorting during Gantt initialization by using the following code example.
$("#GanttContainer").ejGantt(
{
//...
allowSorting: true,
//...
});
Editing
The following code example illustrates how to turn on editing in Gantt control.
$("#GanttContainer").ejGantt(
{
//...
edit:
{
allowEditing: true,
allowAdding: true,
allowDeleting: true,
editMode: "cellEditing"
}
//...
})
Toolbar
You can show or hide the toolbar in Gantt by using the following code example.
$("#GanttContainer").ejGantt(
{
//...
toolBar:
{
allowToolBar: true,
toolBarItems: [ej.Gantt.toolBarItems.Add,
ej.Gantt.toolBarItems.Edit,
ej.Gantt.toolBarItems.Delete,
ej.Gantt.toolBarItems.Update,
ej.Gantt.toolBarItems.Cancel,
ej.Gantt.toolBarItems.Indent,
ej.Gantt.toolBarItems.Outdent,
ej.Gantt.toolBarItems.ExpandAll,
ej.Gantt.toolBarItems.CollapseAll,
ej.Gantt.toolBarItems.Search]
},
//...
});
Wiring Events
Events are important for providing notifications on changes and actions that have taken place in the control. The following code example illustrates event initialization in a Gantt control.
$("#GanttContainer").ejGantt("model.eventName", );
You must bind the event’s “eventName” to the Gantt control as follows.
$("#GanttContainer").ejGantt(
{
dataSource: data,
allowColumnResize: true,

taskIdMapping: "TaskID",
taskNameMapping: "TaskName",
scheduleStartDate: "02/23/2014",
scheduleEndDate: "03/30/2014",
startDateMapping: "StartDate",

progressMapping: "Progress",
durationMapping: "Duration",
childMapping: "Children",

highlightWeekEnds: true,
rowSelected: function (args)
{
// Event handler.
}
});
Please send us your feedback to [email protected]. Your thoughts and opinions are important to us.
Content Contributor: Rajasekar G Content Editor: GeeGee Inekeya
 No spam, just valuable updates.