

This is the second blog in our series on formatting the Syncfusion JavaScript Spreadsheet. For this one, we’ll explain the cell formatting options like number formatting, text formatting, and conditional formatting. If you missed the first blog, you can check it out at “Formatting the Essential JavaScript Spreadsheet: Number Formatting.”
The cell formatting features in the Syncfusion JavaScript Spreadsheet allow you to change the font, font size, color, attributes such as bold or italics, and more for a cell or range of cells.
Formatting text helps you enhance the visibility of the data when you are working on a large worksheet. The different types of cell formatting options available in the spreadsheet control are:
Let’s learn about them!
Font style
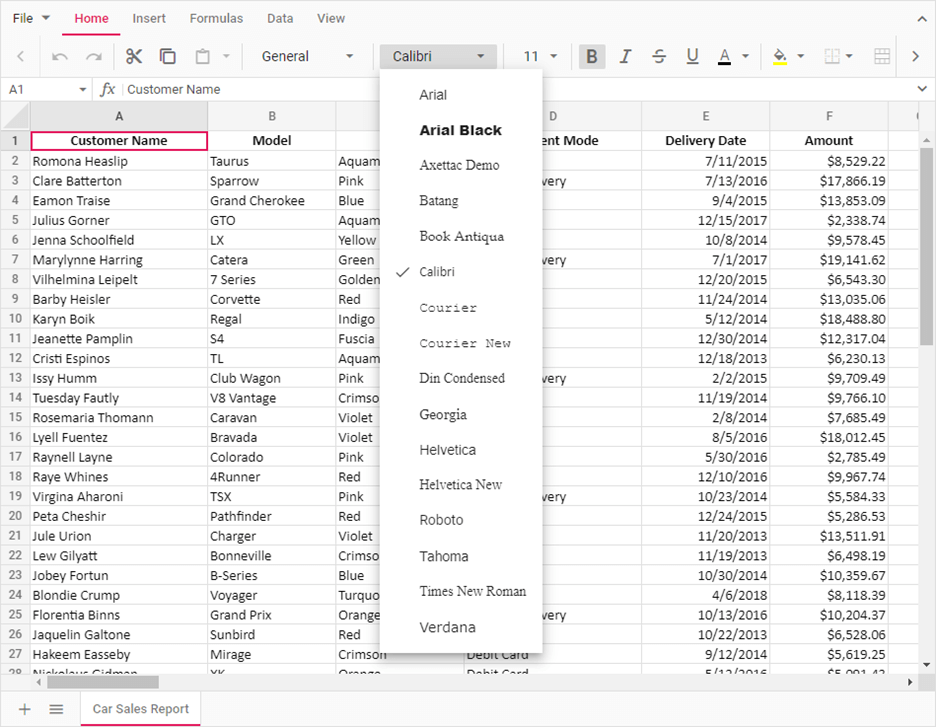
Each type of font and style has a specific purpose. It directly reflects the tone of what we are trying to show in a spreadsheet. The Syncfusion JavaScript Spreadsheet supports several custom font style options like font family, font size, bold, italics, color, and underline.
The default font family is Calibri, and the default font size is 11 pt.
Text alignment
Text alignment is used to realign the text in a cell. The default text alignment is left. We have three alignment options:
- Left
- Center
- Right
You can find the text alignment option in the Home tab in the ribbon of the Spreadsheet control.
Vertical alignment
Vertical alignment is used to align the text vertically in a cell. The default vertical alignment is bottom. We have tree alignment options:
- Top
- Middle
- Bottom
You can find the vertical alignment option in the Home tab in the ribbon of the Spreadsheet control.
Fill color
Fill color is useful to call attention to a specific cell or range of cells. You can use it to highlight the result of a calculated formula or a specific value. You can find the fill color option in the Home tab of the ribbon in the Spreadsheet control.
Border
Adding borders in an Excel worksheet is the easiest way to highlight particular data that we need to show as tabular data. The different types of border options available in Spreadsheet are:
| Types | Actions |
| Top Border | Specifies the top border of a cell or range of cells. |
| Left Border | Specifies the left border of a cell or range of cells. |
| Right Border | Specifies the right border of a cell or range of cells. |
| Bottom Border | Specifies the bottom border of a cell or range of cells. |
| No Border | Used to clear the border from a cell or range of cells. |
| All Border | Specifies all borders of a cell or range of cells. |
| Horizontal Border | Specifies the top and bottom border of a cell or range of cells. |
| Vertical Border | Specifies the left and right border of a cell or range of cells. |
| Outside Border | Specifies the outside border of a range of cells. |
| Inside Border | Specifies the inside border of a range of cells. |
You can also change the color, size, and style of the border. The different types of sizes and styles supported in the Spreadsheet are:
| Types | Actions |
| Thin | Specifies a 1 px border size (default). |
| Medium | Specifies a 2 px border size. |
| Thick | Specifies a 3 px border size. |
| Solid | Used to create a solid border (default). |
| Dashed | Used to create a dashed border. |
| Dotted | Used to create a dotted border. |
| Double | Used to create a double border. |
Wrap text
Wrap text allows you to display large content as multiple lines in a single cell. By default, wrap text support is enabled.
Use the allowWrap property to enable or disable wrap text support in the Spreadsheet component.
Merge cells
Merge cells allows you to merge two or more cells in the same row or column into a single cell. When cells with multiple values are merged, the top-left-most cell’s data will be the data for the merged cell.
By default, the merge cells option is enabled. It is often used when a title is to be centered over a particular section of a spreadsheet.
Use the allowMerge property to enable or disable the merge cells option in Spreadsheet.
Where can you find cell styles?
You’ll find the cell formatting options on the Home tab of the ribbon. The options included there cover fonts, color, fill color, and borders, as shown in the following screenshot.
Adding cell formatting in Spreadsheet through code
In the JavaScript Spreadsheet control, you can add cell formatting through code by using the cellFormat and setBorder public methods and passing the format options and range, respectively. Also, you can use the style property to set a cell format string in a cell object.
The following code example showcases cell formatting.
/**
 * Cell formatting sample
 */


    let columns: ColumnModel[] = [{ width: 80 }, { width: 140 }, { width: 100 }, { width: 232 }, { width: 120 }, { width: 100 },
    { width: 100 }, { width: 120 }, { width: 80 }];

    let rows: RowModel[] = [
        {
            height: 36,
            //Applying cell formatting through cell binding.
            cells: [{ style: { textAlign: 'right' } }, { style: { textIndent: '2pt' } }, { style: { textAlign: 'right' } },
            { style: { textIndent: '2pt' } }, { index: 5, style: { textAlign: 'right' } },
            { index: 7, style: { textAlign: 'center' } }, { index: 8, style: { textAlign: 'right' } }]
        }, { height: 42 }, { height: 42 }, { height: 42 }, { height: 42 }, { height: 42 },
        { height: 42 }, { height: 42 }, { height: 42 }, { height: 42 }, { height: 42 }, { height: 42 }, { height: 42 }, { height: 42 },
        { height: 42 }, { height: 42 }];

    let sheet: SheetModel[] = [{
        name: 'Order Details',
        ranges: [{ dataSource: (dataSource as any).orderDetails }],
        columns: columns,
        rows: rows,
        showGridLines: false
    }];

    //Initialize Spreadsheet component
    let spreadsheet: Spreadsheet = new Spreadsheet({
        sheets: sheet,
        showFormulaBar: false,
        showRibbon: false,
        created: createdHandler,
        beforeCellRender: beforeCellRender
    });

    spreadsheet.appendTo('#spreadsheet');

    function createdHandler(): void {
        //Applying cell formatting dynamically using cellFormat method
        spreadsheet.cellFormat({ fontWeight: 'bold', backgroundColor: '#4b5366', color: '#ffffff', fontSize: '12pt' }, 'A1:I1');
        spreadsheet.cellFormat({ fontWeight: 'bold', textIndent: '2pt' }, 'B2:B16');
        spreadsheet.cellFormat({ fontStyle: 'italic', textIndent: '2pt' }, 'D2:D16');
        spreadsheet.cellFormat({ textIndent: '2pt' }, 'E1:E16');
        spreadsheet.cellFormat({ textIndent: '2pt' }, 'G1:G16');
        spreadsheet.cellFormat({ textAlign: 'center', fontWeight: 'bold' }, 'H2:H16');
        spreadsheet.cellFormat({ fontFamily: 'Helvetica New', verticalAlign: 'middle' }, 'A1:I16');
        //Applying border to a range
        spreadsheet.setBorder({ border: '1px solid #e0e0e0' }, 'A1:I16', 'Outer');
        spreadsheet.setBorder({ border: '1px solid #e0e0e0' }, 'A2:I15', 'Horizontal');
    }

    function beforeCellRender(args: CellRenderEventArgs): void {
        if (!spreadsheet.isOpen && spreadsheet.activeSheetIndex === 0) {
            if (args.cell && args.cell.value) {
                //Applying cell formatting before rendering the particular cell
                switch (args.cell.value) {
                    case 'Delivered':
                        spreadsheet.cellFormat({ color: '#10c469', textDecoration: 'line-through' }, args.address);
                        break;
                    case 'Shipped':
                        spreadsheet.cellFormat({ color: '#62c9e8' }, args.address);
                        break;
                    case 'Pending':
                        spreadsheet.cellFormat({ color: '#FFC107', textDecoration: 'underline' }, args.address);
                        break;
                    case 'Cancelled':
                        spreadsheet.cellFormat({ color: '#ff5b5b' }, args.address);
                        break;
                }
            }
        }
    }
The following screenshot illustrates the cell formatting applied through code in the Spreadsheet.

Conclusion
I hope you now have a better understanding of the cell formatting feature in the Syncfusion JavaScript Spreadsheet control. In our next formatting blog, we can discuss the conditional formatting feature, or whatever else you expect from a spreadsheet. Please share your thoughts in the comments section below.
If you’re already a Syncfusion user, you can download the Essential Studio® for JavaScript product setup to try out this control. Otherwise, you can download a free 30-day trial.
If you have any questions about these features, please contact us through our support forums, Direct-Trac, or feedback portal. We are happy to assist you!
 No spam, just valuable updates.