

TL;DR: Syncfusion’s .NET Excel (XlsIO) library makes it ridiculously easy to export data to Excel in C# and VB.NET from a wide range of data sources. Whether you’re working with DataTables, datasets, arrays, object collections, databases, CSV/TSV, or Microsoft Grid controls, this library streamlines Excel generation with minimal code.
Syncfusion’s .NET Excel library enables users to export data or write to Excel in C# and VB.NET from various data sources including data tables, datasets, arrays, collections of objects, databases, CSV/TSV, and Microsoft Grid controls, in a straightforward manner. Exporting data to Excel in helps in visualizing the data in a more clearly. This feature helps to generate financial reports, banking statements, and invoices, while also allowing for filtering large data, validating data, formatting data, and more.
Essential XlsIO provides the following ways to export data to Excel:
- DataTable to Excel
- Collection of objects to Excel
- Database to Excel
- Microsoft Grid controls to Excel
- Array to Excel
- CSV to Excel
In this blog, we will look at each of these methods and how to execute them.
1. Export from DataTable to Excel
Data from ADO.NET objects such as datatable, datacolumn, and dataview can be exported to Excel worksheets. The exporting can be done as column headers by recognizing column types or cell value types, as hyperlinks, and as large datasets, all in a few seconds.
Exporting DataTable to Excel worksheets can be achieved through the ImportDataTable method. The following code sample shows how to export an employee details data table to an Excel worksheet.
using Syncfusion.XlsIO;
using System.Diagnostics;
using System.IO;
using System.Data;
namespace ImportFromDataTable
{
    class Program
    {
        static void Main(string[] args)
        {
            using (ExcelEngine excelEngine = new ExcelEngine())
            {
                IApplication application = excelEngine.Excel;
                application.DefaultVersion = ExcelVersion.Xlsx;

                //Create a new workbook
                IWorkbook workbook = application.Workbooks.Create(1);
                IWorksheet sheet = workbook.Worksheets[0];

                //Create a dataset from XML file
                DataSet customersDataSet = new DataSet();
                customersDataSet.ReadXml(Path.GetFullPath(@"../../Data/Employees.xml"));

                //Create datatable from the dataset
                DataTable dataTable = new DataTable();
                dataTable = customersDataSet.Tables[1];

                //Import data from the data table with column header, at first row and first column, and by its column type.
                sheet.ImportDataTable(dataTable, true, 1, 1, true);

                //Creating Excel table or list object and apply style to the table
                IListObject table = sheet.ListObjects.Create("Employee_PersonalDetails", sheet.UsedRange);

                table.BuiltInTableStyle = TableBuiltInStyles.TableStyleMedium14;

                //Autofit the columns
                sheet.UsedRange.AutofitColumns();

                //Save the file in the given path
                Stream excelStream = File.Create(Path.GetFullPath(@"Output.xlsx"));
                workbook.SaveAs(excelStream);
                excelStream.Dispose();
                Process.Start(Path.GetFullPath(@"Output.xlsx"));
            }
        }
    }
}
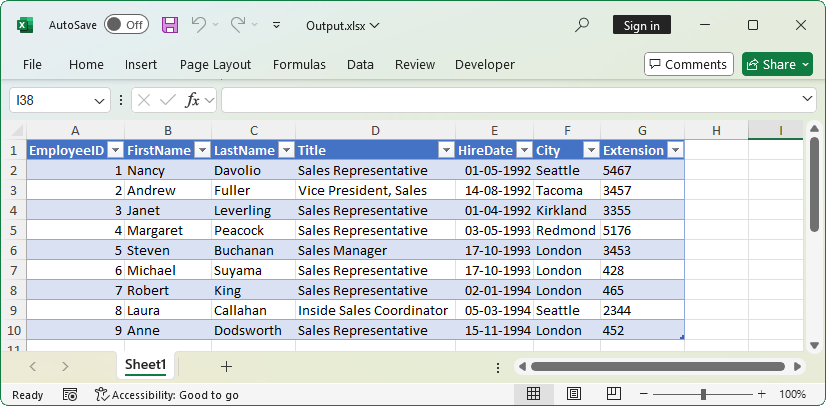
The following image shows the output of above code.

When exporting large data to Excel, and if there is no need to apply number formats and styles, you can make use of the ImportDataTable overload with the TRUE value for importOnSave parameter. Here, the export happens while saving the Excel file.
Use this option to export large data with high performance.
value = instance.ImportDataTable(dataTable, firstRow, firstColumn, importOnSave);
Suppose you have a named range and would like to export data to a named range from a specific row and column of the named range, you can make use of the below API, where rowOffset and columnOffset are the parameters to import from a particular cell in a named range.
sheet.ImportDataTable(dataTable, namedRange, showColumnName, rowOffset, columnOffset);
2. Export from collection of objects to Excel
Exporting data from a collection of objects to an Excel worksheet is a common scenario. However, this feature will be helpful when you need to export data from a model to an Excel worksheet.
The Syncfusion Excel (XlsIO) library provides support to export data from a collection of objects to an Excel worksheet; this collection can be either a single collection or nested collections. Exporting data from nested collections to an Excel worksheet is helps maintain the data hierarchy. In addition, Syncfusion XlsIO allows to exporting data with various layout and grouping options. The blog Export Data from Collection to Excel and Group It in C# clearly explains how to export data from collection to Excel worksheet and also explains the options available while exporting.
Here, let’s see how to export data from a collection of objects to an Excel worksheet. This can be achieved using the ImportData method. The following code example shows how to export data from a collection to an Excel worksheet.
using Syncfusion.XlsIO;
using System;
using System.Collections.Generic;
using System.Diagnostics;
using System.Drawing;
using System.IO;
using System.Linq;
using System.Reflection;
using System.Text;
using System.Threading.Tasks;
using System.Xml.Linq;
namespace ImportFromCollectionObjects
{
class Program
{
static void Main(string[] args)
{
using (ExcelEngine excelEngine = new ExcelEngine())
{
IApplication application = excelEngine.Excel;
application.DefaultVersion = ExcelVersion.Xlsx;
//Read the data from XML file
StreamReader reader = new StreamReader(Path.GetFullPath(@"../../Data/Customers.xml"));
//Assign the data to the customerObjects collection
IEnumerable<Customer> customerObjects = GetData <Customer>(reader.ReadToEnd());
//Create a new workbook
IWorkbook workbook = application.Workbooks.Create(1);
IWorksheet sheet = workbook.Worksheets[0];
//Import data from customerObjects collection
sheet.ImportData(customerObjects, 5, 1, false);
#region Define Styles
IStyle pageHeader = workbook.Styles.Add("PageHeaderStyle");
IStyle tableHeader = workbook.Styles.Add("TableHeaderStyle");
pageHeader.Font.RGBColor = Color.FromArgb(0, 83, 141, 213);
pageHeader.Font.FontName = "Calibri";
pageHeader.Font.Size = 18;
pageHeader.Font.Bold = true;
pageHeader.HorizontalAlignment = ExcelHAlign.HAlignCenter;
pageHeader.VerticalAlignment = ExcelVAlign.VAlignCenter;
tableHeader.Font.Color = ExcelKnownColors.White;
tableHeader.Font.Bold = true;
tableHeader.Font.Size = 11;
tableHeader.Font.FontName = "Calibri";
tableHeader.HorizontalAlignment = ExcelHAlign.HAlignCenter;
tableHeader.VerticalAlignment = ExcelVAlign.VAlignCenter;
tableHeader.Color = Color.FromArgb(0, 118, 147, 60);
tableHeader.Borders[ExcelBordersIndex.EdgeLeft].LineStyle = ExcelLineStyle.Thin;
tableHeader.Borders[ExcelBordersIndex.EdgeRight].LineStyle = ExcelLineStyle.Thin;
tableHeader.Borders[ExcelBordersIndex.EdgeTop].LineStyle = ExcelLineStyle.Thin;
tableHeader.Borders[ExcelBordersIndex.EdgeBottom].LineStyle = ExcelLineStyle.Thin;
#endregion
#region Apply Styles
//Apply style to the header
sheet["A1"].Text = "Yearly Sales Report";
sheet["A1"].CellStyle = pageHeader;
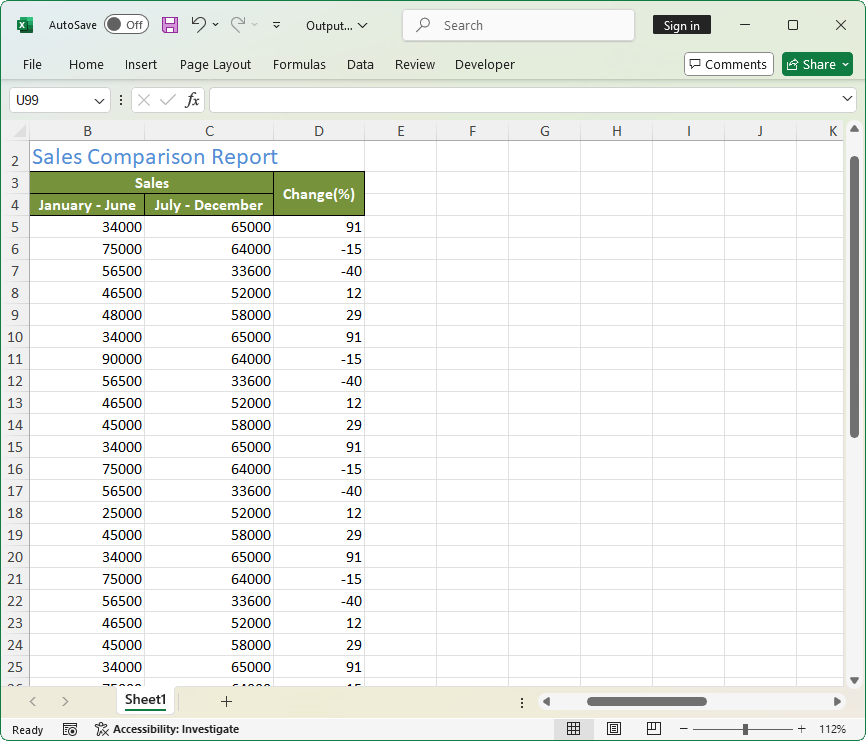
sheet["A2"].Text = "Namewise Sales Comparison Report";
sheet["A2"].CellStyle = pageHeader;
sheet["A2"].CellStyle.Font.Bold = false;
sheet["A2"].CellStyle.Font.Size = 16;
sheet["A1:D1"].Merge();
sheet["A2:D2"].Merge();
sheet["A3:A4"].Merge();
sheet["D3:D4"].Merge();
sheet["B3:C3"].Merge();
sheet["B3"].Text = "Sales";
sheet["A3"].Text = "Sales Person";
sheet["B4"].Text = "January - June";
sheet["C4"].Text = "July - December";
sheet["D3"].Text = "Change(%)";
sheet["A3:D4"].CellStyle = tableHeader;
sheet.UsedRange.AutofitColumns();
#endregion
sheet.UsedRange.AutofitColumns();
//Save the file in the given path
Stream excelStream = File.Create(Path.GetFullPath(@"Output.xlsx"));
workbook.SaveAs(excelStream);
excelStream.Dispose();
Process.Start(Path.GetFullPath(@"Output.xlsx"));
}
}
internal static IEnumerable<T> GetData<T>(string xml)
where T : Customer, new()
{
return XElement.Parse(xml)
.Elements("Customers")
.Select(c => new T
{
SalesPerson = (string)c.Element("SalesPerson"),
SalesJanJune = int.Parse((string)c.Element("SalesJanJune")),
SalesJulyDec= int.Parse((string)c.Element("SalesJulyDec")),
Change= int.Parse((string)c.Element("Change"))
});
}
}
}
3. Export from Database to Excel
Excel supports creating Excel tables from different databases. If you have a scenario in which you need to create one or more Excel tables from a database using Excel, you need to establish every single connection to create those tables. This can be time-consuming, so if you find an alternate way to generate Excel tables from the database very quickly and easily, wouldn’t that be your first choice?
The Syncfusion Excel (XlsIO) library helps you to export data to Excel worksheets from databases like MS SQL, MS Access, Oracle, and more. By establishing a connection between the databases and Excel application, you can export data from a database to an Excel table.
You can use the Refresh() option to update the modified data in the Excel table that is mapped to the database.
Above all, you can refer to the documentation to create a table from an external connection to learn more about how to export databases to Excel tables. The following code sample shows how to export data from a database to an Excel table.
using Syncfusion.XlsIO;
using System.IO;

namespace ImportFromDataBase
{
    class Program
    {
        static void Main(string[] args)
        {

            using (ExcelEngine excelEngine = new ExcelEngine())
            {
                IApplication application = excelEngine.Excel;
                application.DefaultVersion = ExcelVersion.Xlsx;

                //Create a new workbook
                IWorkbook workbook = application.Workbooks.Create(1);
                IWorksheet sheet = workbook.Worksheets[0];

                if (sheet.ListObjects.Count == 0)
                {
                    //Establishing the connection in the worksheet
                    string dBPath = Path.GetFullPath(@"../../Data/EmployeeData.mdb");
                    string ConnectionString = "OLEDB;Provider=Microsoft.JET.OLEDB.4.0;Password=\"\";User ID=Admin;Data Source=" + dBPath;
                    string query = "SELECT EmployeeID,FirstName,LastName,Title,HireDate,Extension,ReportsTo FROM [Employees]";
                    IConnection Connection = workbook.Connections.Add("Connection1", "Sample connection with MsAccess", ConnectionString, query, ExcelCommandType.Sql);
                    sheet.ListObjects.AddEx(ExcelListObjectSourceType.SrcQuery, Connection, sheet.Range["A1"]);
                }

                //Refresh Excel table to get updated values from database
                sheet.ListObjects[0].Refresh();

                sheet.UsedRange.AutofitColumns();

                //Save the file in the given path
                Stream excelStream = File.Create(Path.GetFullPath(@"Output.xlsx"));
                workbook.SaveAs(excelStream);
                excelStream.Dispose();
            }

        }

    }
}
The following images show the database and the output generated from the above code.

4. Export data from DataGrid, GridView, DataGridView to Excel
Exporting data from Microsoft grid controls to Excel worksheets helps to visualize data in different ways. You may work for hours to iterate data and its styles from grid cells to export them into Excel worksheets. It should be good news for those who export data from Microsoft grid controls to Excel worksheets, because exporting with Syncfusion Excel library is much faster.
Syncfusion Excel (XlsIO) library supports exporting data from Microsoft Grid controls, such as DataGrid, GridView, and DataGridView, to Excel worksheets in a single API call. Also, you can export data with header and styles.
The following code example shows how to export data from DataGridView to an Excel worksheet.
using Syncfusion.XlsIO;
using System.Data;
using System.Diagnostics;
using System.Drawing;
using System.IO;
using System.Windows.Forms;

namespace ImportFromGrid
{
    public partial class Form1 :Form
    {
        public Form1()
        {
            InitializeComponent();

            #region Loading the data to Data Grid
            DataSet customersDataSet = new DataSet();
            //Get the path of the input file
            string inputXmlPath = Path.GetFullPath(@"../../Data/Employees.xml");
            customersDataSet.ReadXml(inputXmlPath);
            DataTable dataTable = new DataTable();
            //Copy the structure and data of the table
            dataTable = customersDataSet.Tables[1].Copy();
            //Removing unwanted columns
            dataTable.Columns.RemoveAt(0);
            dataTable.Columns.RemoveAt(10);
            this.dataGridView1.DataSource = dataTable;


            dataGridView1.AlternatingRowsDefaultCellStyle.BackColor = Color.White;
            dataGridView1.RowsDefaultCellStyle.BackColor = Color.LightBlue;
            dataGridView1.ColumnHeadersDefaultCellStyle.Font = new System.Drawing.Font("Tahoma", 9F, ((System.Drawing.FontStyle)(System.Drawing.FontStyle.Bold)));
            dataGridView1.ForeColor = Color.Black;
            dataGridView1.BorderStyle = BorderStyle.None;

            #endregion


        }

        private void btnCreate_Click(object sender, System.EventArgs e)
        {

            using (ExcelEngine excelEngine = new ExcelEngine())
            {
                IApplication application = excelEngine.Excel;

                //Create a workbook with single worksheet
                IWorkbook workbook = application.Workbooks.Create(1);
                workbook.Version = ExcelVersion.Xlsx;

                IWorksheet worksheet = workbook.Worksheets[0];

                //Import from DataGridView to worksheet
                worksheet.ImportDataGridView(dataGridView1, 1, 1, true, true);

                worksheet.UsedRange.AutofitColumns();
                workbook.SaveAs("Output.xlsx");

                Process.Start("Output.xlsx");
            }
        }
    }
}
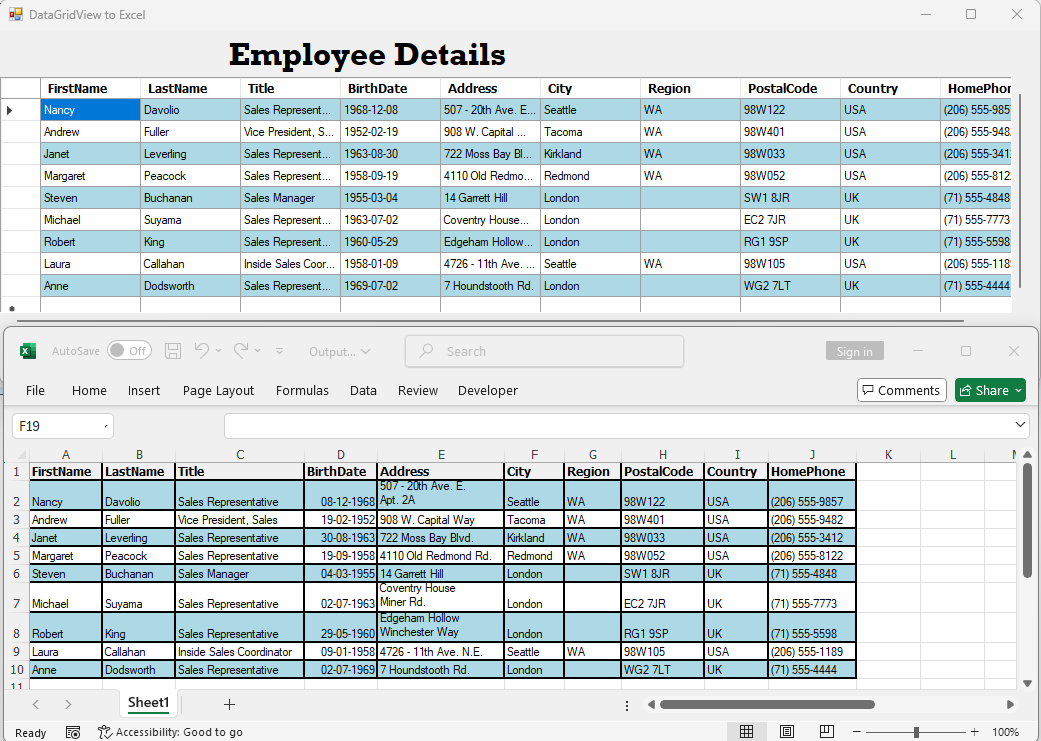
The following image shows the DataGridView and the output of the above code
5. Export from array to Excel
Sometimes, there may be a need where an array of data may need to be inserted or modified into existing data in an Excel worksheet. In this case, the number of rows and columns are known in advance. Arrays are useful when you have a fixed size.
The Syncfusion .NET Excel library provides support to export an array of data into an Excel worksheet, both horizontally and vertically. In addition, two-dimensional arrays can also be exported.
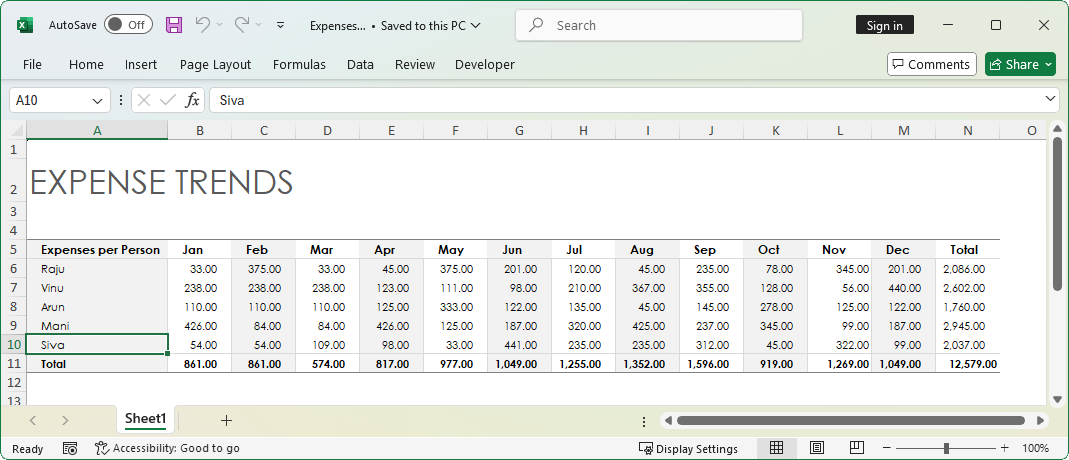
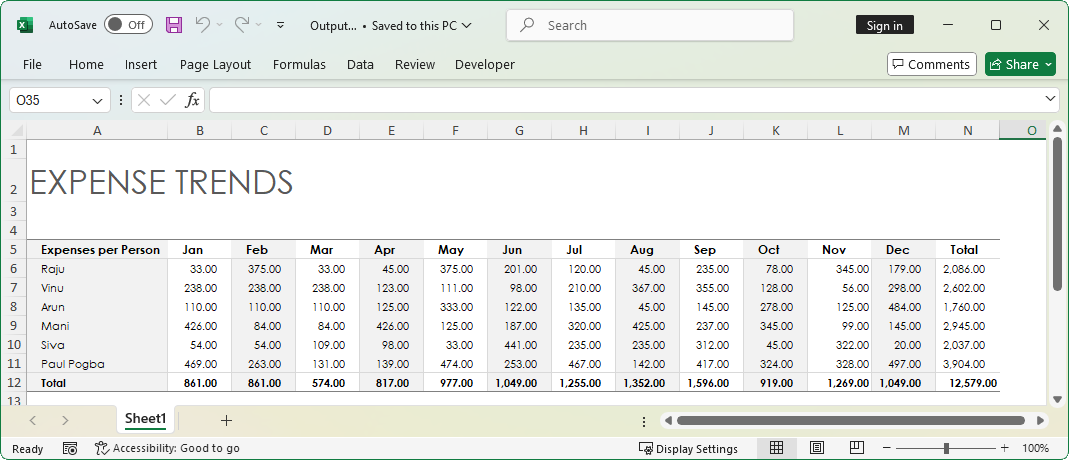
Let us consider a scenario, “Expenses per Person.” The expenses of a person for the whole year is tabulated in the Excel worksheet. In this scenario, you need to add expenses for a new person, Paul Pogba, in a new row and modify the expenses of all tracked people for the month Dec.
Exporting an array of data to an Excel worksheet can be achieved through the ImportArray method. The following code sample shows how to export an array of data to an Excel worksheet, both horizontally and vertically.
using Syncfusion. XlsIO;
using System;
using System.IO;

namespace ImportFromArray
{
    class Program
    {
        static void Main(string[] args)
        {

            using (ExcelEngine excelEngine = new ExcelEngine())
            {
                IApplication application = excelEngine.Excel;
                application.DefaultVersion = ExcelVersion.Xlsx;

                //Reads input Excel stream as a workbook
                IWorkbook workbook = application.Workbooks.Open(File.OpenRead(Path.GetFullPath(@"../../../Expenses.xlsx")));
                IWorksheet sheet = workbook.Worksheets[0];

                //Preparing first array with different data types
                object[] expenseArray = new object[14]
                {"Paul Pogba", 469.00d, 263.00d, 131.00d, 139.00d, 474.00d, 253.00d, 467.00d, 142.00d, 417.00d, 324.00d, 328.00d, 497.00d, "=SUM(B11:M11)"};

                //Inserting a new row by formatting as a previous row.
                sheet.InsertRow(11, 1, ExcelInsertOptions.FormatAsBefore);

                //Import Peter's expenses and fill it horizontally
                sheet.ImportArray(expenseArray, 11, 1, false);

                //Preparing second array with double data type
                double[] expensesOnDec = new double[6]
                {179.00d, 298.00d, 484.00d, 145.00d, 20.00d, 497.00d};

                //Modify the December month's expenses and import it vertically
                sheet.ImportArray(expensesOnDec, 6, 13, true);

                //Save the file in the given path
                Stream excelStream = File.Create(Path.GetFullPath(@"Output.xlsx"));
                workbook.SaveAs(excelStream);
                excelStream.Dispose();
            }

        }
    }
}
The following image shows the output of above code.
6. Export from CSV to Excel
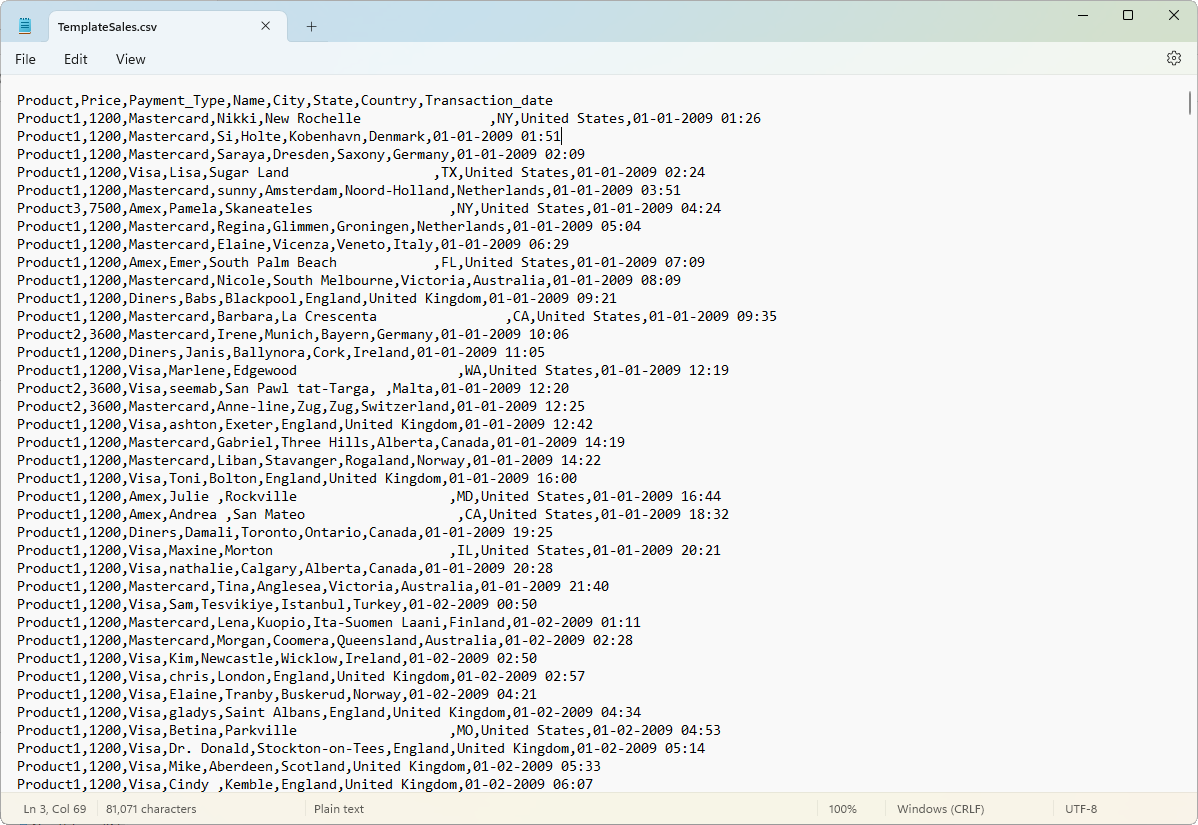
Comma-separated value (CSV) files are helpful in generating tabular data or lightweight reports with few columns and a high number of rows. Excel opens such files to make the data easier to read.
The Syncfusion .NET Excel library supports opening and saving CSV files in seconds. The following code example shows how to open a CSV file, also save it as an XLSX file. Above all, the data is shown in a table with the number of formats applied.
using Syncfusion.XlsIO;
using System;
using System. IO;
using System.Linq;

namespace ImportFromCSV
{
    class Program
    {
        static void Main(string[] args)
        {

            using (ExcelEngine excelEngine = new ExcelEngine())
            {
                IApplication application = excelEngine.Excel;
                application.DefaultVersion = ExcelVersion.Xlsx;

                //Preserve data types as per the value
                application.PreserveCSVDataTypes = true;

                //Read the CSV file
                Stream csvStream = File.OpenRead(Path.GetFullPath(@"../../../TemplateSales.csv")); ;

                //Reads CSV stream as a workbook
                IWorkbook workbook = application.Workbooks.Open(csvStream);
                IWorksheet sheet = workbook.Worksheets[0];

                //Formatting the CSV data as a Table
                IListObject table = sheet.ListObjects.Create("SalesTable", sheet.UsedRange);
                table.BuiltInTableStyle = TableBuiltInStyles.TableStyleMedium6;
                IRange location = table.Location;
                location.AutofitColumns();

                //Apply the proper latitude & longitude numer format in the table
                TryAndUpdateGeoLocation(table, "Latitude");
                TryAndUpdateGeoLocation(table, "Longitude");

                //Apply currency number format in the table column 'Price'
                IRange columnRange = GetListObjectColumnRange(table, "Price");
                if (columnRange != null)
                    columnRange.CellStyle.NumberFormat = "$#,##0.00";

                //Apply Date time number format in the table column 'Transaction_date'
                columnRange = GetListObjectColumnRange(table, "Transaction_date");
                if (columnRange != null)
                    columnRange.CellStyle.NumberFormat = "m/d/yy h:mm AM/PM;@";

                //Sort the data based on 'Products'
                IDataSort sorter = table.AutoFilters.DataSorter;
                ISortField sortField = sorter.SortFields.Add(0, SortOn.Values, OrderBy.Ascending);
                sorter.Sort();

                //Save the file in the given path
                Stream excelStream;
                excelStream = File.Create(Path.GetFullPath(@"../../../Output.xlsx"));
                workbook.SaveAs(excelStream);
                excelStream.Dispose();
            }

        }

        private static void TryAndUpdateGeoLocation(IListObject table, string unitString)
        {
            IRange columnRange = GetListObjectColumnRange(table, unitString);
            if (columnRange == null) return;
            columnRange.Worksheet.EnableSheetCalculations();
            foreach (IRange range in columnRange.Cells)
            {
                string currentValue = range.Value;
                range.Value2 = "=TEXT(TRUNC(" + currentValue + "), \"0\" & CHAR(176) & \" \") &" +
                    " TEXT(INT((ABS(" + currentValue + ")- INT(ABS(" + currentValue + ")))*60), \"0' \") " +
                    "& TEXT(((((ABS(" + currentValue + ")-INT(ABS(" + currentValue + ")))*60)-" +
                    " INT((ABS(" + currentValue + ") - INT(ABS(" + currentValue + ")))*60))*60), \" 0''\")";
            }
        }

        private static IRange GetListObjectColumnRange(IListObject table, string name)
        {
            IListObjectColumn column = table.Columns.FirstOrDefault(x => x.Name.Contains(name, StringComparison.InvariantCultureIgnoreCase));
            if (column != null)
            {
                IRange location = table.Location;
                return location.Worksheet[location.Row + 1, location.Column + column.Index - 1, location.LastRow, location.Column + column.Index - 1];
            }
            else
                return null;
        }
    }
}
The following images shows the CSV template.

GitHub Samples
You can download examples of exporting data to Excel in C# on GitHub.
Wrapping up
Thanks for reading! In this blog we’ve explored how Syncfusion .NET Excel library provides various easy ways to export data to Excel in C#. Use them effectively to generate Excel reports with high performance and to process large data. Take a moment to peruse the documentation, where you’ll find other options and features, all with accompanying code samples. Using the library, you can also export or write Excel data to PDF, image, data table, CSV, TSV, HTML, collections of objects, ODS, JSON. For more insights, please refer to our online demos.
If you are new to our .NET Excel library, it is highly recommended that you follow our Getting started guide.
Are you already a Syncfusion user? You can download the product setup here. If you’re not yet a Syncfusion user, you can download a free, 30-day trial here.
If you have any questions or require clarification about these features, please let us know in the comments below. You can also contact us through our support forum, support portal, or Feedback Portal. We are happy to assist you!


 No spam, just valuable updates.
Comments (26)
fantastic and very clear, so useful.. Thanks a lot..
Do we require MS office to be install to execute given sample code ?
No, MS Office is not required to execute the code.
NOTE: If you want to view the output Excel documents, you need to install MS Excel.
Great post.
I see I can use the `DisplayNameAttribute` to change the header when using `ImportData()`.
Can I also use an attribute to exclude a property to be not exported?
There is no such attribute to exclude a property on export. We will consider this requirement and provide the feature in one of the upcoming releases.
To exclude a property on export, you can make use of our another value added feature – Export data with Template Markers. It is similar like performing Mail Merge in a Word document.
1) Create an Excel template with necessary column names.
2) Have a marker (place holder) to the columns that are to be exported.
3) Open the template file using Excel (XlsIO) library.
4) Map the data source to marker variable.
5) XlsIO exports data to the columns, where markers are applied.
We have created an example for your reference, to export data with specific properties or columns using Template Markers.
https://www.syncfusion.com/downloads/support/directtrac/general/ze/Template_Marker2650947
For more information about Template Markers, refer to the documentation:
https://help.syncfusion.com/file-formats/xlsio/working-with-template-markers
Nice one.
I want to know how in “Syncfusion.XlsIO”, we can create expandable and collapsible excel rows when having a parent and child relationship.
Thank you for the comment.
If Excel worksheet has hierarchical data and if you like to group them using XlsIO, it does support with the Group() and UnGroup() APIs. To know more on how to group, you can refer the following link.
https://help.syncfusion.com/file-formats/xlsio/worksheet-rows-and-columns-manipulation#group-or-ungroup-rows-and-columns
If you want to import a hierarchical data from nested collection, then XlsIO doesn’t support to achieve this requirement. However, a feature request has been logged to import data from nested collection. Along with that, we can provide the support to group them too. Both the features will be available in the upcoming release.
You can track the feature from the below link.
https://www.syncfusion.com/feedback/7056/importing-data-from-nested-collection-should-group-them
Can you show me how to import and export data with database to view on excel with add ins using c#?
To import data from database to Excel, there is an option already in the Microsoft Excel application. We wonder why an Excel add-in is required for this. However, we do not have any provision to export data from Excel to database. If you can share more details about your need and why do you expect in Add-Ins, we can validate further.
[…] on August 19, 2019by admin submitted by /u/prabakarinfo [link] [comments] No comments […]
Hello How should i used the “ExcelEngine”
it say in the error “The type or namespace name’Excel Engine’ could not be found (are you missing a using directive or an assembly reference?)”
Thanks in advance
You have not referenced a valid Syncfusion assembly in this case. You need in refer Syncfusion.XlsIO.Base and Syncfusion.Compression.Base assemblies. If you referred to these assemblies and still facing this error, please make sure whether using Syncfusion.XlsIO; is used at the usings on the program.
Kindly install valid NuGet package to resolve this error. The following link shows valid NuGet packages according to various platforms.
https://help.syncfusion.com/file-formats/xlsio/nuget-packages-required
Please go through our getting started guide to create simple Excel files.
https://help.syncfusion.com/file-formats/xlsio/getting-started
How can we export only database column names as excel header in excel document using asp .net core?
There is no specific functionality to export only column headers to the Excel document. But this can be achieved through a simple workaround by importing a data table with the first row, then delete the first row, and leave the header row.
Please refer to the following code example to achieve your requirement.
worksheet.ImportDataTable(table, true, 1, 1, 1, table.Columns.Count);
worksheet.DeleteRow(2);
I’m facing some problem in creating EXCEL file under LINUX thru proc export. Can you please suggest me the best way to create or export data to excel on LINUX platform itself?
Using DataTable to Excel or Collection Objects to Excel conversion, you can meet the requirement. The NuGet package Syncfusion.XlsIO.Net.Core of Syncfusion XlsIO has to be referred in the Linux Environment.
If you are still facing the issue, you can contact us by creating a support ticket.
Neat trick, Mike. I wish the developer console had an easy way to export the table data I mean, the data is right there! haha As you mentioned in your post, I use workbench as a workaround a lot if i m just wanting to run quick queries.
Hi
Plz send me a sample File
The samples are available in the GitHub location as mentioned in the blog. Please refer to this link.
https://github.com/SyncfusionExamples/export-data-to-excel-in-c-sharp
If you are expecting the sample for a different scenario, you can let us know.
Down loaded syncfusion.xlsio.aspnet.18.3.0.52 but finding difficulty to install on visual studio 2017
There are two ways to install the NuGet package in Visual Studio Project.
1. You have downloaded the ASP.NET WebForms NuGet package. We suggest you download the package in a folder, add this as a new package source in the Visual Studio project, and install it.
2. You can also directly install the package from nuget.org in the Visual Studio project itself.
If you still face the issue, you can contact us by creating a support ticket. We will be happy to assist you.
… [Trackback]
[…] Find More Informations here: syncfusion.com/blogs/post/6-easy-ways-to-export-data-to-excel-in-c-sharp.aspx […]
hi
I need to export an excel file to datagridview with a column for qty. Qty set as 0. on changng qty that rows to be sent to form 2 datagrid. please assist.
An example for exporting data from an Excel file to DataGridView can be downloaded from the following link.
https://github.com/SyncfusionExamples/excel-to-datagridview
Your second query “on changing qty that rows to be sent to form 2 datagrid” is not clear. You can try the sample and let us know in detail if you need further assistance.
sync fusion’s XlsIO is free to use or it’s a paid one?
Hi Digambar,
All of Syncfusion’s Essential Studio components along with XlsIO library are free to use if the company or an individual is eligible for the community license. Please find the criteria of eligibility for the community license below,
https://www.syncfusion.com/products/communitylicense
Thanks,
Suresh