

Collections are special classes that hold a group of related values or objects in a specific series. Generic collections in C# help you maximize code reuse, type safety, and improve performance.
You know that Microsoft Excel is meant for storing data and analyzing it efficiently. So, you may wonder what can be done with collections and Microsoft Excel, as they both can store data. You can export data either from collection to Excel worksheets or from Excel worksheets to collections.
In this blog, we are going to see how the Syncfusion Excel (XlsIO) Library supports exporting data from collection to Excel worksheets and grouping the exported data in C#.
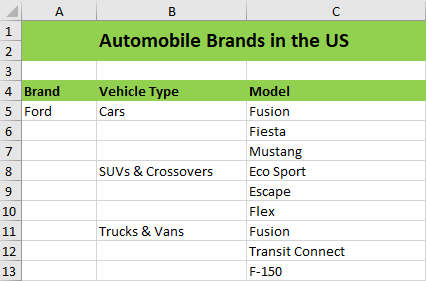
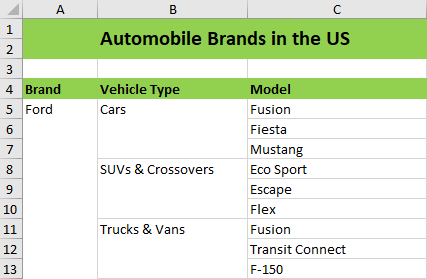
Let’s consider the data of vehicles in the market as shown in the following screenshot. The brands, vehicle types, and models are considered for our scenario.
Export data from collection to Excel worksheet
As an example, say you are using a grid control that is bound to a data model. To export the data from the grid to an Excel worksheet, you do not need to iterate each cell of a grid. Instead, you can make use of the collections that are used to bind the data model. To perform this operation, Syncfusion Excel Library provides support to export data in an easy and efficient way.
Using Syncfusion Excel Library, data can be exported from:
To export data from different sources to an Excel worksheet, refer to this blog post.
Export data from collection to Excel worksheets
Exporting data from a collection to an Excel worksheet is helpful if you need to export data from a model to an Excel worksheet.
The Syncfusion Excel Library provides support to export data from a collection of objects to an Excel worksheet. This can be achieved through the ImportData method. The following code example shows how to export data from a collection to an Excel worksheet.
using (ExcelEngine excelEngine = new ExcelEngine())
{
IApplication application = excelEngine.Excel;
application.DefaultVersion = ExcelVersion.Excel2016;
//Read the data from XML file.
StreamReader reader = new StreamReader(Path.GetFullPath("../../Data/Customers.xml"));
//Assign the data to the customerObjects collection.
IEnumerable customerObjects = GetData (reader.ReadToEnd());
//Create a new workbook.
IWorkbook workbook = application.Workbooks.Create(1);
IWorksheet sheet = workbook.Worksheets[0];
//Import data from customerObjects collection.
sheet.ImportData(customerObjects, 5, 1, false);
#region Define Styles
IStyle pageHeader = workbook.Styles.Add("PageHeaderStyle");
IStyle tableHeader = workbook.Styles.Add("TableHeaderStyle");
pageHeader.Font.RGBColor = Color.FromArgb(0, 83, 141, 213);
pageHeader.Font.FontName = "Calibri";
pageHeader.Font.Size = 18;
pageHeader.Font.Bold = true;
pageHeader.HorizontalAlignment = ExcelHAlign.HAlignCenter;
pageHeader.VerticalAlignment = ExcelVAlign.VAlignCenter;
tableHeader.Font.Color = ExcelKnownColors.White;
tableHeader.Font.Bold = true;
tableHeader.Font.Size = 11;
tableHeader.Font.FontName = "Calibri";
tableHeader.HorizontalAlignment = ExcelHAlign.HAlignCenter;
tableHeader.VerticalAlignment = ExcelVAlign.VAlignCenter;
tableHeader.Color = Color.FromArgb(0, 118, 147, 60);
tableHeader.Borders[ExcelBordersIndex.EdgeLeft].LineStyle = ExcelLineStyle.Thin;
tableHeader.Borders[ExcelBordersIndex.EdgeRight].LineStyle = ExcelLineStyle.Thin;
tableHeader.Borders[ExcelBordersIndex.EdgeTop].LineStyle = ExcelLineStyle.Thin;
tableHeader.Borders[ExcelBordersIndex.EdgeBottom].LineStyle = ExcelLineStyle.Thin;
#endregion
#region Apply Styles
//Apply style to the header.
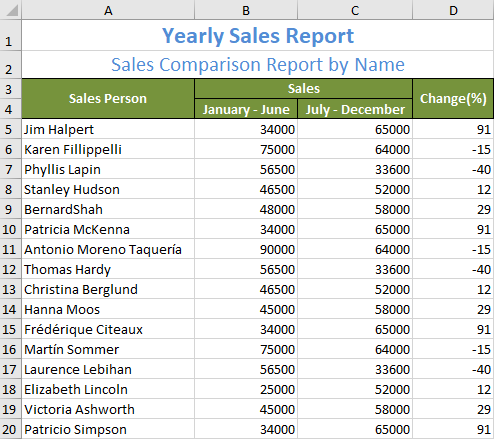
sheet["A1"].Text = "Yearly Sales Report";
sheet["A1"].CellStyle = pageHeader;
sheet["A2"].Text = "Namewise Sales Comparison Report";
sheet["A2"].CellStyle = pageHeader;
sheet["A2"].CellStyle.Font.Bold = false;
sheet["A2"].CellStyle.Font.Size = 16;
sheet["A1:D1"].Merge();
sheet["A2:D2"].Merge();
sheet["A3:A4"].Merge();
sheet["D3:D4"].Merge();
sheet["B3:C3"].Merge();
sheet["B3"].Text = "Sales";
sheet["A3"].Text = "Sales Person";
sheet["B4"].Text = "January - June";
sheet["C4"].Text = "July - December";
sheet["D3"].Text = "Change(%)";
sheet["A3:D4"].CellStyle = tableHeader;
#endregion
sheet.UsedRange.AutofitColumns();
//Save the file in the given path.
Stream excelStream = File.Create(Path.GetFullPath("Output.xlsx"));
workbook.SaveAs(excelStream);
excelStream.Dispose();
}
Export data from nested collection to Excel worksheet and group
Nested collections hold their data in a hierarchy with the parent-child relation. For each parent record, there can be multiple child records. Exporting such hierarchical data from nested collection to Excel worksheets helps the users analyze data in the same structure. Thus, Syncfusion Excel Library provides support with more flexible options to analyze hierarchical data by exporting it into different layouts and grouping it, as explained in the following sections.
Export data to Excel worksheet in different layouts
Data layout helps to analyze in an organized pattern and identify data redundancies easily. Here, we can see the different layout options that Excel Library provides:
- Default—Parent records exported in the first row of its collection.
- Merge—Parent records exported in merged rows.
- Repeat—Parent records exported in all the rows.
Let’s see these options in detail along with code examples and screenshots.
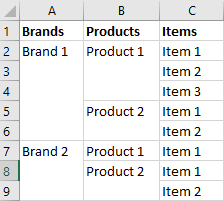
Default layout option
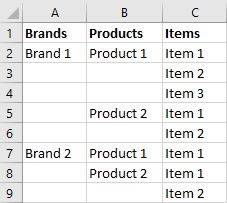
This is the default layout option while exporting data from collections to an Excel worksheet. As shown in the following screenshot, the parent values such as Brands and Products are exported only at the first row of their occurrence. The other rows are left empty, which clearly shows the Items of each parent.
The following code snippet demonstrates how to import data directly from nested collection objects with the Default layout option. The input XML file used in the code can be downloaded.
Step 1: Include the following namespaces in the program.
using Syncfusion.XlsIO;
using System.Collections.Generic;
using System.ComponentModel;
using System.IO;
using System.Xml.Serialization;
Step 2: Create the classes Brand, VehicleType, and Model. Model is declared as a collection object in the class VehicleType, and VehicleType is declared as a collection object in the class Brand.
    //Parent class.
    public class Brand
    {
        private string m_brandName;

        [DisplayNameAttribute("Brand")]
        public string BrandName
        {
            get { return m_brandName; }
            set { m_brandName = value; }
        }

        //Vehicle types collection.
        private IList<VehicleType> m_vehicleTypes;

        public IList<VehicleType> VehicleTypes
        {
            get { return m_vehicleTypes; }
            set { m_vehicleTypes = value; }
        }

        public Brand(string brandName)
        {
            m_brandName = brandName;
        }
    }

    //Child class.
    public class VehicleType
    {
        private string m_vehicleName;

        [DisplayNameAttribute("Vehicle Type")]
        public string VehicleName
        {
            get { return m_vehicleName; }
            set { m_vehicleName = value; }
        }

        //Models collection.
        private IList<Model> m_models;
        public IList<Model> Models
        {
            get { return m_models; }
            set { m_models = value; }
        }

        public VehicleType(string vehicle)
        {
            m_vehicleName = vehicle;
        }
    }

    //Sub-child class.
    public class Model
    {
        private string m_modelName;

        [DisplayNameAttribute("Model")]
        public string ModelName
        {
            get { return m_modelName; }
            set { m_modelName = value; }
        }

        public Model(string name)
        {
            m_modelName = name;
        }
    }
Step 3: Have the helper class BrandObjects read data from a relevant XML file. This class is optional, and data can be added to collection objects in different ways.
    //Helper classes.
    [XmlRootAttribute("BrandObjects")]
    public class BrandObjects
    {
        [XmlElement("BrandObject")]
        public BrandObject[] BrandObject { get; set; }
    }

    public class BrandObject
    {
        public string BrandName { get; set; }
        public string VahicleType { get; set; }
        public string ModelName { get; set; }
    }
Step 4: Add the helper method to fill in data from XML to the collections.
//Helper method to load data from XML file and add it in collections.
private static IList<Brand> GetVehicleDetails()
{
XmlSerializer deserializer = new XmlSerializer(typeof(BrandObjects));
//Read data from XML file.
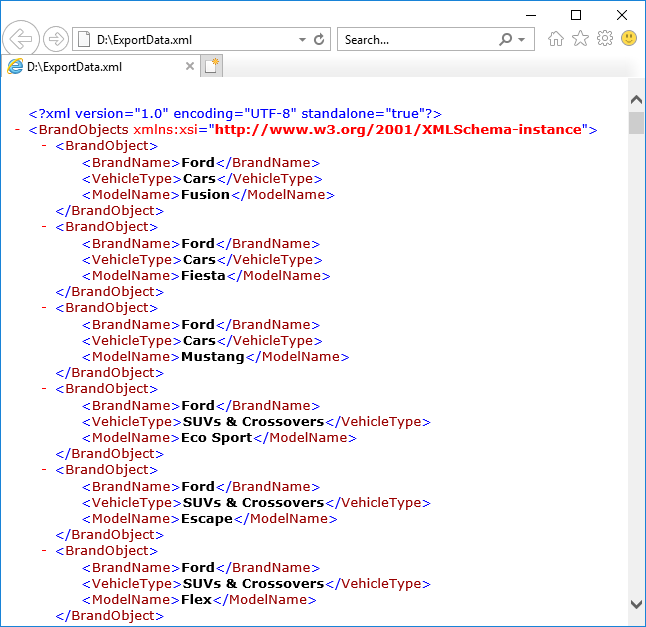
TextReader textReader = new StreamReader("../../Data/ExportData.xml");
BrandObjects brands = (BrandObjects)deserializer.Deserialize(textReader);
//Initialize parent collection to add data from XML file.
List<Brand> list = new List<Brand>();
string brandName = brands.BrandObject[0].BrandName;
string vehicleType = brands.BrandObject[0].VahicleType;
string modelName = brands.BrandObject[0].ModelName;
//Parent class.
Brand brand = new Brand(brandName);
brand.VehicleTypes = new List<VehicleType>();
VehicleType vehicle = new VehicleType(vehicleType);
vehicle.Models = new List<Model>();
Model model = new Model(modelName);
brand.VehicleTypes.Add(vehicle);
list.Add(brand);
foreach (BrandObject brandObj in brands.BrandObject)
{
if (brandName == brandObj.BrandName)
{
if (vehicleType == brandObj.VahicleType)
{
vehicle.Models.Add(new Model(brandObj.ModelName));
continue;
}
else
{
vehicle = new VehicleType(brandObj.VahicleType);
vehicle.Models = new List<Model>();
vehicle.Models.Add(new Model(brandObj.ModelName));
brand.VehicleTypes.Add(vehicle);
vehicleType = brandObj.VahicleType;
}
continue;
}
else
{
brand = new Brand(brandObj.BrandName);
vehicle = new VehicleType(brandObj.VahicleType);
vehicle.Models = new List<Model>();
vehicle.Models.Add(new Model(brandObj.ModelName));
brand.VehicleTypes = new List<VehicleType>();
brand.VehicleTypes.Add(vehicle);
vehicleType = brandObj.VahicleType;
list.Add(brand);
brandName = brandObj.BrandName;
}
}
textReader.Close();
return list;
}
Step 5: Add the code to the main class to initialize Excel engine, create a workbook, and export data from collections to an Excel worksheet.
    class Program
    {
        static void Main(string[] args)
        {
            ImportData();
        }

        //Main method to import data from nested collection to Excel worksheet.
        private static void ImportData()
        {
            ExcelEngine excelEngine = new ExcelEngine();
            IApplication application = excelEngine.Excel;

            application.DefaultVersion = ExcelVersion.Excel2016;

            IWorkbook workbook = excelEngine.Excel.Workbooks.Create(1);
            IWorksheet worksheet = workbook.Worksheets[0];

            IList<Brand> vehicles = GetVehicleDetails();

            ExcelImportDataOptions importDataOptions = new ExcelImportDataOptions();

            //Import from fourth row.
            importDataOptions.FirstRow = 4;

            //Import column headers.
            importDataOptions.IncludeHeader = true;

            //Set layout options.
            importDataOptions.NestedDataLayoutOptions = ExcelNestedDataLayoutOptions.Default;

            //Import data from the nested collection.
            worksheet.ImportData(vehicles, importDataOptions);

            string fileName = "ImportData.xlsx";

            //Apply style to headers
            worksheet["A1:C2"].Merge();
            worksheet["A1"].Text = "Automobile Brands in the US";

            worksheet.UsedRange.AutofitColumns();

            workbook.SaveAs(fileName);

            workbook.Close();
            excelEngine.Dispose();
        }
    }
Merge layout option
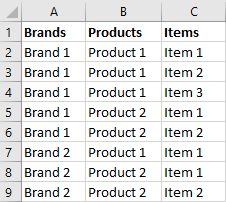
This option is like the Default layout option. However, the empty parent rows are merged to get rid of unnecessary views. Data exported from hierarchical grids to Excel worksheets can be organized in an efficient way to analyze it.
As shown in the following screenshot, the parent values such as Brands and Products are exported only on the first row of their occurrence, like with the Default layout option. The empty parent rows are merged, which clearly shows the Items of each parent.
All the steps mentioned in the code snippets of the default layout option are necessary here. The only difference is the NestedDataLayoutOptions is changed to Merge, as shown.
importDataOptions.NestedDataLayoutOptions = ExcelNestedDataLayoutOptions.Merge;
Repeat layout option
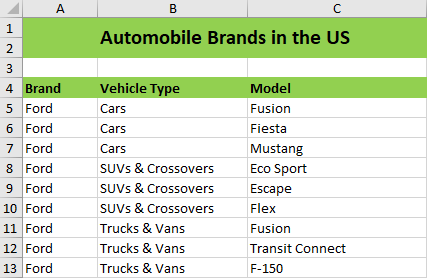
The Repeat layout option behaves differently from the other two options, as the parent data is repeated in all the rows. This option is similar to exporting data from DataTable, but the data is exported hierarchically. Such an option is helpful in analyzing data with the help of the Pivot Table in Excel.
As shown in the following screenshot, the parent values, such as Brands and Products, are exported in all the row for each Item.
All the steps mentioned in the code snippets of the default layout option are necessary here. The only difference is the NestedDataLayoutOptions is changed to Repeat, as shown.
importDataOptions.NestedDataLayoutOptions = ExcelNestedDataLayoutOptions.Repeat;
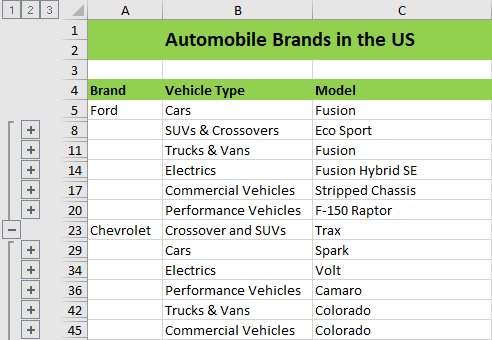
Export grouped data to Excel
Exporting hierarchical data from various grids like Grid Grouping to an Excel worksheet is now much easier. Before, data had to be exported to Excel and then it was grouped by comparing it with the grid control. Now, this hectic operation vanishes with the introduction of exporting nested collection to Excel worksheets with grouping options.
Here, data can be exported with the following grouping options:
- Expand—Exported data will be grouped and expanded.
- Collapse—Exported data will be grouped and collapsed at the first level by default.
In addition, `CollapseLevel` will collapse the group at the mentioned level, up to a maximum of eight levels.
Follow the steps to export data from nested collection to Excel worksheets like in the Default layout option. To group while exporting, the following code snippet must be added.
//Set grouping option.
importDataOptions.NestedDataGroupOptions = ExcelNestedDataGroupOptions.Collapse;

//Set collapse level.
//GroupingOption must set to ‘Collapse’ before applying ‘CollapseLevel’.
importDataOptions.CollapseLevel = 2;
GitHub samples
You can download examples of exporting data from collection to Excel in C# from GitHub.
Conclusion
As you can see, the Syncfusion Excel (XlsIO) Library provides an easy way to analyze data exported from collection to Excel in C#. Use it effectively to generate Excel reports with high performance and to process large data. Take a moment to peruse the documentation, where you’ll find other options and features, all with accompanying code samples. Using the library, you can also export Excel data to PDF, image, data table, CSV, TSV, HTML, collections of objects, ODS file format, and more.
If you are new to our Excel Library, we recommend you follow our Getting Started guide.
Are you already a Syncfusion user? You can download the product setup here. If you’re not yet a Syncfusion user, you can download a free, 30-day trial here.
If you have any questions about these features, please let us know in the comments below. You can also contact us through our support forum, Direct-Trac, or Feedback Portal. We are happy to assist you!
 No spam, just valuable updates.