

With the Bold Reports Embedded platform, you can easily embed reporting components in your project to create, bind data to, view, and export pixel-perfect paginated reports.
In this blog, we are going to walk you through the integration of our Angular Report Viewer component in an Angular template with an ASP.NET Core project. The ASP.NET Core and Angular CLI applications will process the report and render it in a browser, respectively. This lets you host both project types in a single-page app.
Prerequisites
- Visual Studio 2019 with ASP.NET and web development workloads.
- .NET Core 2.2+ Framework.
- NodeJS
- Bold Reports Embedded or Viewer SDK subscription.
Create a new app
- To get started, create an Angular project template ASP.NET Core project using the following commands in the command prompt. If this template is not available for you, refer to the following link to configure the system environment to kick-start your ASP.NET Core with Angular development: Use the Angular project template with ASP.NET Core.
dotnet new angular -o report-viewer |
cd report-viewer |
Project Structure
- The project structure is like the ASP.NET Core, but we will have additional Angular loads to workout with Angular.
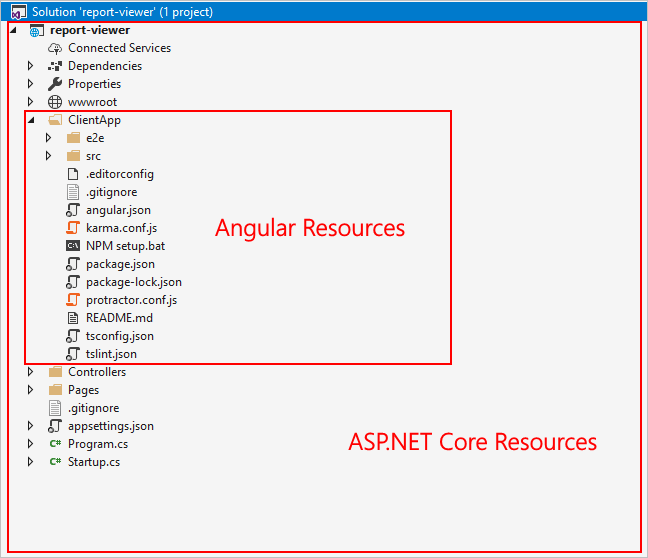
Project structure of ASP.NET Core Angular project
Create a Web API for report processing
In this section, we are going to create a Web API controller that will be used to process the provided RDL reports.
- Install the following NuGet packages in the created ASP.NET Core application. These are used for processing the RDL reports.
| Package | Purpose |
| BoldReports.Net.Core | Creates Web API service to process reports. |
| System.Data.SqlClient | This should be referenced in the project when the RDL report renders visual data from the SQL Server or SQL Azure data source based on the RDL design. The package version should be higher than 4.1.0. |
| Microsoft.AspNetCore.Mvc.NewtonsoftJson | ASP.NET Core MVC features that use Newtonsoft.Json. Includes input and output formats for JSON and JSON Patch. The package version should be higher than 3.1.2. |
- Create an empty API controller by right-clicking the Controller folder, selecting Add –> Controller, and then naming it ReportViewerController.cs
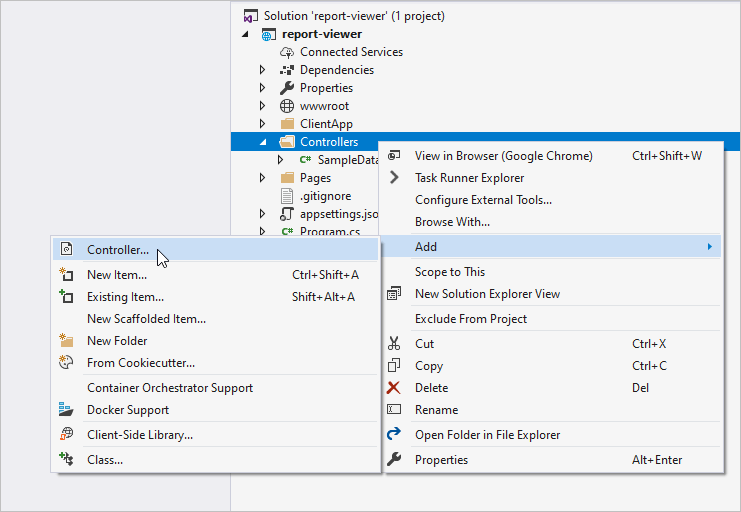
Creating a new controller
Include your already created .rdl or .rdlc reports into the path `wwwroot\Resources\`. Here we have used sales-order-detail.rdl report and which can be downloaded from here. You can also add reports from the Bold Reports installation location(C:\Users\Public\Documents\Bold Reports\Embedded Reporting Tools\Samples\ASP.NET Core\wwwroot\resources\Report). For more information, refer to the samples and demos section of the Bold Reports documentation.
- Replace the following code into ReportViewerController.cs. To learn more about the controller actions, please refer to the documentation for ReportViewer ASP.NET Core Service.
using System;
using System.Collections.Generic;
using System.Linq;
using System.Threading.Tasks;
using Microsoft.AspNetCore.Mvc;
using BoldReports.Web.ReportViewer;

// For more information on enabling Web API for empty projects, visit https://go.microsoft.com/fwlink/?LinkID=397860

namespace webservice
{
    [Route("api/[controller]/[action]")]
    public class ReportViewerController : Controller, IReportController
    {
        // Report viewer requires a memory cache to store the information of consecutive client request and
        // have the rendered report viewer information in server.
        private Microsoft.Extensions.Caching.Memory.IMemoryCache _cache;

        // IHostingEnvironment used with sample to get the application data from wwwroot.
        private Microsoft.AspNetCore.Hosting.IHostingEnvironment _hostingEnvironment;

        // Post action to process the report from server-based json parameters and send the result back to the client.
        public ReportViewerController(Microsoft.Extensions.Caching.Memory.IMemoryCache memoryCache,
            Microsoft.AspNetCore.Hosting.IHostingEnvironment hostingEnvironment)
        {
            _cache = memoryCache;
            _hostingEnvironment = hostingEnvironment;
        }

        // Post action to process the report from server based json parameters and send the result back to the client.
        [HttpPost]
        public object PostReportAction([FromBody] Dictionary<string, object> jsonArray)
        {
            return ReportHelper.ProcessReport(jsonArray, this, this._cache);
        }

        // Method will be called to initialize the report information to load the report with ReportHelper for processing.
        public void OnInitReportOptions(ReportViewerOptions reportOption)
        {
            string basePath = _hostingEnvironment.WebRootPath;
            // Here, we have loaded the sales-order-detail.rdl report from application the folder wwwroot\Resources. sales-order-detail.rdl should be there in wwwroot\Resources application folder.
            System.IO.FileStream reportStream = new System.IO.FileStream(basePath + @"\Resources\sales-order-detail.rdl", System.IO.FileMode.Open, System.IO.FileAccess.Read);
            reportOption.ReportModel.Stream = reportStream;
        }

        // Method will be called when report is loaded internally to start to layout process with ReportHelper.
        public void OnReportLoaded(ReportViewerOptions reportOption)
        {
        }

        //Get action for getting resources from the report.
        [ActionName("GetResource")]
        [AcceptVerbs("GET")]
        // Method will be called from Report Viewer client to get the image src for Image report item.
        public object GetResource(ReportResource resource)
        {
            return ReportHelper.GetResource(resource, this, _cache);
        }

        [HttpPost]
        public object PostFormReportAction()
        {
            return ReportHelper.ProcessReport(null, this, _cache);
        }
    }
}
Configure Report Viewer in Angular
In this section, we are going to install and configure the required packages to render the Bold Reports Angular components in the CLI application.
Installing and importing reporting components assets
- Open the command prompt and navigate to the path
./report-viewer/ClientApp/ - Install the following Bold Reports Angular packages using these commands
npm install @boldreports/angular-reporting-components --savenpm install @boldreports/types –save-dev |
- Include the
jqueryandreports.alltypings in thetsconfig.app.json
 {
  "extends": "./tsconfig.json",
  "compilerOptions": {
    "outDir": "./out-tsc/app",
    "typeRoots": [
      "node_modules/@types",
      "node_modules/@boldreports/types"
    ],
    "types": [
      "jquery",
      "reports.all"
    ]
  },
  "files": [
    "src/main.ts",
    "src/polyfills.ts"
  ],
  "include": [
    "src/**/*.d.ts"
  ]
}- Report Viewer required global
jqueryto render, so we need to import and assignjqueryto the window object pathsrc/polyfills.ts.
import * as jquery from 'jquery';
window['jQuery'] = jquery;
window['
- Include the Report Viewer component style
bold.reports.all.min.cssin theangular.jsonfile.
{
  "$schema": "./node_modules/@angular/cli/lib/config/schema.json",
  "project": {
    "reportviewerapp": {
  "my_new_app": [
    {
      "root": "src",
      "outDir": "dist",
       . . .
       . . .
      "styles": [
        "styles.css",
         "./node_modules/@boldreports/javascript-reporting-controls/Content/material/bold.reports.all.min.css"
      ],
      "scripts": [],
       . . .
       . . .
      }}
}- Import the necessary scripts to
src/app/app.module.ts
import { BrowserModule } from '@angular/platform-browser';
import { NgModule } from '@angular/core';
import { BoldReportViewerModule } from '@boldreports/angular-reporting-components';
import { AppComponent } from './app.component';

// Report Viewer
import '@boldreports/javascript-reporting-controls/Scripts/bold.report-viewer.min';

// data-visualization
import '@boldreports/javascript-reporting-controls/Scripts/data-visualization/ej.bulletgraph.min';
import '@boldreports/javascript-reporting-controls/Scripts/data-visualization/ej.chart.min';
import '@boldreports/javascript-reporting-controls/Scripts/data-visualization/ej2-circulargauge.min';
import '@boldreports/javascript-reporting-controls/Scripts/data-visualization/ej2-lineargauge.min';
import '@boldreports/javascript-reporting-controls/Scripts/data-visualization/ej.map.min';

@NgModule({
  declarations: [
    AppComponent
  ],
imports: [
    BrowserModule,
    BoldReportViewerModule
  ],
  providers: [],
  bootstrap: [AppComponent]
})
export class AppModule { }
Adding Report Viewer Component
- To initialize and render the component use the following code in
src/app/app.component.html
<bold-reportviewer id="reportViewer_Control" [reportServiceUrl] = "serviceUrl"[reportPath] = "reportPath" style="width: 100%;height: 950px"></bold-reportviewer>
- Bind the serviceURL and reportPath in the
src/app/app.component.tsfile.
import { Component } from '@angular/core';
@Component({
  selector: 'app-root',
  templateUrl: './app.component.html',
  styleUrls: ['./app.component.css']
})
export class AppComponent {
  title = 'reportviewerapp';
  public serviceUrl: string;
  public reportPath: string;=
    constructor() {
        this.serviceUrl = '/api/ReportViewer';
        this.reportPath = 'sales-order-detail.rdl';
    }
}
Run the application
- Build and run the project using F5 or by clicking the Start button.
- The application will be launched in the default system browser and the output will look like the following.
- You can also export the report in PDF, Excel, Word, HTML, PowerPoint, XML, and CSV. For more options please refer to the documentation on the Report Viewer.
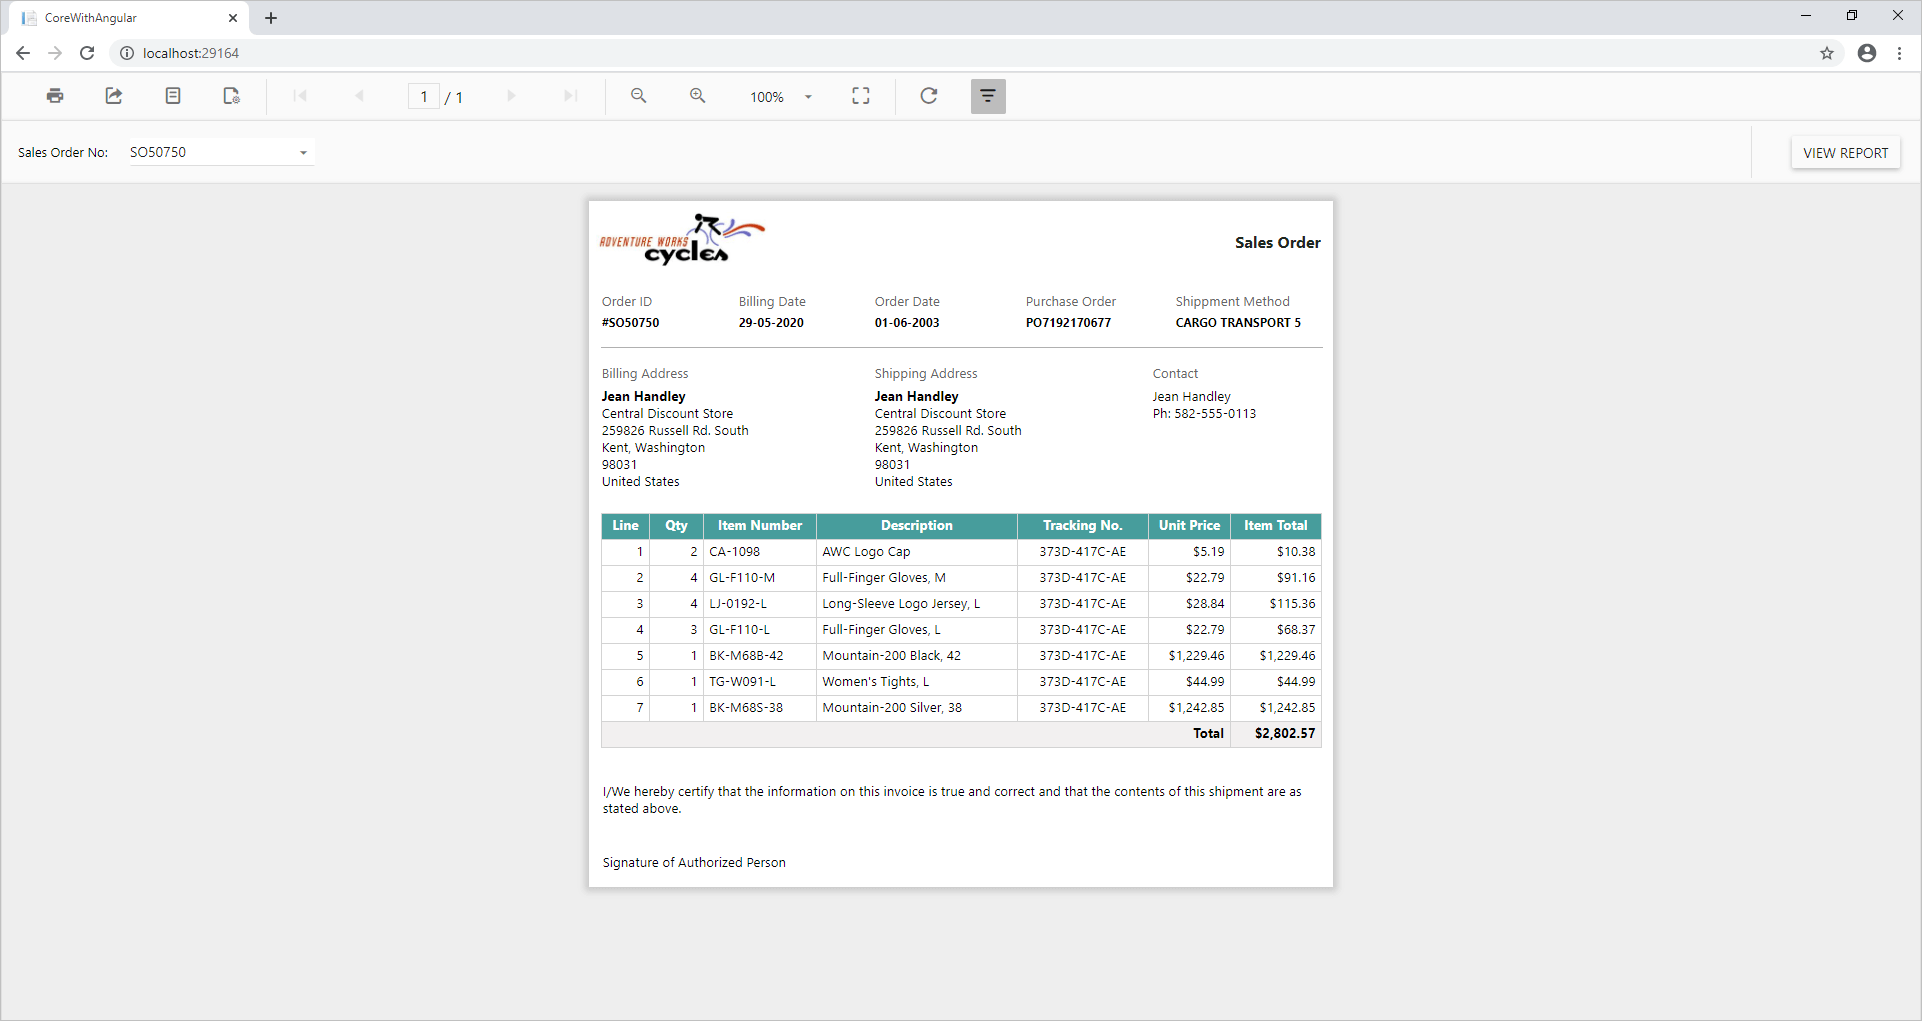
Sales Report in ASP.NET Core with Angular application
You can remove the ‘Invalid License’ from the output by including the licensing token in the project. Please refer to the documentation for how to generate a Bold Reports licensing token.
Conclusion
In this blog, we have learned how to use the Bold Reports Reporting Viewer component using ASP.NET Core with Angular. To explore further, I recommend you go through our sample reports and documentation.
If you have any questions, please post them in the comments section below. You can also contact us through our contact page or, if you already have an account, you can log in to submit your support question. Feel free to check out the Bold Reports Embedded Edition demos and documentation to explore the available tools and their various customization features.
Bold Reports now comes with a 15-day free trial with no credit card information required. We welcome you to start a free trial and experience Bold Reports for yourself. Give it a try and let us know what you think!
Stay tuned to our official Twitter, Facebook, LinkedIn, Pinterest, and Instagram pages for announcements about new releases.
] = jquery;
- Include the Report Viewer component style
bold.reports.all.min.cssin theangular.jsonfile.
- Import the necessary scripts to
src/app/app.module.ts
Adding Report Viewer Component
- To initialize and render the component use the following code in
src/app/app.component.html
- Bind the serviceURL and reportPath in the
src/app/app.component.tsfile.
Run the application
- Build and run the project using F5 or by clicking the Start button.
- The application will be launched in the default system browser and the output will look like the following.
- You can also export the report in PDF, Excel, Word, HTML, PowerPoint, XML, and CSV. For more options please refer to the documentation on the Report Viewer.
Sales Report in ASP.NET Core with Angular application
You can remove the ‘Invalid License’ from the output by including the licensing token in the project. Please refer to the documentation for how to generate a Bold Reports licensing token.
Conclusion
In this blog, we have learned how to use the Bold Reports Reporting Viewer component using ASP.NET Core with Angular. To explore further, I recommend you go through our sample reports and documentation.
If you have any questions, please post them in the comments section below. You can also contact us through our contact page or, if you already have an account, you can log in to submit your support question. Feel free to check out the Bold Reports Embedded Edition demos and documentation to explore the available tools and their various customization features.
Bold Reports now comes with a 15-day free trial with no credit card information required. We welcome you to start a free trial and experience Bold Reports for yourself. Give it a try and let us know what you think!
Stay tuned to our official Twitter, Facebook, LinkedIn, Pinterest, and Instagram pages for announcements about new releases.
 No spam, just valuable updates.
Comments (4)
Thank you for the post.
Syncfusion cost is very high for small companies.
Any solution for that?
Hello, Srinivas
We would like to discuss this with you if you can reach out to us to learn more, for our Report Viewer SDK starts at only $49 monthly, We can discuss your needs and find the best option for you.
Brad Freeman
VP of Sales
Hi,
Can we also use the old crystal report(.rpt) with Bold Report?
Thanks,
Hi Sunil,
Bold reports support .rdl file format defined by SSRS. We don’t have direct support to use the Crystal reports (.rpt) into Bold Reports. We needed to manually migrate the Crystal reports (.rpt) to RDL using the report designer. Please find the below migration document for converting Crystal reports (.rpt) to (.rdl).
migration document : https://docs.microsoft.com/en-us/previous-versions/sql/sql-server-2005/administrator/aa964127(v=sql.90)
After successful migration from rpt to rdl then we can use into bold reports.
Regards,
Richard B