

Our Syncfusion Flutter Excel Library (XlsIO) is a non-UI, reusable file-format library. It allows users to create Excel documents programmatically with text, numbers, date-time values, styles, number formats, formulas, images, charts, hyperlinks, imported data, conditional formatting, and workbook and worksheet protection. This library works in both mobile and web applications. In this article, we are going to see how to create a balance Sheet in an Excel spreadsheet using the Flutter Excel library.
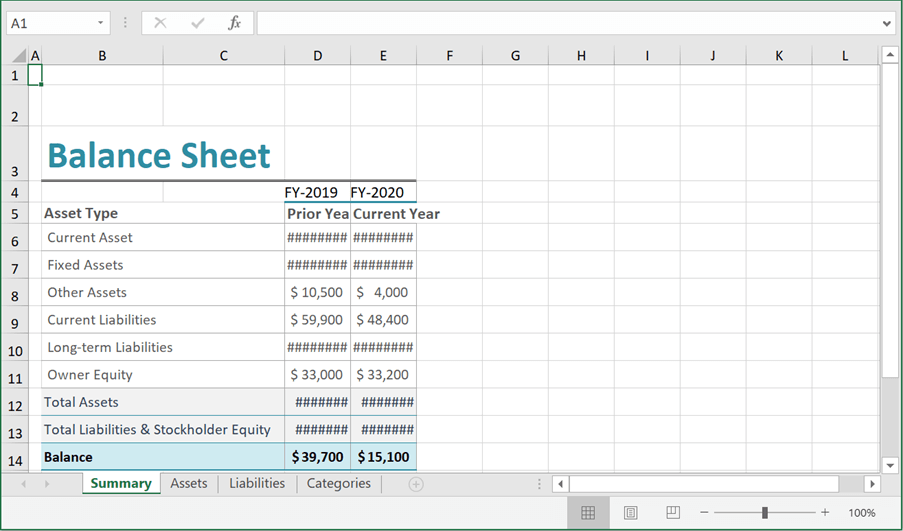
The final worksheet will look like the following screenshot.

You will see:
- How to create and configure a Flutter project
- How to create each sheet with data
- How to apply other features
Create and configure a Flutter project
Follow these steps to create a Flutter project and configure it to create a worksheet:
Step 1: Create a basic Flutter application
Create a simple Flutter project using the instructions provided in the Get started with your first Flutter app documentation.
Step 2: Add the dependency
Then, add the Syncfusion Flutter Excel dependency to your pubsec.yaml file.
dependencies:

  syncfusion_flutter_xlsio: ^18.3.35-beta.1
Step 3: Get the packages
Run the following command to get the required NuGet package.
$ flutter pub get |
Step 4: Import the package
Now, import the following package into your Dart code.
import 'package:syncfusion_flutter_xlsio/xlsio.dart';
Step 5: Add a button widget
After importing the package, add a Button widget as a child to the container widget.
@override
Widget build(BuildContext context) {
  return Scaffold(
    appBar: AppBar(
      title: Text(widget.title),
    ),
    body: Center(
      child: Column(
        mainAxisAlignment: MainAxisAlignment.center,
        children: <Widget>[
          FlatButton(
            child: Text(
              'Generate Excel',
              style: TextStyle(color: Colors.white),
            ),
            onPressed: _createExcel,
            color: Colors.blue,
          )
        ],
      ),
    ),
  );
}Create an Excel worksheet
We have created a basic Flutter application and included the required packages. Let’s now create a balance sheet using the Flutter Excel Library:
Step 1: Create styles
We are going to apply some styles in the balance sheet Excel document. Refer to the following code example.
List<Style> createStyles(Workbook workbook)
{
final Style style = workbook.styles.add('Style');
style.fontColor = '#308DA2';
style.fontSize = 28;
style.bold = true;
style.borders.bottom.lineStyle = LineStyle.double;
style.vAlign = VAlignType.center;
final Style style1 = workbook.styles.add('Style1');
style1.bold = true;
style1.fontSize = 12;
style1.fontColor = '#595959';
style1.vAlign = VAlignType.center;
style1.borders.bottom.lineStyle = LineStyle.thin;
style1.borders.bottom.color = '#A6A6A6';
style1.borders.right.lineStyle = LineStyle.thin;
style1.borders.right.color = '#A6A6A6';
final Style style2 = workbook.styles.add('Style2');
style2.fontColor = '#595959';
style2.wrapText = true;
style2.vAlign = VAlignType.center;
style2.borders.bottom.lineStyle = LineStyle.thin;
style2.borders.bottom.color = '#A6A6A6';
style2.borders.right.lineStyle = LineStyle.thin;
style2.borders.right.color = '#A6A6A6';
style2.numberFormat = '_(\$* #,##0_);_(\$* (#,##0);_(\$* "-"_);_(@_)';
final Style style3 = workbook.styles.add('style3');
style3.backColor = '#F2F2F2';
style3.fontColor = '#313F55';
style3.vAlign = VAlignType.center;
style3.borders.bottom.lineStyle = LineStyle.thin;
style3.borders.bottom.color = '#308DA2';
style3.borders.right.lineStyle = LineStyle.thin;
style3.borders.right.color = '#A6A6A6';
final Style style4 = workbook.styles.add('Style4');
style4.backColor = '#CFEBF1';
style4.bold = true;
style4.vAlign = VAlignType.center;
style4.borders.bottom.lineStyle = LineStyle.medium;
style4.borders.bottom.color = '#308DA2';
style4.borders.right.lineStyle = LineStyle.thin;
style4.borders.right.color = '#A6A6A6';
final Style style5 = workbook.styles.add('Style5');
style5.fontSize = 12;
style5.vAlign = VAlignType.center;
style5.hAlign = HAlignType.right;
style5.indent = 1;
style5.borders.bottom.lineStyle = LineStyle.thick;
style5.borders.bottom.color = '#308DA2';
style5.borders.right.lineStyle = LineStyle.thin;
style5.borders.right.color = '#A6A6A6';
style5.borders.left.lineStyle = LineStyle.thin;
style5.borders.left.color = '#A6A6A6';
final Style style6 = workbook.styles.add('Style6');
style6.fontColor = '#595959';
style6.wrapText = true;
style6.vAlign = VAlignType.center;
style6.borders.right.lineStyle = LineStyle.thin;
style6.borders.right.color = '#A6A6A6';
style6.numberFormat = '_(\$* #,##0_);_(\$* (#,##0);_(\$* "-"_);_(@_)';
final Style style7 = workbook.styles.add('Style7');
style7.fontColor = '#595959';
style7.wrapText = true;
style7.vAlign = VAlignType.center;
style7.borders.bottom.lineStyle = LineStyle.thin;
style7.borders.bottom.color = '#A6A6A6';
final Style style8 = workbook.styles.add('style8');
style8.backColor = '#F2F2F2';
style8.fontColor = '#313F55';
style8.vAlign = VAlignType.center;
style8.borders.bottom.lineStyle = LineStyle.thin;
style8.borders.bottom.color = '#308DA2';
style8.borders.right.lineStyle = LineStyle.thin;
style8.borders.right.color = '#A6A6A6';
style8.numberFormat = '_(\$* #,##0_);_(\$* (#,##0);_(\$* "-"_);_(@_)';
final Style style9 = workbook.styles.add('style9');
style9.backColor = '#CFEBF1';
style9.bold = true;
style9.vAlign = VAlignType.center;
style9.borders.bottom.lineStyle = LineStyle.medium;
style9.borders.bottom.color = '#308DA2';
style9.borders.right.lineStyle = LineStyle.thin;
style9.borders.right.color = '#A6A6A6';
style9.numberFormat = '_(\$* #,##0_);_(\$* (#,##0);_(\$* "-"_);_(@_)';
return [
style,
style1,
style2,
style3,
style4,
style5,
style6,
style7,
style8,
style9
];
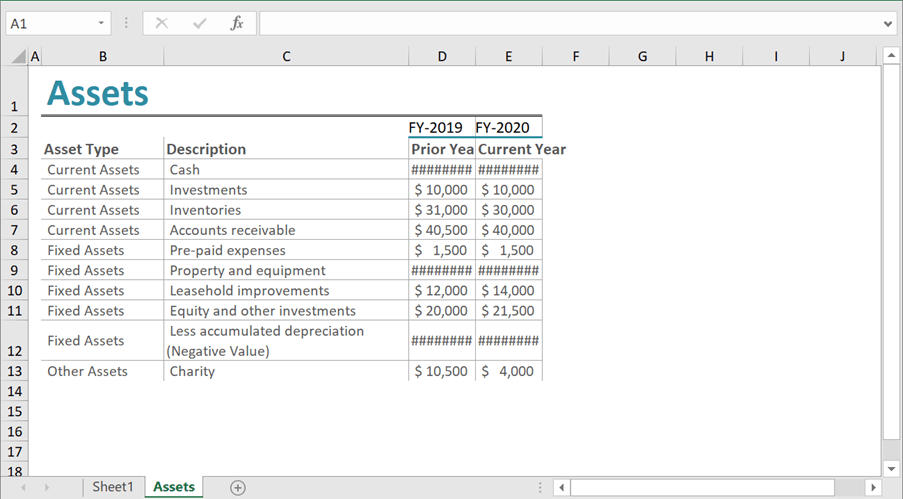
}Step 2: Create the assets worksheet
Let’s create a worksheet named Asset and fill in some data. Refer to the following code example.
void addAssetsSheet(Workbook workbook, List<Style> styles) {
  // Sheet2
  final Worksheet sheet2 = workbook.worksheets.addWithName('Assets');
  sheet2.showGridlines = false;

  sheet2.getRangeByName('A1').columnWidth = 1.69;

  sheet2.getRangeByName('B1').text = 'Assets';
  sheet2.getRangeByName('B1:E1').cellStyle = styles[0];
  sheet2.getRangeByIndex(1, 2).columnWidth = 16;

  sheet2.getRangeByIndex(1, 3).columnWidth = 32;

  final Range range1 = sheet2.getRangeByName('D2');
  range1.cellStyle = styles[5];
  range1.text = 'FY-2019';

  final Range range2 = sheet2.getRangeByName('E2');
  range2.cellStyle = styles[5];
  range2.text = 'FY-2020';

  sheet2.getRangeByName('B3').text = 'Asset Type';
  sheet2.getRangeByName('C3').text = 'Description';
  sheet2.getRangeByName('D3').text = 'Prior Year';
  sheet2.getRangeByName('E3').text = 'Current Year';

  sheet2.getRangeByName('B3:E3').cellStyle = styles[1];

  sheet2.getRangeByName('B4:B7').text = 'Current Assets';
  sheet2.getRangeByName('B8:B12').text = 'Fixed Assets';
  sheet2.getRangeByIndex(13, 2).text = 'Other Assets';

  sheet2.getRangeByName('C4').text = 'Cash';
  sheet2.getRangeByName('C5').text = 'Investments';
  sheet2.getRangeByName('C6').text = 'Inventories';
  sheet2.getRangeByName('C7').text = 'Accounts receivable';
  sheet2.getRangeByName('C8').text = 'Pre-paid expenses';
  sheet2.getRangeByName('C9').text = 'Property and equipment';
  sheet2.getRangeByName('C10').text = 'Leasehold improvements';
  sheet2.getRangeByName('C11').text = 'Equity and other investments';
  sheet2.getRangeByName('C12').text =
      'Less accumulated depreciation (Negative Value)';
  sheet2.getRangeByName('C13').text = 'Charity';
  sheet2.getRangeByName('B4:E12').cellStyle = styles[2];
  sheet2.getRangeByName('B13:E13').cellStyle = styles[6];

  sheet2.getRangeByName('D4').number = 102100;
  sheet2.getRangeByName('D5').number = 10000;
  sheet2.getRangeByName('D6').number = 31000;
  sheet2.getRangeByName('D7').number = 40500;
  sheet2.getRangeByName('D8').number = 1500;
  sheet2.getRangeByName('D9').number = 381000;
  sheet2.getRangeByName('D10').number = 12000;
  sheet2.getRangeByName('D11').number = 20000;
  sheet2.getRangeByName('D12').number = -56000;
  sheet2.getRangeByName('D13').number = 10500;

  sheet2.getRangeByName('E4').number = 100000;
  sheet2.getRangeByName('E5').number = 10000;
  sheet2.getRangeByName('E6').number = 30000;
  sheet2.getRangeByName('E7').number = 40000;
  sheet2.getRangeByName('E8').number = 1500;
  sheet2.getRangeByName('E9').number = 324300;
  sheet2.getRangeByName('E10').number = 14000;
  sheet2.getRangeByName('E11').number = 21500;
  sheet2.getRangeByName('E12').number = -46500;
  sheet2.getRangeByName('E13').number = 4000;
}
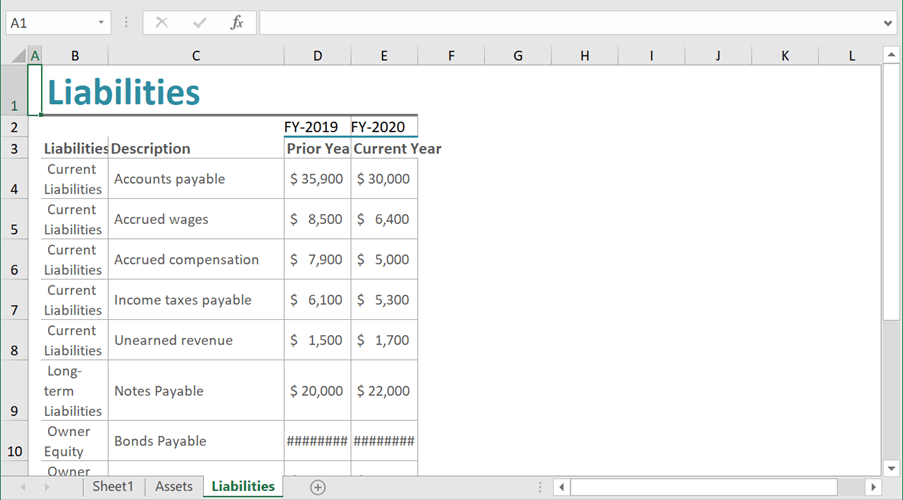
Step 3: Create the liabilities worksheet
Next, let’s create a worksheet named Liabilities and fill in some data. Refer to the following code example.
 void addLiabilitiesSheet(Workbook workbook, List<Style> styles) {
  // sheet3
  final Worksheet sheet3 = workbook.worksheets.addWithName('Liabilities');
  sheet3.showGridlines = false;

  sheet3.getRangeByName('A1').columnWidth = 1.69;
  sheet3.getRangeByIndex(1, 3).columnWidth = 23;

  sheet3.getRangeByName('B1').text = 'Liabilities';
  sheet3.getRangeByName('B1:E1').cellStyle = styles[0];

  final Range range1 = sheet3.getRangeByName('D2');
  range1.cellStyle = styles[5];
  range1.text = 'FY-2019';

  final Range range2 = sheet3.getRangeByName('E2');
  range2.cellStyle = styles[5];
  range2.text = 'FY-2020';

  sheet3.getRangeByName('B3').text = 'Liabilities Type';
  sheet3.getRangeByName('C3').text = 'Description';
  sheet3.getRangeByName('D3').text = 'Prior Year';
  sheet3.getRangeByName('E3').text = 'Current Year';

  sheet3.getRangeByName('B3:E3').cellStyle = styles[1];

  sheet3.getRangeByName('B4:E11').cellStyle = styles[2];
  sheet3.getRangeByName('B12:E12').cellStyle = styles[6];
  sheet3.getRangeByName('B4:B8').text = 'Current Liabilities';
  sheet3.getRangeByName('B9:B10').text = 'Long-term Liabilities';
  sheet3.getRangeByIndex(10, 2, 11, 2).text = 'Owner Equity';

  sheet3.getRangeByIndex(4, 3).text = 'Accounts payable';
  sheet3.getRangeByIndex(5, 3).text = 'Accrued wages';
  sheet3.getRangeByIndex(6, 3).text = 'Accrued compensation';
  sheet3.getRangeByIndex(7, 3).text = 'Income taxes payable';
  sheet3.getRangeByIndex(8, 3).text = 'Unearned revenue';
  sheet3.getRangeByIndex(9, 3).text = 'Notes Payable';
  sheet3.getRangeByIndex(10, 3).text = 'Bonds Payable';
  sheet3.getRangeByIndex(11, 3).text = 'Investment capital';
  sheet3.getRangeByIndex(12, 3).text = 'Accumulated retained earnings';

  sheet3.getRangeByName('D4').number = 35900;
  sheet3.getRangeByName('D5').number = 8500;
  sheet3.getRangeByName('D6').number = 7900;
  sheet3.getRangeByName('D7').number = 6100;
  sheet3.getRangeByName('D8').number = 1500;
  sheet3.getRangeByName('D9').number = 20000;
  sheet3.getRangeByName('D10').number = 400000;
  sheet3.getRangeByName('D11').number = 11000;
  sheet3.getRangeByName('D12').number = 22000;

  sheet3.getRangeByName('E4').number = 30000;
  sheet3.getRangeByName('E5').number = 6400;
  sheet3.getRangeByName('E6').number = 5000;
  sheet3.getRangeByName('E7').number = 5300;
  sheet3.getRangeByName('E8').number = 1700;
  sheet3.getRangeByName('E9').number = 22000;
  sheet3.getRangeByName('E10').number = 380100;
  sheet3.getRangeByName('E11').number = 12500;
  sheet3.getRangeByName('E12').number = 20700;
}
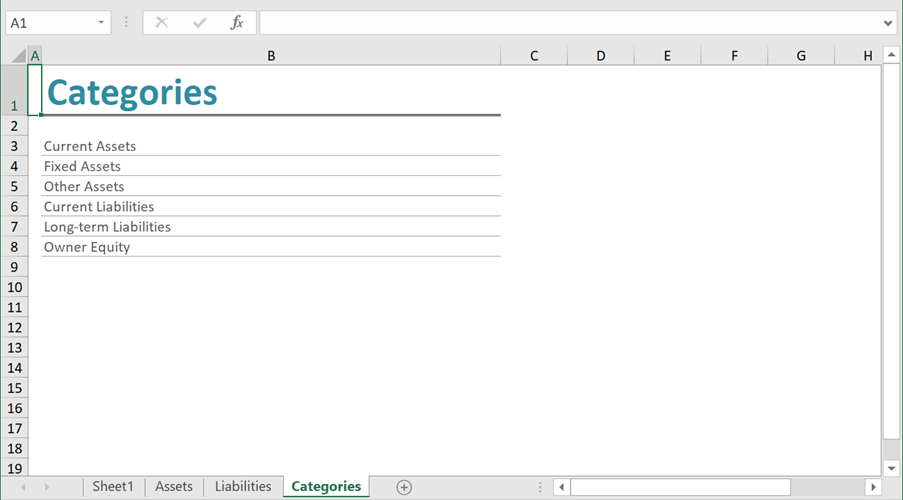
Step 4: Create the categories Worksheet
Then, create a worksheet named Categories and fill in some data. Refer to the following code example.
void addCategoriesSheet(Workbook workbook, List<Style> styles) {
  // sheet4
  final Worksheet sheet4 = workbook.worksheets.addWithName('Categories');
  sheet4.showGridlines = false;

  sheet4.getRangeByName('A1').columnWidth = 1.69;

  sheet4.getRangeByName('B1').text = 'Categories';
  sheet4.getRangeByName('B1').cellStyle = styles[0];
  sheet4.getRangeByName('B1').columnWidth = 60;

  sheet4.getRangeByName('B3:B8').cellStyle = styles[7];
  sheet4.getRangeByIndex(3, 2).text = 'Current Assets';
  sheet4.getRangeByIndex(4, 2).text = 'Fixed Assets';
  sheet4.getRangeByIndex(5, 2).text = 'Other Assets';
  sheet4.getRangeByIndex(6, 2).text = 'Current Liabilities';
  sheet4.getRangeByIndex(7, 2).text = 'Long-term Liabilities';
  sheet4.getRangeByIndex(8, 2).text = 'Owner Equity';
}
Step 5: Create the summary worksheet
Finally, create a worksheet named Summary. This sheet is filled with the data from the other sheets using the nested function formulae to create a balance sheet. The following code example is used to create the Summary worksheet with the nested function formulae.
void addSummarySheet(Workbook workbook, List<Style> styles)
{
  //Accessing via index
  final Worksheet sheet = workbook.worksheets[0];
  sheet.name = 'Summary';

  sheet.enableSheetCalculations();
  sheet.getRangeByName('A1').columnWidth = 1.69;
  sheet.getRangeByIndex(2, 1).rowHeight = 30;
  sheet.getRangeByName('A3').rowHeight = 40;

  final Range range = sheet.getRangeByIndex(3, 2);
  range.setText('Balance Sheet');
  range.cellStyle = styles[0];
  range.columnWidth = 16.14;
  sheet.getRangeByIndex(1, 3).columnWidth = 16.14;

  sheet.getRangeByName('B5:C5').merge();
  sheet.getRangeByName('B6:C6').merge();
  sheet.getRangeByName('B7:C7').merge();
  sheet.getRangeByName('B8:C8').merge();
  sheet.getRangeByName('B9:C9').merge();
  sheet.getRangeByName('B10:C10').merge();
  sheet.getRangeByName('B11:C11').merge();
  sheet.getRangeByName('B12:C12').merge();
  sheet.getRangeByName('B13:C13').merge();
  sheet.getRangeByName('B14:C14').merge();

  sheet.getRangeByName('C3:E3').cellStyle = styles[0];

  final Range range1 = sheet.getRangeByName('D4');
  range1.cellStyle = styles[5];
  range1.text = 'FY-2019';

  final Range range2 = sheet.getRangeByName('E4');
  range2.cellStyle = styles[5];
  range2.text = 'FY-2020';

  sheet.getRangeByName('B5').text = 'Asset Type';
  sheet.getRangeByName('D5').text = 'Prior Year';
  sheet.getRangeByName('E5').text = 'Current Year';

  sheet.getRangeByName('B5:E5').cellStyle = styles[1];

  sheet.getRangeByName('B6').text = 'Current Asset';
  sheet.getRangeByName('B7').text = 'Fixed Assets';
  sheet.getRangeByName('B8').text = 'Other Assets';
  sheet.getRangeByName('B9').text = 'Current Liabilities';
  sheet.getRangeByName('B10').text = 'Long-term Liabilities';
  sheet.getRangeByName('B11').text = 'Owner Equity';

  sheet.getRangeByName('B6:E14').rowHeight = 20;
  sheet.getRangeByName('B6:E11').cellStyle = styles[2];

  sheet.getRangeByName('B12:C13').cellStyle = styles[3];
  sheet.getRangeByName('D12:E13').cellStyle = styles[8];
  sheet.getRangeByName('B12').text = 'Total Assets';
  sheet.getRangeByName('B13').text = 'Total Liabilities & Stockholder Equity';

  sheet.getRangeByName('B14:C14').cellStyle = styles[4];
  sheet.getRangeByName('D14:E14').cellStyle = styles[9];
  sheet.getRangeByName('B14').text = 'Balance';

  sheet.getRangeByIndex(6, 4).formula = '=SUM(Assets!\$D\$4:\$D\$8)';
  sheet.getRangeByIndex(7, 4).formula = '=SUM(Assets!\$D\$9:\$D\$12)';
  sheet.getRangeByIndex(8, 4).formula = '=SUM(Assets!D13)';
  sheet.getRangeByIndex(9, 4).formula = '=SUM(Liabilities!\$D\$4:\$D\$8)';
  sheet.getRangeByIndex(10, 4).formula = '=SUM(Liabilities!\$D\$9:\$D\$10)';
  sheet.getRangeByIndex(11, 4).formula = '=SUM(Liabilities!\$D\$11:\$D\$12)';
  sheet.getRangeByIndex(12, 4).formula =
      '=SUM(SUM(Assets!\$D\$4:\$D\$8),SUM(Assets!\$D\$9:\$D\$12),SUM(Assets!\$D\$13))';
  sheet.getRangeByIndex(13, 4).formula =
      '=SUM(SUM(Liabilities!\$D\$4:\$D\$8), SUM(Liabilities!\$D\$9:\$D\$10), SUM(Liabilities!\$D\$11:\$D\$12))';
  sheet.getRangeByIndex(14, 4).formula = '=D12-D13';

  sheet.getRangeByIndex(6, 5).formula = '=SUM(Assets!\$E\$4:\$E\$8)';
  sheet.getRangeByIndex(7, 5).formula = '=SUM(Assets!\$E\$9:\$E\$12)';
  sheet.getRangeByIndex(8, 5).formula = '=SUM(Assets!E13)';
  sheet.getRangeByIndex(9, 5).formula = '=SUM(Liabilities!\$E\$4:\$E\$8)';
  sheet.getRangeByIndex(10, 5).formula = '=SUM(Liabilities!\$E\$9:\$E\$10)';
  sheet.getRangeByIndex(11, 5).formula = '=SUM(Liabilities!\$E\$11:\$E\$12)';
  sheet.getRangeByIndex(12, 5).formula =
      '=SUM(SUM(Assets!\$E\$4:\$E\$8),SUM(Assets!\$E\$9:\$E\$12),SUM(Assets!\$E\$13))';
  sheet.getRangeByIndex(13, 5).formula =
      '=SUM(SUM(Liabilities!\$E\$4:\$E\$8), SUM(Liabilities!\$E\$9:\$E\$10), SUM(Liabilities!\$E\$11:\$E\$12))';
  sheet.getRangeByIndex(14, 5).formula = '=E12-E13';
}
Other features
The Flutter Excel Library also provides the following useful features:
Let’s learn about them with code examples.
Nested Function formulae
We use several worksheet functions in cell formulae to calculate the desired result. We can also use a function within another function. Here, the result returned from one function will be used as the argument to the other function.
For example, in the Summary sheet, we have used these nested function formulae.
sheet.getRangeByIndex(12, 5).formula =
      '=SUM(SUM(Assets!\$E\$4:\$E\$8),SUM(Assets!\$E\$9:\$E\$12),SUM(Assets!\$E\$13))';
  sheet.getRangeByIndex(13, 5).formula =
      '=SUM(SUM(Liabilities!\$E\$4:\$E\$8), SUM(Liabilities!\$E\$9:\$E\$10), SUM(Liabilities!\$E\$11:\$E\$12))';
Autofit cells
The Flutter Excel library allows us to change the column width and adjust the row height of the worksheet cells. You can easily resize cells with the Autofit option. It will determine whether to widen or narrow a column and expand or collapse a row to match the data size.
The Flutter Excel library supports the following autofit options in the worksheet cells:
- autoFitColumn – changes the column width to show large values in a column.
- autoFitRow – adjusts the row height to show multiple lines or extra tall text.
The following code example explains how to apply autofit feature in the worksheet cells.
void autoFitWorksheets(Workbook workbook)
{
  final sheet = workbook.worksheets[0];
  final sheet2 = workbook.worksheets[1];
  final sheet3 = workbook.worksheets[2];

  //Autofit rows and columns
  sheet.getRangeByName('D4:E14').autoFitColumns();
  sheet2.getRangeByName('C3:C13').autoFitRows();
  sheet2.autoFitColumn(4);
  sheet2.autoFitColumn(5);
  sheet3.autoFitColumn(2);
  sheet3.getRangeByName('C3:C12').autoFitRows();
  sheet3.autoFitColumn(4);
  sheet3.autoFitColumn(5);
}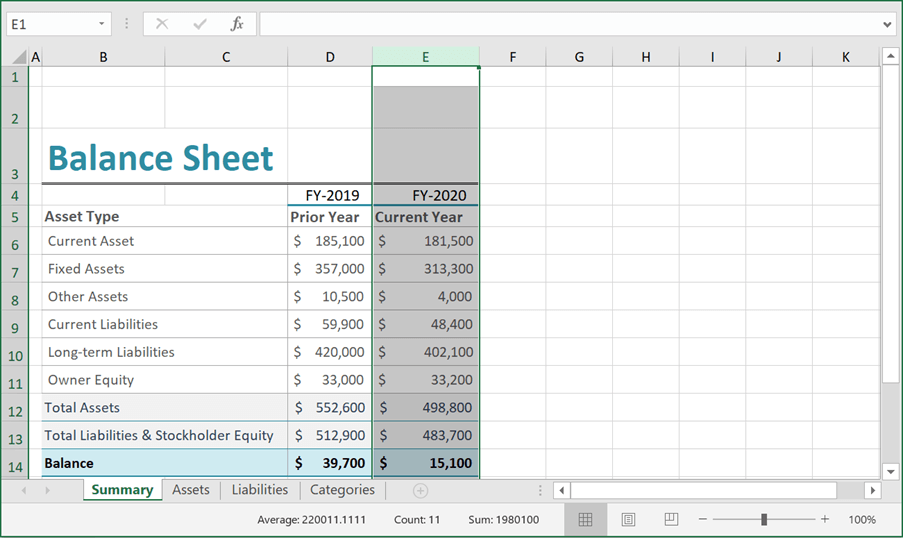
Image hyperlinks
A hyperlink is a reference to a specific location, document, or webpage. It enables a user to easily navigate to the destination by clicking the link in a cell. A hyperlink may target any one of the following that can be added to a worksheet range (cell) or an image:
- Worksheet range
- Web URL
- E-mail address
- External files
The following code example explains how to add a hyperlink to images in the worksheet.
void addImageHyperlink(Workbook workbook) {
final sheet = workbook.worksheets[0];
//Hyperlinks are added to the images in the Summary worksheet.
final Picture picture = sheet.pictures
.addStream(2, 2, File('images/assets.png').readAsBytesSync());
picture.height = 30;
picture.width = 100;
sheet.hyperlinks
.addImage(picture, HyperlinkType.workbook, 'Assets!B1', 'Assets');
final Picture picture1 = sheet.pictures
.addStream(2, 3, File('images/liabilities.png').readAsBytesSync());
picture1.height = 30;
picture1.width = 100;
sheet.hyperlinks.addImage(
picture1, HyperlinkType.workbook, 'Liabilities!B1', 'Liabilities');
final Picture picture2 = sheet.pictures
.addStream(2, 4, File('images/categories.png').readAsBytesSync());
picture2.height = 30;
picture2.width = 100;
sheet.hyperlinks.addImage(
picture2, HyperlinkType.workbook, 'Categories!B1', 'Categories');
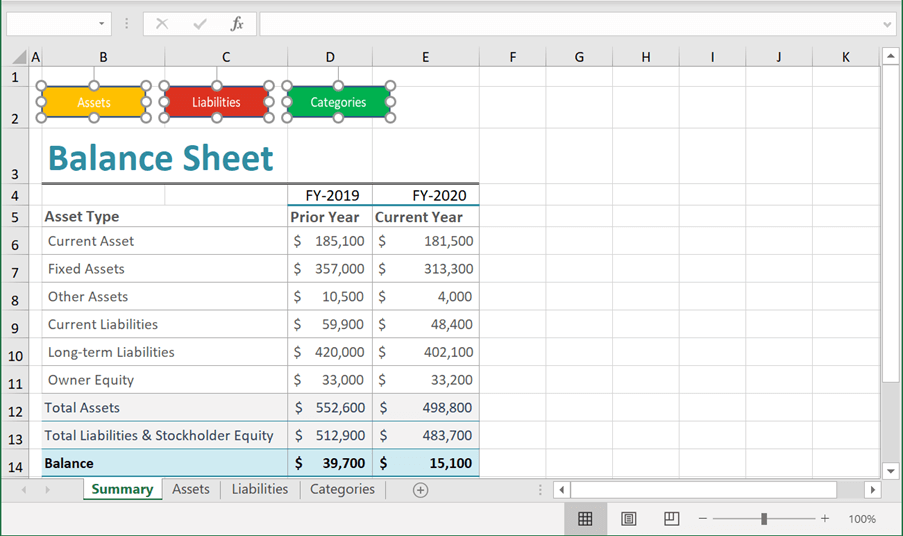
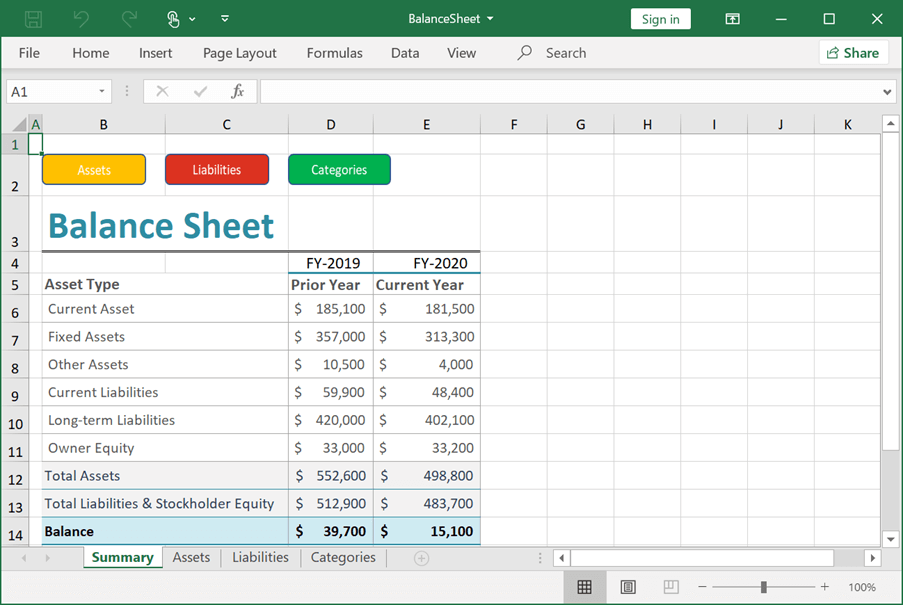
}The following screenshot shows the Excel document with the hyperlinks added to the images (Assets, Liabilities, and Categories) in the Summary worksheet.
Worksheet and workbook protection
You can prevent an anonymous user from moving, editing, or deleting important data from a worksheet or workbook with a password. Syncfusion Flutter Excel library provides both workbook protection and worksheet protection.
Workbook protection
Workbooks are protected by their structure and window:
- Workbook structure prevents unauthorized people from moving, deleting, hiding, unhiding, renaming, or inserting worksheets.
- Window protection will retain the size and position of a workbook whenever opened.
Worksheet protection
You can protect the data on individual worksheet elements, too, from being changed.
The following code example explains how to add worksheet and workbook protection.
void addProtection(Workbook workbook)
{
  final sheet = workbook.worksheets[0];
  final sheet2 = workbook.worksheets[1];
  final sheet3 = workbook.worksheets[2];
  final sheet4 = workbook.worksheets[3];

  //Protection worksheet with a password.
  sheet.protect('Syncfusion');
  ExcelSheetProtectionOption option = ExcelSheetProtectionOption();
  option.lockedCells = true;
  option.insertColumns = true;

  sheet2.protect('Syncfusion', option);
  option = ExcelSheetProtectionOption();
  option.formatCells = true;

  sheet3.protect('Syncfusion', option);
  sheet4.protect('Syncfusion');

  workbook.protect(true, true, 'Syncfusion');
}
So far, we have seen the various features in the Flutter Excel Library to create a worksheet. Finally, we include the following code in the button-click event to create the Excel file.
Future<void> _createExcel () async
{
  //Creating a workbook.
  final Workbook workbook = Workbook();

  // Add data and formulas.
  addDataAndFormulas(workbook);

  // Apply autofit to worksheets.
  autoFitWorksheets(workbook);

  // Add image hyperlinks.
  addImageHyperlink(workbook);

  // Add protection for worksheets and workbook.
  addProtection(workbook);

  final List<int> bytes = workbook.saveAsStream();
  workbook.dispose();

   //Launch file.
    await FileSaveHelper.saveAndLaunchFile(bytes, 'BalanceSheet.xlsx');
}

// Add data and formulas.
void addDataAndFormulas(Workbook workbook)
{
  final List<Style> styles = createStyles(workbook);

  // Add assets worksheet.
  addAssetsSheet(workbook, styles);

  // Add Liabilities worksheet.
  addLiabilitiesSheet(workbook, styles);

  // Add Categories worksheet.
  addCategoriesSheet(workbook, styles);

  // Add Summary worksheet.
  addSummarySheet(workbook, styles);
}
The following screenshot shows the Excel output of the Balance Sheet sample.
Resources
For more information, refer to the project create Excel balance sheet using Flutter Excel library.
Conclusion
Thanks for reading! In this blog post, we have walked through how to create a balance sheet using Syncfusion Flutter Excel Library and how to apply its versatile features. Try out the steps given in this blog and share your feedback in the comments section.
Explore all our Flutter examples in this GitHub location. Additionally, take a look at our demo app in the Google Play Store or App Store.
If you want an in-depth learning experience on how to create a complete Flutter app, be sure to read Flutter Succinctly by Ed Freitas. It’s a part of our Syncfusion’s library of free technical ebooks.
Also, if you need a new widget for the Flutter framework, please let us know in the comments section. You can also contact us through our support forum, Direct-Trac, or feedback portal. We are always happy to assist you!


 No spam, just valuable updates.