

It is the most common requirement to access data from a web API and display it in a mobile app. To build a Xamarin application that consumes ASP.NET Core web APIs or rest services, we need HttpClient to send HTTP requests and receive HTTP responses from a web service identified by a URI. In this blog, I am going to provide a walkthrough on setting this up in 6 easy steps.
Step 1: Create an ASP.NET Core web API service or a rest service.
Use the following reference to create an ASP.NET Core web API service and host it for public access. For demo purposes, we are going to use the following hosted service.
Step 2: Create a helper class to consume the API service and return the data.
Create a helper class and name it WebAPIService with asynchronous method RefreshDataAsync and consume the API service URI.
WebAPIUrl = "https://ej2services.syncfusion.com/production/web-services/api/Orders";
//Set your REST API URL here.
var uri = new Uri(WebAPIUrl);
Step 3: Pass the service URL to process HttpClient get operation.
Use GetAsync on the base URL to retrieve the array of orders. Use the C# await option to consume the value easily.
Pass the returned object into JsonConvert.DeserializeObject to convert the JSON data into an order object and return the data to the service caller.
public async System.Threading.Tasks.Task<ObservableCollection> RefreshDataAsync()
{
    WebAPIUrl = "https://ej2services.syncfusion.com/production/web-services/api/Orders"; // Set your REST API URL here.
    var uri = new Uri(WebAPIUrl);
    try
    {
        var response = await client.GetAsync(uri);

        if (response.IsSuccessStatusCode)
        {
            var content = await response.Content.ReadAsStringAsync();
            Items = JsonConvert.DeserializeObject<ObservableCollection>(content);
            return Items;
        }
    }
    catch (Exception ex)
    {
    }
    return null;
}
Step 4: Create a model class that contains the data structure of the object received from the service call.
For example, create an Order class that contains the data structure of the object received from the demo service call.
public class Order
{
    public int OrderID { get; set; }
    public string CustomerID { get; set; }
    public int EmployeeID { get; set; }
    public double Freight { get; set; }
    public string ShipCity { get; set; }
    public bool Verified { get; set; }
    public DateTime OrderDate { get; set; }
    public string ShipName { get; set; }
    public string ShipCountry { get; set; }
    public DateTime ShippedDate { get; set; }
    public string ShipAddress { get; set; }
}
Step 5: Create a ViewModel that invokes the service call and receives data.
Create a ViewModel named OrdersViewModel that contains an asynchronous method GetData to invoke the service call and store the received data in the proper collection.
public class OrdersViewModel : INotifyPropertyChanged
{
    #region Fields

    WebAPIService webAPIService;
    public event PropertyChangedEventHandler PropertyChanged;
    private ObservableCollection<Order> items;

    #endregion

    #region Properties
    public ObservableCollection<Order> Items
    {
        get
        {
            return items;
        }
        set
        {
            items = value;
            RaisepropertyChanged("Items");
        }
    }
    #endregion

    #region Constructor
    public OrdersViewModel()
    {
        webAPIService = new WebAPIService();
        //Item source that needs to be displayed on the list view.
        items = new ObservableCollection<Order>();
        GetData();
    }
    #endregion

    #region Methods
    async void GetData()
    {
        Items = await webAPIService.RefreshDataAsync();
    }
    void RaisepropertyChanged(string propertyName)
    {
        if (PropertyChanged != null)
            PropertyChanged.Invoke(this, new PropertyChangedEventArgs(propertyName));
    }
    #endregion
}
Step 6: Add references and utilize the collection of items bindable controls to consume and display the received data.
Here, add references to the Syncfusion ListView control for demo purposes. It can receive the collection of items and display them with a custom data template.
<ContentPage xmlns="http://xamarin.com/schemas/2014/forms"
             xmlns:x="http://schemas.microsoft.com/winfx/2009/xaml"
             xmlns:local="clr-namespace:SfListViewSample"
             xmlns:syncfusion="clr-namespace:Syncfusion.ListView.XForms;assembly=Syncfusion.SfListView.XForms"
             x:Class="SfListViewSample.MainPage" Padding="10">
    <ContentPage.BindingContext>
        <local:OrdersViewModel x:Name="viewmodel"/>
    </ContentPage.BindingContext>

    <Grid >
        <Grid.RowDefinitions>
            <RowDefinition Height="50"/>
            <RowDefinition Height="*"/>
        </Grid.RowDefinitions>
        <Label Text="Fetched data from REST Api" BackgroundColor="SlateBlue" FontSize="18" FontAttributes="Bold" TextColor="White" VerticalTextAlignment="Center" HorizontalTextAlignment="Center"/>
        <syncfusion:SfListView x:Name="listView" ItemSize="90" ItemSpacing="5" Grid.Row="1"
                               BackgroundColor="AliceBlue" ItemsSource="{Binding Items}">
            <syncfusion:SfListView.ItemTemplate>
                <DataTemplate>
                    <Frame BorderColor="#757575" Padding="5">
                        <Grid>
                            <Grid.ColumnDefinitions>
                                <ColumnDefinition Width="*"/>
                                <ColumnDefinition Width="*"/>
                            </Grid.ColumnDefinitions>
                            <Grid.RowDefinitions>
                                <RowDefinition Height="Auto"/>
                                <RowDefinition Height="Auto"/>
                                <RowDefinition Height="Auto"/>
                            </Grid.RowDefinitions>
                            <Label Grid.Row="0" Grid.Column="0" Text="Order ID  " HorizontalOptions="Start" TextColor="Black" FontSize="16" FontAttributes="Bold"/>
                            <Label Grid.Row="1" Grid.Column="0" Text="Customer ID  " HorizontalOptions="Start" TextColor="Black" FontSize="16" FontAttributes="Bold"/>
                            <Label Grid.Row="2" Grid.Column="0" Text="Ship Country  " HorizontalOptions="Start" TextColor="Black" FontSize="16" FontAttributes="Bold"/>

                            <Label Grid.Row="0" Grid.Column="1" Text="{Binding OrderID}" HorizontalOptions="Start" TextColor="Black" FontSize="16" WidthRequest="100"/>
                            <Label Grid.Row="1" Grid.Column="1" Text="{Binding CustomerID}" HorizontalOptions="Start" TextColor="Black" WidthRequest="100"/>
                            <Label Grid.Row="2" Grid.Column="1" Text="{Binding ShipCountry}" HorizontalOptions="Start" TextColor="Black" WidthRequest="100"/>
                        </Grid>
                    </Frame>
                </DataTemplate>
            </syncfusion:SfListView.ItemTemplate>
        </syncfusion:SfListView>

    </Grid>
</ContentPage>
Output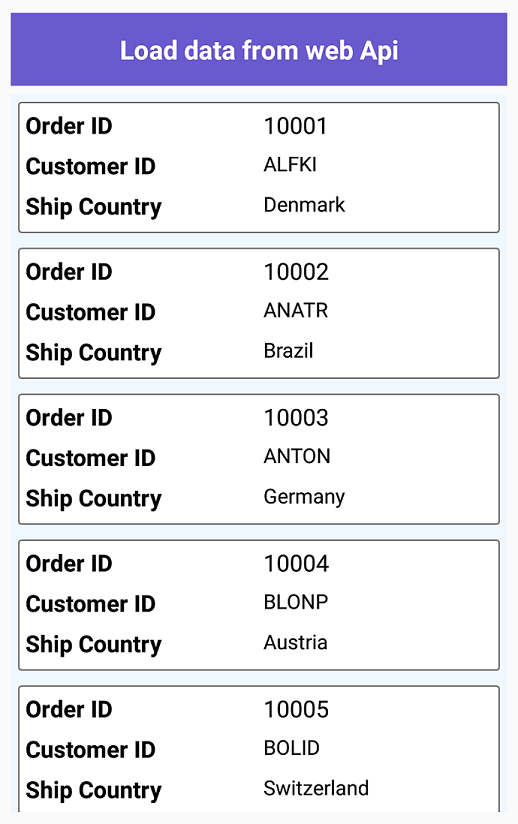
Conclusion
I hope this blog guided you through consuming the ASP.NET Core web API in a Xamarin.Forms application. Follow these steps and share your feedback as comments in this blog.
For better understanding, we have shared the sample project at this GitHub location.
 No spam, just valuable updates.
Comments (4)
Thanks ,That what i was looking for three days ago,You really made my day.
[…] 6 Steps to Consume ASP.NET Core Web API in Xamarin Applications (Magesh Yadav Munuswamy) […]
Thank you for Sharing, This blog is very great and useful.
How to create a helper class ?