
TL;DR: Learn how to implement scalable, performant state management in Angular with NgRx. We’ll cover installing and configuring the NgRx store, defining actions, reducers, selectors, and effects, and wiring it all up in a simple “blog articles” app. By the end, you’ll have a clear pattern for unidirectional data flow and tips for production-ready Angular state management.
Taming the ever-growing complexity of UI state in Angular applications often feels like wrestling with wild vines, slowing development and turning debugging into a maze. NgRx, Angular’s Redux-inspired state library, brings order with a single immutable store, explicit action dispatching, and pure reducers that enforce a clean, unidirectional data flow. You’ll learn how to define strongly‑typed actions, compose reducers, and craft selectors to derive precise slices of state, then wire everything up in your AppModule and components.
We’ll even cover handling real-world side effects using NgRx Effects, so you can orchestrate asynchronous tasks without scattering service calls across your components. By the end, you’ll have a scalable blueprint for managing blog articles (or any domain data) with predictable updates, easier testing, and optimized performance, no more tangled service calls or brittle component logic slowing you down.
What is NgRx?

NgRx is inspired by Redux and helps developers simplify the application’s state in objects by enforcing a unidirectional data flow.

How NgRx works
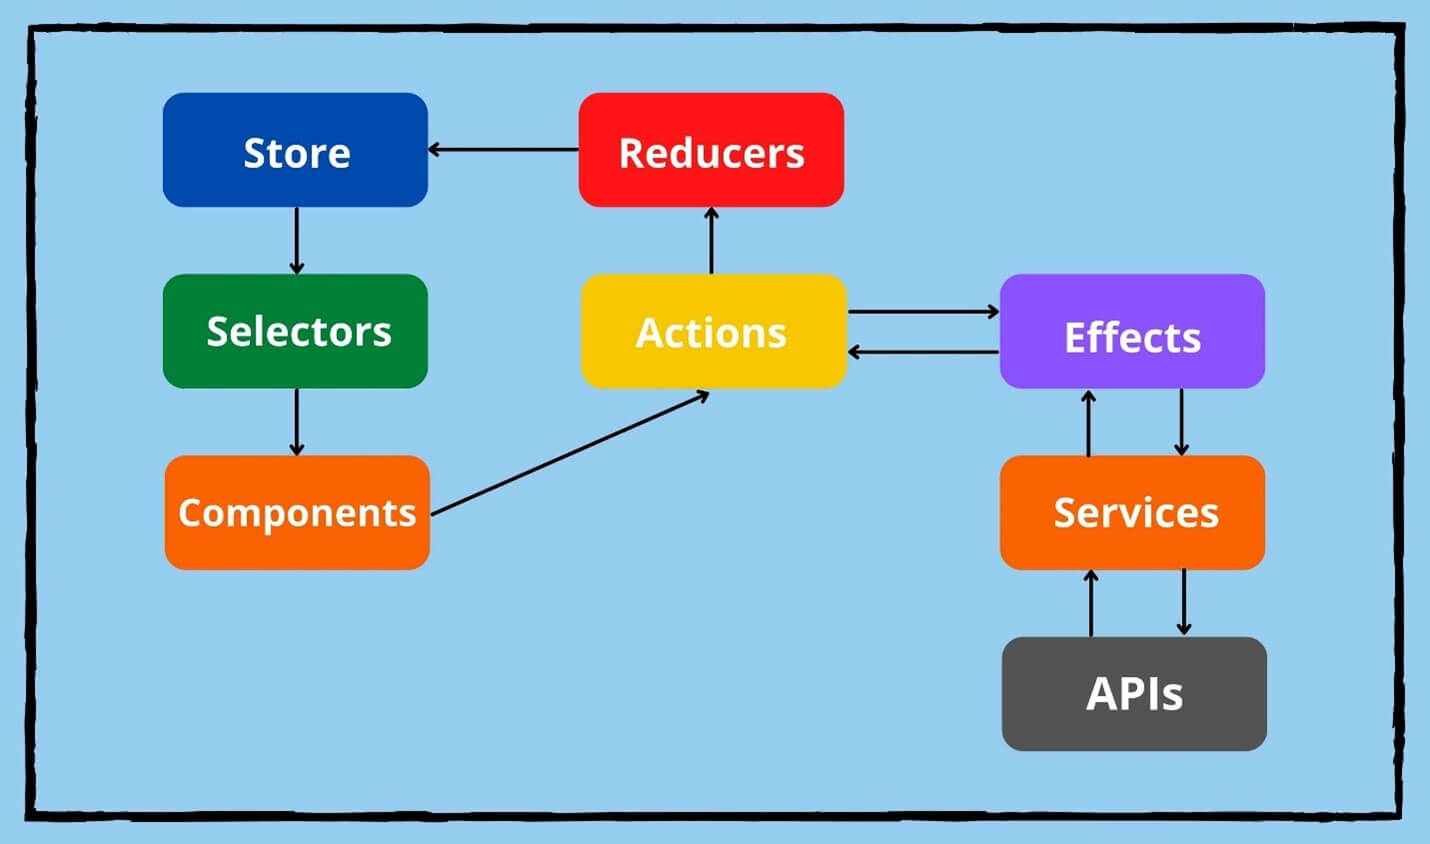 The NgRx state management process is a combination of five key elements:
- Store: The application state is maintained in the store. It is immutable.
- Selectors: Angular components can subscribe to the store and get updates through selectors.
- Reducers: Reducers are responsible for handling the transition from one state to another.
- Actions: Actions modify the state of the store by using reducers.
- Effects: Effects are the results of actions. Also, they can be used to listen for particular action types and run when the action happens.
Although this process seems complex to implement, it is useful for data communication when the application grows.
So, let’s see how we can use NgRx in an Angular application.
How to use NgRx store with Angular
In this tutorial, we will be implementing a simple application to manage blog articles using NgRx store and Angular.
Step 1: Installing NgRx
NgRx can be installed using NPM, Yarn, or Angular CLI as follows:
// NPM
npm install @ngrx/store --save

// Yarn
yarn add @ngrx/store

// Angular CLI
ng add @ngrx/store@latest
Step 2: Creating the Store
After installation, you need to create a separate directory named /store under the src/app directory. This folder will contain all the files related to the NgRx store. The folder structure of the store directory would look like this:
-- app-- src-- app-- store
-- models-- actions
-- reducers
As a first step, you need to create an interface for articles. Let’s name the model article.model.ts.
export interface Article {
  id: string;
  name: string;
  author: string;
  publisher: string;
}
Then, you need to create an action file to define NgRx actions. Here, we have created a file named articles.actions.ts under the actions folder and imported createAction from the NgRx store.
import { createAction, props } from '@ngrx/store';
import { Article } from '../models/article.model';

export const addArticle = createAction(
  '[ARTICLE] Add ARTICLE',
  props<{ article: Article }>()
);
In the above file, we define a new action using the createAction function from NgRx. This method is preferred over the class-based approach, providing a more concise and scalable way to manage actions. The addArticle action has a type (‘[ARTICLE] Add ARTICLE’) and uses props to specify an article as its payload.
Now, we need to create a reducer to help us in state transitions. So, inside the reducers directory, create an article.reducer.ts file with the following content:
import { createReducer, on } from '@ngrx/store';
import { addArticle } from '../actions/article.actions';
import { Article } from '../models/article.model';

export const initialState: ReadonlyArray<Article> = [
  {
    id: '1',
    title: 'Angular State Management with NgRx',
    author: 'Chameera Dulanga',
    publisher: 'SyncFusion',
  },
];

export const articleReducer = createReducer(
  initialState,
  on(addArticle, (state, { article }) => [...state, article])
);
In the above reducer, we have created an initialState to represent the initial collection of articles. This state is a read-only array of Article objects. The articleReducer function is then created using createReducer. It defines how the state should change in response to actions. Here, on(addArticle, …) listens for the addArticle action and adds the new article to the state array. If no matching action is dispatched, it simply returns the current state unaltered.
For the final step of store creation, we need to create another model to keep all application states in a single place. Here, we have named it state.model.ts and it will look like this:
import { Article } from '../models/article.model';

export interface State {
  readonly article: Array<Article>;
}
Step 3: Registering the NgRx store
Now, you need to register the NgRx store in the Angular application. To do this, import the articleReducer you’ve created and include it in the providers array of the appConfig object within the app.config.ts file.
import { ApplicationConfig, provideZoneChangeDetection } from '@angular/core';
import { provideRouter } from '@angular/router';
import { provideStore } from '@ngrx/store';
import { routes } from './app.routes';
import { ReactiveFormsModule } from '@angular/forms';
import { importProvidersFrom } from '@angular/core';
import { articleReducer } from './store/reducers/article.reducer';

export const appConfig: ApplicationConfig = {
  providers: [
    provideZoneChangeDetection({ eventCoalescing: true }),
    provideRouter(routes),
    provideStore({ article: articleReducer }),
    importProvidersFrom(ReactiveFormsModule)
  ]
};Step 4: Using the NgRx store
After registering the store in appConfig, you can start using it in your components. Here, we will be using the AppComponent to display and add articles to the store.
import { Component, OnInit } from '@angular/core';
import { FormBuilder, FormGroup, Validators, ReactiveFormsModule } from '@angular/forms';
import { Store, select } from '@ngrx/store';
import { Observable } from 'rxjs';
import { Article } from './store/models/article.model';
import { State } from './store/models/state.model';
import { addArticle } from './store/actions/article.actions';
import { CommonModule } from '@angular/common';

@Component({
  selector:    'app-root',
  standalone:  true,
  imports:     [ReactiveFormsModule, CommonModule],
  templateUrl: './app.component.html',
  styleUrls:   ['./app.component.css'],
})
export class AppComponent implements OnInit {
  articles$!: Observable<Array<Article>>;
  articleForm!: FormGroup;

  constructor(
    private store: Store<State>,
    private fb: FormBuilder
  ) {}

  ngOnInit(): void {
    this.articles$ = this.store.pipe(select(state => state.article));
    this.articleForm = this.fb.group({
      id: ['', Validators.required],
      title: [''],
      author: [''],
      publisher: [''],
    });
  }

  addArticle() {
    if (this.articleForm.valid) {
      this.store.dispatch(addArticle({ article: this.articleForm.value }));
      this.articleForm.reset();
    }
  }
}
The above code shows the app.component.ts file of our example. There, we have set articles$ to a type of observable and subscribed to the store to get the articles. The addArticle() function is responsible for dispatching new articles to the store.
Now, we need to modify the app.component.html file to display and create articles.
<section>
  <div class="container">
    <div class="row" style="margin-top: 5%;">

      <div class="col-md-12" style="text-align: center; margin: 5%;">
        <h2>My Articles</h2>
      </div>

      <div class="col-md-6">
        <div class="card p-4 shadow-sm">
          <form[formGroup]="articleForm" (ngSubmit)="addArticle()">

            <div class="form-group">
              <label for="id">Article Id</label>
              <input
                type="text"
                class="form-control"
                formControlName="id"
                id="id"
                required
              />
            </div>

            <div class="form-group">
              <label for="title">Title</label>
              <input
                type="text"
                class="form-control"
                formControlName="title"
                id="title"
              />
            </div>

            <div class="form-group">
              <label for="author">Author</label>
              <input
                type="text"
                class="form-control"
                formControlName="author"
                id="author"
              />
            </div>

            <div class="form-group">
              <label for="publisher">Publisher</label>
              <input
                type="text"
                class="form-control"
                formControlName="publisher"
                id="publisher"
              />
            </div>

            <button type="submit" class="btn btn-primary">Submit</button>

          </form>
        </div>
      </div>

      <div class="col-md-6">
        <ul class="list-group">
          <li class="list-group-item list-group-item-primary"
            *ngFor="let article of articles$ | async">
            {{article.title}} by <b>{{article.author}}</b>
          </li>
        </ul>
      </div>

    </div>
  </div>
</section>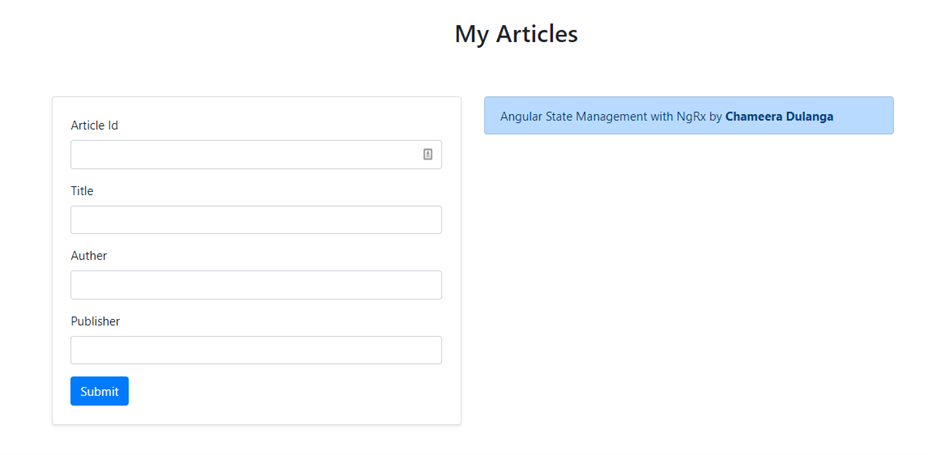
That’s all there is to it! We have successfully configured an NgRx store with an Angular application.
GitHub reference
For more details, you can find the Angular State Management with NgRx demo on GitHub.
Conclusion
Thanks for reading! We’ve just walked through building an Angular application using NgRx for predictable and scalable state management. More importantly, we’ve learned architectural principles that extend beyond this single app.
What makes this approach powerful
We’ve implemented a blueprint for managing complex state in Angular:
- Unidirectional data flow for predictable updates and easier debugging.
- Strongly typed actions and reducers for type safety and maintainability.
- Selectors for optimized state access without redundant computations.
- Effect-based side effects to handle asynchronous tasks cleanly.
- Modular architecture that scales with enterprise-level applications.
These patterns apply whether you’re building dashboards, e-commerce platforms, or data-driven apps. The principles remain the same: type safety, reactive state, error resilience, and clean separation of concerns.
We now have a foundation for creating Angular applications that are maintainable, testable, and optimized for performance.
Syncfusion’s Angular component library offers over 145 high-performance, lightweight, and responsive UI components, including data grids, charts, calendars, and editors. These components integrate seamlessly with NgRx, making it easier to build enterprise-ready apps with rich, interactive UIs.
If you’re a Syncfusion user, you can download the setup from the license and downloads page. Otherwise, you can download a free 30-day trial.
You can also contact us through our support forum, support portal, or feedback portal for queries. We are always happy to assist you!


 No spam, just valuable updates.
Comments (4)
I just read your blog on Angular State Management with NgRx—thanks for sharing! It was a great introduction to NgRx and its role in simplifying state management for large-scale applications. The way you walked through the steps of creating a simple Angular app using NgRx made it much easier to grasp.
While exploring more, I found this resource on Angular Signals Guide: Architectural Patterns and Best Practices: https://mobisoftinfotech.com/resources/blog/angular-signals-architecture-best-practices . It covers Angular state management and compares Signals vs Observables. How do you see NgRx evolving with the introduction of Signals?
Looking forward to your thoughts—great read!
Hi Alexis,
Thank you for reaching out to Syncfusion! It was a great observation, and we appreciate your feedback!
With the introduction of selectSignal() in NgRx v16+, we’re seeing a gradual shift towards Signals-based state management. This reduces the need for subscription boilerplate and integrates more naturally with Angular’s zoneless and fine-grained change detection strategies.
Additionally, the experimental @ngrx/signals library provides a lightweight reactive state layer for smaller or modular apps, which is especially beneficial in micro frontend architectures where tree-shakability and reactivity matter most.
Regards,
Meena
You have put it in a concise way. Thanks a lot for the simple and easy-to-understand article.
Hi,
Thank you for your message. We’re delighted to hear that this was helpful to you. You are most welcome!