
In the current software development era, multiple teams work on numerous projects. We need to store the codebase in some version control system like GitHub or TFS. Many organizations add different projects to a single repository, which is known as a monorepo. Many big organizations like Google, Microsoft, and Uber use a monorepo in their application development.
In this blog post, you will learn how to:
- Create a new Angular workspace.
- Add multiple applications to the workspace.
- Use Nx to manage a monorepo.
- Create a full-stack application using Nx.
Prerequisites
You need to install the following software:
- Node 12.x or above
- Angular CLI 9.x
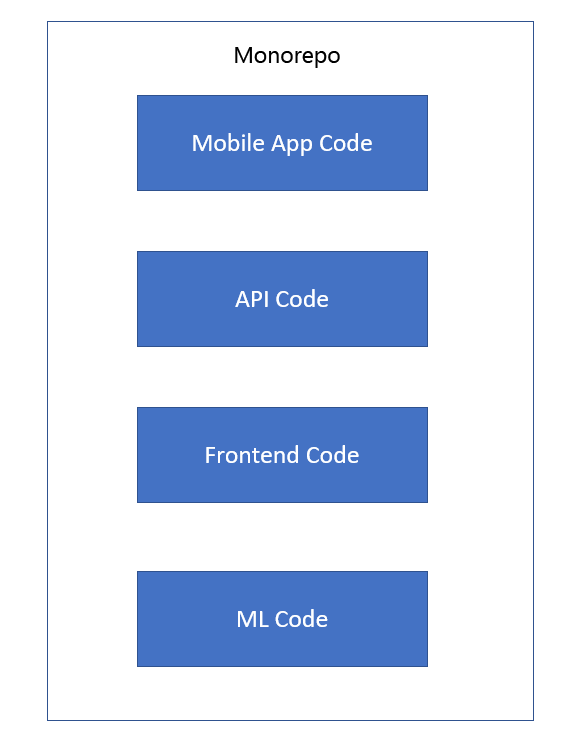
Monorepo
The monorepo strategy follows the approach (as in the following image) where we can have multiple projects in a single repository. This strategy is not new. If you have worked in Java or .NET, you may recollect that a solution can contain multiple projects, which is nothing but a monorepo strategy. This strategy was named monorepo in 2017.
 But why use a monorepo? Let’s look into some of its advantages.

Advantages of monorepo
Code sharing
In big organizations, code sharing is really important to make sure there is no duplicate code and that developers are not re-inventing something that already exists. With the help of a monorepo, you can easily create shared libraries and use them across multiple projects
Better collaboration
When it comes to improving the code base, multiple teams across the organization can help each other to make the code better and reusable.
Simplified dependency management
It is possible that many projects may be using some dependency on management tools like NuGet, Maven, or npm. It will be tedious to update those dependencies separately, but by sharing dependencies within multiple projects, you can make sure all the projects in your organization are updated to the latest version at the same time.
Limitations of monorepo
Every architecture has its limitations, and so does the monorepo. Let’s look into few limitations in using a monorepo:
Project access
In monorepo, everyone has access to the entire code-base. So, it presents a challenge restricting access to a few projects, as they are part of the same repository.
Versioning for projects
Every project in a monorepo needs to follow the same version, which means if we need to release one project, the semantic version for every project will be updated.
Semantic versioning
A very important term to understand while working on a project is semantic versioning. The following image shows how to version a project. Generally, we denote versions in three parts, as shown.
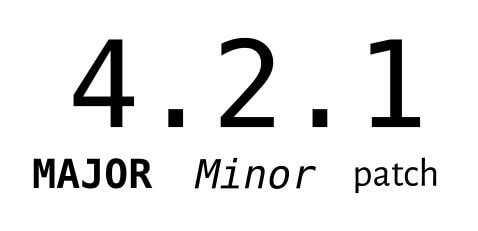
Major: If there is any big release or breaking change, you need to increase this number.
Minor: If there is any small feature update or minor improvement that is not causing any breaking changes, you need to increase this number.
Patch: If there is any bug fix or some change that does not include features like updating a dependent package, you can choose to increase this number.
Note:In case you want more information on semantic versioning, please read https://en.wikipedia.org/wiki/Software_versioning#Degree_of_compatibility.
Creating a new Angular workspace
There are two ways we can start working with a monorepo:
- Create a workspace with a default application.
- Create an empty workspace and then define what needs to be added.
Prerequisites
Before installing Angular CLI, we need to install Node.js and we also need an editor.
Node.js
We need to install Node.js before we can start development. You can download the setup from nodejs.org (https://nodejs.org/en/). For Angular 9, the Node.js version should be 10.13 or above.
If you already have Node.js installed, you can verify the version using the following command.
c:\Users\Lumi>node -V |
Editor/IDE
You are free to use any editor or IDE of your choice. I am using VS Code. You can download and install it from (https://code.visualstudio.com/).
Angular CLI
As Node.js is installed, let’s install Angular CLI. You need to run the following command to install it. At the time of writing this article, the latest stable version available was 9.1.0.
npm i @angular/cli -g |
 Creating a workspace with a default app
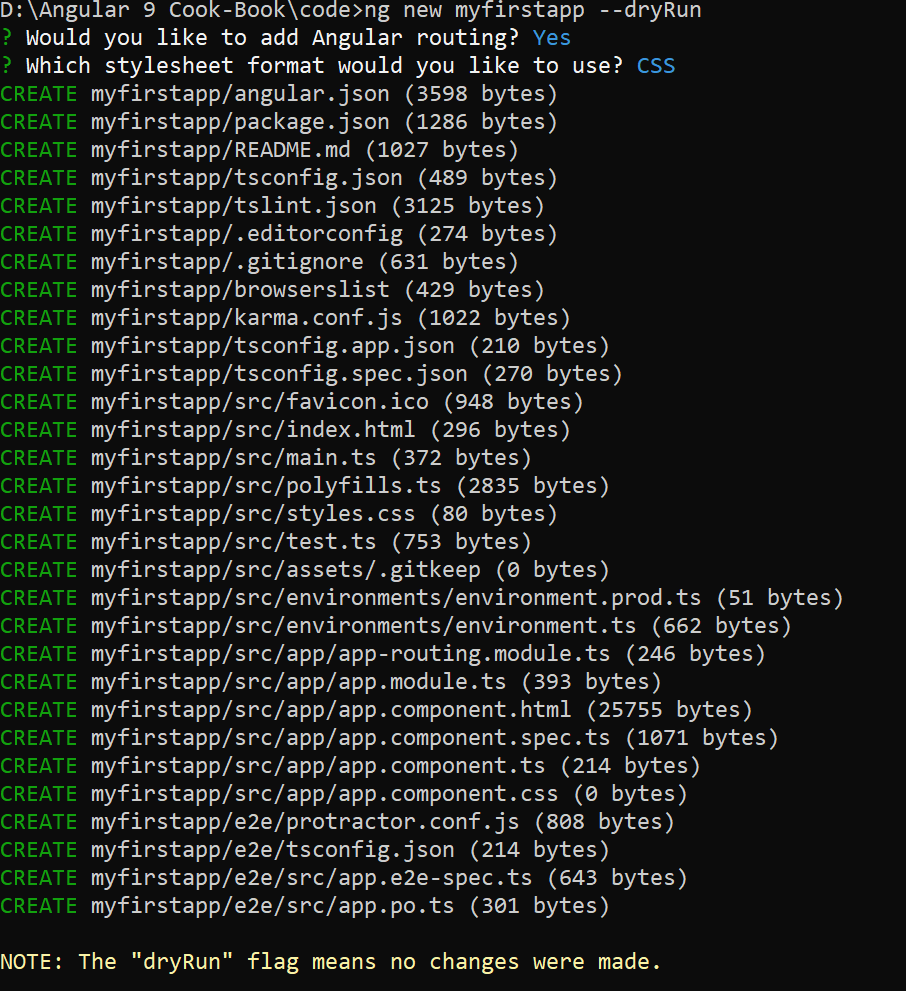
Now that we have Angular CLI installed, we can go ahead and create the app. You can run the following command to create a workspace with a default app.
ng new myfirstapp |
You can add the –dryRun flag and see the list of files created.
The src folder contains the source code for our default app. You can also see what our angular.json looks like. We have a property called defaultProject to customize our default project.
Creating an empty workspace
You may not need to create a default application every time. For example, here we just want to create a library and add applications as needed. For this, you can run the following command to create an empty workspace.
ng new myfirstapp –createApplication=false |
The flag –createApplication controls the creation of the default project, which is set to true by default. To skip creating a default project, we set it to false.
![]()
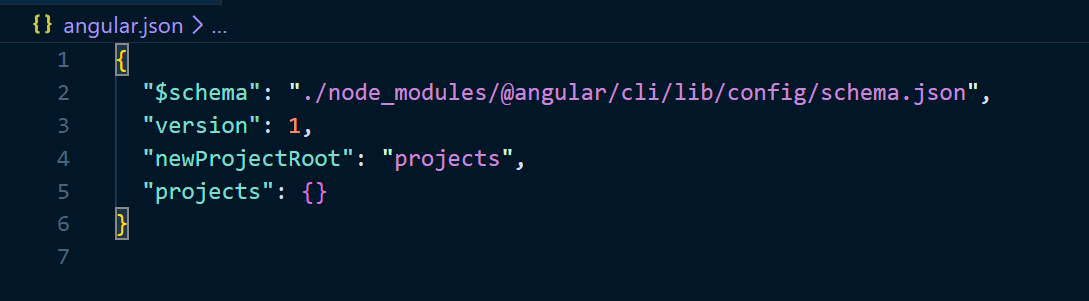
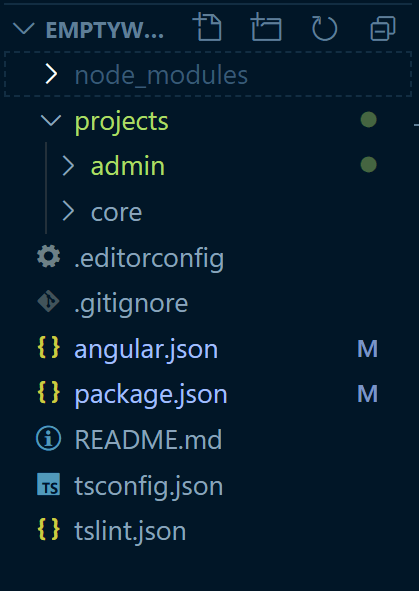
You can see that only a limited number of files are created, as this is an empty workspace. You can add different project types, such as library or application, inside this workspace.
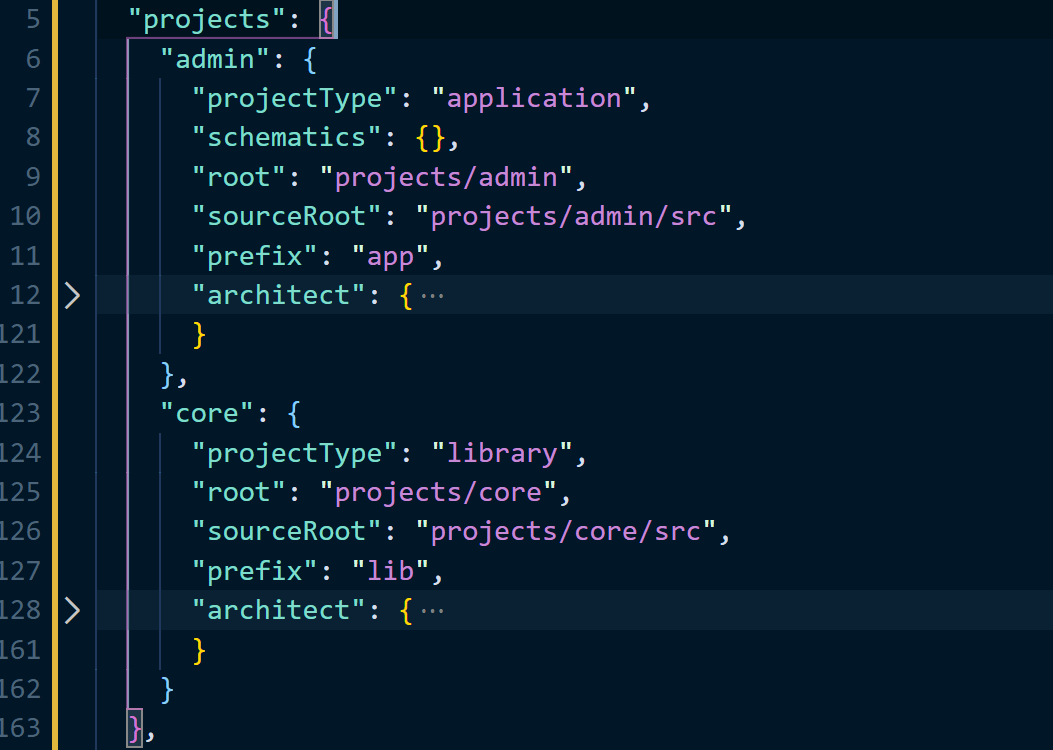
See the following screenshot of the angular.json. As this is an empty workspace, there is no defaultProject and the project’s properties are empty.
More flags for workspace creation
The flags for ng new can be changed with the version. They can be removed, added, or renamed. Always refer to the documentation before using flags. The list of commands and flags are available on https://angular.io/cli.
Let’s see some of the flags that are available and useful.
directory
When we use ng new <workspace-name>, by default, a folder is created with <workspace-name> like myfirstapp in the earlier example. You can give a different name to the folder if you want, just pass the –directory=<folder-name> you want to use. For example, you can name the workspace according to your organization name and add projects and libraries when needed.
dryRun
This is very useful flag when you want to test the different files that will be created using the command. It prints the output on the console and will not disturb any files.
force
If you have already created a workspace and wish to overwrite it, then you can pass this flag with the ng new command.
minimal
Angular workspaces come with a testing framework included. If you add a new project or library, it will add all the configuration related to the testing framework Karma and Jasmine for unit testing, and Protractor for end-to-end testing. For learning purposes, you may not need them, so you can pass the –minimal flag to create an application without these frameworks. This is not recommended for real projects.
skipTests
When creating a new application, as discussed earlier, you will get it with the testing framework configured. With every component, directive, service, or pipe created using the CLI, you will get a spec.ts file. If you pass this flag while creating the application, the spec.ts files will be ignored.
skipInstall
On the creation of a new application or library, CLI will ignore the dependencies via the package manager if this flag is passed.
Creating multiple applications in the workspace
Now you know how to create an application with a default app and an empty workspace without any project. Now you will learn how to create multiple apps inside a workspace.
We will add an application and library to see how you can utilize the monorepo in Angular.
Open the emptyworkspace project in the editor and move to the terminal. Or you can right-click and select Open with Code.
 Adding a new application
Once inside VS Code, open the terminal from Terminal->New Terminal, which will open a command prompt.
In the terminal, type the following command.
ng generate app admin |
This command will add a new project inside the folder projects, which is the default folder where all new apps and libraries will be created. In this command, app stands for application, you can also use “application”.
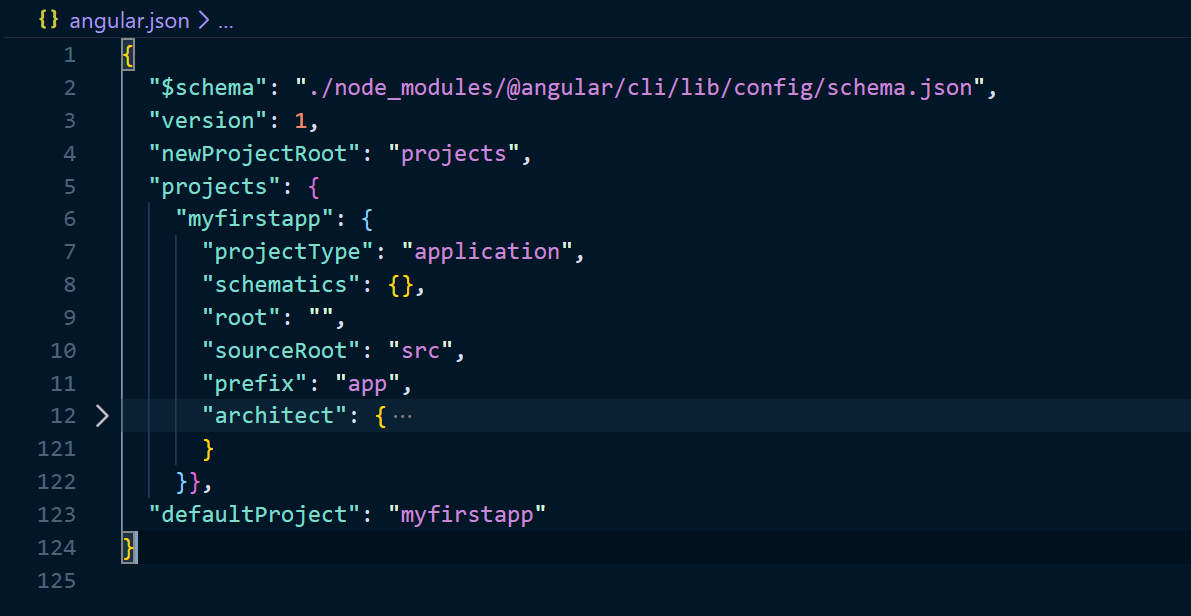
Apart from creating the project subfolder and adding the project file, one more file will be impacted: angular.json.
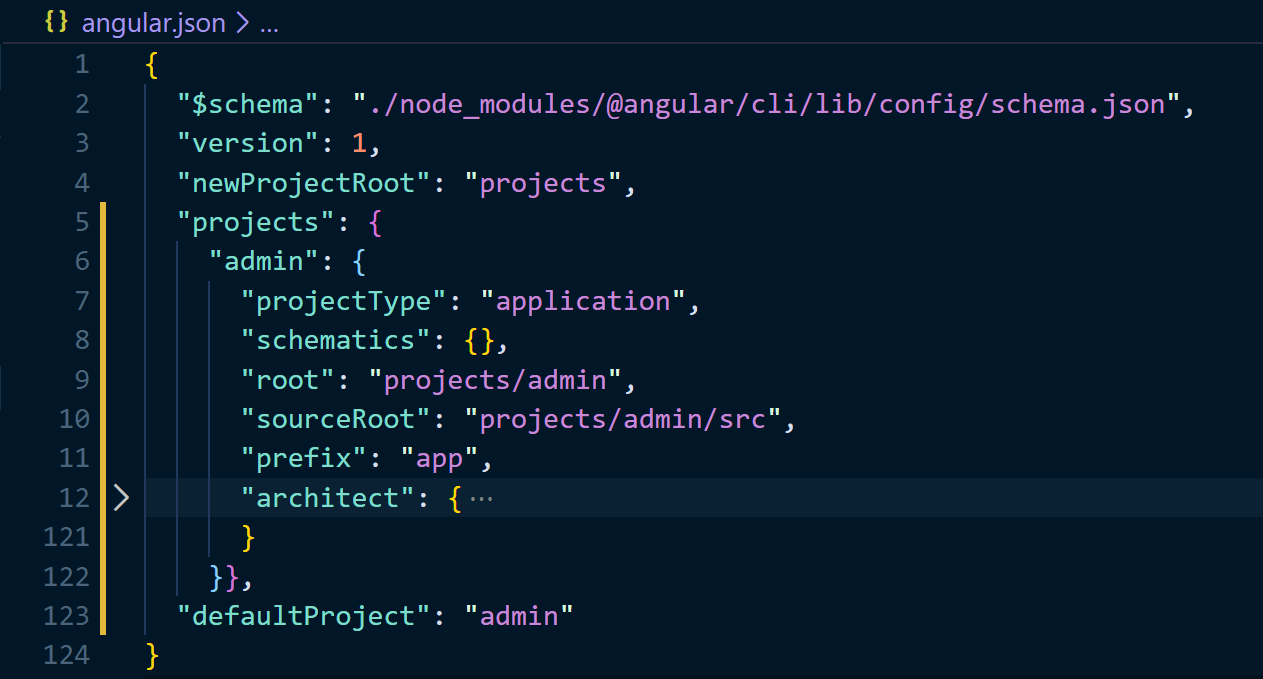
You can see the following changes:
- admin project is added in the projects schema.
- defaultProject is added.
You can change the newProjectRoot property to any other value if you don’t want to use the projects subfolder. For example, if you name it portal, all new projects will be created inside the portal subfolder.
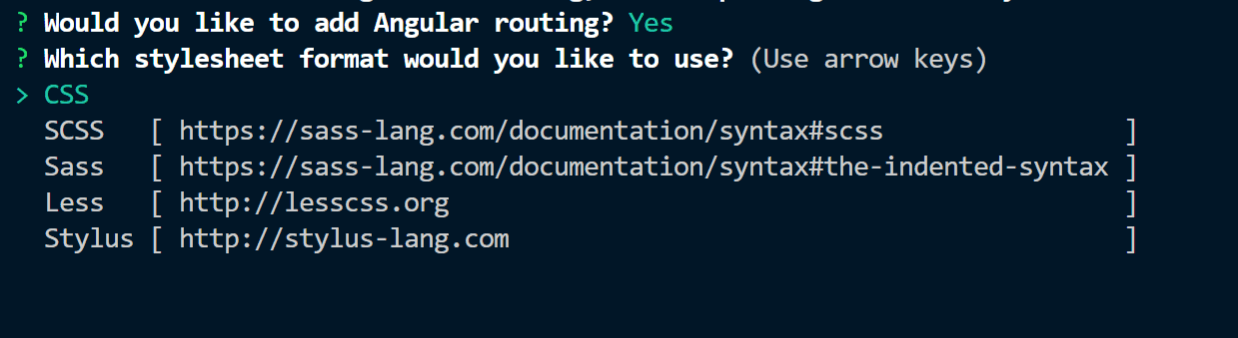
While creating a new application, CLI will ask you the following questions:
- Would you like to add Angular routing?If you want to create an app where you will be adding routes in the future, you can enter y, if no routes are required, you can enter n.
- The second question asks you to select a stylesheet format.You can choose one that is required in your application. CSS is default and widely used. Here we are going to use CSS.
 Another property to notice is projectType. Our newly created project is of type application, the other project type supported in the library.
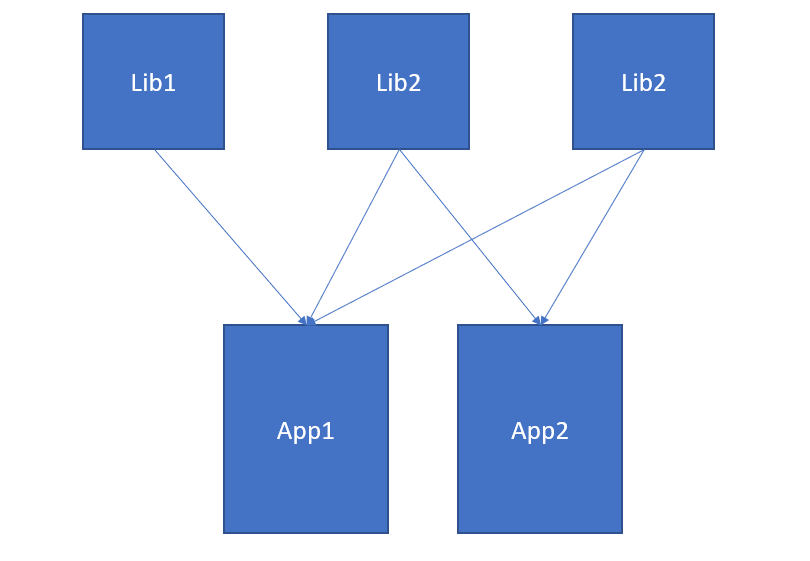
As you can see in the diagram, we can have multiple libraries being shared in multiple Angular apps. You already know how to create an application, let’s see how to create a library.
Run the following command to create a library.
ng generate lib core |
This command will create a new project called core inside our projects subfolder.
Now open the angular.json file and you will see that the projects segment contains two projects, one with a projectType application and the other as a library.
Open tsconfig.json and see the paths property added, containing the core folder, which is the newly created library. Adding more libraries will add more segments in the paths property.
"paths": {
      "core": [
        "dist/core/core",
        "dist/core"
      ]
    }
Build and serve the application
After adding an application to the workspace, we need to learn how to build and test the application locally.
To run and test any application, you can use the following command.
ng build <appname/libname> |
If you have a single project, <appname/libname> is optional. The following command will build the defaultProject mentioned in angular.json, in our case admin.
ng build |
To test any application locally, we can use the following command.
ng serve |
This serve command will build and serve the defaultApplication listed in angular.json on the localhost. Port 4200 is the default port number.
If you want to target a specific application, you can use the following command.
ng serve <appName> |
To serve multiple applications from same monorepo, you need to use different ports for each application. Use the following command to serve a different application in a different port.
ng serve <appName> --port <portnumber> |
In this command, portnumber is any available port on your machine.
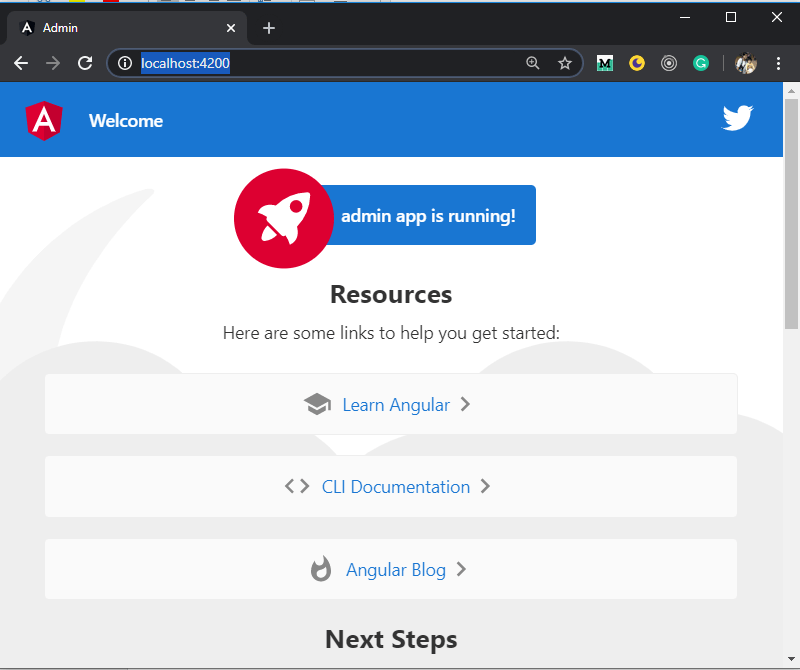
Let’s serve the default app from our workspace, run the ng serve command, and open in your browser (Chrome preferred).
Also, you can use the -o flag with ng serve to open the app in your default browser.
ng serve -o |
The default application has some links to Angular resources and looks like the following screenshot.
Using Nx to manage monorepos
We can create a monorepo with Angular CLI, but there are some limitations. We cannot add any other projects apart from Angular applications and libraries.
This is where Nx comes into the play, which provides DevTools for creating a monorepo. Using Nx, you can also add React and full-stack applications to your monorepo using Node.js. Nx also lets you use modern tools like Cypress, Jest, and Prettier.
Let’s see how to use the Nx DevTools and how and why to use modern tools with Nx.
Create Nx workspace
You can use npm, npx, or yarn to create the Nx workspace. I am using npm. Run the following command.
npm init nx-workspace nxworkspace |
It will request what to create in the new workspace: choose Angular.
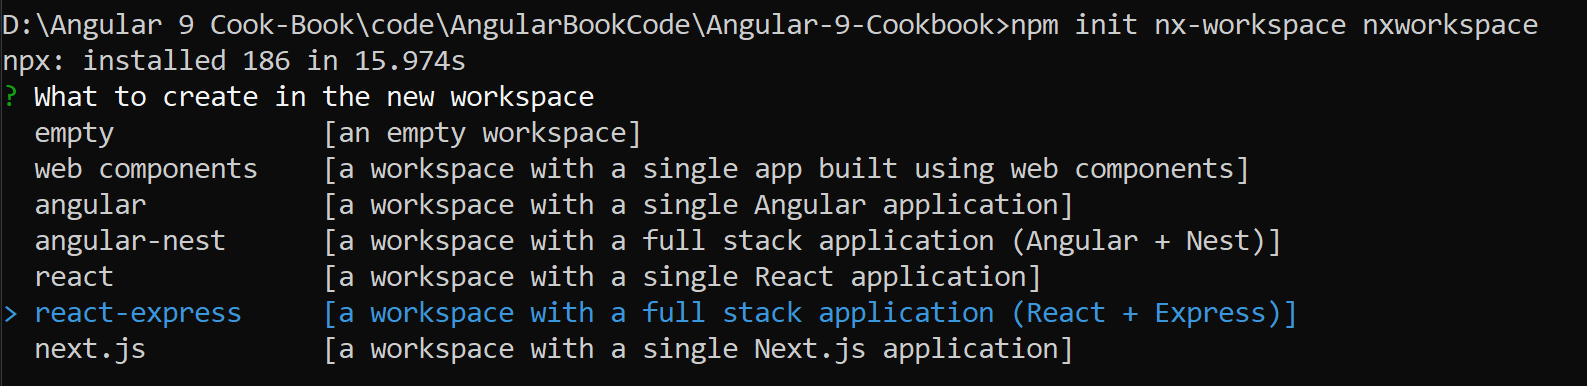
Next, it will request that you provide an application name. Enter nxdemo.

Next, choose the stylesheet format. Press Enter to select the default, which is CSS.
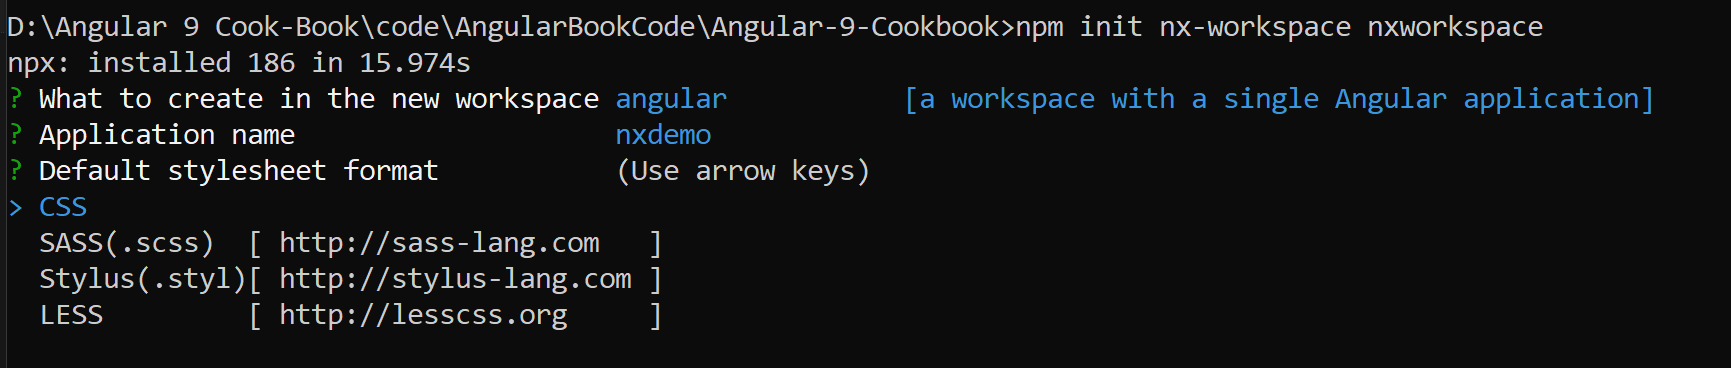
Once installation is done, an Nx workspace with a default application will be created.
This is how your final folder structure will look.
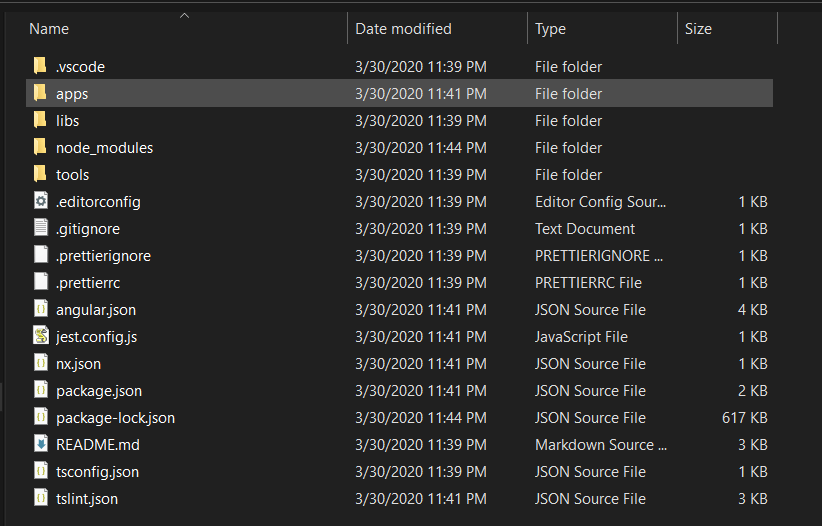
The apps folder will contain any application that will be added to the project. By application, we mean the Angular projectType we saw earlier in this section.
If you create any library type project, it will be added inside the libs folder.
The tools folder is available to write any custom schematics.
Converting existing Angular workspace to Nx workspace
If you have any existing project created using Angular CLI, and you want to use Nx, then it is possible to convert it to an Nx workspace.
Let’s create an Angular CLI project.
ng new angluartonxdemo |
Now run the following command to convert the workspace to Nx. Make sure you are inside the new project angluartonxdemo.
ng add @nrwl/workspace |
Adding the application or libraries to Nx workspace
To add an application or library, you need to use Nx commands rather than Angular CLI commands.
Let’s add a new application and library to the existing nxworkspace project we just created. Run the following command to create a new application called ecommerce.
ng g @nrwl/angular:application ecommerce |
As per Nx workspace structure, it will be added inside the apps folder. To add an Angular library to the Nx workspace, run the following command. Here, core is the name of the library.
ng g @nrwl/angular:library core |
The libraries will be added to the libs folder as per Nx workspace structure.
Advantages of using Nx
Use of modern tools
Nx comes with modern tools included in your workspace like Jest and Cypress. You can also easily configure your backend using Nests.
With the help of tools like Cypress, you get some great features, like time travel, automatic waiting, network traffic control and screenshots and videos.
On the other hand, Jest provides a built-in reporter for printing put results, where Karma requires different reporters. Snapshot testing is another great feature.
Dependency graph
One of the problems in a monorepo is the ability to identify how the projects rely on each other or, in simple terms, graph dependency. In earlier days, software architects used to build dependency graphs. Over time, that becomes out of sync with the actual application. Nx monorepo has the ability to generate a dependency graph using a single command. You can run the following command anytime to generate and view a dependency graph.
npm run dep-graph |
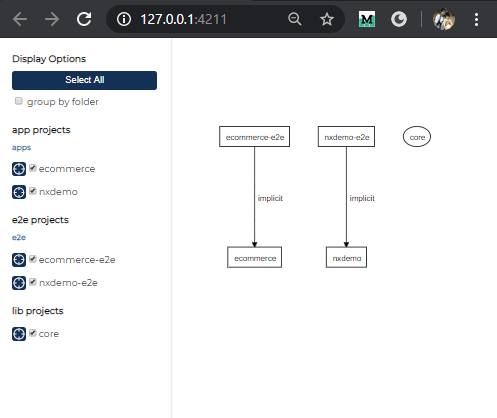
This is how the dependency graph looks for our current workspace created using Nx DevTools.
Code sharing
In an Angular monorepo, it is possible to share the code using Angular libraries. But if we are creating a full-stack application using Express or Nest, we still end up doing a lot of code duplication, especially for the interfaces. In an Nx monorepo, we can share the code between the frontend and backend.
Build and test affected projects
In a monorepo, running a test case for an entire application and libraries can be time consuming, even if the change is really small. This is where Nx monorepo really stands out. It gives you the ability to run the test cases quicker and even build only the affected projects and libraries after any change.
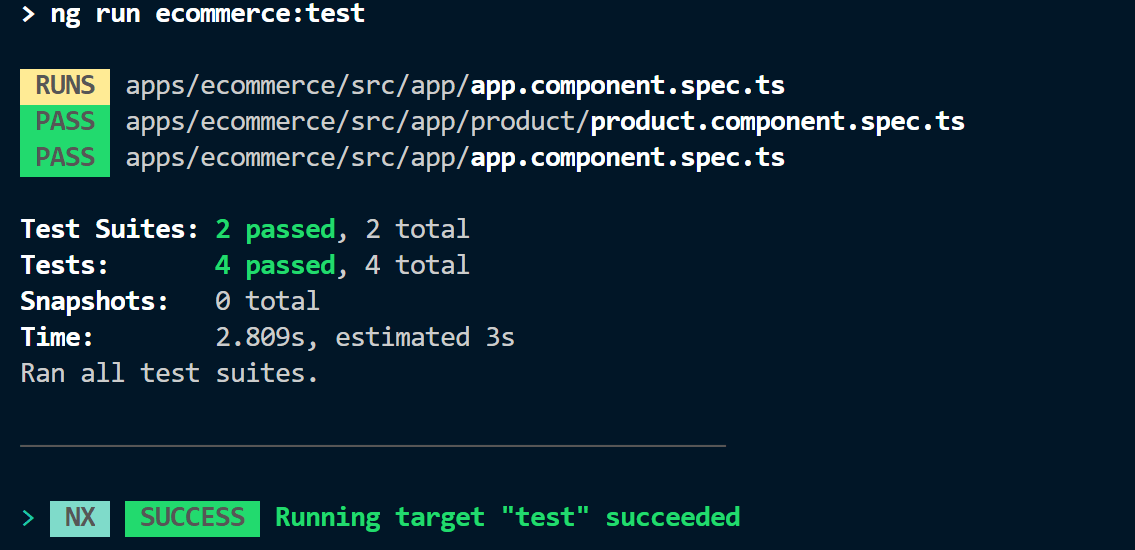
To test this feature, let’s make a code change in our workspace and run the command to build the affected apps and libraries.
We have two projects in nxworkspace. Let’s make some changes to the ecommerce project. We will add a new component for product and test the build and affected apps.
ng g c product --project ecommerce |
The command will add a new component called product to our project ecommerce; here the –project flag is used to make sure the component gets created in the correct project.
Next, in the product folder, add a new file, name it product.ts, and add the following code.
export interface Product {
  id: number;
  name: string;
  price: number;
  mfd: Date;
}
Now, add the following code in product.component.ts.
import { Component, OnInit } from '@angular/core';
import { Product } from './product';

@Component({
  selector: 'nxworkspace-product',
  templateUrl: './product.component.html',
  styleUrls: ['./product.component.css']
})
export class ProductComponent implements OnInit {

  products: Product[] = [
    { id: 1, name: 'One Plus 7 Pro', mfd: new Date('1-Jan-2019'), price: 500 },
    { id: 2, name: 'IPhone 11 Pro', mfd: new Date('1-Mar-2019'), price: 1000 },
    { id: 3, name: 'Pixel 3', mfd: new Date('1-Dec-2019'), price: 700 }
  ];

  constructor() { }
  ngOnInit(): void {
  }
}
Now, let’s use the ngx-bootstrap command to add bootstrap styling to the project. Run the following command.
ng add ngx-bootstrap --project ecommerce |
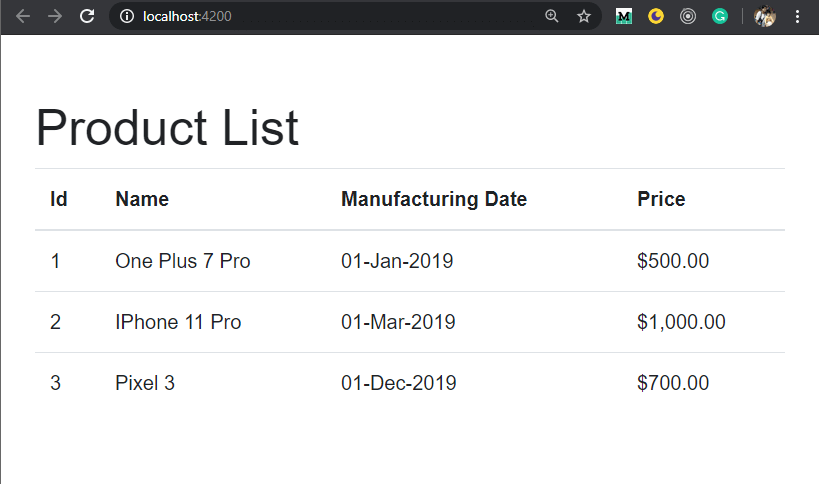
The component has products that can be displayed in the UI. Add the following code to display it in tabular format using HTML tables, open the product.component.html, and copy the code.
<h1>Product List</h1>

<table class="table">
  <thead>
    <tr>
      <th>Id</th>
      <th>Name</th>
      <th>Manufacturing Date</th>
      <th>Price</th>
    </tr>
  </thead>
  <tbody>
    <tr *ngFor="let product of products">
      <td>{{product.id}}</td>
      <td>{{product.name}}</td>
      <td>{{product.mfd | date:'dd-MMM-yyyy'}}</td>
      <td>{{product.price| currency}}</td>
    </tr>
  </tbody>
</table>
Next, open the app.component.html and replace the existing HTML with the following code.
<nxworkspace-product></nxworkspace-product>
Let’s verify the changes in the UI. Run the following code to see the changes in the UI.
ng serve ecommerce -o |
The UI will look like the following screenshot.
We are going to discuss the syntax that we used in our template more, so don’t worry if you didn’t understand why it was used.
It is time to run the affected build commands to check which project has changed and build only the impacted projects.
npm run affected:apps |

Run the pevious command to see which projects are impacted. In my local setup, angular.json was changed due to some formatting changes, so it shows that both the apps are impacted.
Next is to build the impacted projects by executing the following command.
npm run affected:build |
This command will build both the projects and, once it is done, you will get the following output.
You can add these commands as part of your CI/CD pipeline to avoid building all the applications on every commit apart from the master branch. These commands are very useful for feature branches to reduce the build time.
Let’s see how to run the impacted test cases. Open the app.component.spec.ts and add the following code.
import { TestBed, async } from '@angular/core/testing';
import { AppComponent } from './app.component';
import { RouterTestingModule } from '@angular/router/testing';
import { ProductComponent } from './product/product.component';

describe('AppComponent', () => {
  beforeEach(async(() => {
    TestBed.configureTestingModule({
      imports: [RouterTestingModule],
      declarations: [AppComponent, ProductComponent]
    }).compileComponents();
  }));

  it('should create the app', () => {
    const fixture = TestBed.createComponent(AppComponent);
    const app = fixture.componentInstance;
    expect(app).toBeTruthy();
  });

  it(`should have as title 'ecommerce'`, () => {
    const fixture = TestBed.createComponent(AppComponent);
    const app = fixture.componentInstance;
    expect(app.title).toEqual('ecommerce with Nx');
  });

  it('should render title', () => {
    const fixture = TestBed.createComponent(AppComponent);
    fixture.detectChanges();
    const compiled = fixture.nativeElement;
    expect(compiled.querySelector('h1').textContent).toContain(
      'Product List'
    );
  });
});
Run the following command to run only the impacted test case.
npm run affected:test |
The output will be like this.
Creating full-stack Angular apps with Nx
We learned how to create an Angular application with an Nx monorepo. Let’s see how we can use it to create a full-stack application with Nest.js. You can choose Express as well, as it is also supported. Let’s create our first full-stack application using Angular and Nest.js to fetch some data from our backend with the help of Nx DevTools.
We already have a frontend created using Nx, so let’s create a new backend project using Nx CLI. We’ll use the Nest.js as backend. Install the Nx CLI before we add a backend project. Run the following command to install it.
npm install -g @nrwl/cli |
Once installation is completed, inside the workspace, run the following commands to add a backend application powered by NextJs.
npm install --save-dev @nrwl/nest |
The previous command will add the @nrwl/nest package as a dependency in our workspace. Once it is installed, run the following command.
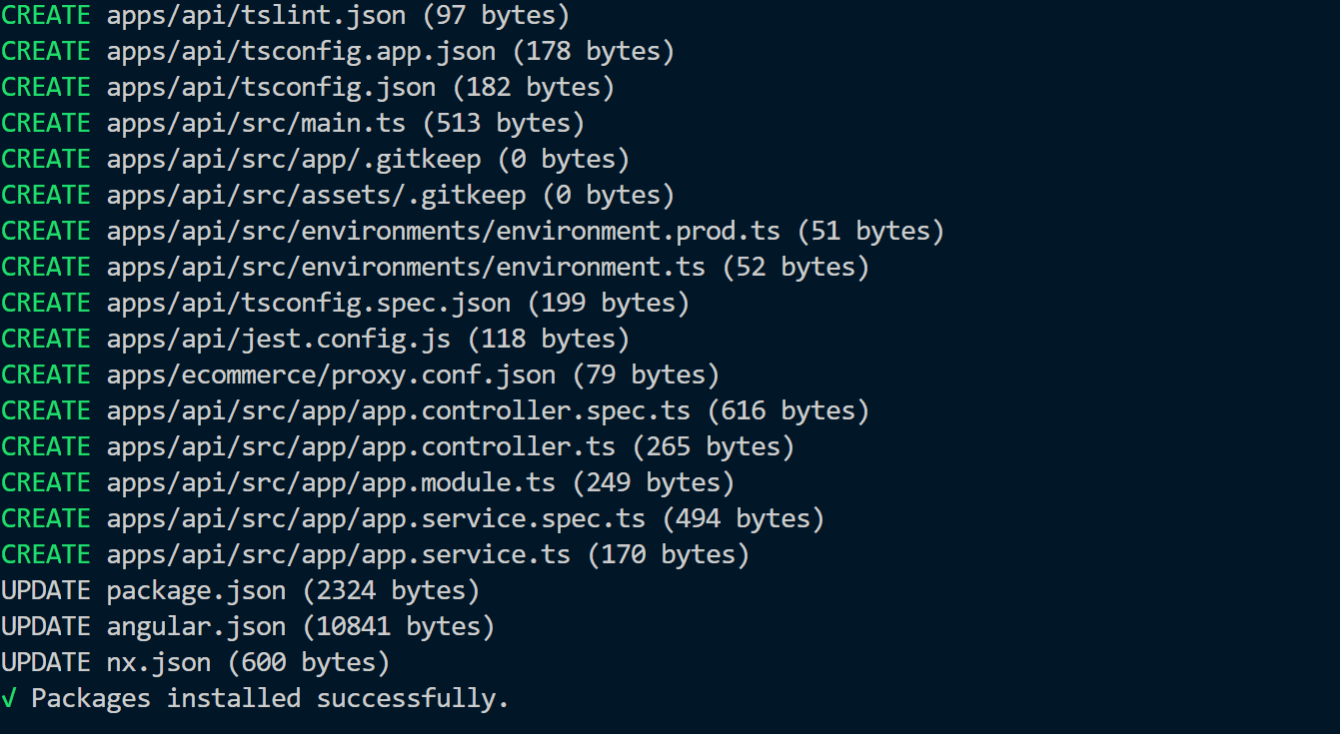
nx g @nrwl/nest:app api --frontendProject=ecommerce |
Here the –frontendProject flag is used to define which frontendApplication will connect to the new backend. The name of the backend project is api. You will see the output like in the following screenshot.
The good thing about using Nx is it auto configures the proxy to connect to backend for development. You can open proxy.conj.json and it will contain the following code.
{
  "/api": {
    "target": "http://localhost:3333",
    "secure": false
  }
}
Here /api is the prefix for all APIs and the target is the backend URL. The proxy is used for local development only.
By default, the backend application uses the 3333 port.
Now, let’s make some changes to the API code to connect with the ecommerce application. Add the following code in app.service.ts inside the api/src/app folder.
import { Injectable } from '@nestjs/common';

@Injectable()
export class AppService {

  getProduct() {
    return [
      { id: 1, name: 'One Plus 7 Pro', mfd: new Date('1-Jan-2019'), price: 500 },
      { id: 2, name: 'IPhone 11 Pro', mfd: new Date('1-Mar-2019'), price: 1000 },
      { id: 3, name: 'Pixel 3', mfd: new Date('1-Dec-2019'), price: 700 }
    ];
  }
}
And add the following code in app.controller.ts.
import { Controller, Get } from '@nestjs/common';
import { AppService } from './app.service';

@Controller()
export class AppController {
  constructor(private readonly appService: AppService) {}

  @Get()
  getProduct() {
    return this.appService.getProduct();
  }
}
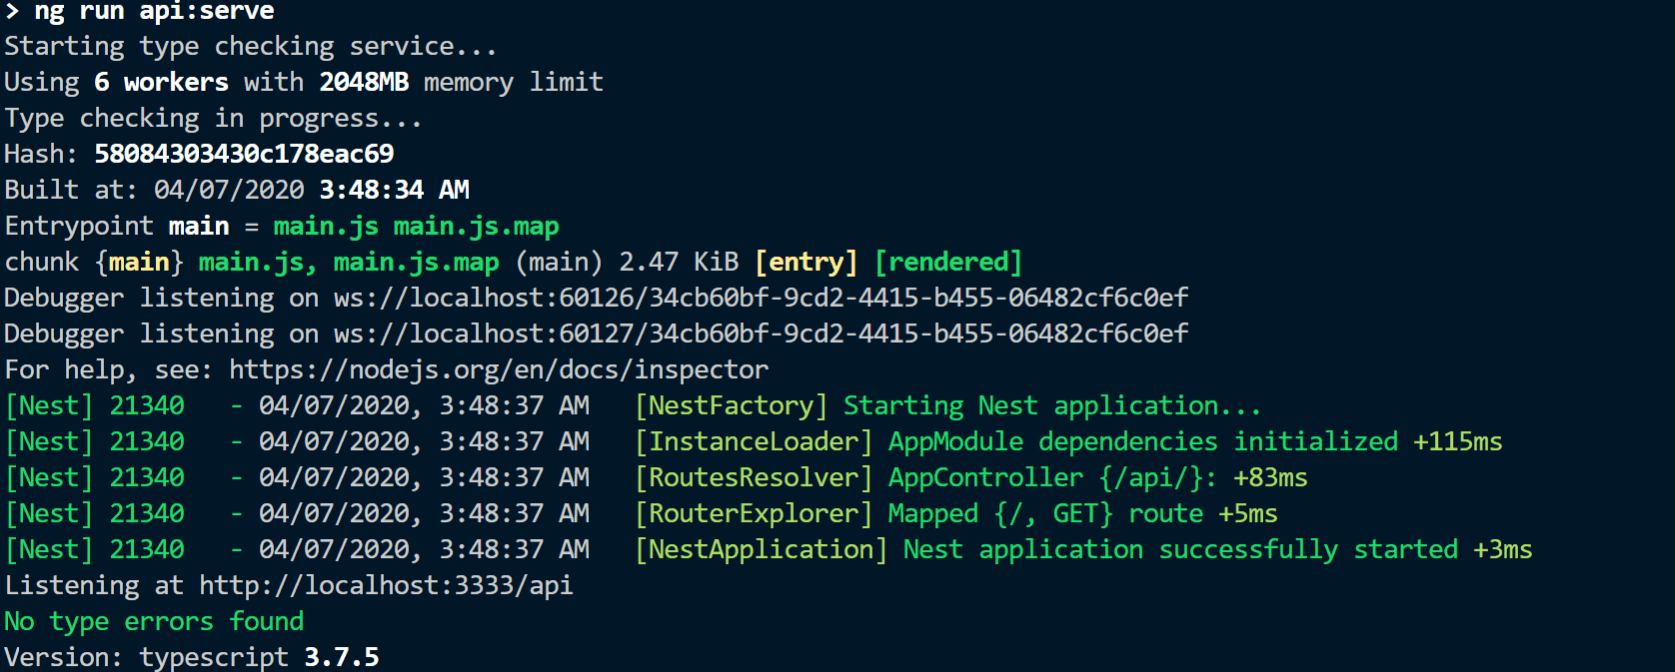
To check the backend API, use the following command to serve it locally.
nx serve api |
Here the API is the name of the backend application. You will see the output like the following.
Now, open the browser and enter in the address bar. This will trigger the backend API and you will get the output like the following.
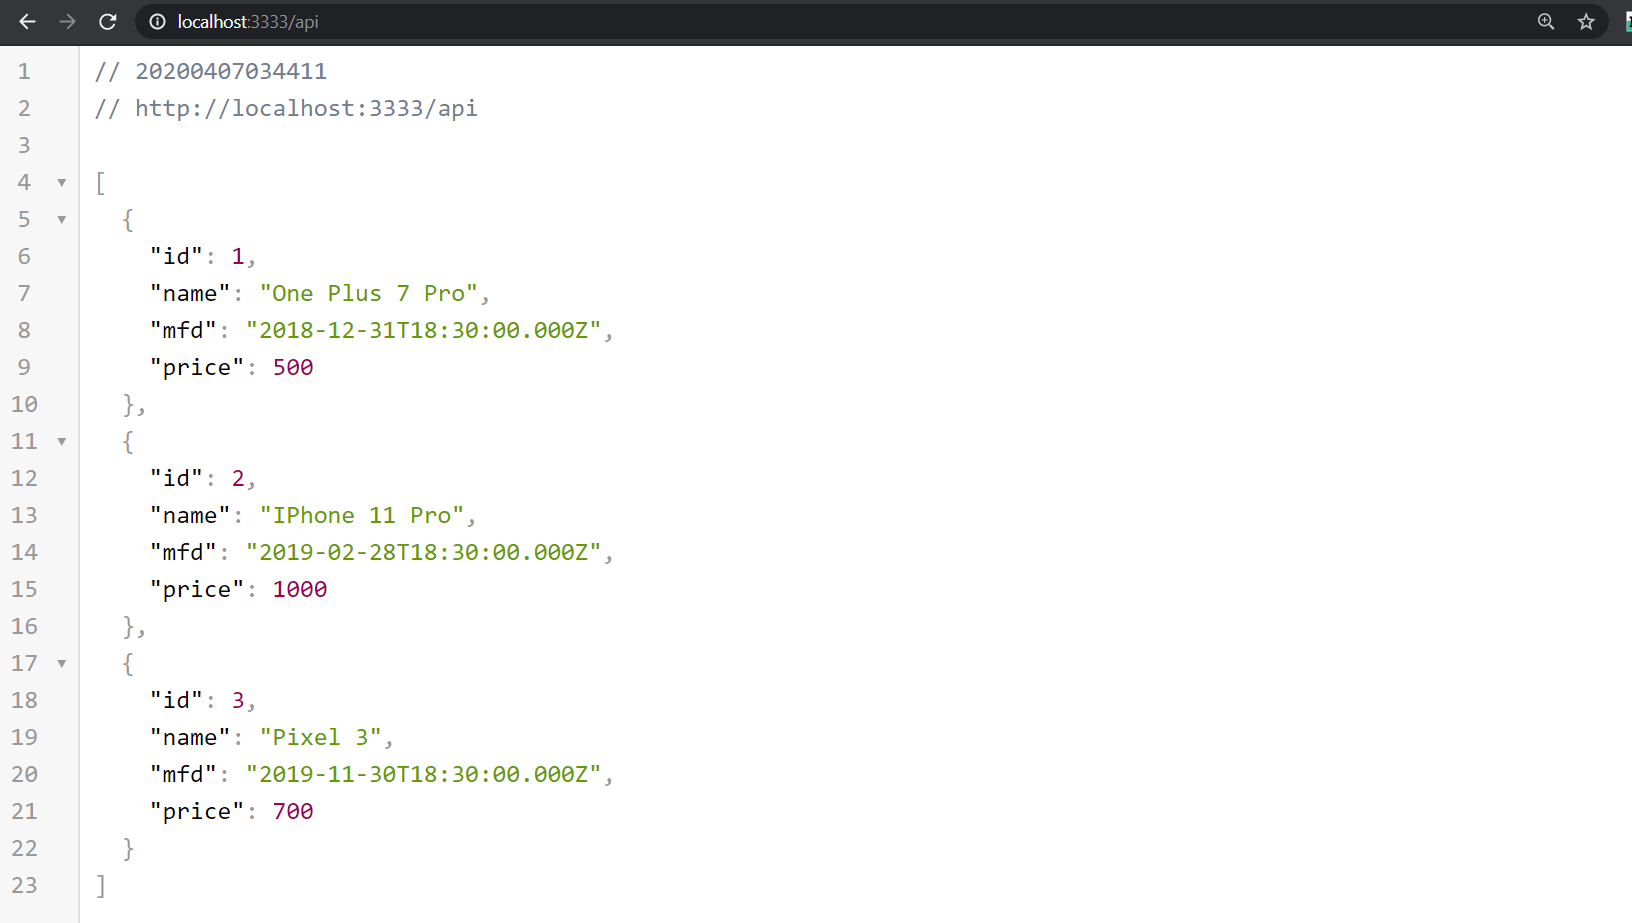
We have created the backend to get products. Now let’s make changes to connect it to the frontend application.
Go to the product folder inside the ecommerce project and run the following command.
ng g service services/product |
This command will generate a folder named services and add two files, product.service.ts and product.service.spec.ts, to it.
Open product.service.ts and add the following code to fetch the data from the backend.
import { Injectable } from '@angular/core';
import { HttpClient } from '@angular/common/http';
import { Product } from '../product';

@Injectable({
  providedIn: 'root'
})
export class ProductService {

  constructor(private http: HttpClient) { }

  getProduct() {
    return this.http.get<Product[]>('/api');
  }
}
Add the following code in product.component.ts.
import { Component, OnInit } from '@angular/core';
import { Product } from './product';
import { ProductService } from './services/product.service';
import { Observable } from 'rxjs';

@Component({
  selector: 'nxworkspace-product',
  templateUrl: './product.component.html',
  styleUrls: ['./product.component.css']
})
export class ProductComponent implements OnInit {

  products$: Observable<Product[]>;

  constructor(private productService: ProductService) { }

 ngOnInit(): void {
    this.products$ = this.productService.getProduct();
  }
}
And now make the changes to the product.component.html.
<h1>Product List</h1>

<table class="table">
  <thead>
    <tr>
      <th>Id</th>
      <th>Name</th>
      <th>Manufacturing Date</th>
      <th>Price</th>
    </tr>
  </thead>
  <tbody>
    <tr *ngFor="let product of products$ | async ">
      <td>{{product.id}}</td>
      <td>{{product.name}}</td>
      <td>{{product.mfd | date:'dd-MMM-yyyy'}}</td>
      <td>{{product.price| currency}}</td>
    </tr>
  </tbody>
</table>
We are using async pipe here in the template.
Now, do the final changes to make our application work, open app.component.ts, and add make the following changes.
Add this import.
import { HttpClientModule } from '@angular/common/http';
And then in the imports array, add the module.
imports: [
    BrowserModule,
    RouterModule.forRoot([], { initialNavigation: 'enabled' }),
    BrowserAnimationsModule,
    HttpClientModule
  ],
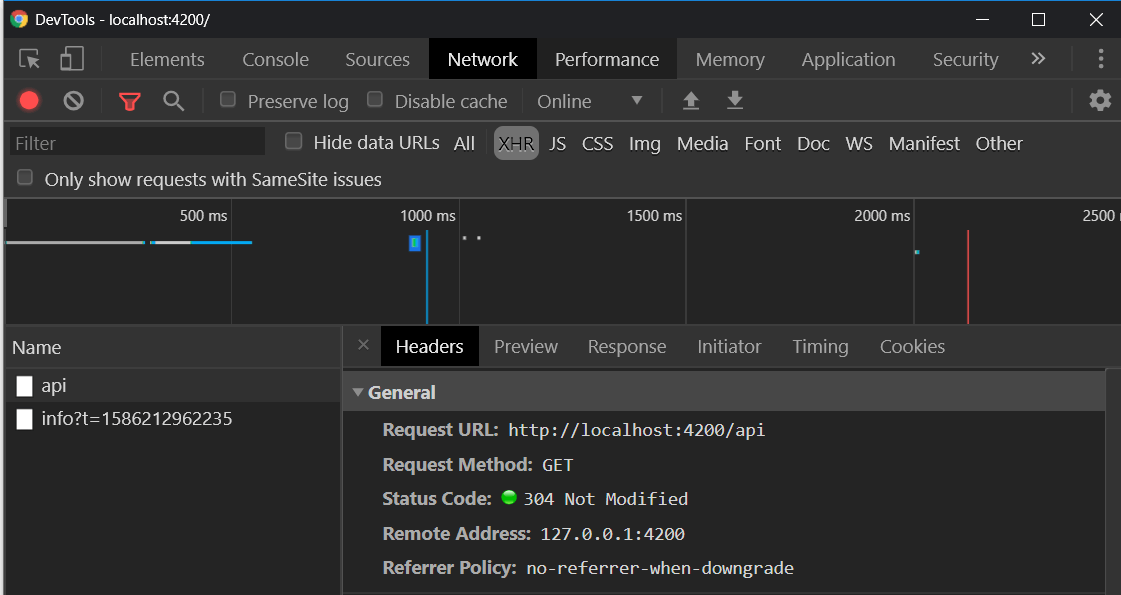
Once done, it’s time to test the application. Run the following command and make sure you are still running the backend application. If it is not running, run these two commands in a separate command prompt.
nx serve api |
It will open the application and you will get the products that are now loaded from the backend. To verify, open the devTools and move to the network tab. You will find the request like the following.
 You can download the complete code from : https://github.com/santoshyadav198613/nx-workspace-demo
Conclusion
I hope you now have a clear idea of creating and executing a full-stack Angular application in a monorepo. Share this blog with your colleagues if you find it useful and share your feedbacks as comments.
For Angular developers, Syncfusion offers over 65 high-performance, lightweight, modular, and responsive Angular components to speed up development.
For current customers, the latest version of our controls is available for download from the License and Downloads page. If you are not yet a customer, you can try our 30-day free trial to check out all our Angular components have to offer. You can also explore samples in our GitHub repository.
 No spam, just valuable updates.
Comments (1)
Excelent post.
tks 4 sharing