
TL;DR: Natural-language prompts can simplify complex Pivot Table interactions in React applications. This guide shows how to build conversational Pivot Tables using AI-assisted configuration, applying safe, minimal updates to sorting, filtering, aggregation, and views without impacting performance or UX. It covers real-world patterns like predictable state management, scalable architecture, and secure server-side AI integration to help you build production-ready analytics interfaces with Syncfusion tools.
Modern analytics UIs often struggle with the same trade-off: powerful Pivot Table features versus usability. Drag‑and‑drop fields, configuring filters, switching aggregations, and toggling views all work, but they slow users down, especially those unfamiliar with Pivot interfaces.
The Syncfusion® React Pivot Table helps you build that analytics surface quickly with a single component, fast configuration, rich data shaping, and an enterprise-ready UI model.
A conversational layer can change that. By allowing users to express intent in plain English, “Sort by country,” “Exclude Q3,” “Average units sold”, you can turn complex configuration steps into fast, natural interactions.
This article shows how to build conversational Pivot Tables in React using an AI‑assisted configuration pattern. The approach focuses on safety, predictability, and performance, making it suitable not just for demos but for real production analytics apps.
Why conversational configuration works for analytics
The key idea behind conversational analytics is not replacing UI controls with chat. Instead:
- The Pivot Table remains configuration‑driven
- AI translates user intent into small, safe configuration changes
- Existing UI controls (field list, toolbar, grouping bar) continue to work
In this pattern:
- AI accelerates common actions
- Users stay in context
- State remains predictable
- UX stays stable
The Pivot configuration becomes the single source of truth, and AI simply helps update it faster.
Architecture overview
The solution is built around four core pieces:
- React Pivot Table driven by explicit configuration
- Conversational UI panel for natural‑language input
- A constrained AI contract that limits what can change
- Server‑side AI integration to keep credentials secure
At no point does the AI “click UI” or manipulate DOM elements. It works entirely at the configuration layer.
Syncfusion React Pivot Table capabilities
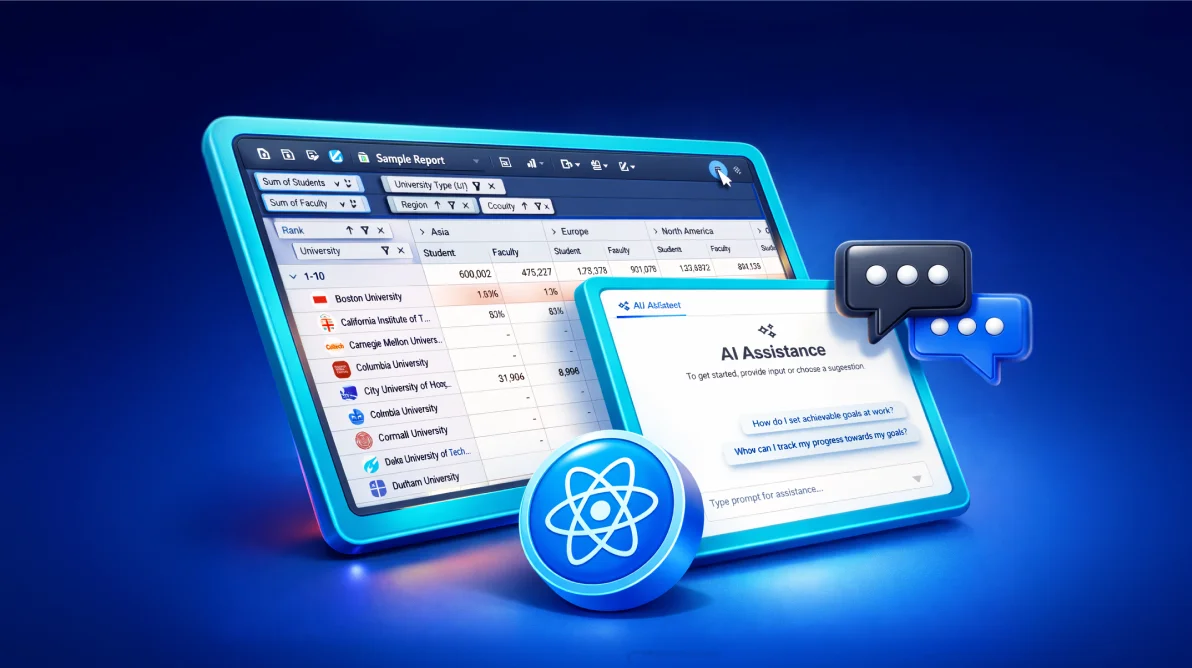
Conversational UI with AI AssistView
This pattern combines Syncfusion’s PivotView with AIAssistViewComponent inside a dialog. The user opens it from a custom toolbar item and submits prompts via promptRequest, which triggers the AI workflow.
<DialogComponent id='ai-assist-dialog' width='500px' visible={false} height='500px'>
    <AIAssistViewComponent
        id="ai-pivot-aiassistview"
        promptRequest={onPromptRequest}
    >
        <ViewsDirective>
            <ViewDirective type='Assist' name='Ask AI' />
        </ViewsDirective>
    </AIAssistViewComponent>
</DialogComponent>
Pivot configuration as the AI contract
At the center of the approach is a strongly-typed dataSourceSettings object (IDataOptions). This is where the Syncfusion React Pivot Table gets its structure: rows, columns, values, formatting, sorting, and filtering.
const dataSourceSettings: IDataOptions = {
    enableSorting: true,
    allowLabelFilter: true,
    allowValueFilter: true,
    columns: [
        { name: 'Year' },
        { name: 'Quarter' }
    ],
    rows: [
        { name: 'Country', expandAll: true },
        { name: 'Product_Categories' }
    ],
    values: [
        { name: 'Sold', caption: 'Units Sold' },
        { name: 'Amount', caption: 'Sold Amount' }
    ],
    formatSettings: [
        { name: 'Amount', format: 'C0' }
    ],
    sortSettings: [
        { name: 'Year', order: "Ascending" }
    ],
    filterSettings: [
        { name: 'Quarter', items: ['Q3'], type: 'Exclude' }
    ],
    dataSource: pivotProductData,
    expandAll: false,
    showSubTotals: false
};
Field List, Grouping Bar, and Toolbar (Inject services)
Enable common Pivot Table UX surfaces (field list, grouping bar, toolbar) and inject the necessary services.
<PivotViewComponent
    id='ai-pivot'
    dataSourceSettings={dataSourceSettings}
    displayOption={{ view: 'Both', primary: 'Table' }}
    showGroupingBar={true}
    showFieldList={true}
    showToolbar={true}
    allowCalculatedField={true}
    allowConditionalFormatting={true}
    allowNumberFormatting={true}
    enableValueSorting={true}
    toolbar={toolbarOptions}
>
    <Inject
        services={[
            GroupingBar,
            FieldList,
            CalculatedField,
            Toolbar,
            ConditionalFormatting,
            NumberFormatting
        ]}
    />
</PivotViewComponent>
Sorting, filtering, and value shaping (via AI-driven deltas)
This approach is built around the idea that AI can modify only a few “safe” areas: props.dataSourceSettings - props.displayOption - props.chartSettings.
The AI prompt rules instruct the model to apply minimal diffs and avoid resetting unrelated settings. That allows prompts like:
- Sort the Country field in descending order
- Clear filtering
- Change the Sold field aggregation from
sumtoavg
Even without “hardcoding” each command, you still keep control by limiting what the AI is allowed to touch.
Conditional formatting and number formatting
The base configuration includes conditional formatting rules for measures like Amount and Sold, plus currency formatting for Amount. These are exactly the kinds of changes users ask for in natural language (“highlight low revenue in red”, “format as currency”).
conditionalFormatSettings: [
    {
        measure: 'Amount',
        value1: 250000,
        conditions: 'LessThan',
        style: {
            backgroundColor: '#FF005C',
            color: 'white',
            fontFamily: 'Tahoma',
            fontSize: '12px'
        },
        applyGrandTotals: false
    }
],
formatSettings: [
    { name: 'Amount', format: 'C0' }
]
Grid + chart view switching (both views)
The Pivot Table can be configured to support both grid and chart representations via displayOption, letting you keep a single analytical surface with multiple perspectives.
displayOption={{
    view: 'Both',
    primary: 'Table'
}}
The AI contract can also allow changing only the primary view (Table/Chart) without altering the overall “Both” mode.
Now that you’ve seen the core building blocks, Pivot configuration, a conversational prompt surface, and a constrained “props delta” contract, let’s assemble the full app end-to-end.
Build the app from scratch
This section is a complete, start-to-finish walkthrough to build the app described in this post: a Syncfusion React Pivot Table that can be configured with natural-language prompts through an AI AssistView panel, backed by a Node/Express API that calls OpenAI.
Prerequisites
- Node.js 18+ and npm
- An OpenAI API key
Step 1: Create the frontend (Vite + React + TypeScript)
Create the app:
npm create vite@latest assistive-pivot -- --template react-ts
cd assistive-pivot
npm install
Install the Syncfusion React components used by this UI:
npm install @syncfusion/ej2-react-pivotview @syncfusion/ej2-react-interactive-chat @syncfusion/ej2-react-popupsStep 2: Add Syncfusion styles (Tailwind 3 theme)
Add the required theme imports to your global stylesheet (for example, src/index.css):
@import "@syncfusion/ej2-base/styles/tailwind3.css";
@import "@syncfusion/ej2-buttons/styles/tailwind3.css";
@import "@syncfusion/ej2-calendars/styles/tailwind3.css";
@import "@syncfusion/ej2-dropdowns/styles/tailwind3.css";
@import "@syncfusion/ej2-grids/styles/tailwind3.css";
@import "@syncfusion/ej2-inputs/styles/tailwind3.css";
@import "@syncfusion/ej2-lists/styles/tailwind3.css";
@import "@syncfusion/ej2-navigations/styles/tailwind3.css";
@import "@syncfusion/ej2-popups/styles/tailwind3.css";
@import "@syncfusion/ej2-splitbuttons/styles/tailwind3.css";
@import "@syncfusion/ej2-pivotview/styles/tailwind3.css";
@import "@syncfusion/ej2-interactive-chat/styles/tailwind3.css";
@import "@syncfusion/ej2-notifications/styles/tailwind3.css";
Step 3: Create a small dataset module
Create src/datasource.ts exporting an array named pivotProductData. The Pivot configuration expects fields like Country, Year, Quarter, Product_Categories, Sold, and Amount.
Minimal starting point:
export const pivotProductData = [
    {
        Country: 'United States',
        Year: 'FY 2024',
        Quarter: 'Q1',
        Product_Categories: 'Bikes',
        Sold: 120,
        Amount: 240000
    }
];
Step 4: Build the Pivot + AI UI component
Create src/frontend/ai-assistive-pivot.tsx and implement these pieces:
- A
PivotViewComponentconfigured withdataSourceSettings (IDataOptions) - A custom Pivot toolbar item labeled “AI Assist” that opens a
DialogComponent - An
AIAssistViewComponentinside the dialog that callsfetchAI(...)when a prompt is submitted - A “Suggestions” footer that can execute example prompts with one click
Core component shape (showing the key interactions):
import { useRef, useState } from 'react';
import {
    PivotViewComponent,
    type IDataOptions,
    Inject,
    GroupingBar,
    FieldList,
    CalculatedField,
    Toolbar,
    ConditionalFormatting,
    NumberFormatting,
} from '@syncfusion/ej2-react-pivotview';
import { DialogComponent } from '@syncfusion/ej2-react-popups';
import {
    AIAssistViewComponent,
    ViewsDirective,
    ViewDirective,
} from '@syncfusion/ej2-react-interactive-chat';
import { pivotProductData } from '../datasource';
import { fetchAI } from '../model/ai-input'; // adjust path if needed

export function AIAssistivePivot() {
    const pivotRef = useRef<PivotViewComponent>(null);
    const dialogRef = useRef<DialogComponent>(null);
    const assistRef = useRef<AIAssistViewComponent>(null);
    const [isDialogVisible, setIsDialogVisible] = useState(false);

    const dataSourceSettings: IDataOptions = {
        dataSource: pivotProductData,
        expandAll: false,
        enableSorting: true,
        allowLabelFilter: true,
        allowValueFilter: true,
        formatSettings: [{ name: 'Amount', format: 'C0' }],
        rows: [
            { name: 'Country', expandAll: true },
            { name: 'Product_Categories' },
        ],
        columns: [{ name: 'Year' }, { name: 'Quarter' }],
        values: [
            { name: 'Sold', caption: 'Units Sold' },
            { name: 'Amount', caption: 'Sold Amount' },
        ],
    };

    const toolbarOptions = [
        'FieldList',
        'Grid',
        'Chart',
        {
            text: 'AI Assist',
            tooltipText: 'Ask AI to configure the pivot',
            prefixIcon: 'e-assistview-icon',
            id: 'ai-assist-btn',
            align: 'Right',
        },
    ];

    const toolbarClick = (args: any) => {
        if (args.item.id === 'ai-assist-btn') {
            setIsDialogVisible(true);
        }
    };

    const handlePromptRequest = (args: { prompt: string }) => {
        const pivot = pivotRef.current;
        const assistView = assistRef.current;
        if (!pivot || !assistView) return;
        fetchAI(args.prompt, pivot, assistView);
    };

    const suggestions = [
        'Sort Country field by descending',
        'Show only data from France and Germany',
        'Change the Sold field aggregation from sum to avg',
        'Clear filtering',
        'Make chart the primary view',
    ];

    return (
        <>
            <PivotViewComponent
                ref={pivotRef}
                id="ai-pivot"
                dataSourceSettings={dataSourceSettings}
                width="100%"
                height={650}
                displayOption={{ view: 'Both', primary: 'Table' }}
                showGroupingBar={true}
                showFieldList={true}
                showToolbar={true}
                allowCalculatedField={true}
                allowConditionalFormatting={true}
                allowNumberFormatting={true}
                enableValueSorting={true}
                toolbar={toolbarOptions}
                toolbarClick={toolbarClick}
            >
                <Inject
                    services={[
                        GroupingBar,
                        FieldList,
                        CalculatedField,
                        Toolbar,
                        ConditionalFormatting,
                        NumberFormatting,
                    ]}
                />
            </PivotViewComponent>

            <DialogComponent
                ref={dialogRef}
                id="ai-assist-dialog"
                header="AI Pivot Assistant"
                width="520px"
                height="580px"
                visible={isDialogVisible}
                close={() => setIsDialogVisible(false)}
                isModal={true} // ← changed: modal behavior
                enableResize={true}
                allowDragging={true}
                position={{ X: 'center', Y: 'center' }}  // ← simpler, more reliable centering
                // Optional: add focus trap/accessibility improvements if needed
                cssClass="ai-assist-dialog"
                footerTemplate={() => (
                    <div className="e-suggestions-footer">
                        <div className="e-suggestion-header">Quick suggestions:</div>
                        <div style={{ display: 'flex', flexWrap: 'wrap', gap: '8px', padding: '8px' }}>
                            {suggestions.map((text, idx) => (
                                <button
                                    key={idx}
                                    className="e-btn e-small e-outline"
                                    onClick={() => assistRef.current?.executePrompt(text)}
                                >
                                    {text}
                                </button>
                            ))}
                        </div>
                    </div>
                )}
            >
                <AIAssistViewComponent
                    ref={assistRef}
                    id="ai-pivot-aiassistview"
                    promptRequest={handlePromptRequest}
                    promptPlaceholder="Ask me to sort, filter, change aggregation, switch view..."
                >
                    <ViewsDirective>
                        <ViewDirective type="Assist" name="Ask AI" />
                    </ViewsDirective>
                </AIAssistViewComponent>
            </DialogComponent>
        </>
    );
}#ai-pivot-aiassistview .response-header .e-assistview-icon:before {
margin-right: 10px;
}
#ai-pivot-aiassistview .response-item-content {
display: flex;
flex-direction: column;
gap: 10px;
margin-left: 20px
}
#ai-pivot-aiassistview .response-item-content .response-header {
display: flex;
align-items: center;
}
#ai-pivot-aiassistview .response-item-content .assist-response-content {
margin-left: 35px;
}
#ai-pivot-aiassistview .response-item-content .response-header .e-assistview-icon:before {
margin-right: 10px;
}
#ai-pivot-aiassistview .e-response-item-template .e-toolbar-items {
margin-left: 35px;
}
#ai-pivot-aiassistview.e-aiassistview .e-footer {
width: 90%;
}
#ai-pivot-aiassistview.e-aiassistview .e-output-container {
width: 100%;
}
#ai-pivot-aiassistview.e-aiassistview .e-content-container .e-content {
overflow-y: auto;
}
#ai-pivot-aiassistview .e-response-item-template .e-content-footer,
#ai-pivot-aiassistview .e-prompt-toolbar {
display: none;
}
#ai-pivot-aiassistview.e-aiassistview .e-view-container {
margin: 0;
}
#ai-pivot .e-badge {
padding: 6px;
width: 70px;
}
#ai-pivot .email {
color: gray;
}
#ai-pivot .product-items {
display: flex;
gap: 0.75rem;
align-items: center;
}
#ai-pivot .product-items p {
margin: 0px;
}
#ai-assist-dialog {
max-height: fit-content !important;
}
#ai-assist-dialog .e-suggestions {
max-width: 100%;
padding: 0 0 10px 0;
}
#ai-assist-dialog .e-suggestion-header {
font-weight: bold;
margin-bottom: 8px;
font-size: 14px;
text-align: left;
}
#ai-assist-dialog .e-suggestion-list {
display: flex;
flex-wrap: wrap;
gap: 4px;
}
#ai-assist-dialog .e-suggestion-list ul {
list-style: none;
margin: 0;
padding: 0;
display: flex;
flex-wrap: wrap;
gap: 4px;
width: 100%;
}
#ai-assist-dialog .e-suggestion-list li {
display: inline-block;
padding: 6px 10px;
border-radius: 16px;
font-size: 13px;
cursor: pointer;
white-space: normal;
box-shadow: 0 2px 4px rgba(0, 0, 0, 0.1);
margin: 5px 2px;
}
#assistive-pivot {
margin: 10px;
}
#ai-assist-dialog .e-suggestion-list li:hover {
background: rgba(28, 27, 31, 0.05);
}
#dialog-target .e-dialog .e-footer-content {
border-top: 1px solid rgb(209, 213, 219);
}
.fluent-dark #ai-assist-dialog .e-suggestion-list li,
.fluent2-dark #ai-assist-dialog .e-suggestion-list li,
.tailwind-dark #ai-assist-dialog .e-suggestion-list li,
.material-dark #ai-assist-dialog .e-suggestion-list li,
.bootstrap5\.3-dark #ai-assist-dialog .e-suggestion-list li,
.tailwind3-dark #ai-assist-dialog .e-suggestion-list li,
.tailwind33-dark #ai-assist-dialog .e-suggestion-list li,
.fabric-dark #ai-assist-dialog .e-suggestion-list li,
.bootstrap-dark #ai-assist-dialog .e-suggestion-list li,
.bootstrap4-dark #ai-assist-dialog .e-suggestion-list li,
.bootstrap5-dark #ai-assist-dialog .e-suggestion-list li,
.highcontrast #ai-assist-dialog .e-suggestion-list li {
box-shadow: 0 2px 4px rgb(228 228 228 / 15%);
}Checkpoint:
- The Pivot table renders (grid and chart toolbar items are visible).
- Clicking the AI Assist button in the Pivot toolbar opens the dialog.
- Clicking a suggestion inserts and executes the prompt.
Step 4.1: Render the component in your app
Now wire the UI into your Vite entry so it actually renders.
Update src/App.tsx:
import './App.css';
import { AIAssistivePivot } from './frontend/ai-assistive-pivot';

function App() {
    return (
        <div className="App">
            <AIAssistivePivot />
        </div>
    );
}

export default App;
Make sure src/main.tsx imports your global styles:
import { StrictMode } from 'react'
import { createRoot } from 'react-dom/client'
import './index.css'
import App from './App.tsx'

createRoot(document.getElementById('root')!).render(
    <StrictMode>
        <App />
    </StrictMode>,
)Checkpoint:
- Visiting your dev server shows the Pivot UI.
Step 5: Implement the prompt → Pivot “delta” pipeline
Create these modules:
src/model/sf-ai-schema.ts: A small helper that defines the JSON response shape you require.src/model/PivotAction.tsx: Applies returned prop diffs viasetProperties(...).src/model/ai-input.tsx: Gathers Pivot state, builds the system instruction, calls the backend, parses JSON, and applies the delta.
The key rule: Only allow the model to modify a narrow set of props (for example: dataSourceSettings, displayOption, and chartSettings). That makes the conversational experience predictable and keeps UX stable.
Two small implementation details make this work smoothly:
- Always get the current Pivot state via
pivot.getPersistData()and send that to the model (after trimming large fields). - Apply changes with
pivot.setProperties(...)so you update only what the prompt asked for.
Minimal apply helper:
import { PivotViewComponent } from '@syncfusion/ej2-react-pivotview';
import { pivotProductData } from '../datasource';

export const executePivotAction = (
    data: any,
    pivot: PivotViewComponent,
    includedProps?: object
) => {
    if (data.props) {
        if (data.props.dataSourceSettings) {
            data.props.dataSourceSettings.dataSource = pivotProductData;
        } else {
            data.props.dataSourceSettings = { dataSource: pivotProductData };
        }
        if (data.props.displayOption) {
            pivot.setProperties(data.props, true);
            pivot.refresh();
        } else {
            pivot.setProperties(data.props, false);
        }
    }
}
Prompt runner (trim state → call backend → parse JSON → apply):
import { serverAIRequest } from '../backend/ai-service';
import { executePivotAction } from './PivotAction';
import { AIAssistViewComponent } from '@syncfusion/ej2-react-interactive-chat';
import type { PivotViewComponent } from '@syncfusion/ej2-react-pivotview';
import { generateSchema } from './sf-ai-schema';

function fetchAI(
    text: string | undefined,
    pivot: PivotViewComponent,
    assistView: AIAssistViewComponent,
    dataSourceSettings: any
) {
    let schema = generateSchema('PivotView');
    let required = schema.required;
    let state: any = JSON.parse(pivot.getPersistData());
    if (Array.isArray(state?.dataSourceSettings?.dataSource)) {
        dataSourceSettings.dataSource = dataSourceSettings.dataSource.slice(0, 1);
        state.dataSourceSettings.dataSource = state.dataSourceSettings.dataSource.slice(0, 1);
        state.pivotValues = [];
    }
    delete state.pivotValues;
    delete state.gridSettings;
    delete state.pageSettings;
    delete state.dataSourceSettings.authentication;
    delete state.dataSourceSettings.alwaysShowValueHeader;
    delete state.dataSourceSettings.fieldMapping;
    delete state.dataSourceSettings.localeIdentifier;
    delete state.dataSourceSettings.groupSettings;
    delete state.dataSourceSettings.mode;
    delete state.dataSourceSettings.providerType;
    delete state.dataSourceSettings.showHeaderWhenEmpty;
    delete state.dataSourceSettings.showAggregationOnValueField;
    delete state.dataSourceSettings.valueIndex;
    delete state.dataSourceSettings.type;

    if (state.chartSettings) {
        const type = state.chartSettings?.chartSeries?.type ?? undefined;
        state.chartSettings = { chartSeries: {} };
        if (type !== undefined) {
            state.chartSettings.chartSeries.type = type;
        }
    }
    const dss = state.dataSourceSettings;
    if (dss && typeof dss === 'object') {
        const shrinkFields = (arr: any) => {
            if (!Array.isArray(arr)) return arr;
            return arr.map(f => ({
                name: f?.name ?? '',
                caption: (
                    typeof f?.caption === 'string' && f.caption.length > 0)
                        ? f.caption
                        : (f?.name ?? ''),
                expandAll: !!f?.expandAll
            }));
        };
        const shrinkValueFields = (arr: any) => {
            if (!Array.isArray(arr)) return arr;
            return arr.map(f => ({
                name: f?.name ?? '',
                caption: (typeof f?.caption === 'string' && f.caption.length > 0) ? f.caption : (f?.name ?? ''),
                type: f?.type ?? ''
            }));
        };

        if (Array.isArray(dss.columns)) dss.columns = shrinkFields(dss.columns);
        if (Array.isArray(dss.rows)) dss.rows = shrinkFields(dss.rows);
        if (Array.isArray(dss.values)) dss.values = shrinkValueFields(dss.values);
        schema.props.properties.properties = state;
    }
    const systemPrompt = `
        You are a **very precise** Syncfusion PivotView configuration assistant.
        Rules you MUST follow:
        1. Return ONLY valid JSON — no markdown, no explanation outside the JSON
        2. Follow the exact JSON schema below
        3. Modify ONLY fields inside "props" that were explicitly requested
        4. NEVER invent field names — only use fields/measures that exist in the current state
        5. Preserve all settings that were not mentioned in the request
        6. For dataSourceSettings: never include "dataSource" array
        7. Use correct Syncfusion enum values (case-sensitive)
        8. If request is unclear, impossible, or asks for dangerous changes → confidence ≤ 0.4 and explain why
        9. "displayOption.view" must always remain "Both" — only change "primary"

        Current pivot configuration (read-only reference):
        ${JSON.stringify(currentSettings, null, 2)}

        Available fields/measures (case-insensitive match):
        - Rows/Columns: Country, Year, Quarter, Product_Categories, Products
        - Values: Sold, Amount
        - Order_Source: Retail Outlets, Sales Person, App Store, Teleshopping

        Response format (JSON only):
        ${JSON.stringify(schema, null, 2)}

        Examples of valid changes:
        - "Sort Country descending" → sortSettings: [{ name: "Country", order: "Descending" }]
        - "Average Sold" → values: [...existing..., { name: "Sold", type: "Average" }]
        - "Show only France" → filterSettings: [{ name: "Country", type: "Include", items: ["France"] }]
        - "Primary chart view" → displayOption: { primary: "Chart" }

        Return confidence 0.0–1.0 based on how well the request matches Pivot capabilities.
    `;
    let aiOutput = serverAIRequest({
        messages: [
            { role: 'system', content: systemPrompt },
            { role: 'user', content: text },
        ]
    });
    aiOutput.then((result: string) => {
        if (!result) {
            return;
        }
        let jsonResult = result;
        if (result.indexOf("```json") !== -1) {
            jsonResult = result.split("```json")[1].split("```")[0].trim();
        }
        let data;
        let response: string = '';
        try {
            if (jsonResult.indexOf('{') !== -1 && jsonResult.indexOf('}') !== -1) {
                data = JSON.parse(jsonResult);
                executePivotAction(data, pivot, data.includedProps);
                response = data.explanation;
            } else {
                response = jsonResult;
            }
        } catch (error) {
            assistView.addPromptResponse({ prompt: error, response: error });
            return;
        }
        if (data && data.confidence < 0.7) {
            aiOutput = serverAIRequest({
                messages: [
                    { role: 'system', content: systemPrompt },
                    { role: 'user', content: text },
                ],
            });
        }
        assistView.addPromptResponse({ response: response });
    });
}

export { fetchAI };import type { PivotViewComponent } from "@syncfusion/ej2-react-pivotview";
export interface UniversalAIDelta {
componentType: PivotViewComponent;
properties: Record<string, any>; // Any valid Syncfusion prop/value
ignoreProps?: string[]; // Props AI must NEVER touch
explanation: string; // Human-friendly "I did X, Y, Z"
confidence?: number; // 0-1 (optional, for UI feedback)
}
export const generateSchema = (componentType: string) => ({
"title": "Syncfusion Universal AI Response",
"type": "object",
"props": {
"componentType": {
"type": "string",
"const": componentType
},
"properties": {
"type": "object",
"properties": {},
"description": "Only the props you want to change. Can be any valid Syncfusion prop."
},
},
"includedProps": {
"type": "array",
"items": {"type": "string"},
"default": ["dataSourceSettings", "displayOption"], // Used for ai result as for this enabled features.
"description": 'This actions only handled in this schema'
},
"ignoreProps": {
"type": "array",
"items": { "type": "string" },
"default": [
"dataSource",
"height",
"width",
"locale",
"enableRtl",
"cssClass",
"created",
"destroyed"
], // Used to prevent the changes requested from user.
"description": 'This actions were not handled in this schema'
},
"explanation": {
"type": "string",
"description": "User actions for included or ignored props"
},
"confidence": {
"type": "Float",
"minimum": 0,
"maximum": 1
},
"required": ["props", "explanation", "includedProps", "ignoredProps", "confidence"],
"additionalProperties": true
});// Example in frontend – simple session ID
const getVisitorId = () => {
let id = sessionStorage.getItem('ai-pivot-visitor-id');
if (!id) {
id =
'visitor-' +
Date.now() +
'-' +
Math.random().toString(36).substring(2, 10);
sessionStorage.setItem('ai-pivot-visitor-id', id);
}
return id;
};
export const serverAIRequest = async (settings: any): Promise<any> => {
try {
const visitorId = getVisitorId();
const baseUrl =
(import.meta as any).env?.VITE_API_BASE_URL || 'http://localhost:3000';
let response = await fetch(`${baseUrl}/api/chat`, {
method: 'POST',
headers: { 'Content-Type': 'application/json' },
body: JSON.stringify({ visitorId, messages: settings })
})
let result = await response.json();
if (!response.ok) {
throw new Error(result.error || 'Network response was not ok');
}
result.response = result.response.replace('END_INSERTION', '');
return result.response;
} catch (error: any) {
if (error.message.includes('token limit')) {
document.querySelector('.banner-message')!.innerHTML = error.message;
document.querySelector('.sb-token-header')!.classList.remove('sb-hide');
} else {
console.error('There was a problem with your fetch operation:', error);
}
}
};Checkpoint:
- Submitting a prompt triggers a network call to
/api/chat. - On success, the chat displays a short explanation and the Pivot updates.
- On failure, the chat displays the error message (so the user isn’t stuck).
Step 6: Create the backend (Express + OpenAI + token budgeting)
In a separate folder at the repository root, create a Node service:
mkdir server
cd server
npm init -y
npm install express cors dotenv openai date-fns
Update server/package.json to enable ES modules (so import works) and add a start script:
{
    "type": "module",
    "scripts": {
        "start": "node server.js"
    }
}
Create server/.env:
OPENAI_API_KEY=sk-...
OPENAI_MODEL=gpt-4o-mini
CORS_ORIGIN=http://localhost:5173
Create an /api/chat route that accepts { visitorId, messages }, forwards the chat payload to OpenAI, and returns { response }. If you add usage control (recommended), deduct tokens based on result.usage.total_tokens.
If you want the same “per-visitor token budget with hourly resets” behavior, implement a tiny token store and integrate it into the route.
// server/token-store.js
// IMPORTANT: This is a simple in-memory implementation for demonstration purposes only!
// In production, use Redis, a database, or similar persistent + concurrent-safe storage.

const TOKEN_RESET_INTERVAL_HOURS = 1;
const DEFAULT_TOKENS_PER_VISITOR = 50000;

// In-memory store (resets on server restart – fine for demo)
const tokenStore = new Map();

export function getUserTokens(visitorId) {
    const now = new Date();
    let userData =
        tokenStore.get(visitorId) || {
            visitorId,
            tokensRemaining: DEFAULT_TOKENS_PER_VISITOR,
            lastReset: now,
        };

    // Reset if interval has passed
    const hoursSinceReset = (now - userData.lastReset) / (1000 * 60 * 60);
    if (hoursSinceReset >= TOKEN_RESET_INTERVAL_HOURS) {
        userData = {
            visitorId,
            tokensRemaining: DEFAULT_TOKENS_PER_VISITOR,
            lastReset: now,
        };
    }

    tokenStore.set(visitorId, userData);
    return userData;
}

export function deductTokens(visitorId, tokensUsed) {
    const userData = getUserTokens(visitorId);
    userData.tokensRemaining = Math.max(
        0,
        userData.tokensRemaining - (tokensUsed || 0)
    );
    tokenStore.set(visitorId, userData);
    return userData.tokensRemaining;
}

export function hasEnoughTokens(visitorId) {
    return getUserTokens(visitorId).tokensRemaining > 0;
}import OpenAI from "openai";
import dotenv from 'dotenv';
// Load environment variables
dotenv.config();
const apiKey = process.env.OPENAI_API_KEY || "API_Key";
const model = process.env.OPENAI_MODEL || "gpt-4o-mini";
// Initialize OpenAI client
const client = new OpenAI({ apiKey });
export async function getAzureChatAIRequest(options) {
try {
const payload = {
messages: options?.messages?.messages ?? [],
model,
top_p: options?.topP,
temperature: options?.temperature,
max_tokens: options?.maxTokens,
frequency_penalty: options?.frequencyPenalty,
presence_penalty: options?.presencePenalty,
stop: options?.stopSequences
};
const result = await client.chat.completions.create(payload);
// Log only minimal info to avoid leaking content
console.log(
'chat.completions.create ok - model:',
model,
'usage:',
result?.usage?.total_tokens
);
return result;
} catch (err) {
console.error("OpenAI request failed:", err?.message || err);
throw err; // let caller handle
}
}// server.js
import express from 'express';
import { getAzureChatAIRequest } from './ai-model.js';
import { format } from 'date-fns';
import cors from 'cors';
import { getUserTokens, updateTokens } from './token-store.js';
const app = express();
const PORT = process.env.PORT || 3000;
// Configure middleware for CORS and JSON parsing
const corsOrigin = process.env.CORS_ORIGIN || '*';
app.use(cors({ origin: corsOrigin }));
app.use(express.json());
// Token helpers moved to token-store.js (no behavior change)
// Chat endpoint with token check and deduction
// In app.post('/api/chat', async (req, res) => { ... }
app.post('/api/chat', async (req, res) => {
try {
const { visitorId, ...chatData } = req.body;
if (!visitorId) {
return res.status(400).json({ error: 'Missing visitorId' });
}
// Simple token check
if (!hasEnoughTokens(visitorId)) {
const nextReset = new Date();
nextReset.setHours(nextReset.getHours() + TOKEN_RESET_INTERVAL_HOURS);
const resetTimeStr = nextReset.toLocaleString();
return res.status(429).json({
error: `Rate limit reached. Tokens reset at approximately ${resetTimeStr}`
});
}
const result = await getAzureChatAIRequest(chatData);
if (result?.usage?.total_tokens) {
deductTokens(visitorId, result.usage.total_tokens);
}
return res.status(200).json({
response: result.choices[0].message.content
});
} catch (err) {
console.error('Chat endpoint error:', err);
return res.status(500).json({ error: 'Internal server error' });
}
});
app.listen(PORT, () => {
console.log(`Server is running on http://localhost:${PORT}`);
});Checkpoint:
- Start the server and verify it prints Server is running on http://localhost:3000.
- Verify the API returns a response using curl:
curl -X POST http://localhost:3000/api/chat \
    -H "Content-Type: application/json" \
    -d "{\"visitorId\":\"dev-visitor\",\"messages\":{\"messages\":[{\"role\":\"system\",\"content\":\"Return a short hello.\"},{\"role\":\"user\",\"content\":\"Hello\"}]}}"
Add practical guardrails: per-visitor token limiting (demo only)
For demonstration purposes, the backend limits each visitor to 50,000 tokens per hour (roughly 15–30 longer conversations depending on model and prompt size).
When the limit is reached, users see a clear message with an approximate reset time.
Important: This is a simple in-memory implementation and resets when the server restarts.
In production, replace this with Redis, a database, or a proper rate-limiting service (such as Upstash Rate Limit, Cloudflare, or similar).
Step 7: Connect the frontend to the backend
Create assistive-pivot/.env:
VITE_API_BASE_URL=http://localhost:3000Then have your frontend AI request helper POST to ${VITE_API_BASE_URL}/api/chat.
Step 8: Run the app
Run the backend:
cd server
npm start
Run the frontend:
cd assistive-pivot
npm run dev
Try prompts like:
- Sort Country field by descending.
- Show only data from France and Germany.
- Change the Sold field aggregation from sum to avg.
- Clear filtering.
Handling edge cases and limitations
While reliable, conversational analytics still has edge cases:
- Invalid AI output or malformed JSON
- Requests referencing non‑existent fields
- Large configurations increase prompt size
- Concurrent user actions colliding with AI updates
- Token limits or network failures
The current implementation handles these gracefully by:
- Validating responses before applying
- Displaying clear error states
- Avoiding partial or destructive updates
For production, additional safeguards like rollback support or preview‑before‑applying can be added.
Integration notes (React)
Component wiring patterns
- Use
useRefto hold thePivotViewComponentinstance and theAIAssistViewComponent. This enables direct calls likepivot.getPersistData(),pivot.setProperties(...), andassistView.executePrompt(...). - Drive the Pivot from a stable
dataSourceSettingsobject, and treat AI changes as updates to that configuration (not imperative DOM actions).
Opening the AI panel from the Pivot toolbar
Add a custom toolbar item and open a DialogComponent positioned near the clicked toolbar button. This keeps the AI experience attached to the analytics surface and avoids disruptive navigation.
Dialog positioning & interaction:
We use the built-in isModal={true} and centered positioning of the DialogComponent rather than calculating exact coordinates relative to the toolbar button. This approach is more robust across screen sizes, zoom levels, scrolling, and RTL layouts. The modal behavior also improves accessibility by trapping focus inside the AI assistant dialog while it is open, preventing accidental interaction with the pivot table underneath.
Calling the backend reliably
Use VITE_API_BASE_URL to target the API environment (local, staging, prod) without changing code. Your browser-side helper should POST to /api/chat and surface server errors in the chat UI.
Advanced scenarios
1. Ground the model in the current Pivot state (and keep it small)
Before calling the AI endpoint, read the Pivot state using pivot.getPersistData(), then remove heavyweight/irrelevant fields and shrink arrays to keep the context focused and token-efficient.
Conceptually:
- Capture current Pivot state.
- Remove large sections like pivotValues.
- Keep just what matters for safe configuration changes (
dataSourceSettings,displayOption,chartSettings).
This improves reliability because the AI isn’t guessing what the Pivot currently contains; it’s responding to the actual state.
2. Apply “minimal diffs” back to PivotView (instead of resetting)
The workflow intentionally applies targeted updates using Syncfusion’s component API (setProperties) and refreshes only when needed.
if (data.props.displayOption) {
    pivot.setProperties(data.props, true); // apply and re-render safely
    pivot.refresh();
} else {
    pivot.setProperties(data.props, false); // apply without forcing full refresh
}
Why it matters:
- You avoid destroying the user’s current view context.
- You reduce the risk of the AI “over-correcting” and wiping unrelated settings.
3. Secure OpenAI access with an Express proxy (no API keys in the browser)
The frontend calls a local endpoint and never touches the OpenAI key. The backend constructs the chat payload and forwards it to the OpenAI SDK.
app.post('/api/chat', async (req, res) => {
    const { visitorId, ...chatData } = req.body;
    const responseText = await getChatAIRequest(chatData);
    return res.status(200).json({
        response: responseText.choices[0].message.content
    });
});
Why it matters:
- You can enforce policy (allowed actions, budgets, logging discipline).
- You can rotate keys and change models without redeploying the frontend.
4. Add practical guardrails: per-visitor token budgeting
To keep demos and internal deployments predictable, the server tracks token usage per visitor ID and enforces a reset window.
const TOKEN_RESET_INTERVAL_HOURS = 1;
const DEFAULT_TOKENS = 50000;

export function updateTokens(visitorId, usedTokens) {
    const userTokenInfo = getUserTokens(visitorId);
    userTokenInfo.remainingTokens -= Number(usedTokens) || 0;
    writeTokensToFile({
        ...readTokensFromFile(),
        [visitorId]: userTokenInfo
    });
    return userTokenInfo.remainingTokens;
}
The result: users get a clear 403 message when they hit their budget, instead of a surprise bill, or a degraded experience during a demo.
Performance and UX best practices
To keep the experience fast and stable:
- Keep the AI contract narrow
- Remove heavy state before sending prompts
- Ground the model in the current Pivot configuration
- Favor configuration updates over UI commands
- Provide quick suggestion prompts for discoverability
These practices ensure conversational features enhance analytics UX rather than complicate it.
Real-world use cases
This pattern works well in situations like:
- Sales and revenue dashboards
- Operational performance reviews
- Finance and reporting portals
- Analytics demos and internal tooling
- Self‑serve BI experiences
In each case, conversational configuration lowers friction while preserving analytical power.
GitHub reference
To see the complete implementation, you can check out the sample project available on GitHub.
Frequently Asked Questions
No. The conversational layer complements existing Pivot UI features like field lists, grouping bars, and toolbars. Users can switch freely between natural‑language input and traditional configuration without losing state.Does conversational analytics replace traditional Pivot Table controls?
The assistant is intentionally limited to high‑value, safe operations such as sorting, filtering, changing aggregation types, switching primary views, and applying formatting rules. It cannot modify the data source or reset unrelated configuration.What Pivot Table operations can the AI safely change?
Instead of reinitializing the component, the AI applies minimal configuration diffs using controlled updates. Unchanged settings are preserved, keeping the UI predictable and preventing accidental resets.How does this approach prevent the Pivot configuration from being broken?
Yes. The pattern is designed for real‑world use, with strong constraints, server‑side AI integration, token limits, and explicit handling for errors and low‑confidence responses.Is this suitable for production applications?
All AI requests are handled by a Node/Express backend. API keys never reach the browser, and the server enforces usage limits, prompt rules, and error handling.How is the AI API kept secure?

Conclusion and CTA
Thank you for reading! Conversational analytics doesn’t require rebuilding your data UI it requires using configuration smarter.
By pairing a configuration‑driven Syncfusion React Pivot Table with a constrained AI assistant, you can deliver:
- Faster interactions
- Better accessibility
- Predictable behavior
- Production‑ready performance
The result is an analytics experience that feels modern and intuitive, without sacrificing safety or maintainability. This AI‑assisted pattern provides a practical blueprint for building conversational reporting interfaces in real‑world React applications.
If you’re a Syncfusion user, you can download the setup from the license and downloads page. Otherwise, you can download a free 30-day trial.
You can also contact us through our support forum, support portal, or feedback portal for queries. We are always happy to assist you!


 No spam, just valuable updates.