

TL;DR: Enjoy seamless editing experience with the inline editor feature of Syncfusion’s Blazor Rich Text Editor control. This user-friendly feature helps you edit text directly within your document. Say goodbye to cumbersome workflows and embrace seamless text editing!
Syncfusion Blazor Rich Text Editor Editor is a feature-rich WYSIWYG HTML and Markdown editor. It is used to create blogs, forum posts, notes sections, support tickets (incidents), comment sections, messaging apps, and more. It provides an efficient UI for a better editing experience with mobile support. It has a variety of tools to edit and format rich content and returns valid HTML markup or Markdown (MD) content. It allows users to insert images, links, tables, and lists with modular architectures.
This blog covers the complete details about the inline editor, one of the Rich Text Editor modes that helps us to edit the content quickly.
Let’s get started!
Inline editing
Users often want to edit the content and format inline instead of frequently navigating to the main toolbar.
The inline editor in Blazor Rich Text Editor displays toolbars on-demand and hides the main toolbar while selecting/clicking on any editable content. The inline editor helps to interact with the content easily when there is enormous content on editing. Also, the inline editor is used to format the content through its quick access toolbar items.
Getting started
First, create a Blazor server-side app and configure the Syncfusion Blazor services.
Enable the inline editor
By default, the Blazor Rich Text Editor is configured without the inline editor. So, add the Rich Text Editor component to the index.razor file and enable the inline editor by enabling the RichTextEditorInlineMode class.
Refer to the following code example.
<SfRichTextEditor @bind-Value="@rteValue" >
   <RichTextEditorInlineMode Enable="true" />
</SfRichTextEditor>
@code {
    private string rteValue { get; set; } = "<p>The sample is configured with the inline mode of the editor. Initially, the editor is rendered without a <a href='https://blazor.syncfusion.com/home/' target='_blank'>toolbar</a>. The toolbar becomes visible only when the content is selected. </p>";

 }
Refer to the following image.
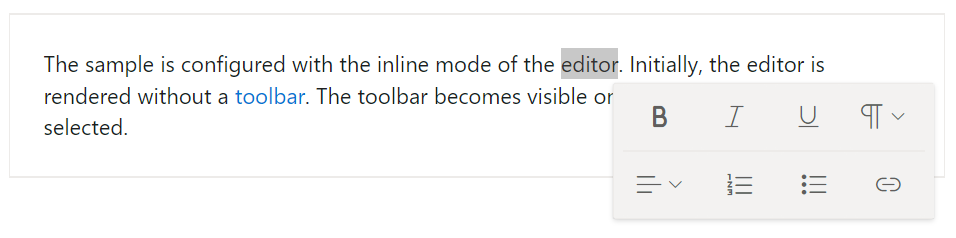
Inline editor on selection
By default, the inline toolbar will appear on clicking in the editable area.
You can enable the ShowOnSelection property of the RichTextEditorInlineMode class to display the inline toolbar only when selecting text in the editable area.
Refer to the following code example.
<SfRichTextEditor @bind-Value="@rteValue" >
    <RichTextEditorInlineMode Enable="true" ShowOnSelection="true" />
</SfRichTextEditor>
@code {
    private string rteValue { get; set; } = "<p>The sample is configured with the inline mode of the editor. Initially, the editor is rendered without a <a href='https://blazor.syncfusion.com/home/' target='_blank'>toolbar</a>. The toolbar becomes visible only when the content is selected. </p>";
}
Multi-row inline editor
Sometimes, we need to configure more tools in multiple rows. To display a multi-row toolbar, add the ToolbarCommand.HorizontalSeparator command within the RichTextEditorToolbarSettings Items property. Otherwise, the tools will be displayed in a single row.
Then, configure the most-used toolbar items like Bold and Italic for the Rich Text Editor, as shown in the following code example.
<SfRichTextEditor @bind-Value="@rteValue" >
    <RichTextEditorToolbarSettings Items="@ToolsForInline"/>
    <RichTextEditorInlineMode Enable="true" ShowOnSelection="true" />
</SfRichTextEditor>
@code {
    private string rteValue { get; set; } = "<p>The sample is configured with the inline mode of the editor. Initially, the editor is rendered without a <a href='https://blazor.syncfusion.com/home/' target='_blank'>toolbar</a>. The toolbar becomes visible only when the content is selected.</p>";

    private List<ToolbarItemModel> ToolsForInline = new List<ToolbarItemModel>()
	{
	new ToolbarItemModel() { Command = ToolbarCommand.Bold },
	new ToolbarItemModel() { Command = ToolbarCommand.Italic },
	new ToolbarItemModel() { Command = ToolbarCommand.Underline },
	new ToolbarItemModel() { Command = ToolbarCommand.OrderedList },
	new ToolbarItemModel() { Command = ToolbarCommand.UnorderedList },
	new ToolbarItemModel(){ Command = ToolbarCommand.HorizontalSeparator},
	new ToolbarItemModel() { Command = ToolbarCommand.Formats },
	new ToolbarItemModel() { Command = ToolbarCommand.Alignments },
	new ToolbarItemModel() { Command = ToolbarCommand.CreateLink },
	new ToolbarItemModel() { Command = ToolbarCommand.Image },
	new ToolbarItemModel(){ Command = ToolbarCommand.HorizontalSeparator},
	new ToolbarItemModel() { Command = ToolbarCommand.Indent },
	new ToolbarItemModel() { Command = ToolbarCommand.Outdent },
	new ToolbarItemModel() { Command = ToolbarCommand.SourceCode },
	new ToolbarItemModel() { Command = ToolbarCommand.Undo },
	new ToolbarItemModel() { Command = ToolbarCommand.Redo }
  };
}
Customizing the inline editor
You can add custom commands for the toolbar using the Items property of the RichTextEditorToolbarSettings class. We can also modify the appearance of those custom command toolbar items using the RichTextEditorCustomToolbarItems property.
The following code example shows how to add a smiley emoticon toolbar item to the Rich Text Editor toolbar. On clicking the 🙂 icon in the toolbar, will inserted the icon in the editor.
<SfRichTextEditor @ref="rteObj" @bind-Value="@rteValue" >
    <RichTextEditorToolbarSettings Items="@ToolsForInline">
		<RichTextEditorCustomToolbarItems>
			<RichTextEditorCustomToolbarItem Name="Symbol">
				<Template>
					<button class="e-btn e-tbar-btn" @onclick="ClickHandler">
						<div class="e-tbar-btn-text" style="font-weight: 500;">🙂</div>
					</button>
				</Template>
			</RichTextEditorCustomToolbarItem>
		</RichTextEditorCustomToolbarItems>
	</RichTextEditorToolbarSettings>
    <RichTextEditorInlineMode Enable="true"  ShowOnSelection="true" />
</SfRichTextEditor>
@code {
	private SfRichTextEditor rteObj { get; set; }
	private string rteValue { get; set; } = "<p>The sample is configured with the inline mode of the editor. Initially, the editor is rendered without a <a href='https://blazor.syncfusion.com/home/' target='_blank'>toolbar</a>. The toolbar becomes visible only when the content is selected. </p>";

    private List<ToolbarItemModel> ToolsForInline = new List<ToolbarItemModel>()
	{
	new ToolbarItemModel() { Command = ToolbarCommand.Bold },
	new ToolbarItemModel() { Command = ToolbarCommand.Italic },
	new ToolbarItemModel() { Command = ToolbarCommand.Underline },
	new ToolbarItemModel() { Command = ToolbarCommand.OrderedList },
	new ToolbarItemModel() { Command = ToolbarCommand.UnorderedList },
	new ToolbarItemModel(){ Command = ToolbarCommand.HorizontalSeparator},
	new ToolbarItemModel() { Command = ToolbarCommand.Formats },
	new ToolbarItemModel() { Command = ToolbarCommand.Alignments },
	new ToolbarItemModel() { Command = ToolbarCommand.CreateLink },
	new ToolbarItemModel() { Command = ToolbarCommand.Image },
	new ToolbarItemModel(){ Command = ToolbarCommand.HorizontalSeparator},
	new ToolbarItemModel() { Command = ToolbarCommand.Indent },
	new ToolbarItemModel() { Command = ToolbarCommand.Outdent },
	new ToolbarItemModel() { Command = ToolbarCommand.SourceCode },
	new ToolbarItemModel() { Command = ToolbarCommand.Undo },
	new ToolbarItemModel() { Command = ToolbarCommand.Redo },
	new ToolbarItemModel() { Name = "Symbol", TooltipText = "Insert Emoticons" },
  };

  private async Task ClickHandler() {
	   await this.rteObj.ExecuteCommandAsync(CommandName.InsertHTML, "🙂");
    }
}
Quick access toolbar
You can see the quick access toolbar while clicking on the following target elements.
- Image
- Table
- Link
You can configure the possible commands for image, table, and link elements using the RichTextEditorQuickToolbarSettings property.
| Target elements | Default quick access toolbar items |
| Image | Replace, Align, Caption, Remove, InsertLink, Display, AltText, Dimension. |
| Link | Open, Edit, UnLink. |
| Table | TableHeader, TableRows, TableColumns, BackgroundColor, TableRemove, Alignments, TableCellVerticalAlign, Styles. |
GitHub reference
For more details, check out the Blazor Rich Text Editor demos on GitHub.

Conclusion
Thanks for reading! In this blog, we’ve seen how to use and configure the inline editor in the Syncfusion Blazor Rich Text Editor. Try out this user-friendly feature and provide your feedback in the comments section given below!
If you are new to Syncfusion, try our control’s features by downloading a free trial. You can also explore our Blazor Rich Text Editor online demos and documentation.
You can also contact us through our support forums, support portal, or feedback portal. We are always happy to assist you!


 No spam, just valuable updates.