
TL;DR: Learn to design a directional compass using Syncfusion .NET MAUI Radial Gauge control. Dynamically update the directional compass values using the Compass sensor and customize the Radial Gauge’s appearance for better visualization.
Syncfusion .NET MAUI Radial Gauge is a multi-purpose data visualization control that displays numerical values on a circular scale. Its rich set of features includes axes, ranges, pointers, and annotations that are fully customizable and extendable. We can use this control to design speedometers, temperature monitors, multi-axis clocks, circular progress indicators, watches, and more.
In this blog, we’ll see how to design a directional compass using the Syncfusion .NET MAUI Radial Gauge control and update the direction using the Compass sensor.
Let’s dive in!
Understanding the compass sensor
The Compass sensor monitors the device’s orientation relative to the Earth’s magnetic North. By providing real-time information on device heading direction, it enables us to create dynamic compass apps.
For more details, refer to the Compass Platform-specific information.
Monitoring the compass sensor
Using the Compass sensor, you can monitor the device’s magnetic North heading. Using the ICompass interface, you can determine whether the compass is actively monitored or not. The IsMonitoring property returns true if monitoring is ongoing. You can start monitoring using the ICompass.Start and stop it with ICompass.Stop methods.
Refer to the following code example.
RadialGaugeViewModel.cs
private void ToggleCompass()
{
     if (Compass.Default.IsSupported)
     {
            if (!Compass.Default.IsMonitoring)
            {
                Compass.Default.ReadingChanged += OnCompassReadingChanged;
                Compass.Default.Start(SensorSpeed.UI);
            }
            else
            {
                Compass.Default.Stop();
                Compass.Default.ReadingChanged -= OnCompassReadingChanged;
            }
      }
}
Updating the compass heading changes
To obtain the changes in the compass heading, we will utilize the ICompass.ReadingChanged event. By using this event and handling it in our OnCompassReadingChanged method, we can dynamically update the compass direction.
Refer to the following code example.
RadialGaugeViewModel.cs
private double reading, rotationAngle;
   public double Reading
   {
       get
       {
           return reading;
       }
       set
       {
           reading = value;
           this.RaisePropertyChanged(nameof(Reading));
       }
   }

   public double RotationAngle
   {
       get
       {
           return rotationAngle;
       }
       set
       {
           rotationAngle = value;
           this.RaisePropertyChanged(nameof(RotationAngle));
       }
   }

   private void OnCompassReadingChanged(object sender, CompassChangedEventArgs e)
   {
       this.Reading = e.Reading.HeadingMagneticNorth;
       this.RotationAngle = 360 - e.Reading.HeadingMagneticNorth;
   }
In the above code example, we’ve updated the Reading property with the current heading and calculated the rotation angle to reflect the direction accurately.
The RadialGaugeViewModel class subscribes to the Compass.ReadingChanged event to receive updates on compass heading changes. Within the event handler Compass_ReadingChanged, you can handle the compass heading changes as required.
Refer to the following code example, which illustrates how to update the direction text based on the compass heading changes dynamically.
RadialGaugeViewModel.cs
private string readingText;
public string ReadingText
{
    get
    {
        return readingText;
    }
    set
    {
        readingText = value;
        this.RaisePropertyChanged(nameof(ReadingText));
    }
}

private void OnCompassReadingChanged(object sender, CompassChangedEventArgs e)
{
    this.Reading = e.Reading.HeadingMagneticNorth;
    this.RotationAngle = 360 - e.Reading.HeadingMagneticNorth;

    var degree = (int)this.Reading;
    string direction = string.Empty;

    if (degree < 30)
    {
        direction = "N";
    }
    else if (degree >= 30 && degree < 90)
    {
        direction = "NE";
    }
    else if (degree >= 90 && degree < 120)
    {
        direction = "E";
    }
    else if (degree >= 120 && degree < 180)
    {
        direction = "SE";
    }
    else if (degree >= 180 && degree < 210)
    {
        direction = "S";
    }
    else if (degree >= 210 && degree < 270)
    {
        direction = "SW";
    }
    else if (degree >= 270 && degree < 300)
    {
        direction = "W";
    }
    else if (degree >= 300 && degree <= 360)
    {
        direction = "NW";
    }

    ReadingText = $"{degree}\u00B0 {direction}";
}
The RadialGaugeViewModel class efficiently handles updating direction text when there are changes in the compass heading.
Designing a directional compass using .NET MAUI Radial Gauge
We can create a visually appealing and functional compass by customizing the .NET MAUI Radial Gauge’s properties and binding the Compass sensor values.
To do so, please follow these steps:
Step1: Register the Syncfusion core handler
First, we should set up the Syncfusion core handler in the MauiProgram.cs file to utilize the Syncfusion NET MAUI controls (In this case, Radial Gauge).
MauiProgram.cs
builder
   .UseMauiApp<App>()
   .ConfigureSyncfusionCore()
Step 2: Initialize the Radial Gauge
Initialize the Syncfusion .NET MAUI Radial Gauge control in the MainPage.xaml file using this documentation.
Refer to the following code example.
xmlns:gauge="clr-namespace:Syncfusion.Maui.Gauges;assembly=Syncfusion.Maui.Gauges"

<gauge:SfRadialGauge/>
Step 3: Customize the Radial Gauge axis angle
Let’s customize the Radial Gauge axis by setting its StartAngle and EndAngle to 270 degrees to place the North (N) direction label at the top. Usually, the Radial Gauge axis’s start angle is zero and will be updated clockwise by default.
Refer to the following code example.
MainPage.xaml
<gauge:SfRadialGauge>
 <gauge:SfRadialGauge.Axes>
  <gauge:RadialAxis StartAngle="270" EndAngle="270" RadiusFactor="0.6">
  </gauge:RadialAxis>
 </gauge:SfRadialGauge.Axes>
</gauge:SfRadialGauge>
Step 4: Customize the Radial Gauge axis label
You can customize the Radial Gauge axis labels by adjusting the properties such as LabelPosition, CanRotateLabels, Minimum, Maximum, and ShowLastLabel properties.
Refer to the following code example.
MainPage.xaml
<gauge:SfRadialGauge>
<gauge:SfRadialGauge.Axes>
  <gauge:RadialAxis LabelPosition="Outside" CanRotateLabels="True" Minimum="0" Maximum="360" ShowLastLabel="False">
</gauge:SfRadialGauge.Axes>
Step 5: Customize Radial Gauge axis ticks
Then, customize the Radial Gauge axis ticks by utilizing the TickPosition, ShowAxisLine, and MinorTicksPerInterval properties.
Refer to the following code example.
MainPage.xaml
<gauge:SfRadialGauge>
 <gauge:SfRadialGauge.Axes>
  <gauge:RadialAxis ShowAxisLine="False" TickPosition="Outside" MinorTicksPerInterval="5" Interval="30">
   <gauge:RadialAxis.MajorTickStyle>
    <gauge:RadialTickStyle LengthUnit="Pixel"
                           StrokeThickness="2"
                           Length="15" />
   </gauge:RadialAxis.MajorTickStyle>
   <gauge:RadialAxis.MinorTickStyle>
    <gauge:RadialTickStyle LengthUnit="Pixel"
                           Length="10" />
   </gauge:RadialAxis.MinorTickStyle>
  </gauge:SfRadialGauge.Axes>
Step 6: Customize the Radial Gauge axis shape pointer
Using the ShapePointer class, let’s add an inverted triangle to indicate the current value on the Radial Gauge axis.
MainPage.xaml
<gauge:RadialAxis.Pointers>
 <gauge:ShapePointer Offset="-45" OffsetUnit="Pixel"
                     ShapeType="InvertedTriangle" />
</gauge:RadialAxis.Pointers>
Step 7: Customize the Radial Gauge axis needle pointer
Now, add a NeedlePointer to indicate the directions as shown in the following code example.
MainPage.xaml
<gauge:RadialAxis.Pointers>
 <gauge:NeedlePointer Value="0"
                      NeedleLengthUnit="Factor"
                      NeedleLength="0.3"
                      NeedleStartWidth="1"
                      NeedleEndWidth="1"
                      NeedleFill="#FFC4C4C4"
                      KnobRadius="0"
                      TailLengthUnit="Factor"
                      TailLength="0.3"
                      TailWidth="1"
                      TailFill="#FFC4C4C4">
 </gauge:NeedlePointer>
 <gauge:NeedlePointer Value="270"
                      NeedleLengthUnit="Factor"
                      NeedleLength="0.3"
                      NeedleStartWidth="1"
                      NeedleEndWidth="1"
                      NeedleFill="#FFC4C4C4"
                      KnobRadius="0"
                      TailLengthUnit="Factor"
                      TailLength="0.3"
                      TailWidth="1"
                      TailFill="#FFC4C4C4">
 </gauge:NeedlePointer>
</gauge:RadialAxis.Pointers>
Step 8: Customize Radial Gauge axis annotation
To enhance the visual representation of the Radial Gauge, add the direction label onto the gauge axis using the Annotations.
MainPage.xaml
<gauge:RadialAxis.Annotations>
 <gauge:GaugeAnnotation DirectionUnit="AxisValue" DirectionValue="270" PositionFactor="0.6">
  <gauge:GaugeAnnotation.Content>
   <Label Text="W" FontAttributes="Bold"  FontSize="20" TextColor="Black" />
  </gauge:GaugeAnnotation.Content>
 </gauge:GaugeAnnotation>
 <gauge:GaugeAnnotation DirectionUnit="AxisValue" DirectionValue="0" PositionFactor="0.6">
  <gauge:GaugeAnnotation.Content>
   <Label Text="N" FontAttributes="Bold" FontSize="20" TextColor="Black" />
  </gauge:GaugeAnnotation.Content>
 </gauge:GaugeAnnotation>
 <gauge:GaugeAnnotation DirectionUnit="AxisValue" DirectionValue="90" PositionFactor="0.6">
  <gauge:GaugeAnnotation.Content>
   <Label Text="E" FontAttributes="Bold" FontSize="20" TextColor="Black" />
  </gauge:GaugeAnnotation.Content>
 </gauge:GaugeAnnotation>
 <gauge:GaugeAnnotation DirectionUnit="AxisValue" DirectionValue="180" PositionFactor="0.6">
  <gauge:GaugeAnnotation.Content>
   <Label Text="S" FontAttributes="Bold" FontSize="20" TextColor="Black" />
  </gauge:GaugeAnnotation.Content>
 </gauge:GaugeAnnotation>
</gauge:RadialAxis.Annotations>
Bind compass value in the .NET MAUI Radial Gauge
Finally, bind the Compass’ Reading property value from the RadialGaugeViewModel class to the .NET MAUI Radial Gauge axis Shape pointer, which indicates the current direction.
Also, bind the RotationAngle property value from the RadialGaugeViewModel class to the Radial Gauge’s Rotation property to rotate the Radial Gauge based on the Compass value.
Refer to the following code example.
MainPage.xaml
<ContentPage xmlns="http://schemas.microsoft.com/dotnet/2021/maui"
xmlns:x="http://schemas.microsoft.com/winfx/2009/xaml"
xmlns:local="clr-namespace:RadialGaugeMAUI"
xmlns:system="clr-namespace:System;assembly=netstandard"
xmlns:gauge="clr-namespace:Syncfusion.Maui.Gauges;assembly=Syncfusion.Maui.Gauges"
x:Class="RadialGaugeMAUI.MainPage">
<ContentPage.BindingContext>
<local:RadialGaugeViewModel/>
</ContentPage.BindingContext>
<!-- Display direction text -->
<Label x:Name="CompassLabel"
HorizontalTextAlignment="Center"
FontAttributes="Italic,Bold"
VerticalOptions="Center"
HorizontalOptions="Center">
<Label.FormattedText>
<FormattedString>
<Span Text="Current location" />
<Span Text="{x:Static system:Environment.NewLine}" />
<Span Text="{Binding ReadingText}"
FontAutoScalingEnabled="True"
FontAttributes="Italic,Bold"
FontSize="20" />
</FormattedString>
</Label.FormattedText>
</Label>
<!-- Bind Compass value in the .NET MAUI Radial Gauge -->
<gauge:SfRadialGauge Rotation="{Binding RotationAngle}" >
<gauge:SfRadialGauge.Axes>
…
<gauge:RadialAxis.Pointers>
<gauge:ShapePointer Value="{Binding Reading}" Offset="-100" OffsetUnit="Pixel" ShapeType="InvertedTriangle" />
</gauge:RadialAxis.Pointers>
</gauge:SfRadialGauge.Axes>
</gauge:SfRadialGauge>
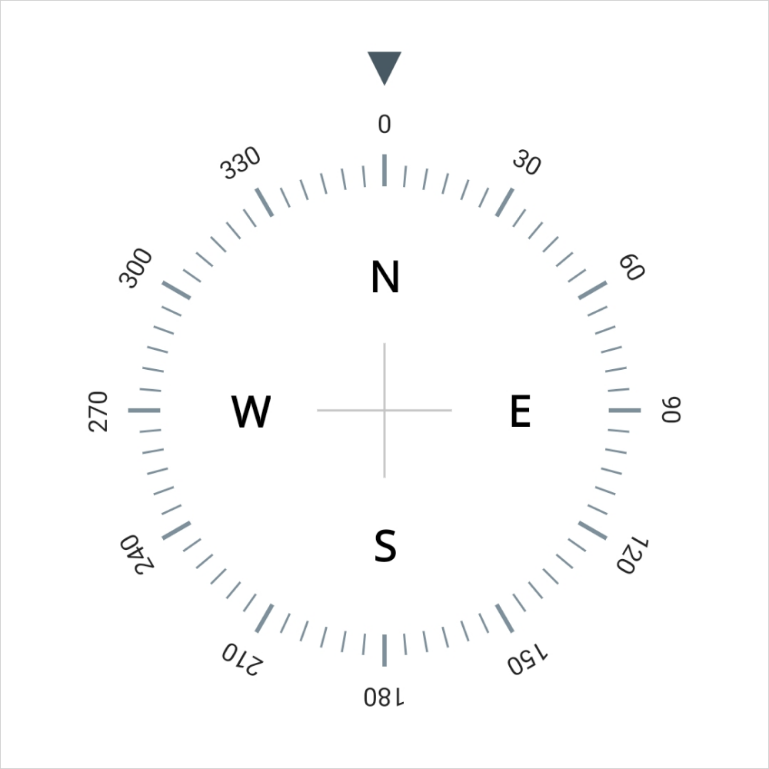
</ContentPage>Refer to the following output image
GitHub reference
For more details, refer to Creating a directional compass using .NET MAUI Radial Gauge GitHub demo.

Conclusion
Thanks for reading! In this blog, we’ve seen how to design a directional compass using Syncfusion’s .NET MAUI Radial Gauge control and how to update its direction using the Compass sensor.
We’d appreciate your feedback! If you have any suggestions, specific requirements, or ideas for controls you’d like to see in our .NET MAUI suite, please share them in the comments section below.
Syncfusion’s .NET MAUI controls are meticulously crafted with .NET MAUI, ensuring seamless integration with native framework controls. Optimized to handle extensive data, these controls are ideal for developing high-quality, cross-platform mobile and desktop apps.
If you need further assistance, don’t hesitate to contact us through our support forum, support portal, or feedback portal. We’re always ready to help!


 No spam, just valuable updates.