
Most desktop applications handle complicated tasks that are tracked in steps or checkpoints. To visualize the progress of these kinds of tasks in a WPF application, we’ve introduced a new WPF Step ProgressBar control in our 2020 Volume 3 release.
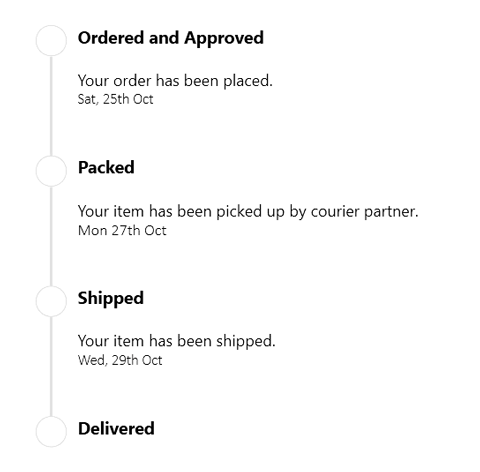
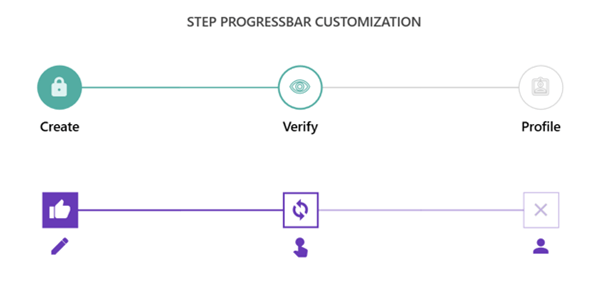
The Step ProgressBar control can be used to show the progress of a multiple-step process, such as new-user registration or package delivery status tracking. You can completely customize the appearance by changing the step shape, progress bar color, step template, and content template.
Let’s now briefly see the features of the WPF Step ProgressBar, and then I’ll walk you through the steps to add it to your application.
Key features of WPF Step ProgressBar
The key features of the WPF Step ProgressBar include:
Data binding
Data binding support in the WPF Step ProgressBar allows you to bind a collection of data models to the ItemSource property and control the last active item using the SelectedIndex property.
 Step shapes
The shape of a step marker can be a circle or square. You can also load custom templates for it.
 Statuses
The WPF Step ProgressBar supports the following statuses to show progress:
- Active
- Inactive
- Indeterminate
Based on the status, you can customize the step marker. This means whenever the status of a step changes, the visual of the step will also be changed synchronously.
Orientation
You can visualize the progress of a multiple-step process both horizontally and vertically.

Customization
The WPF Step ProgressBar control allows you to customize each step based on its status using the MarkerTemplateSelector property. You can customize the content of each step using a data template.
Getting started with the WPF Step ProgressBar
Follow these steps to include the Step ProgressBar in your WPF application.
Step 1: Create a WPF application and install the following NuGet packages:
- Syncfusion.SfProgressBar.WPF
- Syncfusion.Tools.WPF
- Syncfusion.SfSkinManager.WPF
- Syncfusion.Themes.MaterialLight.WPF
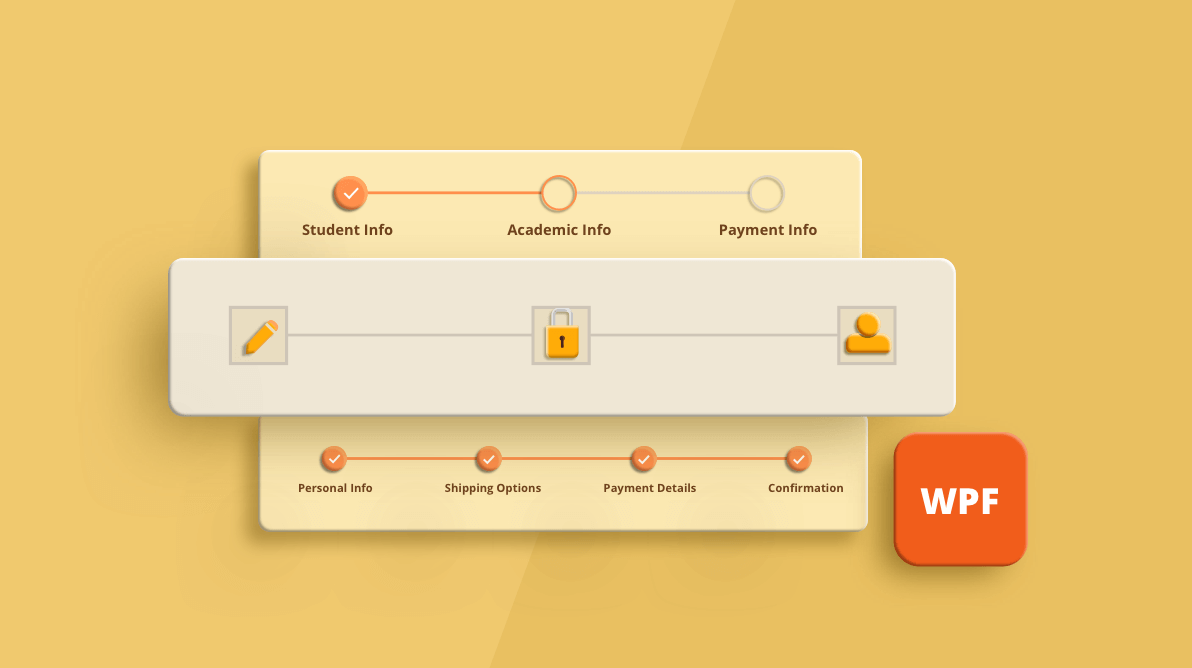
Step 2: Create a new view model class as demonstrated in the following code example. Here, we are going to use the Step ProgressBar to show the status of online semester fees payments.
/// <summary>
/// Represents the view model class.
/// </summary>
public class StepViewModel: INotifyPropertyChanged
{
   /// <summary>
   /// Represents the step view item collection.
   /// </summary>
     private ObservableCollection<string> stepViewItems;

   /// <summary>
   /// Initializes a new instance of the <see cref="StepViewModel"/> class.
   /// </summary>
   public StepViewModel()
   {
       this.StepViewItems = new ObservableCollection<string>();
       this.PopulateData();
   }

   /// <summary>
   /// Represents the property changed event.
   /// </summary>
   public event PropertyChangedEventHandler PropertyChanged;

   /// <summary>
   /// Gets or sets the step view collections.
   /// </summary>
   public ObservableCollection<string> StepViewItems
   {
      get
      {
          return this.stepViewItems;
      }

      set
       {
          this.stepViewItems = value;
          this.OnPropertyChanged(new PropertyChangedEventArgs(nameof(this.StepViewItems)));
        }
    }

    /// <summary>
    /// Represents the property changed.
    /// </summary>
    /// <param name="e">event args.</param>
    public void OnPropertyChanged(PropertyChangedEventArgs e)
    {
         this.PropertyChanged?.Invoke(this, e);
     }

     private void PopulateData()
     {
         this.StepViewItems.Add("StudentInfo");
         this.StepViewItems.Add("AcademicInfo");
         this.StepViewItems.Add("PaymentInfo");
     }
}
Step 3: Import the WPF schema namespace in the MainWindow.xaml file as demonstrated in the following code.
xmlns:Syncfusion="http://schemas.syncfusion.com/wpf"
Step 4: Initialize the Step ProgressBar as demonstrated in the following code example.
<Window.DataContext>
     <local:StepViewModel />
</Window.DataContext>
<Syncfusion:SfStepProgressBar
      ItemsSource="{Binding StepViewItems}"
      SelectedIndex="{Binding SelectedIndex}"
      SelectedItemStatus="Indeterminate" />
<!--  The code for frame navigation goes here.-->
Now, we have added the Step ProgressBar control to our WPF application. After executing the previous code example, we will get output like in the following screenshot.

Resources
You can download the source code for this sample project from this GitHub repository.
Conclusion
We hope you now have a clear idea of the features and how to get started with the new WPF Step ProgressBar control. Refer to this UG documentation for more customization options. You can download the control in our 2020 Volume 3 release setup to check out these features.
If you have any questions about this control, please let us know in the comments section below. You can also contact us through our support forum, Direct-Trac, or feedback portal. We are happy to assist you!


 No spam, just valuable updates.
Comments (4)
When will be included in Angular packages??
Hi Cesar Smerling,
Thank you for your interest in Syncfusion products.
We have considered your request “StepProgressBar in Angular package” and it will be implemented by the 2021 volume 2 release
Regards,
Prakash Kumar
where can i download full source code this kind of project? please help me.
Hi Pol,
Thank you for your interest in Syncfusion products.
You can download the source code for this sample project from this GitHub repository. For more information, we request you to refer our StepProgressBar UG Documentation .
Regards,
Prakash Kumar