

TLDR: Building an ASP.NET Core application and establishing a database connection to execute basic CRUD operations with Entity Framework Core 3.1 using Visual Studio.
In this blog, I am going to provide a walk-through on developing a web application using ASP.NET Core 3.1. Then, I will connect it to a database (database-first) using the Entity Framework Core 3.1 command, and perform CRUD (Create, Read, Update and Delete) operations using scaffolding (code generator). I am going to develop a sample application for inventory management with basic operations.
ASP.NET Core is a web framework from Microsoft. It is an open-source, cross-platform, cloud-optimized web framework that runs on Windows using .NET Framework and .NET Core, and on other platforms using .NET Core. It is a complete rewrite that unites ASP.NET MVC and Web API into a single programming model and removes system-related dependencies. This helps in deploying applications to non-Windows servers and improves performance.
This blog post will discuss the following:
- Prerequisites
- Database creation
- Create an ASP.NET Core application
- Install necessary NuGet packages
- Connect application to database
- Scaffold CRUD operations
- Run application
- Conclusion
Note: In this demo application, I have used ASP.NET Core 3.1, Entity Framework Core 3.1, with Visual Studio 2019 16.4.0.
Prerequisites
A .NET Core application can be developed using these IDEs:
- Visual Studio
- Visual Studio Code
- Command Prompt
Here, I am using Visual Studio to build the application. Be sure that the necessary software is installed:
- Visual Studio 2019 16.4.0
- NET Core 3.1
- SQL Server 2017
Create database
Let’s create a database on your local SQL Server. I hope you have installed SQL Server 2017 in your machine (you can use SQL Server 2008, 2012, or 2016, as well).
Step 1: Open Visual Studio 2019.
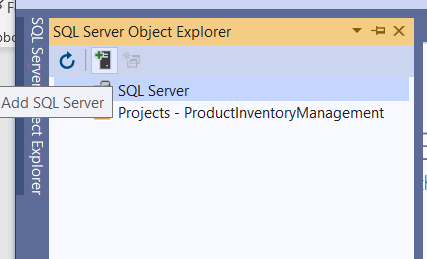
Step 2: Open SQL Server Object Explorer and click Add SQL Server.
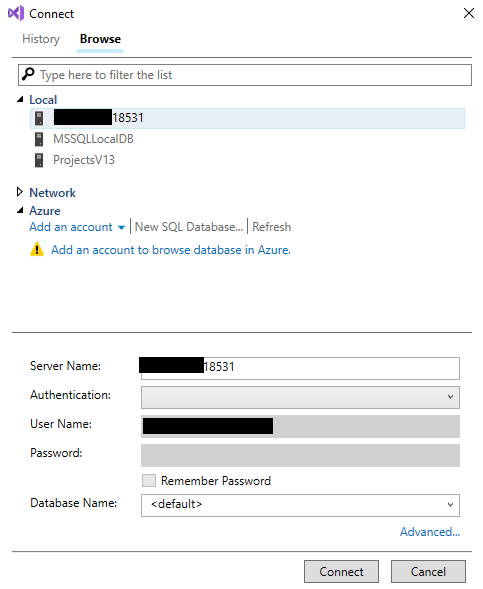
Step 3: Here we have an option to choose from the local machine’s SQL Server, connected via network, and the Azure SQL database. I have chosen the local SQL Server instance. I provide the SQL Server details and click Connect. The SQL Server will be listed in Explorer.
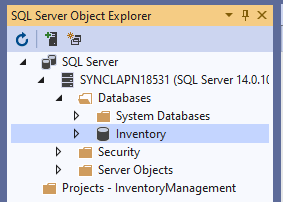
Step 4: Right-click on a database node and create a new database (Inventory).
Step 5: Now we have the database in place. Click on our database and choose New Query.
Step 6: For this application, I am going to create a table called Products with basic attributes. Paste the following SQL query into the Query window to create a Products table.
Create Table Products(
  ProductId Int Identity(1,1) Primary Key,
  Name Varchar(100) Not Null,
  Category Varchar(100),
  Color Varchar(20),
  UnitPrice Decimal Not Null,
  AvailableQuantity Int Not Null
)
Step 7: Click the Run icon to create the table. Now we have the table needed for our application.
Create an ASP.NET Core application
Follow these steps to create an ASP.NET Core application.
Step 1: In Visual Studio 2019, click on File -> New -> Project.
Step 2: Choose the Create a new project option.
Step 3: Select the ASP.NET Core Web Application template. 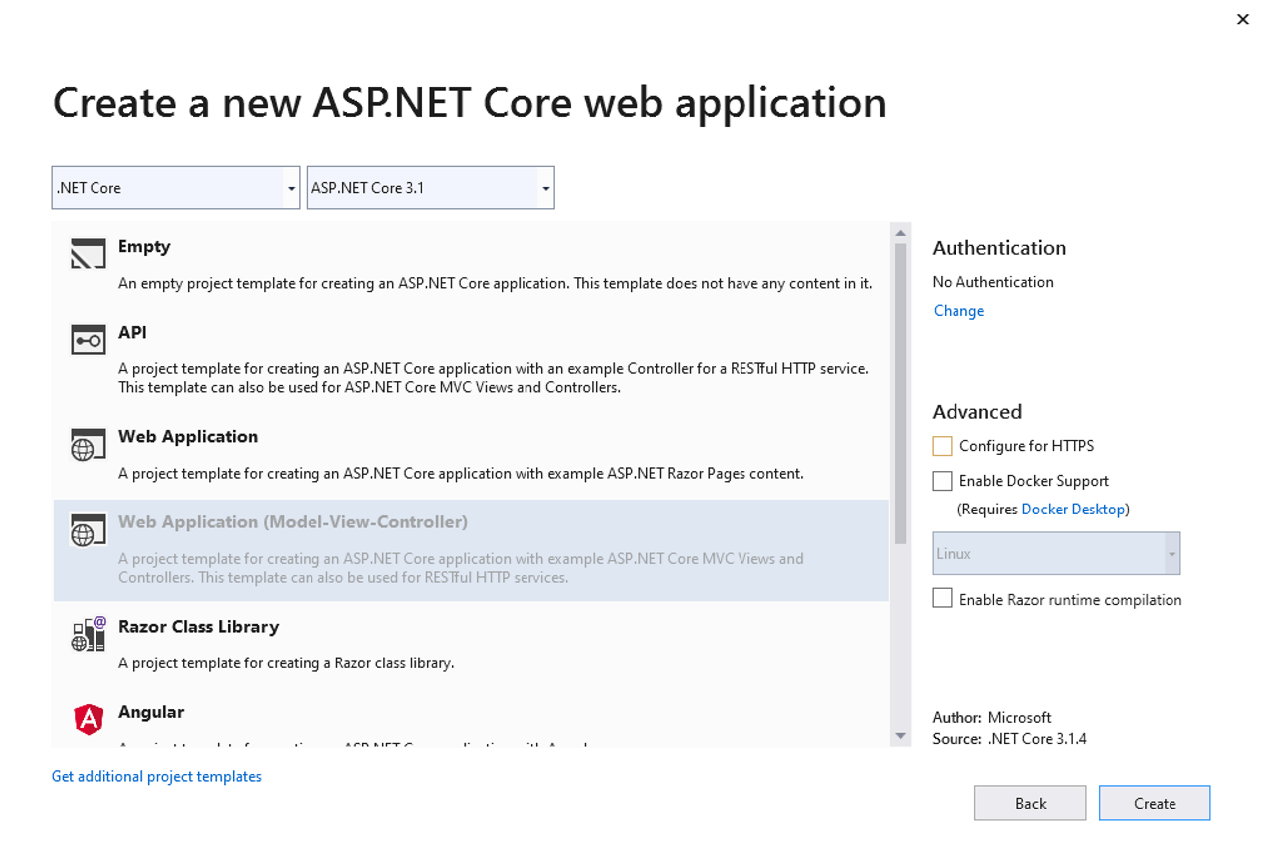
Step 4: Enter project name and click Create.
Step 5: Select .NET Core and ASP.NET Core 3.1 and choose the Web Application (Model-View-Controller) template.
Uncheck the Configure for HTTPS under the Advanced options (in a development environment, we have no need of SSL).
Click Create. Then the sample ASP.NET Core application will be created with this project structure.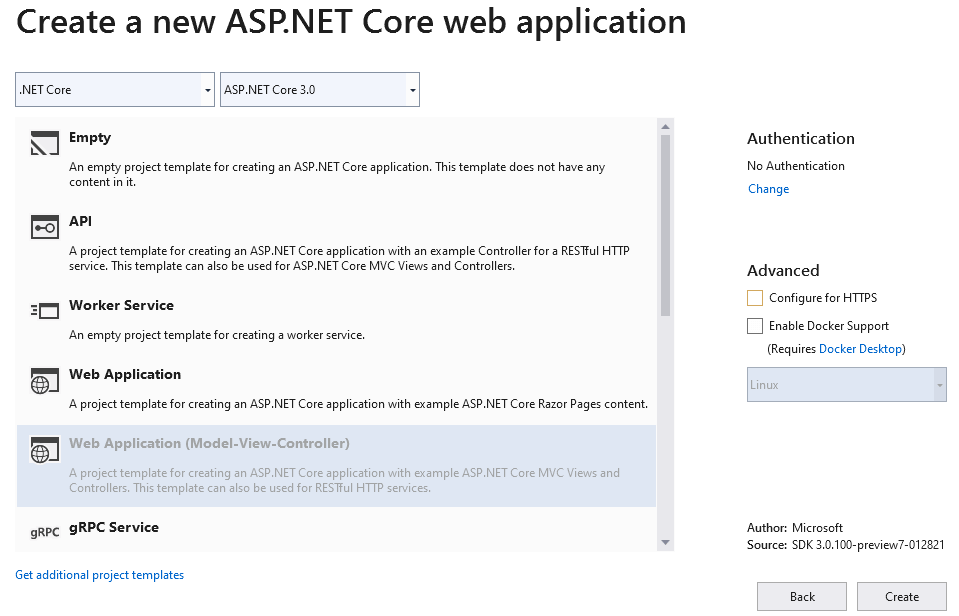
Install NuGet packages
The following NuGet packages should be added to work with the SQL Server database and scaffolding. Run these commands in Package Manager Console:
- Install-Package Microsoft.VisualStudio.Web.CodeGeneration.Design -Version 3.1.4
- Install-Package Microsoft.EntityFrameworkCore.Tools -Version 3.1.8
- Install-Package Microsoft.EntityFrameworkCore.SqlServer -Version 3.1.8
Scaffolding
ASP.NET Core has a feature called scaffolding, which uses T4 templates to generate code of common functionalities to help keep developers from writing repeat code. We use scaffolding to perform the following operations:
- Generate entity POCO classes and a context class for the database.
- Generate code for create, read, update, and delete (CRUD) operations of the database model using Entity Framework Core, which includes controllers and views.
Connect application with database
Run the following scaffold command in Package Manager Console to reverse engineer the database to create database context and entity POCO classes from tables. The scaffold command will create POCO class only for the tables that have a primary key.
Scaffold-DbContext “Scaffold-DbContext “Server=******;Database=Inventory;Integrated Security=True” Microsoft.EntityFrameworkCore.SqlServer -OutputDir Models
- Connection—Sets connection string of the database.
- Provider—Sets which provider to use to connect database.
- OutputDir—Sets the directory where the POCO classes are to be generated.
In our case, the Products class and Inventory context class will be created.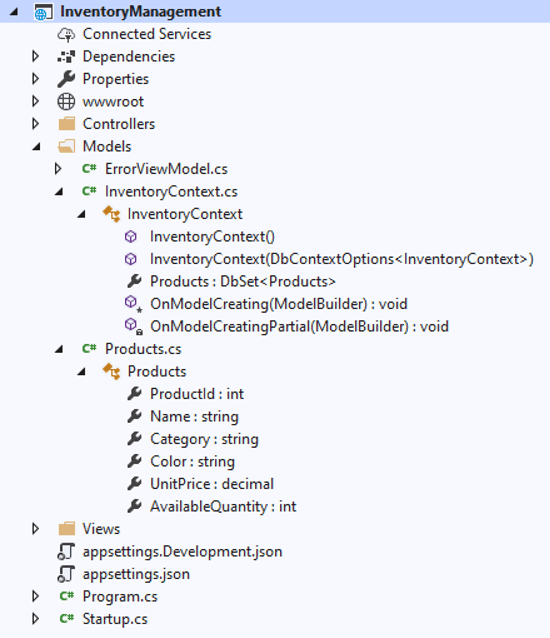
Open the Inventory Context class file. You will see the database credentials are hard coded in the OnConfiguring method.
It’s not good practice to have SQL Server credentials in C# class, considering the security issues. So, remove this OnConfiguring method from context file.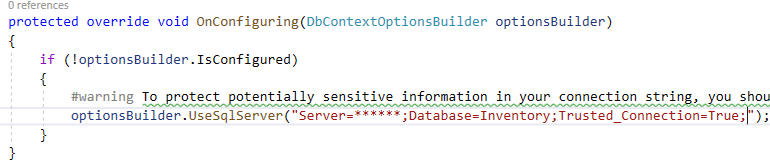
And move the connection string to the appsettings.json file.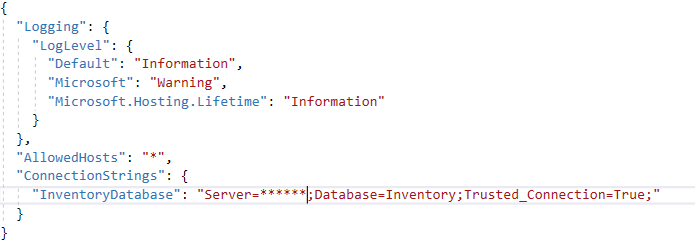
Then we can register the database context service (InventoryContext) during application startup. In the following code, the connection string is read from the appsettings file and passed to the context service.
Then this context service is injected with the required controllers via dependency injection.
Perform CRUD operations
Now we set up the database and configure it to work with Entity Framework Core. We’ll see how to perform CRUD operations.
Right-click on the controller folder, select add new item, and then select controller. Then, this dialog will be displayed.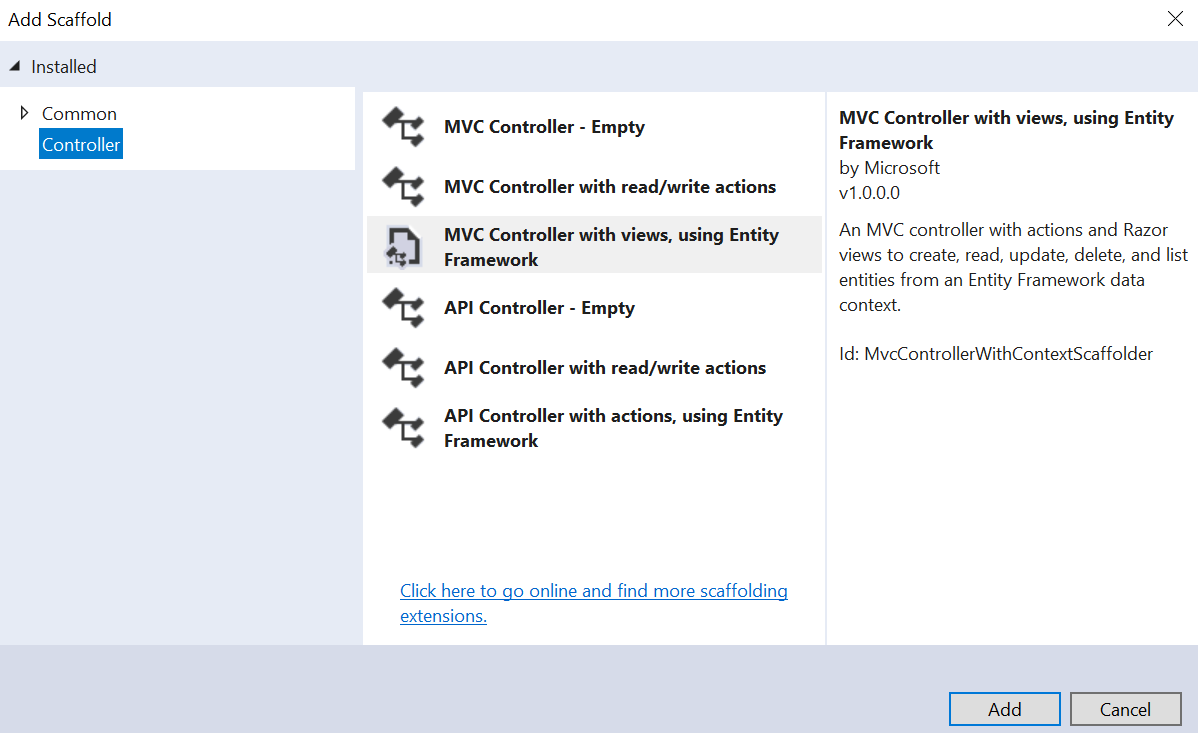
Select the MVC Controller with views, using Entity Framework option and click Add.
We need to choose a database model class and data context class, which were created earlier, and click Add.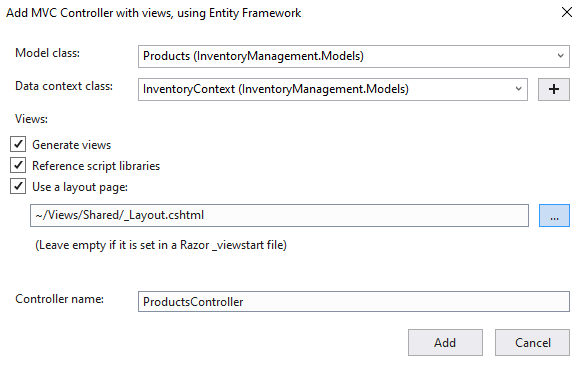
That’s it, we’re done. The scaffolding engine uses T4 templates to generate code for controller actions and views in their respective folders. This is the basic version of code; we can modify it as needed.
Please find the files created,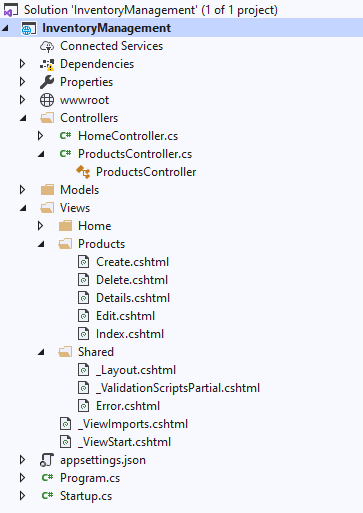
Now we have fully functional CRUD operations on the Products table.
Then, change the default application route to load the Products Controller instead of the home controller. Open the Startup.cs file and under the Configure method, change the default controller to Products.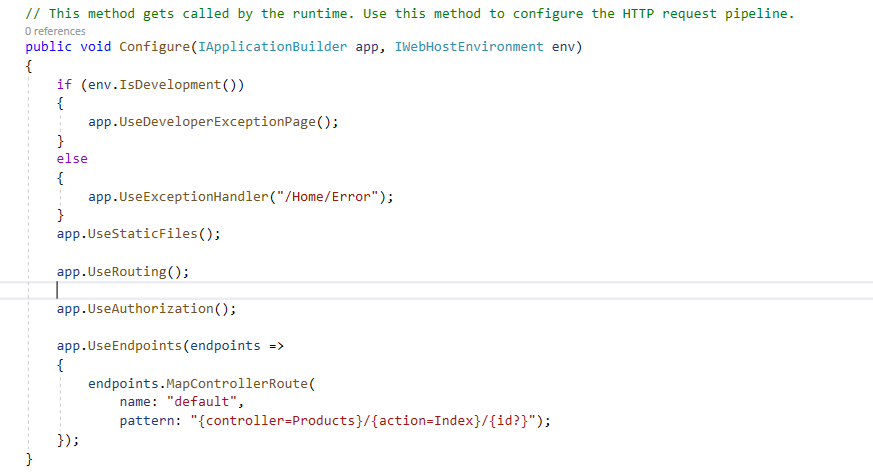
With the help of the scaffolding engine, developers need not write CRUD operations for each database model.
Run application
Click Run to view the application. A new browser tab will open and we’ll be able to see the product listing page. Since there is no product in the inventory, it’s empty.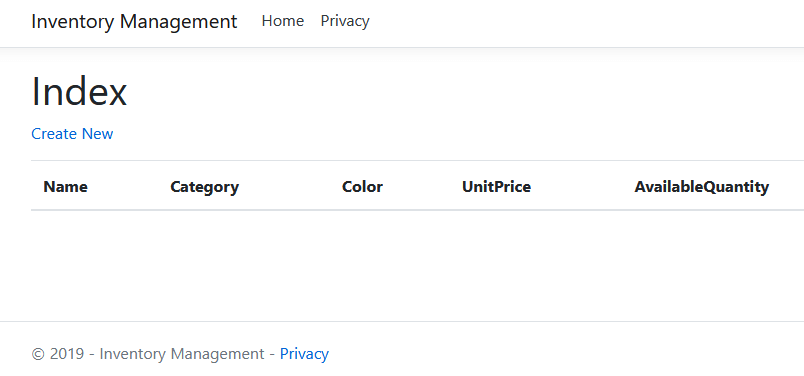
Create
Click Create New to add new products to the inventory.
After entering the details, click Create. Now we should see newly created products in the listing page as in the following screenshot. I have added three more products.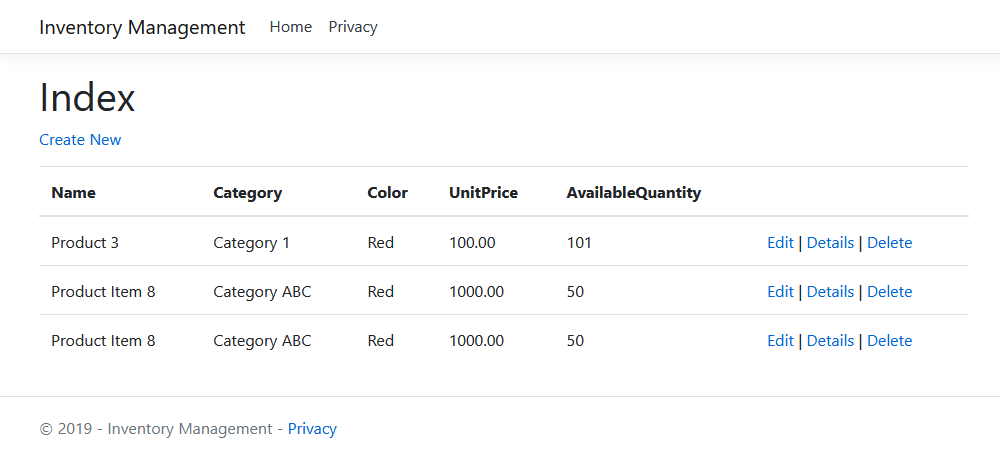
Read
Click Details to view the product details.
Update
Click Edit to update product details.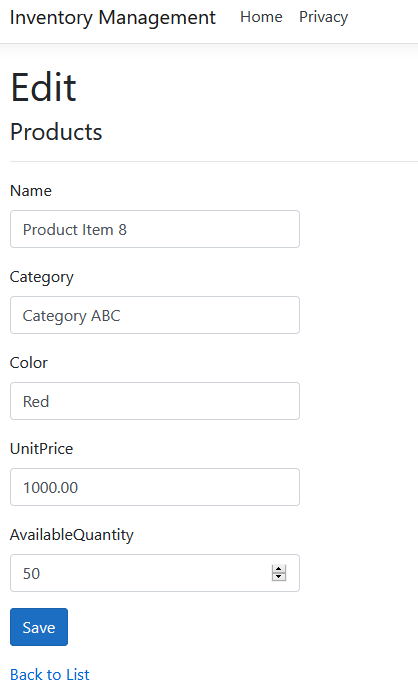
Delete
Click Delete to delete a product. Confirmation will be requested before it’s deleted from the database.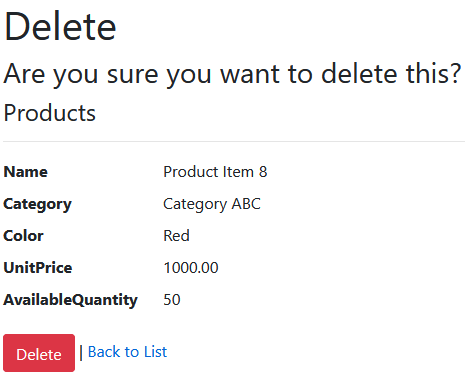
Without writing a single line of code, we are able to create an application with basic CRUD operations with the help of the scaffolding engine.
I have shared the sample application in this GitHub location. Extract the application, change the connection string in the appsettings.json file that points to your SQL Server, and run the application.
Conclusion
In this blog, we have learned how to create an ASP.NET Core application and connect it to a database to perform basic CRUD operations using Entity Framework Core 3.1 and a code generation tool. I hope it was useful. Please share your feedback in the comments section below.
The Syncfusion ASP.NET Core UI controls library is the only suite that you will ever need to build an application since it contains over 65 high-performance, lightweight, modular, and responsive UI controls in a single package. Download our free trial from here. You can also explore our online demos here.
If you have any questions or require clarifications about these controls, please let us know in the comments below. You can also contact us through our support forum, support portal, or feedback portal. We are happy to assist you!
Recommended resources
- Visual Studio 2022 Succinctly
- Simple Steps to Automate UI Testing in ASP.NET Core
- Creating an ASP.NET Core CRUD Web API with Dapper and PostgreSQL
- Easy Steps to Migrate an ASP.NET MVC Project to an ASP.NET Core Project
- Simple Steps to Integrate a Blazor WebAssembly Project with an Existing ASP.NET Core Application
 No spam, just valuable updates.
Comments (84)
[…] How to Build a CRUD Application with ASP.NET Core 3.0 & Entity Framework 3.0 using Visual Studio… (Kannan Eswar) […]
Hi, This is Mahendra. Can we develop ASP .NET Core MVC web application without using Entity framework? Is this possible to create a seperate layer for database like calling the only the stored procedure name for all modifying db?
Hi Mahendra,
Yes, you can work without entity framework to connect database.
You can create separate data access layer and can use Stored Procedure to perform CRUD operations.
Please follow the steps,
1. Create stored procedure to perform CRUD operations. Refer this link https://www.c-sharpcorner.com/UploadFile/ca2535/insert-update-and-delete-using-stored-procedure-in-sql-ser/
2. Call from stored procedure using FromSqlRaw method. Refer this link https://docs.microsoft.com/en-us/ef/core/querying/raw-sql
Thanks,
Kannan Eswar.
Good article, but since we’re here for Syncfusion, it would be nice to show how to use Syncfusion controls in the data entry forms or how the Syncfusion scaffolding process for grid (say) works with Entity Framework. Any chance of an update or a new article?
Hi Grahame,
Thanks for your feedback. You can find more details about how to use Essential JS 2 form controls for ASP.NET Core in the below link,
https://ej2.syncfusion.com/aspnetcore/TextBoxes/DefaultFunctionalities#/material
Currently we doesn’t support scaffolding for ASP.NET Core. We already planned to provide scaffolding support for ASP.NET Core and will be released in our future release. Once we release we will update you.
Thanks,
Kannan Eswar.
Hi GRAHAME,
I am happy to inform you that scaffolding support has been implemented for Syncfusion’s ASP.NET Core controls and you can find out more in the below blog,
https://www.syncfusion.com/blogs/post/scaffolding-syncfusion-controls-in-asp-net-core-applications.aspx
Thanks,
Kannan Eswar.
Thank you for article. Scaffolding is a quick way to create code, but it violates the SOLID principle. It is better to use repository pattern and inject dependencies. Unfortunately, such a code generator does not have in VS 🙁
Next thing, a better way, more efficient is use to AddDbContextPool method:
~~~
public void ConfigureServices(IServiceCollection services)
{
services.AddDbContextPool(options => options.UseSqlServer(connectionString));
}
~~~
Regards,
Marcin
Hi Marcin Sulecki,
Yes, VS Scaffolding is starting point to work with ASP.NET Core application with database. In upcoming blog I will write about how to use repository pattern and dependency injection to connect with database.
You have pointed correctly AddDbContextPool gives better performance since it shares the context instance instead of creating new context instance for every request.
Thanks,
Kannan Eswar.
Thank you for this brilliant article, I need exactly this to start a new project.
Hi Zsolt Hunyadi,
I am glad to hear that this blog helped you.
Thanks,
Kannan Eswar.
Can this app be easily deployed on Azure free plan?
Hi UROSP,
Support of deploying ASP.NET Core 3.0 application to Azure App service is not available yet.
But we can deploy to Azure app service by following one of the approach mentioned in the link below,
https://docs.microsoft.com/en-us/aspnet/core/host-and-deploy/azure-apps/?view=aspnetcore-3.0&tabs=visual-studio#deploy-aspnet-core-30-to-azure-app-service
Thanks,
Kannan Eswar.
Thanks for a good intro.
But using BigInt for product id and quantity seems a bit excessive …
Hi Gustav Brock,
Thanks for your feedback.
Yes, you are correct datatype selection depends on the each application need. For the demo purpose I have used BigInt instead of Int.
Thanks,
Kannan Eswar.
Hi,
I would like to know how I call out multiple tables with connected ID’s in ASP.NET Core 3.0 ?
Hi SIIM,
In this blog, I have used Scaffolding support to implement the basic level of database queries using Entity Framework.
In below you can find more details about how to join different tables and obtain the result,
I hope you have downloaded the Inventory application attached to this blog. Please follow the below steps,
Step 1:
For example, consider you have the below two tables and add some dummy data.
Create table Region (
RegionId int identity(1,1) primary key,
RegionName varchar(100) Not null,
RegionManagerEmail varchar(100) Not null)
Create table Store (
StoreId int identity(1,1) primary key,
RegionId int FOREIGN KEY REFERENCES Region(RegionId) not null,
StoreName varchar(100) Not null,
StoreManagerEmail varchar(100) Not null,
Location varchar(max))
insert into Region (RegionName, RegionManagerEmail)
values (‘Africa’, ‘[email protected]’), (‘Asia’, ‘[email protected]’),(‘Europe’, ‘[email protected]’),
(‘North America’, ‘[email protected]’), (‘Sotuh America’, ‘[email protected]’),(‘Australia’, ‘[email protected]’)
insert into Store (StoreName, StoreManagerEmail, RegionId, Location)
Values (‘Store 1’, ‘[email protected]’, 2, ‘Location A’), (‘Store 2’, ‘[email protected]’, 2, ‘Location B’), (‘Store 3’, ‘[email protected]’, 2, ‘Location C’),
(‘Store 1’, ‘[email protected]’, 1, ‘Location A’), (‘Store 2’, ‘[email protected]’, 1, ‘Location B’), (‘Store 3’, ‘[email protected]’, 1, ‘Location C’)
Step 2:
Paste the below code into Package Manager Console and run, which will auto-generate entity POCO classes from the above two tables and entity will be added into inventory context file,
Scaffold-DbContext “Server=ABCSERVER;Database=Inventory;Integrated Security=True” Microsoft.EntityFrameworkCore.SqlServer -OutputDir Models -force
Step 3:
Add new MVC Empty Controller called Store and add the necessary dependencies, in our case add Inventory context as below,
public class StoreController : Controller
{
private readonly InventoryContext _context;
public StoreController(InventoryContext context)
{
_context = context;
}
}
Step 4:
Now it’s time to write LINQ query to join the two tables and retrieve the result. In this example, I am going to write a method which returns all the stores belongs to a particular region.
public async Task<List> GetStoreByRegionId(int regionId)
{
var stores = await (from store in _context.Store
join region in _context.Region on store.RegionId equals region.RegionId
where region.RegionId == regionId
select store).ToListAsync();
return stores;
}
Here I have used LINQ Query Expression method to join Store and Region tables and retrieving the result.
Step 5:
Load the below URL in your browser,
http://localhost:54360/Store/GetStoreByRegionId?regionId=1
And you able to view stores filtered by given regionId,
[{“storeId”:4,”regionId”:1,”storeName”:”Store 1″,”storeManagerEmail”:”[email protected]”,”location”:”Location A”,”region”:null},{“storeId”:5,”regionId”:1,”storeName”:”Store 2″,”storeManagerEmail”:”[email protected]”,”location”:”Location B”,”region”:null},{“storeId”:6,”regionId”:1,”storeName”:”Store 3″,”storeManagerEmail”:”[email protected]”,”location”:”Location C”,”region”:null}]
Note: localhost port number may be varied in your development machine.
Please refer the below link to know more about LINQ Query,
https://docs.microsoft.com/en-us/dotnet/csharp/programming-guide/concepts/linq/basic-linq-query-operations
Thanks,
Kannan Eswar.
Hope the article helps the freshers and new joinee’s like me.
thanks Eswar , keep spreading knowledge..
Hi Manikandan Pandian,
Yes sure, thanks for your feedback.
Thanks,
Kannan Eswar.
Hi, thanks for your article…. I learnt a lot.
I tried to follow the steps and when I try to create the controller. I got the following error
No database provider has been configured for this DbContext. A provider can be configured by overriding the DbContext.OnConfiguring method or by using AddDbContext on the application service provider. If AddDbContext is used, then also ensure that your DbContext type accepts a DbContextOptions object in its constructor and passes it to the base constructor for DbContext.
I would like to ask how I could solve it.
Thank you.
Hi GEORGE,
Thanks for your feedback.
Error conveys that DbContext was not configured correctly. Could you please ensure the below steps to confirm DbContext is configured correctly before creating controller?
1. In context file, ensure our DbContext accepts InventoryContext object in its constructor and passes it to the base constructor.
public InventoryContext(DbContextOptions options) : base(options)
{
}
2. Below code should be removed from Context file.
protected override void OnConfiguring(DbContextOptionsBuilder optionsBuilder)
{
if (!optionsBuilder.IsConfigured)
{
#warning To protect potentially sensitive information in your connection string, you should move it out of source code. See http://go.microsoft.com/fwlink/?LinkId=723263 for guidance on storing connection strings.
optionsBuilder.UseSqlServer(“Server=synclapn18531;Database=Inventory;Integrated Security=True”);
}
}
3. And move the connection string to the appsettings.json file.
“ConnectionStrings”: {
“InventoryDatabase”: “Server=*******;Database=Inventory;Trusted_Connection=True;”
}
Note: Here provide appropriate connection string based on your database server.
4. Then register the database context service (InventotyContext) during application startup. In the following code, the connection string is read from the appsettings file and passed to the context service.
var connection = Configuration.GetConnectionString(“InventoryDatabase”);
services.AddDbContext(options => options.UseSqlServer(connection));
5. Now try to create scaffold controller.
Thanks,
Kannan Eswar.
Dear Kannan, thank you for the article, it is very useful to newbie like me, however, I encountered the same error, can you be more explicit with instruction number 4. I have tried to put the code in startup.cs but it gave coding error.
This is the previous code in the startup.cs:
public IConfiguration Configuration { get; }
// This method gets called by the runtime. Use this method to add services to the container.
public void ConfigureServices(IServiceCollection services)
{
services.AddControllersWithViews();
}
// This method gets called by the runtime. Use this method to configure the HTTP request pipeline.
public void Configure(IApplicationBuilder app, IWebHostEnvironment env)
{
if (env.IsDevelopment())
and this is new with the error:
public IConfiguration Configuration { get; }
// This method gets called by the runtime. Use this method to add services to the container.
public void ConfigureServices(IServiceCollection services)
{
var connection = Configuration.GetConnectionString(“InventoryDatabase”);
services.AddDbContext(options => options.UseSqlServer(connection));
services.AddControllersWithViews();
}
// This method gets called by the runtime. Use this method to configure the HTTP request pipeline.
public void Configure(IApplicationBuilder app, IWebHostEnvironment env)
{
if (env.IsDevelopment())
Below is the coding error:
The type or namespace name ‘InventoryContext’ could not be found (are you missing a using directive or an assembly reference?)
‘DbContextOptionsBuilder’ does not contain a definition for ‘UseSqlServer’ and no accessible extension method ‘UseSqlServer’ accepting a first argument of type ‘DbContextOptionsBuilder’ could be found (are you missing a using directive or an assembly reference?)
Kindly help, as usual, thank you.
Hi ABBEY,
Thanks for your feedback. The reported errors are due to reference missing.
ERROR 1: THE TYPE OR NAMESPACE NAME ‘INVENTORYCONTEXT’ COULD NOT BE FOUND (ARE YOU MISSING A USING DIRECTIVE OR AN ASSEMBLY REFERENCE?)
In this demo application context name is InventoryContext, (if your context name is different, please update that context name here)
services.AddDbContext<InventoryContext > (options => options.UseSqlServer(connection));
You have to add namespace of context file in Startup.cs as below
using InventoryManagement.Models;
ERROR 2: ‘DBCONTEXTOPTIONSBUILDER’ DOES NOT CONTAIN A DEFINITION FOR ‘USESQLSERVER’ AND NO ACCESSIBLE EXTENSION METHOD ‘USESQLSERVER’ ACCEPTING A FIRST ARGUMENT OF TYPE ‘DBCONTEXTOPTIONSBUILDER’ COULD BE FOUND (ARE YOU MISSING A USING DIRECTIVE OR AN ASSEMBLY REFERENCE?)
You have add namespace of ‘USESQLSERVER’ in Startup.cs as below,
using Microsoft.EntityFrameworkCore;
———————————————————————————————
Th final namespace reference of Startup.cs class as below,
using InventoryManagement.Models;
using Microsoft.AspNetCore.Builder;
using Microsoft.AspNetCore.Hosting;
using Microsoft.EntityFrameworkCore;
using Microsoft.Extensions.Configuration;
using Microsoft.Extensions.DependencyInjection;
using Microsoft.Extensions.Hosting;
Thanks,
Kannan Eswar.
Dear Kannan,
Much appreciation for the error correction. The code was subsequently concluded and run successfully.
Cheers!
Hello, How are you?
Could show me, please, how tu use “Entity Framework” and “MVC Controller with views, using Entity Framework” with SyncFusion DataGrid in ASP NET Core?
What I need is operate on MS SQL Server database – CRUD – with DataGrid.
Have a nice day
Mario
Hi Mario,
Thanks for contacting syncfusion support
CRUD operations are require remote data binding. We used the UrlAdaptor to access the remote data. Refer to the following Help Document for the CRUD Actions.
Documentation link : https://ej2.syncfusion.com/aspnetcore/documentation/grid/edit/?no-cache=1#url-adaptor
A sample with entity framework is attached below which covers the remote binding with the CRUD actions.
Sample : https://www.syncfusion.com/downloads/support/forum/148512/ze/Sample_CRUD_SQL_CORE-1121156690.zip
Code Snippet :
For Insert operation :
HomeController.cs
public async Task Insert([FromBody]CRUDModel param)
{
_context.Orders.Add(param.Value);
await _context.SaveChangesAsync();
return Json(param.Value);
}
For Update operation :
HomeController.cs
public async Task Update([FromBody]CRUDModel param)
{
_context.Orders.Update(param.Value);
await _context.SaveChangesAsync();
return Json(param.Value);
}
For Delete operation :
HomeController.cs
public async Task Delete([FromBody]CRUDModel param)
{
Orders value = _context.Orders.Where(e => e.OrderID == Int32.Parse(param.Key.ToString())).FirstOrDefault();
_context.Remove(value);
await _context.SaveChangesAsync();
return Json(value);
}
Index.cshtml
<ejs-grid id="Grid" allowPaging="true" height="300" toolbar="@(new List() {“Add”, “Edit”, “Update”, “Delete” })”>
…
Please get back to us if you need further assistance
Regards,
Maithiliy K
Nice post, I’ve bookmarked this. I had to write an Azure Core WebApp exactly like this a few months ago and struggled through a lot of what you describe clearly here – I could have done with this then! Keep up the good work 🙂
Hello Kannan,
I am very thankful to you for this blog. This blog is very helpful to me for starting work with core 3.0 and entity framework.
Hello! Thank you for this helpful post!
I am working on an app that is similar but following a slightly different way. I created a table using MSSQL which has carID as primary key and other attributes like brand, model etc. I followed the steps to generate carRentalDBContext.cs and this is a part of the code from this class:
protected override void OnModelCreating(ModelBuilder modelBuilder)
{
modelBuilder.Entity(entity =>
{
entity.Property(e => e.CarId)
.HasColumnName(“carID”)
.ValueGeneratedNever();
entity.Property(e => e.Brand)
.IsRequired()
.HasColumnName(“brand”)
.HasMaxLength(50)
.IsUnicode(false);
… the code continues
And this code from Create.cshtml:
<!–
–>
…
I have CarId as an input field but I don’t want it like that. I set it as primary key so it’d autoincrement instead of asking for user input. I tried to remove the first div and replace
entity.Property(e => e.CarId)
.HasColumnName(“carID”)
.ValueGeneratedNever();
with entity.HasKey(e => e.CarId); but it gives error because it doesn’t allow null values. What can I do to remove carID as an input field and keep it as a primary key only?
Hi ADA,
Based on your code and error message what you have shared I suspect that, error is due to no Identity (Auto increment) is configured for CarId column.
Follow the below steps to solve the issue,
Step 1: Drop existing table and create new table as below,
————————————————————————–
Create Table Products(
ProductId BigInt Identity(1,1) Primary Key,
Name Varchar(100) Not Null,
Category Varchar(100),
Color Varchar(20),
UnitPrice Decimal Not Null,
AvailableQuantity BigInt Not Null,
CratedDate DateTime Default(GetDate()) Not null)
——————————————–
Note: Please note I have added Identity(1,1) for ProductId column, which helps auto increment the ProductId. In same way you can set Identity for CarId column.
Step 2: Now follow the steps above in this blog to Scaffold database context and CRUD controllers.
Step 3: And run the application, now that column (for example ProductId) will not be displayed in Create/Update view and able to Add/Edit without any issues.
Thanks,
Kannan Eswar.
Hi Kannan,
First, thank you for your project that u can shared. I tried to following your step, can u help me, how to fix on step var connection = Configuration.GetConnectionString(“InventoryDatabase”); . On my project the Configuration does not exist in the current context. I appreciated for this, thanks
Hi Kannan,
Pls ignore my earlier comment, i’ve done found the resolution regarding my problem, thanks.. this tutorial is a good..
Hi, Thank you so much for the article about API. I learned a lot from this one!
but I have something in mind :
“Then we can register the database context service (InventotyContext) during application startup. In the following code, the connection string is read from the appsettings file and passed to the context service.”
where InventotyContext namespace was built?
Hi HERLAMBANG,
Thanks for notifying typo, that should be InventoryContext. We have updated in the blog.
Thanks,
Kannan Eswar.
For those who’re getting an error at the Configuration.GetConnectionString(“InventoryDatabase”);
You have to inject the IConfiguration dependency, so the constructor of this class will be:
public partial class InventoryContext : DbContext
{
public IConfiguration Configuration;
public InventoryContext(IConfiguration configuration)
{
Configuration = configuration;
}
*etc*
}
Then the Configuration.GetConnectionString will work flawlessly
Would it be possible for the create button to print the data entered into the form?
Hi Adam,
We have built-in support in Syncfusion EJ2 Grid to print the Grid, but it is not feasible to print the form element. Please refer the below Sample demo to know the support print feature in Grid.
Demo link: https://ej2.syncfusion.com/aspnetcore/Grid/Print#/material
Regards,
Maithiliy K
Hi, Thank you so much for the article about API. I learned a lot from this one! I’m getting an error while creating controller “There was an error running the selected code generator:’Could not load type ‘Microsoft.EntityFrameworkCore.Query.IShapedQueryOptimizerFactory’ from assembly ‘Microsoft.EntityFrameworkCore, Version=3.1.0.0, Culture=neutral’. ‘
Help needed!!!
Hi ZAIN,
I hope you created project using .NET Core 3.1, and I suspect that problem with .Net Core version and packages what we have added. At the time of writing blog latest version was .NET Core 3.0 Preview 8, hence I have referred preview version of packages. But for the .NET Core 3.1, we need latest version of packages as below,
• Install-Package Microsoft.VisualStudio.Web.CodeGeneration.Design -Version 3.1.0
• Install-Package Microsoft.EntityFrameworkCore.Tools -Version 3.1.0
• Install-Package Microsoft.EntityFrameworkCore.SqlServer -Version 3.1.0
Follow the below steps,
Step 1: Upgrade the packages to the above version by running the above command in Package Manager Console
Step 2: Try to create the controller
Step 3: Now controller get created with CURD operation
Thanks,
Kannan Eswar.
Code ran successfully. Thanks for your consideration. Cheers!!!
I was able to successfully create an app but now I have updated my DB with more tables and more columns in existing tables. When I re-run the console Scaffold DbContext command I get a ‘Build failed’. error in the console.
I tried deleting the existing context class file then running again but still the same error. How do I ‘refresh’ the existing models and add new models now initial scaffold has already been run and the DB has been updated?
Thanks!
Hi MD,
Follow the below steps to update existing context and views,
Step 1: Run scaffold command with -force attribute to update existing context as below,
Scaffold-DbContext “Server=ABCSERVER;Database=Inventory;Integrated Security=True” Microsoft.EntityFrameworkCore.SqlServer -OutputDir Models –force
This will make changes in existing context and POCO classes to include additionally added columns or newly added tables.
Step 2: For newly added tables you can create scaffold controller with views and use.
Step 3: If you made changes in existing table you can follow the any one options given below,
– Remove scaffold controller and views. Then again create scaffold controller with views and use. (Please take copy of controller and views, if you made any customization’s)
– Or you can manually make changes in views to accommodate your new table changes.
Step 4: If you facing any other issues in above step 1, remove existing context file and POCO classes and related scaffold controller and views created earlier. (Please take copy of controller and views, if you made any customization’s)
And run the above scaffold command in Package Manager Console and crate scaffold controller and views.
Thanks,
Kannan Eswar.
Nice article. It helps me to learn about connecting to database using entity framework.. Keep up your good work.
Cheers!!
Hi, Thank you for this article.
when I run these commands in Package Manager Console:
*Install-Package Microsoft.VisualStudio.Web.CodeGeneration.Design -Version 3.0.0-preview8-19413-06
an error message is displayed:
Install-Package : Données non valides détectées lors du décodage.
Au caractère Ligne:1 : 1
+ Install-Package Microsoft.VisualStudio.Web.CodeGeneration.Design -Ver …
+ ~~~~~~~~~~~~~~~~~~~~~~~~~~~~~~~~~~~~~~~~~~~~~~~~~~~~~~~~~~~~~~~~~~~~~
+ CategoryInfo : NotSpecified: (:) [Install-Package], Exception
+ FullyQualifiedErrorId : NuGetCmdletUnhandledException,NuGet.PackageManagement.PowerShellCmdlets.InstallPackageCommand
*Install-Package Microsoft.EntityFrameworkCore.SqlServer -Version 3.0.0-preview8.19405.11
an error message is displayed:
Install-Package : Données non valides détectées lors du décodage.
Au caractère Ligne:1 : 1
+ Install-Package Microsoft.EntityFrameworkCore.SqlServer -Version 3.0. …
+ ~~~~~~~~~~~~~~~~~~~~~~~~~~~~~~~~~~~~~~~~~~~~~~~~~~~~~~~~~~~~~~~~~~~~~
+ CategoryInfo : NotSpecified: (:) [Install-Package], Exception
+ FullyQualifiedErrorId : NuGetCmdletUnhandledException,NuGet.PackageManagement.PowerShellCmdlets.InstallPackageCommand
Hi GHADA,
Follow the below steps,
Step 1: Follow the answer mentioned in the below post to resolve the issue
https://stackoverflow.com/questions/55807079/found-invalid-data-while-decoding-error-updating-nuget-packages
Step 2: I hope you created project using .NET Core 3.1. At the time of writing blog latest version was .NET Core 3.0 Preview 8, hence I have referred preview version of packages. But for the .NET Core 3.1, we need latest version of packages as below,
Install-Package Microsoft.VisualStudio.Web.CodeGeneration.Design -Version 3.1.0
Install-Package Microsoft.EntityFrameworkCore.Tools -Version 3.1.0
Install-Package Microsoft.EntityFrameworkCore.SqlServer -Version 3.1.0
Install the above packages by running the command in Package Manager Console. And follow the blog to perform CRUD operation.
Thanks,
Kannan Eswar.
Hi KANNAN ESWAR,
Thank you for your help.
I’m very grateful.
Ghada
Hi Kannan,
Help like this article is valuable, especially for beginners.
It is presented step by step, and I have tested it with ASP.NET Core 3.1 and with some updates it works.
It would be helpful (if there is available time), to post an example which relies on repository pattern and dependency injection.
Hi JASON,
Thanks for your feedback.
In my perspective repository pattern is not needed with Entity Framework Core, since Entity Framework Core itself comes with the below necessary benefits of repository pattern,
– Abstraction between business and data access layer
– Single save on context (Unit of work)
– Unit testing (Mock services)
Please refer the below links which explains about how we can use Entity Framework Core to achieve the above mentioned benefits,
https://www.reddit.com/r/dotnet/comments/6y8g7a/is_it_good_practice_to_implement_repository/
https://gunnarpeipman.com/ef-core-repository-unit-of-work/
https://www.thereformedprogrammer.net/is-the-repository-pattern-useful-with-entity-framework-core/
If you still need to implement repository pattern, please refer the below links,
https://code-maze.com/net-core-web-development-part4/
Thanks,
Kannan Eswar.
Bro! Thank you so much!!
Everything works as it should, your instruction helped me a lot. I had done something like this for a long time, but on older versions of the ASP.NET Framework MVC. And you helped me create this on Core. This thing is great for implementing very fast and simple projects.
Thank you so much!!
Everything works as it should, your instruction helped me a lot.
I will try to repeat on VS Code.
Hi ALEXEY ANIPCHENKO,
I am pleased to hear that this blog helped you.
Thanks,
Kannan Eswar.
Hi,
Below message is coming while i am adding the controller. I am using VS2019. Please help me to fix the error. Below is the error,
“There was an error running the selected code generator:’Could not load type ‘Microsoft.EntityFrameworkCore.JShapedQueryOptimizerFactory’ from assembly’Microsoft.EntityFrameworkCore,Version=3.1.2.0′.'”
Hi JITHIN V P,
I hope you created project using .NET Core 3.1, and I suspect that problem with .Net Core version and packages what we have added. At the time of writing blog latest version was .NET Core 3.0 Preview 8, hence I have referred preview version of packages. But for the .NET Core 3.1, we need latest version of packages as below,
• Install-Package Microsoft.VisualStudio.Web.CodeGeneration.Design -Version 3.1.1
• Install-Package Microsoft.EntityFrameworkCore.Tools -Version 3.1.2
• Install-Package Microsoft.EntityFrameworkCore.SqlServer -Version 3.1.2
Follow the below steps,
Step 1: Upgrade the packages to the latest version by running the above command in Package Manager Console
Step 2: Try to create the controller
Step 3: Now controller get created with CURD operation
Thanks,
Kannan Eswar.
You’ve taught me a semester’s worth of content in these few minutes. I am genuinely grateful for your help. Thank you.
Hi ERIC A,
I am very happy to hear that this blog helped you.
Thanks,
Kannan Eswar.
Hi
Thanks For learning
i have a question
how can save & load picture on DB??
Hi ARYA,
By default Scaffolding doesn’t support image processing, please follow the below links to save and load picture from database,
http://www.binaryintellect.net/articles/2f55345c-1fcb-4262-89f4-c4319f95c5bd.aspx
Thanks,
Kannan Eswar.
thank you✌
Thanks for your article, I was able to easily remove EF Core and replace it by NHibernate – the replacement was a very quick job.
Excelente, Felicitaciones por ayuda que nos brinda
Deseo consultar como ejecutar o realizar con Stored Procedure SQL Server?
Muchas Gracias Por tu Ayuda
Hi HERÁCLIDES MORALES
Yes, you can connect to Stored Procedure to perform CRUD operations.
Please follow the steps,
1. Create stored procedure to perform CRUD operations. Refer this link https://www.c-sharpcorner.com/UploadFile/ca2535/insert-update-and-delete-using-stored-procedure-in-sql-ser/
2. Call from stored procedure using FromSqlRaw method. Refer this link https://docs.microsoft.com/en-us/ef/core/querying/raw-sql
Thanks,
Kannan Eswar.
Create a new folder named “Context” and add one class “DataContext” which extends from the DbContext class.
Hi CPH MEDIA,
The creation of the folder can better organize the class files, but the code will work fine even without the folder creation.
Thanks,
Kannan Eswar.
Hi Khannan,
I’m new to mvc core and facing problems in User authentication and updating the database columns and then migrating it to the project. Can you tell me the resolve of how to build db first application with user authentication in mvc core 3.1.
Thank,
Zain
Hi ZAIN UL ABIDEEN,
Check the below articles to learn about adding identity to an existing project,
https://code-maze.com/identity-asp-net-core-project/
https://docs.microsoft.com/en-us/aspnet/core/security/authentication/scaffold-identity?view=aspnetcore-3.1&tabs=visual-studio
Thanks,
Kannan Eswar.
Hi…
I have got error in Configuration part. It says : The name ‘Configuration’ does not exist in the current context.
Makes me wonder, how the other not get this error. Because of this, I cannot execute the CRUD part.
Thanks for this nice article btw,
Ross.
Hi ROSSI G,
I have recreated again and didn’t face any issues.
Can you check the below article related to the error you have mentioned?
https://entityframeworkcore.com/knowledge-base/47702394/new–net-core-2-site-does-not-reconize-configuration-getconnectionstring
Thanks,
Kannan Eswar.
Thank you for the article!
I wasn’t getting the desired outcome because the main page kept displaying instead of products.
I discovered the error in the article which is we need to comment out `//endpoints.MapRazorPages();` in `Startup.cs`.
However, even now the Products controller’s View gets displayed without working links, so “Create new”, “Edit” etc. are just plain black texts.. any idea why?
Thank you so much for this, im still learning and being able to edit/create/delete stuff on a real database is exciting.
private readonly ApplicationDbCOntext _context;
public EmployeeRepository(ApplicationDbCOntext context)
{
_context = context;
}
public Employee Add(Employee employee)
{
_context.Employee.Add(employee);
int a = _context.SaveChanges();
return employee;
}
public void DeleteEmployee(int EmpId)
{
var employee = _context.Employee.Find(EmpId);
if (employee != null)
{
_context.Employee.Remove(employee);
}
_context.SaveChanges();
}
public Employee Delete(int EmpId)
{
Employee employee = _context.Employee.Find(EmpId);
if (employee != null)
{
_context.Employee.Remove(employee);
_context.SaveChanges();
}
return employee;
}
public IEnumerable GetAllEmployee()
{
return _context.Employee;
}
public Employee GetEmployee(int Id)
{
return _context.Employee.Find(Id);
}
public Employee Update(Employee employeeChanges)
{
var employee = _context.Employee.Attach(employeeChanges);
employee.State = EntityState.Modified;
_context.SaveChanges();
return employeeChanges;
}
public class EmployeeController : Controller
{
private readonly IEmployeeService _service;
public EmployeeController(IEmployeeService service)
{
_service = service;
}
public IActionResult Index()
{
return View(_service.GetAllEmployee());
}
[HttpGet]
public ViewResult Create()
{
return View();
}
[HttpPost]
public IActionResult Create(Employee model)
{
if (ModelState.IsValid)
{
try
{
Employee emp = new Employee()
{
EmpName = model.EmpName,
EmpDesignation = model.EmpDesignation,
EmpAddress = model.EmpAddress,
Age = model.Age
};
var datasave = _service.Add(emp);
return RedirectToAction(“Index”);
}
catch (Exception ex)
{
//ex.Message;
}
}
return RedirectToAction(“Index”);
}
[AllowAnonymous]
public ViewResult Details(int id)
{
Employee employee = _service.GetEmployee(id);
if (employee == null)
{
Response.StatusCode = 404;
return View(“EmployeeNotFound”, id);
}
Employee _detail = new Employee()
{
EmpName = employee.EmpName,
EmpDesignation = employee.EmpDesignation,
EmpAddress = employee.EmpAddress,
Age = employee.Age
};
return View(_detail);
}
[HttpGet]
public ActionResult Edit(int Id)
{
Employee emp = _service.GetEmployee(Id);
return View(emp);
}
[HttpPost]
public IActionResult Edit(int EmpId, Employee model)
{
if (ModelState.IsValid)
{
Employee emp = _service.GetEmployee(EmpId);
emp.EmpName = model.EmpName;
emp.EmpDesignation = model.EmpDesignation;
emp.EmpAddress = model.EmpAddress;
emp.Age = model.Age;
_service.Update(emp);
return RedirectToAction(“Index”);
}
return View();
}
[HttpGet]
public ActionResult Delete(int Id)
{
Employee emp = _service.GetEmployee(Id);
return View(emp);
}
[HttpPost]
public ActionResult Delete(Employee model)
{
_service.DeleteEmployee(model.EmpId);
return RedirectToAction(“Index”);
}
}
public interface IEmployeeService
{
Employee GetEmployee(int Id);
IEnumerable GetAllEmployee();
Employee Add(Employee employee);
Employee Update(Employee employeeChanges);
Employee Delete(int id);
void DeleteEmployee(int id);
}
It is a wonderful CRUD tutorial.
Thank you and jeep up the good work!
Hi!
I love the possibilities the Syncfusion development kit gives me. I`m currently on a trial version, but I`m sure we wil by a license later.
You have probably been giving advice a thousand times on my problem and maybe you have allready done it above here.
I am currently exploring the Gantt control and would like some help on how to use it in an ASP Net Core MVC with MSSql support.
How should I go about? 🙂
Tommy
Hi Tommy,
Thanks for contacting us.
We have already provided updates for your queries in the following forums.
Please refer the code snippets and reference samples & documentations,
Forum 1 – https://www.syncfusion.com/forums/159853/working-with-razor-pages-and-mysql
Forum 2 – https://www.syncfusion.com/forums/159839/regarding-running-the-example-for-gantt-control
Please revert us in forums, If you need further assistance on this.
Regards,
Jayakumar D
Hello, thx for this!
but i got this error message:
“InvalidOperationException: Unable to resolve service for type ‘InventoryManagement.Models.InventoryContext’ while attempting to activate ‘InventoryManagement.Controllers.ProductsController”.
how can i solve it?
Hi RODRIG,
Looks like InventoryContext is not registered with the application startup.
The following code should be added in ConfigureServices method of Startup.cs.
var connection = Configuration.GetConnectionString(“InventoryDatabase”);
services.AddDbContext(options => options.UseSqlServer(connection));
Refer the source code in the below GitHub repository,
https://github.com/SyncfusionExamples/inventory-management-asp-dotnet-core
Thanks,
Kannan Eswar.
Hello,
I am a newbie.
When I try to create a controller, I get a ‘There was an error running the selected code generator; ‘Value can not be null(Parameter ‘connectionString’) error.
I checked the appsettings.json file – seems ok, checked the database context file. Not sure what I am missing.
I do have an underscore in the database name, am using the same name as the database name for the dbcontext.
I can run the app till the ‘add controller’ steps listed above. So I am confused.
Thank you so much.
Hello Again,
I had commands in the wrong order in the start up file (in configureservices method) –
I was trying to add services.AddControllersWithViews(); before setting up the context.
I looked at your code in github and found out after spending a lot of time 🙁
I am posting this follow up in the hope that it will help someone else.
Thanks again.
Hi BHARATHI,
Happy to hear that you found solution.
Thanks,
Kannan Eswar.
How could I go about doing requests with react instead?
Hi STEVE,
This blogs sample application works on server side rendering and form post to send values to server from browser.
Please find the articles that talks about CRUD operation with React.js
https://dzone.com/articles/aspnet-core-crud-with-reactjs-and-entity-framework
https://dotnetdetail.net/how-to-create-crud-operations-using-reactjs-and-asp-net-core-2-0/
Thanks,
Kannan Eswar.
Kannan,
Thanks so much this wonderful ASP.Net Core / Angular tutorial! It was just what I was looking for – an Angular tutorial that I could start to explore – and it came right up with very little tweaking! Maybe some of the most helpful info I (MVC background) have seen on Core, as well as very clean, clear Angular execution. You’re a life saver!!!
Oops, posted to the wrong thread by mistake! In any case, found this to be excellent. Thanks!
Hi Kannan,
When I run this command you posted, nothing happens. I am typing it in VERBATIM (I’m brand new to all this). Am I supposed to be substituting something for “******”?
Scaffold-DbContext “Scaffold-DbContext “Server=******;Database=Inventory;Integrated Security=True” Microsoft.EntityFrameworkCore.SqlServer -OutputDir Models
While I appreciate the clarity of this post, there are thousands of asp.net core CRUD examples on the web.
But, there are HARDLY ANY examples of doing CRUD operations in asp.net core with SYNCFUSION!!!!!
Please have more posts on your own products!!!
–Dave
Hi Dave,
Thank you for your feedback.
We appreciate your suggestion to create more examples of CRUD operations in ASP.NET Core using Syncfusion products.
We will definitely consider your suggestion for future content. In the meantime, if you have any specific questions or need assistance with using Syncfusion in your projects, please feel free to reach out. We’re here to help!
Regards,
Gayathri R