
OpenAI Succinctly®

CHAPTER 7
Fine-Tuning and Embedding

Figure 42: Abstract Image of AI Thinking
In this chapter, we will cover fine-tuning a model and creating and consuming embeddings.
Fine-tuning is a technique used to adapt an already-trained model to a specific task, while embeddings are a way of transforming text or other data into a more suitable format for machines to process.
Both techniques are used in machine learning but operate at different levels of abstraction and serve different purposes.
Fine-tuning involves changing the way a model behaves to improve its performance on a specific task. It does this by adjusting the weights of the model's layers based on the new training data, which essentially modifies the model's internal representations and decision-making processes.
Embeddings, on the other hand, are a way of representing data in a more machine-readable format. An embedding transforms raw data, such as text or images, into a low-dimensional vector space where it can be more easily processed and analyzed by a model.
Fine-tuning

Figure 43: Fine-Tuning the Abstract Image
Fine-tuning is a powerful technique in machine learning that involves taking a model and further training it on a specific task or domain, enabling us to leverage its existing knowledge from a larger dataset to learn a new task or domain quickly with a smaller dataset.
For instance, if we have a pretrained model that recognizes objects in images and we want it to identify specific types of fruits in images, we can fine-tune the model by training it further on a smaller dataset of fruit images.
This allows us to adapt the model to the new task while still benefiting from its general knowledge from the larger dataset. Fine-tuning is widely used in natural language processing, computer vision, speech recognition, and other areas of machine learning to adapt pre-trained models quickly to new domains and achieve high accuracy with limited data.
Create fine-tuning using Blazor
In this section, we will use Blazor to create and consume a fine-tuned model. The general outline of the process is:
- Organize and upload training data.
- Develop a refined model through training.
- Implement the customized model.
Note: At present, fine-tuning can be performed on these base models: DaVinci, Curie, Babbage, and Ada. These represent the initial models that lack any instruction-based training, such as text-davinci-003.
Figure 44: Add SentimentSample.jsonl
To add the training data, open the OpenAIExplorer project and add the following SentimentSample.jsonl file to the SampleData folder.
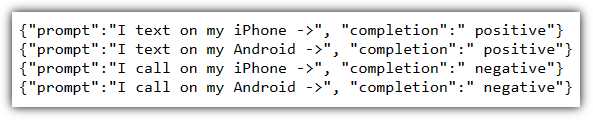
Figure 45: Contents of the SentimentSample.jsonl file
This sample data trains the model to treat texts as positive and calls as negative.
You can download the sample file using this link.
Model fine-tuning will require a collection of training samples, each containing a single input (referred to as a prompt) and its corresponding output (completion). The data must be in JSONL format, with each line representing a prompt-completion pair that corresponds to a specific training sample.
To denote the end of the prompt and the beginning of the completion, you need to utilize a consistent separator in every prompt. In this example, we will use ->.
Note: To make a model work better, you will want to fine-tune it on at least a few hundred good examples. After that, the model gets better as you double the number of examples. Adding more examples is usually the best way to make the model work better. You can find more guidance on preparing training datasets here.
Next, add a new Razor control called FineTuningExample.razor to the project, which will allow you to fine-tune a model.
Replace all the code in the file with the following code.
Code Listing 30
@page "/finetuningexample" @using OpenAI; @using OpenAI.Files; @using OpenAI.FineTuning; @using OpenAI.Models; @inject IJSRuntime JSRuntime @inject IConfiguration _configuration <PageTitle>Fine Tuning Example</PageTitle> <style> .scrollable-list { height: 200px; overflow-y: scroll; } </style> <h1>Fine Tuning Example</h1> <br /> <button class="btn btn-success" @onclick="UploadFile"> Upload SentimentSample.jsonl File </button> <br /> <br /> @if (ColFileData.Count > 0) { <h4> <button class="btn btn-secondary" @onclick="(() => ListFiles())"> Refesh </button> Files </h4> <table class="table"> <thead> <tr> <th></th> <th></th> </tr> </thead> <tbody> @foreach (var file in ColFileData) { <tr> <td> <a href="javascript:void(0)" onclick="@(() => DownloadFile(file))"> @file.FileName </a> (@file.Status - @file.Size bytes) [@file.CreatedAt] </td> <td> <!-- Only allow fine-tune jobs to be created --> <!-- for files with the purpose "fine-tune". --> @if (file.Purpose == "fine-tune") { <button class="btn btn-success" @onclick="(() => CreateFineTuneJob(file))"> Create Fine Tune Job </button> } <button class="btn btn-danger" @onclick="(() => DeleteFile(file))"> Delete </button> </td> </tr> } </tbody> </table> } |
This Blazor component allows users to upload files, view a list of uploaded files, and perform actions such as downloading, creating a fine-tune job, and deleting files.
Add the following procedure code.
Code Listing 31
@code { // Declare variables for organization, API key, // and collections of objects. string Organization = ""; string ApiKey = ""; List<FileData> ColFileData = new List<FileData>(); // Declare nullable objects for file data and fine-tuning job. FileData? fileData; FineTuneJob? fineTuneJob; // Declare collections for events, fine-tuning jobs, and models. List<FineTuneJob> colFineTuneJob = new List<FineTuneJob>(); List<Model> colModels = new List<Model>(); // Declare variables for completion model, prompt, and response. string CompletionModel = ""; string CompletionPrompt = "I text on my iPhone ->"; string CompletionResponse = ""; // Initialize component, set organization and API key, // and call listing methods. protected override async Task OnInitializedAsync() { // Set the organization value from the configuration // or use an empty string if not found. Organization = _configuration["OpenAIServiceOptions:Organization"] ?? ""; // Set the API key value from the configuration // or use an empty string if not found. ApiKey = _configuration["OpenAIServiceOptions:ApiKey"] ?? ""; // Call the ListFiles method to list files // using the OpenAI API. await ListFiles(); } // Files // List files using OpenAI API. private async Task ListFiles() { // Create a new OpenAI API client with // the provided API key and organization. var api = new OpenAIClient(new OpenAIAuthentication(ApiKey, Organization)); // Call the ListFilesAsync method to // fetch files from the OpenAI API. var files = await api.FilesEndpoint.ListFilesAsync(); // Convert the fetched files to a list // and assign it to the ColFileData variable. ColFileData = files.ToList(); } // FineTune private async Task CreateFineTuneJob(FileData paramaFile) { // To Be Implemented... } } |
The first step is for the end user to click the button labeled Upload SentimentSample.jsonl File, which calls the UploadFile method.
Add the following code to implement that method.
Code Listing 32
// Upload file using OpenAI API. private async Task UploadFile() { // Create a new OpenAI API client with // the provided API key and organization. var api = new OpenAIClient(new OpenAIAuthentication(ApiKey, Organization)); // Upload the file located at "SampleData/SentimentSample.jsonl" // for fine-tuning using the OpenAI API. fileData = await api.FilesEndpoint.UploadFileAsync( @"SampleData/SentimentSample.jsonl", "fine-tune"); } |
The UI allows a user to delete any uploaded file. Add the following code to implement that method.
Code Listing 33
// Delete file using OpenAI API. private async Task DeleteFile(FileData paramaFile) { // Create a new OpenAI API client with the provided // API key and organization. var api = new OpenAIClient(new OpenAIAuthentication(ApiKey, Organization)); // Delete the specified file (paramaFile) using the OpenAI API. var result = await api.FilesEndpoint.DeleteFileAsync(paramaFile); // Update the list of files by calling the ListFiles method. await ListFiles(); } |
The code also allows a user to download a file. Add the following code to implement that method.
Code Listing 34
// Download file using OpenAI API. private async Task DownloadFile(FileData paramaFile) { // Create a new OpenAI API client with the provided // API key and organization. var api = new OpenAIClient(new OpenAIAuthentication(ApiKey, Organization)); // Download the specified file (paramaFile) using the // OpenAI API and store the path to the downloaded file. var downloadedFilePath = await api.FilesEndpoint.DownloadFileAsync(paramaFile, "data"); // Load the content of the downloaded file into a byte array. var filecontents = System.IO.File.ReadAllBytes(downloadedFilePath); // Invoke a JavaScript function to save the downloaded // file content as a file with the original file name. await JSRuntime.InvokeVoidAsync( "saveAsFile", paramaFile.FileName, Convert.ToBase64String(filecontents.ToArray())); } |
This method invokes a saveAsFile JavaScript method. Add the following code to the _Host.cshtml file to implement that method.
Code Listing 35
<script> function saveAsFile(filename, bytesBase64) { var link = document.createElement('a'); link.download = filename; link.href = "data:application/octet-stream;base64," + bytesBase64; document.body.appendChild(link); // Needed for Firefox. link.click(); document.body.removeChild(link); } </script> |
Add a link to the control in the NavMenu.razor control and hit F5 to run the application.
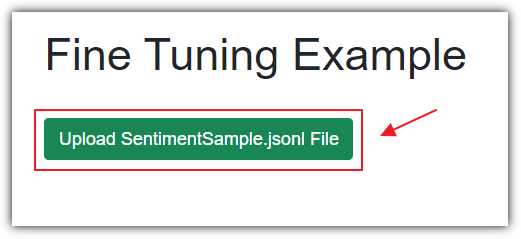
Figure 46: Click Upload SentimentSample.jsonl File
Navigate to the Razor page and click Upload SentimentSample.jsonl File.
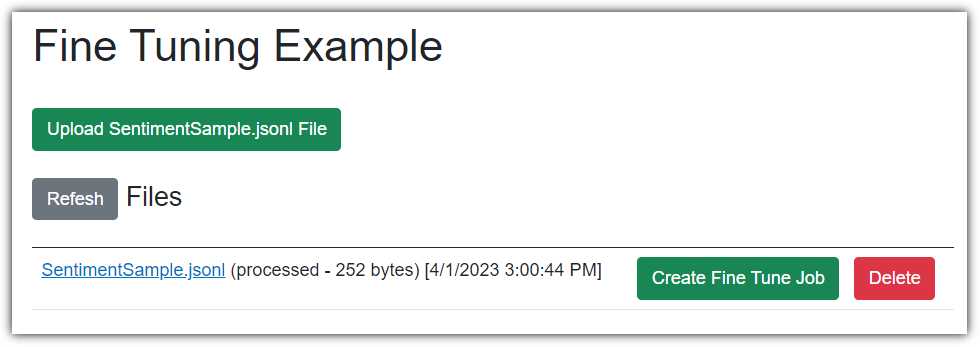
Figure 47: View Fine Tune File
Wait 30 seconds and then refresh your web browser page and navigate to the Razor page again.
You will see the file listed. You can click the file name to download it or click the Delete button to delete it. Clicking the Create Fine Tune Job button doesn’t do anything at this point because the method that it triggers, CreateFineTuneJob, has not been implemented yet.
Close your web browser to stop Visual Studio and replace the existing code for the CreateFineTuneJob method with the following code.
Code Listing 36
private async Task CreateFineTuneJob(FileData paramaFile) { // Create a new OpenAI API client with the // provided API key and organization. var api = new OpenAIClient(new OpenAIAuthentication(ApiKey, Organization)); // Create a new fine-tuning job request with // the specified file (paramaFile). var request = new CreateFineTuneJobRequest(paramaFile); // Create a fine-tuning job using the OpenAI API // and store the result in the fineTuneJob variable. fineTuneJob = await api.FineTuningEndpoint.CreateFineTuneJobAsync(request); } |
Hit F5 to run the application.
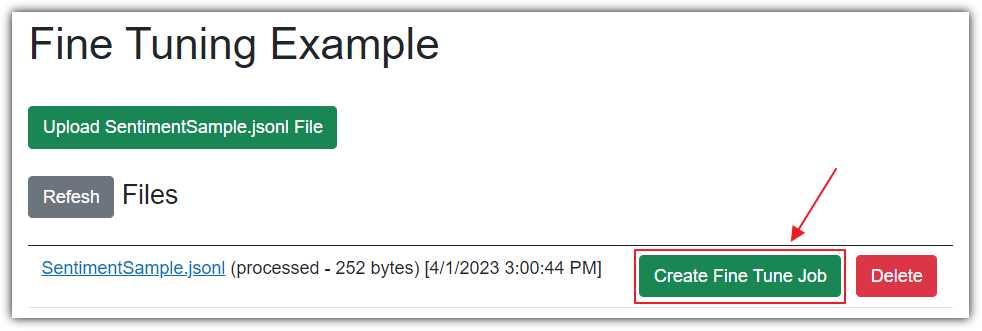
Figure 48: Create Fine Tune Job
Click Create Fine Tune Job.
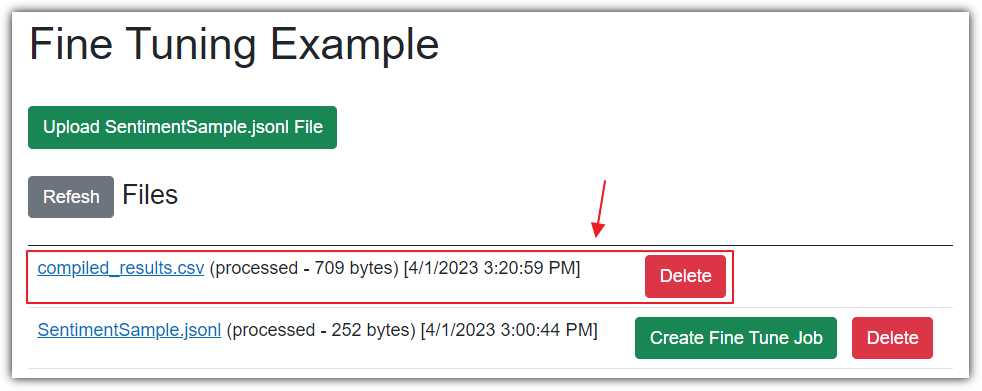
Figure 49: Create Fine Tune Job Completed
Wait about 30 minutes, then refresh your web browser and return to the page.
You should see a compiled_results.csv file listed.
Note: If the results file doesn’t appear, the OpenAI service may be running slower because of demand. Wait an hour and check back again.
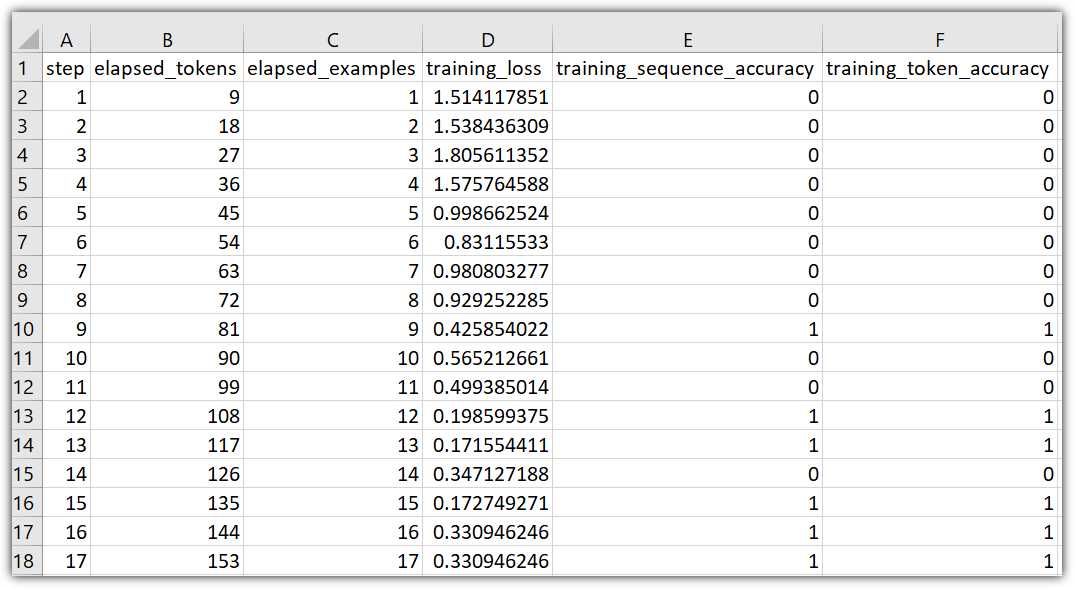
Figure 50: Fine Tuning Results
You can click the results file to download and examine it to see the results of the fine-tuning process.
To view the status of all the fine tune jobs, add the following markup code.
Code Listing 37
<!-- FineTuneJobs --> @if (colFineTuneJob.Any()) { <h4> <button class="btn btn-secondary" @onclick="(() => ListFineTuneJobs())"> Refesh </button> FineTune Jobs </h4> <div class="scrollable-list"> <ul> @foreach ( var job in colFineTuneJob.OrderByDescending(x => x.CreatedAt)) { <li>@job.Id @job.FineTunedModel (@job.Status) [@job.CreatedAt]</li> } </ul> </div> <br /> } |
This code contains a button to refresh the list if needed. This button calls the ListFineTuneJobs method.
Add the following code to implement the ListFineTuneJobs method.
Code Listing 38
private async Task ListFineTuneJobs() { // Clear collection. colFineTuneJob = new List<FineTuneJob>(); // Create a new OpenAI API client with the provided // API key and organization. var api = new OpenAIClient(new OpenAIAuthentication(ApiKey, Organization)); // Fetch the list of fine-tuning jobs using the OpenAI API. var fineTuneJobs = await api.FineTuningEndpoint.ListFineTuneJobsAsync(); // Add each fetched fine-tuning job to the colFineTuneJob list. foreach (var job in fineTuneJobs) { colFineTuneJob.Add(job); } } |
Finally, add the following code to the OnInitializedAsync method.
Code Listing 39
// Call the ListFineTuneJobs method to list // fine-tune jobs using the OpenAI API. await ListFineTuneJobs(); |
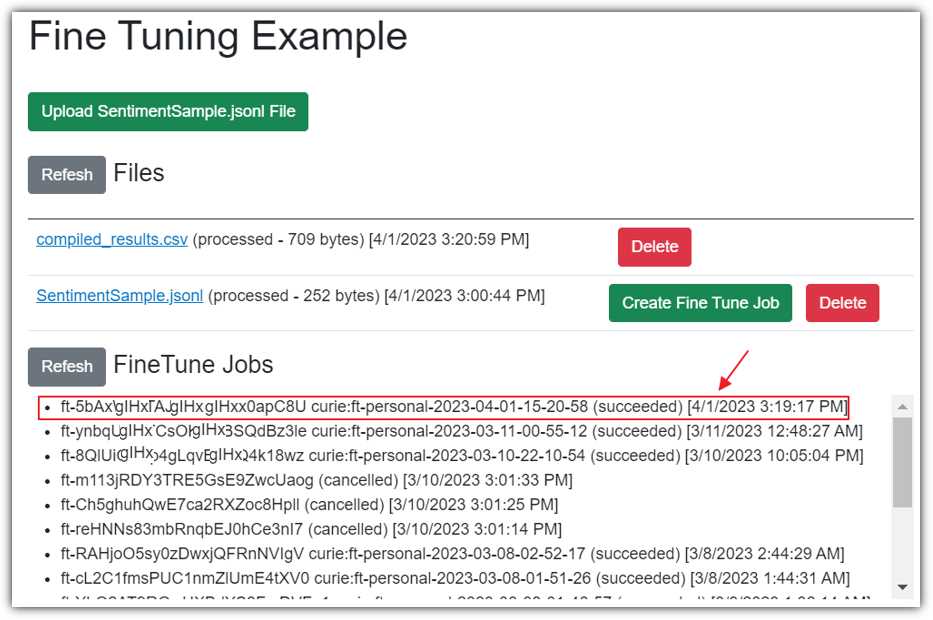
Figure 51: View Fine Tune Jobs
Hit F5 to run the application. Navigate to the page and view the status of all jobs. If there were any errors, or the job is still processing, you will see that here. If we see that the job has succeeded, there will be a model available that we can now consume.
To view a list of available fine-tune models, add the following code markup.
Code Listing 40
<!-- Models --> @if (colModels.Count > 0) { <h4> <button class="btn btn-secondary" @onclick="(() => ListModels())"> Refesh </button> Models </h4> <table class="table"> <thead> <tr> <th></th> <th></th> </tr> </thead> <tbody> @foreach (var model in colModels) { <tr> <td> @model.Id </td> <td> <button class="btn btn-danger" @onclick="(() => DeleteModel(model))"> Delete </button> </td> </tr> } </tbody> </table> } <br /> |
This code contains a button to refresh the list if needed. This button calls the ListModels method.
Add the following code to implement the ListModels method.
Code Listing 41
// Models private async Task ListModels() { // Create a new OpenAI API client with the provided // API key and organization. var api = new OpenAIClient(new OpenAIAuthentication(ApiKey, Organization)); // Fetch the list of models using the OpenAI API. var models = await api.ModelsEndpoint.GetModelsAsync(); // Initialize a new list to store filtered models. colModels = new List<Model>(); // Iterate through the fetched models. foreach (var model in models) { // Filter out models owned by "openai" or "system". if (!model.OwnedBy.Contains("openai") && !model.OwnedBy.Contains("system")) { // Add the filtered model to the colModels list. colModels.Add(model); } } } |
The UI allows a user to delete a selected model. Add the following code to implement that method.
Code Listing 42
private async Task DeleteModel(Model paramaModel) { // Create a new OpenAI API client with the provided // API key and organization. var api = new OpenAIClient(new OpenAIAuthentication(ApiKey, Organization)); // Delete the specified fine-tuned model (paramaModel) // using the OpenAI API. var result = await api.ModelsEndpoint.DeleteFineTuneModelAsync(paramaModel.Id); // Update the list of models by calling the ListModels method. await ListModels(); } |
Finally, add the following code to the OnInitializedAsync method.
Code Listing 43
// Call the ListModels method to list // models using the OpenAI API. await ListModels(); |
Hit F5 to run the application. Navigate to the page and view the fine-tuned model(s).

Figure 52: List Fine Tune Models
Finally, we will add the code that will allow us to select our fine-tuned model and generate a completion.
Add the following markup code.
Code Listing 44
<!-- Completion --> @if (colModels.Count > 0) { <h4> <button class="btn btn-secondary" @onclick="(() => ListModels())"> Refesh </button> Completions </h4> <p> Model:<span> </span> <select id="Completion" style="width:400px" @bind="@CompletionModel"> <option value="">Select Model</option> @foreach (var model in colModels) { <option value="@model.Id">@model.Id</option> } </select> <span> </span> <input id="newJobName" type="text" style="width:400px" @bind="@CompletionPrompt" /> <span> </span> <button type="button" class="btn btn-primary" @onclick="(() => SubmitCompletion())"> Submit </button> </p> <br /> <p>@CompletionResponse</p> <br /> } |
This Blazor code creates a user interface for selecting a completion model from a dropdown, entering a prompt in the text box, and generating completion text by calling the SubmitCompletion method.
Add the following code to implement the SubmitCompletion method.
Code Listing 45
private async Task SubmitCompletion() { // Check if a completion model is selected // (CompletionModel is not empty) if (CompletionModel != "") { // Reset the completion response text. CompletionResponse = ""; // Create a new OpenAI API client with the // provided API key and organization. var api = new OpenAIClient(new OpenAIAuthentication(ApiKey, Organization)); // Fetch the details of the selected completion // model (CompletionModel) using the OpenAI API. var objModel = await api.ModelsEndpoint.GetModelDetailsAsync(CompletionModel); // Define a list of stop sequences for the completion. List<string> StopSequence = new List<string>() { "->", "." }; // Generate a completion using the specified // prompt, model, and other parameters. var result = await api.CompletionsEndpoint.CreateCompletionAsync( CompletionPrompt, maxTokens: 100, echo: false, temperature: 0.1, stopSequences: StopSequence, model: objModel); // Concatenate the generated completion text to // the CompletionResponse. foreach (var completion in result.Completions) { CompletionResponse += completion.Text; } } } |
Press F5 to run the application.
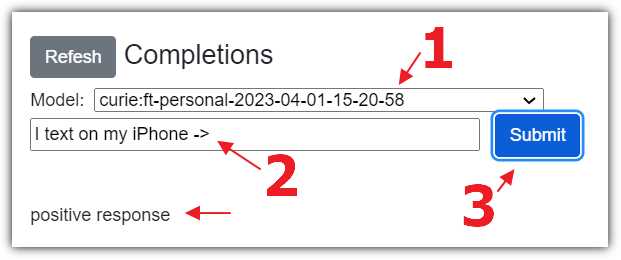
Figure 53: Positive Response
We can select the model from the dropdown and enter a prompt. Because the model was fine-tuned with data using the -> delimiter, we must also use that in the prompt.
Clicking the Submit button will call the completion API endpoint, using the fine-tuned model. The response is then displayed.
As expected, because of the new data added for fine-tuning, the response is positive.

Figure 54: Negative Response
However, when we enter a prompt for a call, the completion is negative.
Note: The documentation for the Fine-tunes API is located here.
Embeddings

Figure 55: Abstract Embedding Image
An embedding is like a summary of what a piece of text means. Each embedding is a vector of floating-point numbers. Each element of an embedding has a specific value and position within the vector, and the relationships between these values help to represent the meaning of the original text in a way that machine learning models can understand. If two embeddings are close together, it means that the texts they represent are similar in meaning. So, if two pieces of text have similar meanings, their embeddings will also be similar.
By transforming raw data into a low-dimensional vector space, embeddings can capture meaningful relationships between data points that might be difficult or impossible to capture in the original format.
Essentially, word embeddings allow you to represent words as vectors in a high-dimensional space, capturing the semantic meaning of these words. For instance, you can obtain a vector for the word car and another set of vectors for the words coffee, milk, latte. With these vector representations, you can perform various tasks, such as classification and document search.
One common method to measure the similarity between vectors is cosine similarity. This will be demonstrated in the following code. By using cosine similarity, you can determine that the vectors for car and tire are close together, indicating that these words are semantically related. In this way, embeddings provide a powerful tool for computing similarity among documents and queries, enabling effective natural language processing applications.
Create an embedding using Blazor
To demonstrate embeddings, open the OpenAIExplorer project and add a new Razor control called EmbeddingExample.razor, which will allow users to create embeddings and search for similar items.
Replace all the code in the file with the following code.
Code Listing 46
@page "/embeddings" @using OpenAI; @using OpenAI.Models; @inject IConfiguration _configuration <PageTitle>Embedding Example</PageTitle> <h1>Embedding Example</h1> <button class="btn btn-primary" @onclick="CreateEmbeddings"> Create Embeddings </button> <br /> <br /> @if (embeddingCollection.GetAll().Count > 0) { <div> <textarea rows="2" cols="25" style="vertical-align:text-top" @bind="prompt"></textarea> <span> </span> <button class="btn btn-success" style="vertical-align:text-top" @onclick="CallService"> Search </button> </div> <br /> <ul> @foreach (var item in similarities) { <li> @item.Item1 - @item.Item2 </li> } </ul> } |
This code creates a user interface for creating embeddings and searching for similar items based on the embeddings.
The code begins with a button labeled Create Embeddings that, when clicked, invokes the CreateEmbeddings method that creates embeddings.
The user can then input a query in the text area and click the Search button to find similar items. The results are then displayed as a list of items with their corresponding similarity scores.
Next, add the following code.
Code Listing 47
@code { string Organization = ""; string ApiKey = ""; string prompt = "latte"; // Declare an embedding collection and a list to store similarities. EmbeddingCollection embeddingCollection = new EmbeddingCollection(); List<(string?, float)> similarities = new List<(string?, float)>(); // Initialize the component by setting the organization and API key. protected override void OnInitialized() { Organization = _configuration["OpenAIServiceOptions:Organization"] ?? ""; ApiKey = _configuration["OpenAIServiceOptions:ApiKey"] ?? ""; } // Classes public class Embedding { public string? Text { get; set; } public float[]? Values { get; set; } } public class EmbeddingCollection { // Declare a private list to store Embedding objects. private readonly List<Embedding> _embeddings = new List<Embedding>(); // Add an Embedding object to the list of embeddings. public void Add(Embedding embedding) { _embeddings.Add(embedding); } // Retrieve all Embedding objects in the list. public List<Embedding> GetAll() { return _embeddings; } } } |
This code sets up the necessary variables and retrieves the Organization and ApiKey. It also constructs a default prompt to request the embeddings to be related to the word latte. The end user will have the ability to change this prompt.
Next, add the following code to @code section. It will implement the CreateEmbeddings method that will be called when the Create Embeddings button is clicked.
Code Listing 48
// Create embeddings for the given terms using the OpenAI API. private async Task CreateEmbeddings() { // Create an instance of the OpenAI client. var api = new OpenAIClient(new OpenAIAuthentication(ApiKey, Organization)); // Get the model details. var model = await api.ModelsEndpoint.GetModelDetailsAsync("text-embedding-ada-002"); // Create embeddings for each term. var coffee = await api.EmbeddingsEndpoint.CreateEmbeddingAsync("coffee", model); var milk = await api.EmbeddingsEndpoint.CreateEmbeddingAsync("milk", model); var HotWater = await api.EmbeddingsEndpoint.CreateEmbeddingAsync("hot water", model); var chocolate = await api.EmbeddingsEndpoint.CreateEmbeddingAsync("chocolate", model); var tea = await api.EmbeddingsEndpoint.CreateEmbeddingAsync("tea", model); var chai = await api.EmbeddingsEndpoint.CreateEmbeddingAsync("chai", model); var car = await api.EmbeddingsEndpoint.CreateEmbeddingAsync("car", model); var tire = await api.EmbeddingsEndpoint.CreateEmbeddingAsync("tire", model); // Add the embeddings to the embedding collection. embeddingCollection.Add( new Embedding { Text = "coffee", Values = coffee.Data[0].Embedding .Select(d => (float)d).ToArray() }); embeddingCollection.Add( new Embedding { Text = "milk", Values = milk.Data[0].Embedding .Select(d => (float)d).ToArray() }); embeddingCollection.Add( new Embedding { Text = "chocolate", Values = chocolate.Data[0].Embedding .Select(d => (float)d).ToArray() }); embeddingCollection.Add( new Embedding { Text = "tea", Values = tea.Data[0].Embedding .Select(d => (float)d).ToArray() }); embeddingCollection.Add( new Embedding { Text = "car", Values = chai.Data[0].Embedding .Select(d => (float)d).ToArray() }); embeddingCollection.Add( new Embedding { Text = "tire", Values = chai.Data[0].Embedding .Select(d => (float)d).ToArray() }); } |
Add the following code to the @code section. It will implement the CallService method that will be called when the Search button is clicked.
Code Listing 49
// Call the OpenAI service to calculate similarities between embeddings. async Task CallService() { // Reset the similarities list. similarities = new List<(string?, float)>(); // Get all embeddings from the collection. var embeddingsInCollection = embeddingCollection.GetAll(); // Create an instance of the OpenAI client. var api = new OpenAIClient(new OpenAIAuthentication(ApiKey, Organization)); // Get the model details. var model = await api.ModelsEndpoint.GetModelDetailsAsync("text-embedding-ada-002"); // Create an embedding for the user's input prompt. var EmbeddingQueryResponse = await api.EmbeddingsEndpoint.CreateEmbeddingAsync(prompt, model); // Calculate the similarity between the prompt's // embedding and each existing embedding. foreach (var embedding in embeddingsInCollection) { if (embedding.Values != null) { var similarity = CosineSimilarity( EmbeddingQueryResponse.Data[0].Embedding .Select(d => (float)d).ToArray(), embedding.Values); similarities.Add((embedding.Text, similarity)); } } // Sort the results by similarity in descending order. similarities.Sort((a, b) => b.Item2.CompareTo(a.Item2)); } |
This method calls the CosineSimilarity method. Add the following code to implement that method.
Code Listing 50
private float CosineSimilarity(float[] vector1, float[] vector2) { // Initialize variables for dot product and // magnitudes of the vectors. float dotProduct = 0; float magnitude1 = 0; float magnitude2 = 0; // Iterate through the vectors and calculate // the dot product and magnitudes. for (int i = 0; i < vector1?.Length; i++) { // Calculate dot product. dotProduct += vector1[i] * vector2[i]; // Calculate squared magnitude of vector1. magnitude1 += vector1[i] * vector1[i]; // Calculate squared magnitude of vector2. magnitude2 += vector2[i] * vector2[i]; } // Take the square root of the squared magnitudes // to obtain actual magnitudes. magnitude1 = (float)Math.Sqrt(magnitude1); magnitude2 = (float)Math.Sqrt(magnitude2); // Calculate and return cosine similarity by dividing // dot product by the product of magnitudes. return dotProduct / (magnitude1 * magnitude2); } |
Add a link to the control in the NavMenu.razor control and hit F5 to run the application.
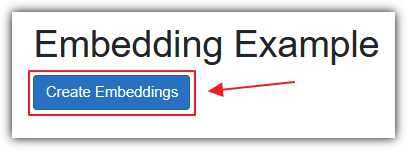
Figure 56: Create Embeddings
Navigate to the Razor page and click Create Embeddings.
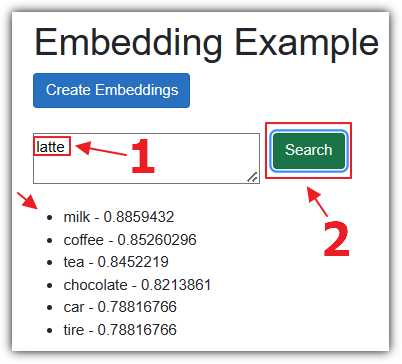
Figure 57: Search Latte
Enter latte for the prompt and click Search. The CreateEmbeddingAsync method will be called to create an embedding of the prompt.
The CosineSimilarity will be called to compare that embedding to the collection of embeddings created in the first step. Those embeddings, and the calculation of their similarity (in order of closest to furthest), are then presented in a list.
Note that milk, coffee, and tea are listed as the most similar words to latte.
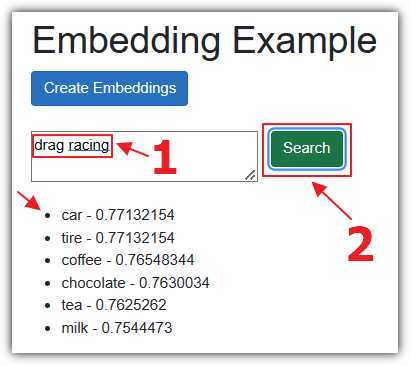
Figure 58: Search Drag Racing
Change the prompt to drag racing and click Search. Note that car and tire are now listed as the most similar words.
Note: The documentation for the Embeddings API is located here.
- 1800+ high-performance UI components.
- Includes popular controls such as Grid, Chart, Scheduler, and more.
- 24x5 unlimited support by developers.