---
title: "WinUI Scheduler: A Smart Tool to Handle Appointments in a Hospital"
published_at: "2021-09-16T10:33:58+00:00"
modified_at: "2026-01-19T09:27:12+00:00"
url: "https://www.syncfusion.com/blogs/post/winui-scheduler-a-smart-tool-to-handle-appointments-in-a-hospital"
excerpt: "Today, we see tremendous growth in the healthcare system. Multispecialty hospitals are everywhere, equipped with the facilities needed to treat all kinds of ailments. However, it is not an easy task to manage all the resources- doctors and medical devices-..."
taxonomy_category:
- "Desktop"
- "Scheduler"
- "WinUI"
taxonomy_post_tag:
- "desktop"
- "productivity"
- "project management"
- "Scheduler"
- "WinUI"
---
# WinUI Scheduler: A Smart Tool to Handle Appointments in a Hospital
[Jeyasri Murugan](https://www.syncfusion.com/blogs/author/jeyasrim)
Today, we see tremendous growth in the healthcare system. Multispecialty hospitals are everywhere, equipped with the facilities needed to treat all kinds of ailments. However, it is not an easy task to manage all the resources- doctors and medical devices- in a hospital. In that scenario, you need an all-rounder appointment management system to treat patients as soon as possible.
The [Syncfusion WinUI Scheduler](https://www.syncfusion.com/winui-controls/scheduler)
allows you to easily create a scheduler for each resource and manage appointments based on its availability. By using the resource view, you can group appointments based on their resources or by dates. The Scheduler also allows you to share events or appointments among multiple resources. Also, you can edit the resource appointment details using a built-in appointment editor.
In this blog, we will see how to easily allocate and manage appointments for doctors in a hospital based on their availability using our WinUI Scheduler control.
**Note:** If you are new to our Scheduler control, please read the [Getting Started with WinUI Scheduler](https://help.syncfusion.com/winui/scheduler/getting-started)
documentation before proceeding with it.
## Adding resources in the Scheduler
First, let’s add the resources in our WinUI Scheduler. Change the [ResourceGroupType](https://help.syncfusion.com/cr/winui/Syncfusion.UI.Xaml.Scheduler.ResourceGroupType.html)
property value to [Resource](https://help.syncfusion.com/cr/winui/Syncfusion.UI.Xaml.Scheduler.ResourceGroupType.html#Syncfusion_UI_Xaml_Scheduler_ResourceGroupType_Resource)
and the add resource collections in the [ResourceCollection](https://help.syncfusion.com/cr/winui/Syncfusion.UI.Xaml.Scheduler.SfScheduler.html#Syncfusion_UI_Xaml_Scheduler_SfScheduler_ResourceCollection)
property.
Then, create a resource view for a doctor by setting the [Id](https://help.syncfusion.com/cr/winui/Syncfusion.UI.Xaml.Scheduler.SchedulerResource.html#Syncfusion_UI_Xaml_Scheduler_SchedulerResource_Id)
, [Name](https://help.syncfusion.com/cr/winui/Syncfusion.UI.Xaml.Scheduler.SchedulerResource.html#Syncfusion_UI_Xaml_Scheduler_SchedulerResource_Name)
, [Foreground](https://help.syncfusion.com/cr/winui/Syncfusion.UI.Xaml.Scheduler.SchedulerResource.html#Syncfusion_UI_Xaml_Scheduler_SchedulerResource_Foreground)
, and [Background](https://help.syncfusion.com/cr/winui/Syncfusion.UI.Xaml.Scheduler.SchedulerResource.html#Syncfusion_UI_Xaml_Scheduler_SchedulerResource_Background)
properties in the [SchedulerResource](https://help.syncfusion.com/cr/winui/Syncfusion.UI.Xaml.Scheduler.SchedulerResource.html)
class. Refer to the following code example.
```
// Creates instance of scheduler resource.
```
**Note:** Since the ** ResourceCollection** is of ** IEnumerable** type, we have maintained a local class ** SchedulerResourceCollection**, which is derived from the ** ObservableCollection** to directly add the resources in the XAML code.
## Creating a scheduler for each resource
The WinUI Scheduler allows you to create an individual scheduler for each resource (doctor) and then group the appointments based on the [Date](https://help.syncfusion.com/cr/winui/Syncfusion.UI.Xaml.Scheduler.ResourceGroupType.html#Syncfusion_UI_Xaml_Scheduler_ResourceGroupType_Date)
or [Resource](https://help.syncfusion.com/cr/winui/Syncfusion.UI.Xaml.Scheduler.ResourceGroupType.html#Syncfusion_UI_Xaml_Scheduler_ResourceGroupType_Resource)
using the [ResourceGroupType](https://help.syncfusion.com/cr/winui/Syncfusion.UI.Xaml.Scheduler.ResourceGroupType.html)
property.
Refer to the following code example.
```
xmlns:scheduler="using:Syncfusion.UI.Xaml.Scheduler"
```
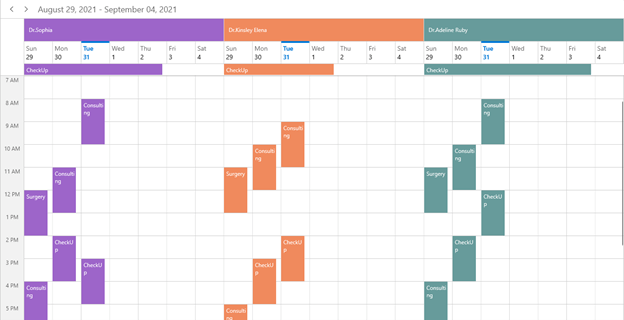
Group by Resource in WinUI Scheduler
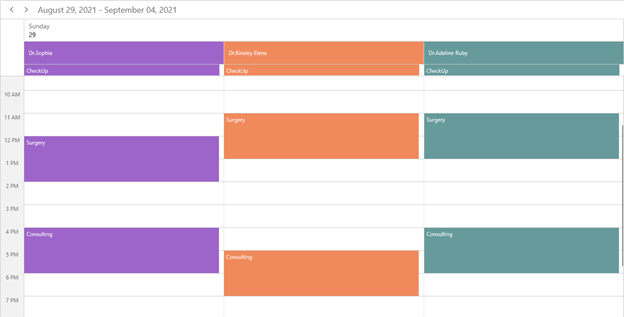
Group by Date in WinUI Scheduler
## Scheduling appointments to the resources
Set the schedule resource Id in the [ScheduleAppointment](https://help.syncfusion.com/cr/winui/Syncfusion.UI.Xaml.Scheduler.ScheduleAppointment.html)
class using the [ResourceIdCollection](https://help.syncfusion.com/cr/winui/Syncfusion.UI.Xaml.Scheduler.ScheduleAppointment.html#Syncfusion_UI_Xaml_Scheduler_ScheduleAppointment_ResourceIdCollection)
property to easily schedule the appointments to their respective doctors.
Refer to the following code example.
```
// Creating an instance for the schedule appointment collection.
var scheduleAppointmentCollection = new ScheduleAppointmentCollection();
//Adding schedule appointment in the schedule appointment collection.
var appointment = new ScheduleAppointment()
{
StartTime = DateTime.Now,
EndTime = DateTime.Now.AddHours(2),
Subject = "General Checkup",
// Allocate Scheduler ResourceCollection Id to the appointment.
ResourceIdCollection = new ObservableCollection() { "1000", "1001" }
};
//Adding the schedule appointment to the schedule appointment collection.
scheduleAppointmentCollection.Add(appointment);
//Adding the schedule appointment collection to the ItemsSource of SfScheduler.
this.Scheduler.ItemsSource = scheduleAppointmentCollection;
```
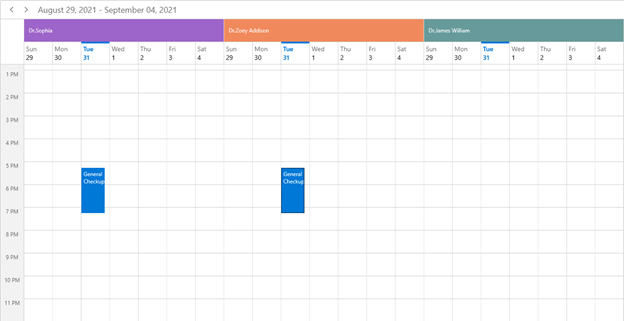
Scheduling Appointments to the Resources in WinUI Scheduler
## Sharing appointments to multiple resources
Also, you can share the same events or appointments with multiple doctors. If the appointment details are edited or updated, then the changes will be reflected in all other shared instances simultaneously.
To achieve this, set the required Scheduler’s [ResourceCollection](https://help.syncfusion.com/cr/winui/Syncfusion.UI.Xaml.Scheduler.SfScheduler.html#Syncfusion_UI_Xaml_Scheduler_SfScheduler_ResourceCollection)
Id to the [ResourceIdCollection](https://help.syncfusion.com/cr/winui/Syncfusion.UI.Xaml.Scheduler.ScheduleAppointment.html#Syncfusion_UI_Xaml_Scheduler_ScheduleAppointment_ResourceIdCollection)
property of the [ScheduleAppointment](https://help.syncfusion.com/cr/winui/Syncfusion.UI.Xaml.Scheduler.ScheduleAppointment.html)
– created object.
Refer to the following code example.
```
// Creating an instance for schedule appointment collection.
var scheduleAppointmentCollection = new ScheduleAppointmentCollection();
//Adding schedule appointment in the schedule appointment collection.
var appointment = new ScheduleAppointment()
{
StartTime = DateTime.Now,
EndTime = DateTime.Now.AddHours(2),
Subject = "Surgery",
// Allocate Scheduler ResourceCollection Id to the appointment.
ResourceIdCollection = new ObservableCollection() { "1000", "1001", "1002" },
AppointmentBackground = new SolidColorBrush(Color.FromArgb(255, 133, 81, 242)),
};
//Adding the schedule appointment to the schedule appointment collection.
scheduleAppointmentCollection.Add(appointment);
//Adding the schedule appointment collection to the ItemsSource of SfScheduler.
this.Scheduler.ItemsSource = scheduleAppointmentCollection;
```
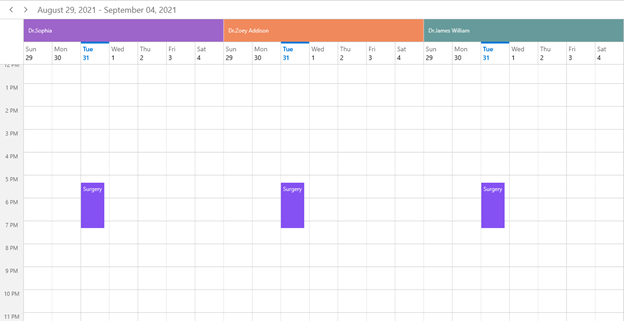
Sharing Appointments to Multiple Resources in WinUI Scheduler
## Data binding
The Scheduler provides complete data binding support to bind any kind of object to the [ResourceCollection](https://help.syncfusion.com/cr/winui/Syncfusion.UI.Xaml.Scheduler.SfScheduler.html#Syncfusion_UI_Xaml_Scheduler_SfScheduler_ResourceCollection)
. Create a custom resource model with the required field Id, Name, and other optional fields like Background and Foreground. Then, map the equivalent properties to the [ResourceMapping](https://help.syncfusion.com/cr/winui/Syncfusion.UI.Xaml.Scheduler.ResourceMapping.html)
API in the **Scheduler** class.
Refer to the following code example. Here, we have created a custom class **Doctor** with mandatory fields ** Name**, ** Id**, ** ForegroundColor**, and ** BackgroundColor**.
```
public class Doctor
{
///
/// Gets or sets the resource name.
///
public string Name { get; set; }
///
/// Gets or sets the resource id.
///
public object Id { get; set; }
///
/// Gets or sets the resource background brush.
///
public Brush BackgroundBrush { get; set; }
///
/// Gets or sets the foreground brush.
///
public Brush ForegroundBrush { get; set; }
}
```
Map the properties of the **Doctor** class with the Scheduler control using the ** ResourceMapping** property like the following code example.
```
```
Then, add the custom resources in the Scheduler’s **ResourceCollection** property.
```
```
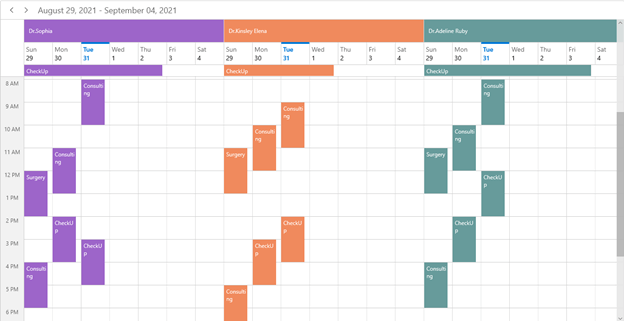
Creating Custom Resources in WinUI Scheduler
**Note:** For more details, refer to [Manage Resources with the Resource View in WinUI Scheduler demo](https://github.com/SyncfusionExamples/manage-the-resources-with-the-resource-view-in-winui-scheduler/tree/main/ResourceView)
on GitHub.
## Appointment rescheduling
If you need to cancel or reschedule a doctor’s appointments, use the built-in [editor](https://help.syncfusion.com/winui/scheduler/appointment-editing)
to dynamically create, edit, or delete them. With the [drag-and-drop](https://help.syncfusion.com/winui/scheduler/appointment-drag-and-drop)
and appointment [resizing](https://help.syncfusion.com/winui/scheduler/appointment-editing#appointment-resizing)
features, you can simply reassign and reschedule the appointments.
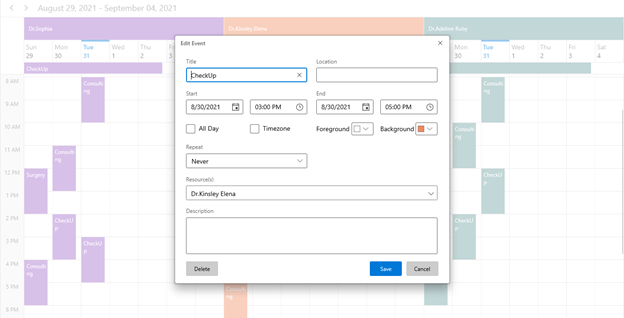
Built-in Editor in WinUI Scheduler
## Resource availability
You can manage and track the absence and unavailability of doctors using the [special time regions](https://help.syncfusion.com/winui/scheduler/resource-grouping#assign-resources-to-special-time-regions)
. This feature allows you to indicate the availability of each doctor. Add the resource Id in the [ResourceIdCollection](https://help.syncfusion.com/cr/winui/Syncfusion.UI.Xaml.Scheduler.ScheduleAppointment.html#Syncfusion_UI_Xaml_Scheduler_ScheduleAppointment_ResourceIdCollection)
property of the [SpecialTimeRegions](https://help.syncfusion.com/cr/winui/Syncfusion.UI.Xaml.Scheduler.SpecialTimeRegion.html)
API in the [DaysViewSettings](https://help.syncfusion.com/cr/winui/Syncfusion.UI.Xaml.Scheduler.DaysViewSettings.html)
for the days view and [TimelineViewSettings](https://help.syncfusion.com/cr/winui/Syncfusion.UI.Xaml.Scheduler.TimelineViewSettings.html)
for the timeline view.
Refer to the following code example.
```
var currentDate = DateTime.Now;
var casualLeave = new SpecialTimeRegion();
casualLeave.Text = "Casual leave";
casualLeave.StartTime = new DateTime(currentDate.Year, currentDate.Month, currentDate.AddDays(-2).Day, 0, 0, 0);
casualLeave.EndTime = new DateTime(currentDate.Year, currentDate.Month, currentDate.AddDays(-2).Day, 23, 59, 0);
casualLeave.Background = new SolidColorBrush(Colors.DarkGray);
casualLeave.Foreground = new SolidColorBrush(Colors.Black);
casualLeave.RecurrenceRule = "FREQ=DAILY;INTERVAL=1;COUNT=1";
casualLeave.ResourceIdCollection = new ObservableCollection() { "2" };
var lunch = new SpecialTimeRegion();
lunch.Text = "Lunch";
lunch.Foreground = new SolidColorBrush(Colors.Black);
lunch.StartTime = new DateTime(currentDate.Year, currentDate.Month, currentDate.AddDays(-1).Day, 12, 0, 0);
lunch.EndTime = new DateTime(currentDate.Year, currentDate.Month, currentDate.AddDays(-1).Day, 13, 0, 0);
lunch.Background = new SolidColorBrush(Colors.DarkGray);
lunch.Foreground = new SolidColorBrush(Colors.Black);
lunch.ResourceIdCollection = new ObservableCollection() { "3" };
lunch.RecurrenceRule = "FREQ=DAILY;INTERVAL=1;COUNT=1";
Scheduler.DaysViewSettings.SpecialTimeRegions = new ObservableCollection() { casualLeave, lunch };
```
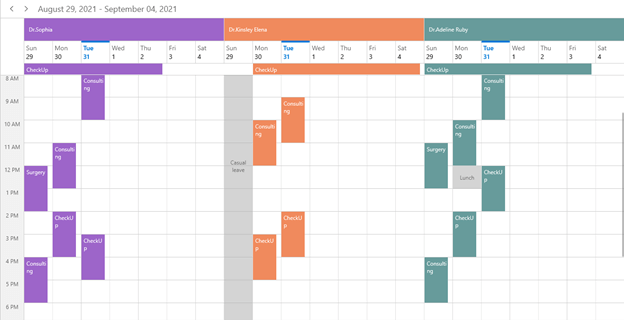
Tracking Resources Availabilty in WinUI Scheduler
## Customization
Using the data template and data template selector features, the Scheduler resource view lets you apply different colors and even alternative views based on the departments in a hospital. To achieve this, use the [ResourceHeaderTemplate](https://help.syncfusion.com/cr/winui/Syncfusion.UI.Xaml.Scheduler.SfScheduler.html#Syncfusion_UI_Xaml_Scheduler_SfScheduler_ResourceHeaderTemplate)
and [ResourceHeaderTemplateSelector](https://help.syncfusion.com/cr/winui/Syncfusion.UI.Xaml.Scheduler.SfScheduler.html#Syncfusion_UI_Xaml_Scheduler_SfScheduler_ResourceHeaderTemplateSelector)
APIs in the Scheduler class.
Refer to the following code example.
```
```
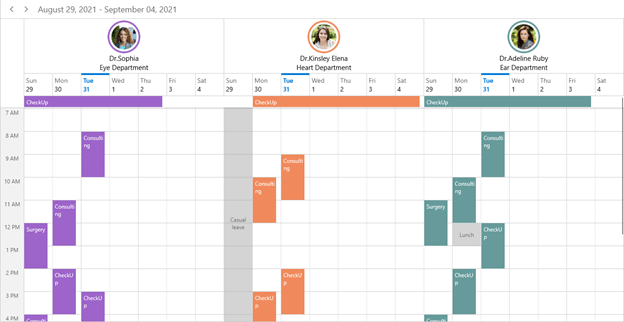
Resource View Customization in WinUI Scheduler
**Note:** For more details, refer to [Custom Resource View in WinUI Scheduler demo on GitHub](https://github.com/SyncfusionExamples/manage-the-resources-with-the-resource-view-in-winui-scheduler/tree/main/CustomResourceView)
.
## Conclusion
Thanks for reading! In this blog post, we have seen how to easily manage and allocate appointments to the resources in a hospital with our [WinUI Scheduler](https://www.syncfusion.com/winui-controls/scheduler)
. Its rich feature set includes date restriction, load-on-demand, flexible working days, localization, globalization, and more. Try out these user-friendly features and enjoy hassle-free scheduling!
If you are an existing Syncfusion user, please download the latest version from the [License and Downloads](https://www.syncfusion.com/account/downloads)
page. Also, our NuGet packages are available on [NuGet.org](https://www.nuget.org/)
.
If you aren’t a customer yet, you can try our 30-day [free trial](https://www.syncfusion.com/downloads)
to check out these features. You can also try our other WinUI control demos from this [GitHub](https://github.com/SyncfusionExamples)
location.
If you have any questions or comments, you can contact us through our [support forums](https://www.syncfusion.com/forums)
, [Direct-Trac](https://www.syncfusion.com/support/directtrac/incidents)
, or [feedback portal](https://www.syncfusion.com/feedback/)
. We are always happy to assist you!
## Related blogs
- [Pick Colors Like a Boss Using Syncfusion Color Controls in WinUI](https://www.syncfusion.com/blogs/post/pick-colors-like-a-boss-using-syncfusion-color-controls-in-winui.aspx)
- [Syncfusion Defers UWP Support in WinUI 3 Suite](https://www.syncfusion.com/blogs/post/syncfusion-defers-uwp-support-in-winui-3-suite.aspx)
- [Everything You Need to Know About the WinUI 3 Range Slider](https://www.syncfusion.com/blogs/post/everything-you-need-to-know-about-the-winui-3-range-slider.aspx)
- [Introducing the New WinUI NumberBox Control](https://www.syncfusion.com/blogs/post/introducing-the-new-winui-numberbox-control.aspx)