() { };
private async void CreatedAsync()
{
await ImageEditor.OpenAsync("nature.png");
}
private async void DrawImageAsync()
{
ImageDimension Dimension = await ImageEditor.GetImageDimensionAsync();
await ImageEditor.DrawImageAsync("bridge.png", Dimension.X, Dimension.Y, 200, 200, true);
}
}
```
## Image resizing
The Blazor Image Editor now provides the capability to resize images. Whether it’s for printing, web display, or any other purpose, this feature allows users to tailor images to the desired specifications. Users also have an option to maintain the image’s aspect ratio or not.
### Achieve through end-user capabilities
You can resize images by selecting the **Resize** button from the toolbar. It displays two text boxes for setting the height and width and a button to enable or disable the aspect ratio, as shown in the following image.
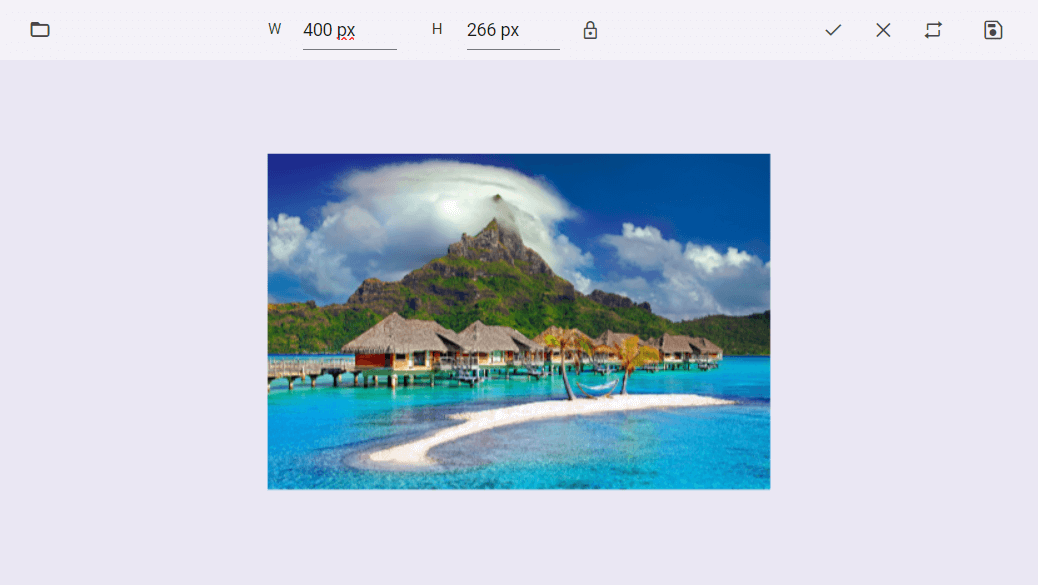
Resizing an image using the toolbar in Blazor Image Editor
### Achieve programmatically
The [ImageResizeAsync](https://help.syncfusion.com/cr/blazor/Syncfusion.Blazor.ImageEditor.SfImageEditor.html#Syncfusion_Blazor_ImageEditor_SfImageEditor_ImageResizeAsync_System_Nullable_System_Int32__System_Nullable_System_Int32__System_Nullable_System_Boolean__)
method resizes an image in the Image Editor. This method takes three parameters that define how the resizing should be carried out:
- **width**: Specifies the resized width of the image.
- **height**: Specifies the resized height of the image.
- **isAspectRatio**: Specifies a Boolean value indicating whether the image should maintain its original aspect ratio during resizing. When set to true, the image will be resized while preserving its aspect ratio.
Refer to the following code example to resize the image using the Blazor Image Editor component.
```
@using Syncfusion.Blazor.ImageEditor
@using Syncfusion.Blazor.Buttons
Aspect ratio
Non aspect ratio
@code {
SfImageEditor ImageEditor;
private List customToolbarItem = new List() {};
private async void CreatedAsync()
{
await ImageEditor.OpenAsync("nature.png");
}
private async void AspectClick()
{
await ImageEditor.ImageResizeAsync(300, 342, true);
}
private async void NonAspectClick()
{
await ImageEditor.ImageResizeAsync(400, 100, true);
}
}
```
## Frames
You can also add decorative borders or frames around images to enhance their overall appearance and appeal. We have provided a few sets of frames: **Mat**, ** Bevel**, ** Line**, ** Hook**, and ** Inset**.
Depending on the frame type selected, users may have additional customization options, such as adjusting the frame’s thickness, color, texture, or other attributes. This allows for fine-tuning the appearance of the frame to match the image’s theme or the user’s preferences.
### Achieve through end-user capabilities
You can add frames by selecting the **Frame** button in the toolbar, which displays a list of frame options available in the Blazor Image Editor. The contextual toolbar will be displayed once the user selects the frame, and it will display customization options based on the selected frame.
Refer to the following image.
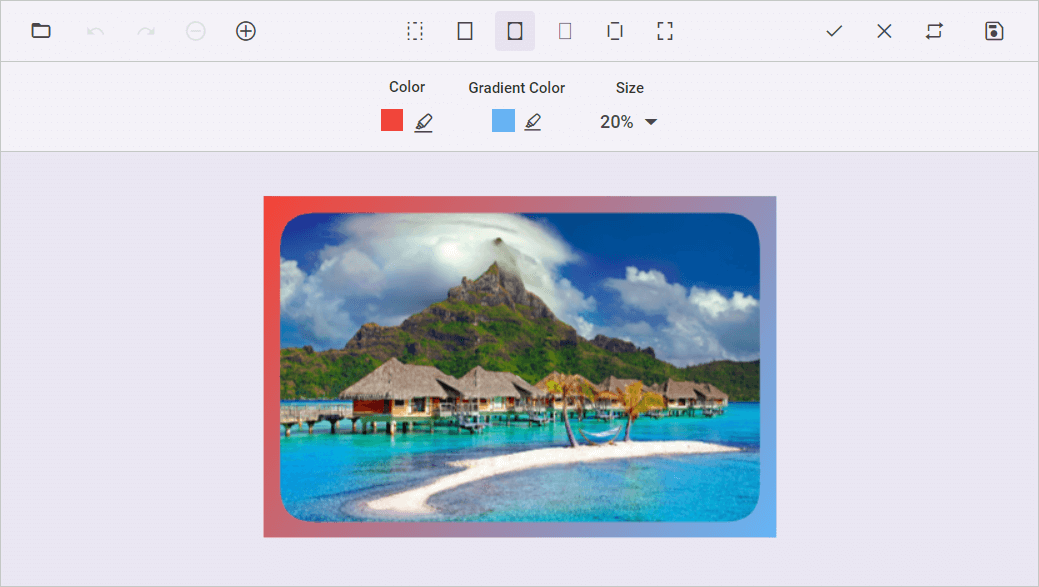
Adding a frame to an image using Blazor Image Editor
### Achieve programmatically
The [DrawFrameAsync](https://help.syncfusion.com/cr/blazor/Syncfusion.Blazor.ImageEditor.SfImageEditor.html#Syncfusion_Blazor_ImageEditor_SfImageEditor_DrawFrameAsync_Syncfusion_Blazor_ImageEditor_FrameType_System_String_System_String_System_Int32_System_Nullable_System_Int32__System_Nullable_System_Int32__System_Nullable_System_Int32__Syncfusion_Blazor_ImageEditor_FrameLineStyle_System_Nullable_System_Int32__)
method applies frames to images. This allows a user to enhance the overall appearance and appeal of an image. This method takes nine parameters to define the properties of the frame:
- **frameType**: Specifies the image data or URL of the image to be inserted.
- **color**: Specifies the color for the frame.
- **gradientColor**: Specifies the gradient color for the frame.
- **size**: Specifies the size of the frame.
- **inset**: Specifies the inset value for line, hook, and inset-type frames.
- **offset**: Specifies the offset value for line and inset type frames.
- **borderRadius**: Specifies the border radius for line-type frames.
- **frameLineStyle**: Specifies the frame line style for line type frames.
- **lineCount**: Specifies the line count for line type frames.
Refer to the following code example to apply a frame to an image using the Blazor Image Editor.
```
@using Syncfusion.Blazor.ImageEditor
@using Syncfusion.Blazor.Buttons
Mat
Bevel
Line
Inset
Hook
@code {
SfImageEditor ImageEditor;
private List customToolbarItem = new List() { };
private async void OpenAsync()
{
await ImageEditor.OpenAsync("nature.png");
}
private async void MatClick()
{
await ImageEditor.DrawFrameAsync(FrameType.Mat, "red", "blue", 20, 20, 20, 20, FrameLineStyle.Solid, 1);
}
private async void BevelClick()
{
await ImageEditor.DrawFrameAsync(FrameType.Bevel, "red", "blue", 20, 20, 20, 20, FrameLineStyle.Solid, 1);
}
private async void LineClick()
{
await ImageEditor.DrawFrameAsync(FrameType.Line, "red", "blue", 20, 20, 20, 20, FrameLineStyle.Solid, 1);
}
private async void InsetClick()
{
await ImageEditor.DrawFrameAsync(FrameType.Inset, "red", "blue", 20, 20, 20, 20, FrameLineStyle.Solid, 1);
}
private async void HookClick()
{
await ImageEditor.DrawFrameAsync(FrameType.Hook, "red", "blue", 20, 20, 20, 20, FrameLineStyle.Solid, 1);
}
}
```
## Conclusion
Thanks for reading! We hope you enjoyed this quick introduction to the new features of our [Blazor Image Editor component](https://www.syncfusion.com/blazor-components/blazor-image-editor)
. If you would like to give it a try, please download the latest available version of Essential Studio***®***, [2023 Volume 3](https://www.syncfusion.com/forums/184588/essential-studio-2023-volume-3-main-release-v23-1-36-is-available-for-download)
. Experience wonderful image editing with this component, and provide your valuable feedback in the comments section below.
Also, check out our [Release Notes](https://blazor.syncfusion.com/documentation/release-notes/23.1.36?type=all)
and the [What’s New](https://www.syncfusion.com/products/whatsnew)
pages to see the other available features in the 2023 Volume 3 release.
The new version is available for existing customers on the [License and Downloads](https://www.syncfusion.com/account/downloads)
page. If you are not a Syncfusion customer, try our 30-day [free trial](https://www.syncfusion.com/downloads)
to check out our controls’ features.
You can also contact us through our [support forums](https://www.syncfusion.com/forums)
, [support portal](https://support.syncfusion.com)
, or [feedback portal](https://www.syncfusion.com/feedback/)
. We are always happy to assist you!
## Related blogs
- [Syncfusion Essential Studio® 2023 Volume 3 Is Here!](https://www.syncfusion.com/blogs/post/syncfusion-essential-studio-2023-volume-3.aspx)
- [What’s New in Syncfusion Blazor: 2023 Volume 3](https://www.syncfusion.com/blogs/post/syncfusion-blazor-2023-volume-3.aspx)
- [Enhancing Data Visualization with a Nested Grid UI in Blazor TreeGrid](https://www.syncfusion.com/blogs/post/nested-grid-in-blazor-treegrid.aspx)
- [Smartly Customize the Blazor Linear Gauge to Reproduce a Step Progress Bar](https://www.syncfusion.com/blogs/post/blazor-linear-gauge-to-step-progress-bar.aspx)