Video calling has become an essential part of team collaboration as teams are more geographically diverse than ever.
Many folks work remotely or in a hybrid setup, resulting in team members in different parts of the world. Regardless of their location, video calls allow teams to connect with a single click and get the job done.
Agora is an online service that provides a real-time collaboration mechanism using voice, video, and messaging, and Syncfusion has UI component libraries that help developers quickly create a web application with a rich set of predefined and extensible components.
In this blog, we’ll create a video-calling web app in React using Syncfusion React components and Agora, where users with the same channel name (meeting code) can collaborate.
Let’s get started.
Setting up Agora
Log in to Agora, navigate to the console, and set up the token. We need the token, app ID, and channel name to join a channel.
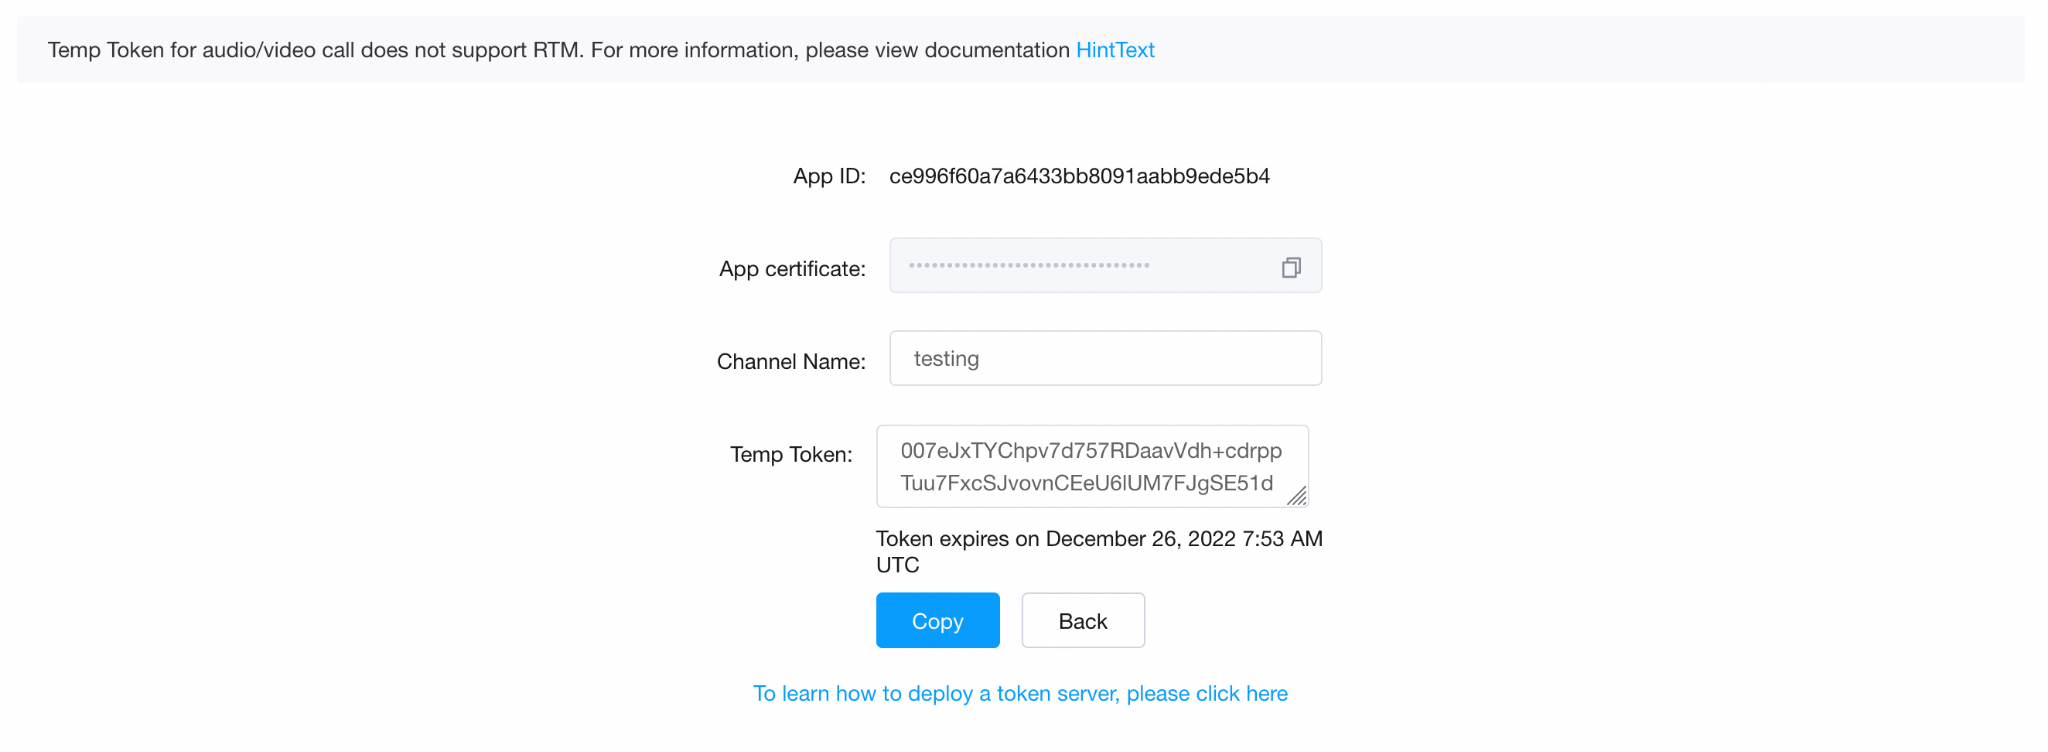 For testing, we are going to use the web dashboard provided by Agora, where we will create a dummy channel.
 Then through our React app, we will join that channel.

React app for video calling
Create a fresh instance of create-react-app using the following command:
npx create-react-app video-call
Install the following dependencies:
Agora
"agora-rtc-react":"github:AgoraIO-Community/agora-rtc-react#v1.1.3"
This is a React SDK that comes with essential hooks that make it easy to create functional components with Agora services.
Syncfusion
"@syncfusion/ej2-icons": "^20.3.56",
"@syncfusion/ej2-layouts": "^20.3.58",
"@syncfusion/ej2-react-buttons": "^20.3.58",
"@syncfusion/ej2-react-inputs": "^20.3.57",
"@syncfusion/ej2-react-layouts": "^20.4.38",
This is a set of UI components that we will need during development.
Now that we have all the dependencies installed, let’s begin creating the application.
The application is divided into two parts:
- A landing page where the user enters the channel name they want to join.
- A video page where all the users that have joined the channel are listed.
Entry file
We have an entry file where, based on whether the user has joined the channel, we will show the landing page or the video page.
App.js
import React, { useState } from "react";
import VideoCall from "./VideoCall";
import ChannelForm from "./ChannelForm";
import "./App.css";

const App = () => {
  const [inCall, setInCall] = useState(false);
  const [channelName, setChannelName] = useState("");

  return (
    <div>
  	{inCall ? (
    	<VideoCall setInCall={setInCall} channelName={channelName} />
  	) : (
    	<ChannelForm setInCall={setInCall} setChannelName={setChannelName} />
  	)}
    </div>
  );
};

export default App;Landing page
The landing page of our application is where the user enters the channel name they want to join.
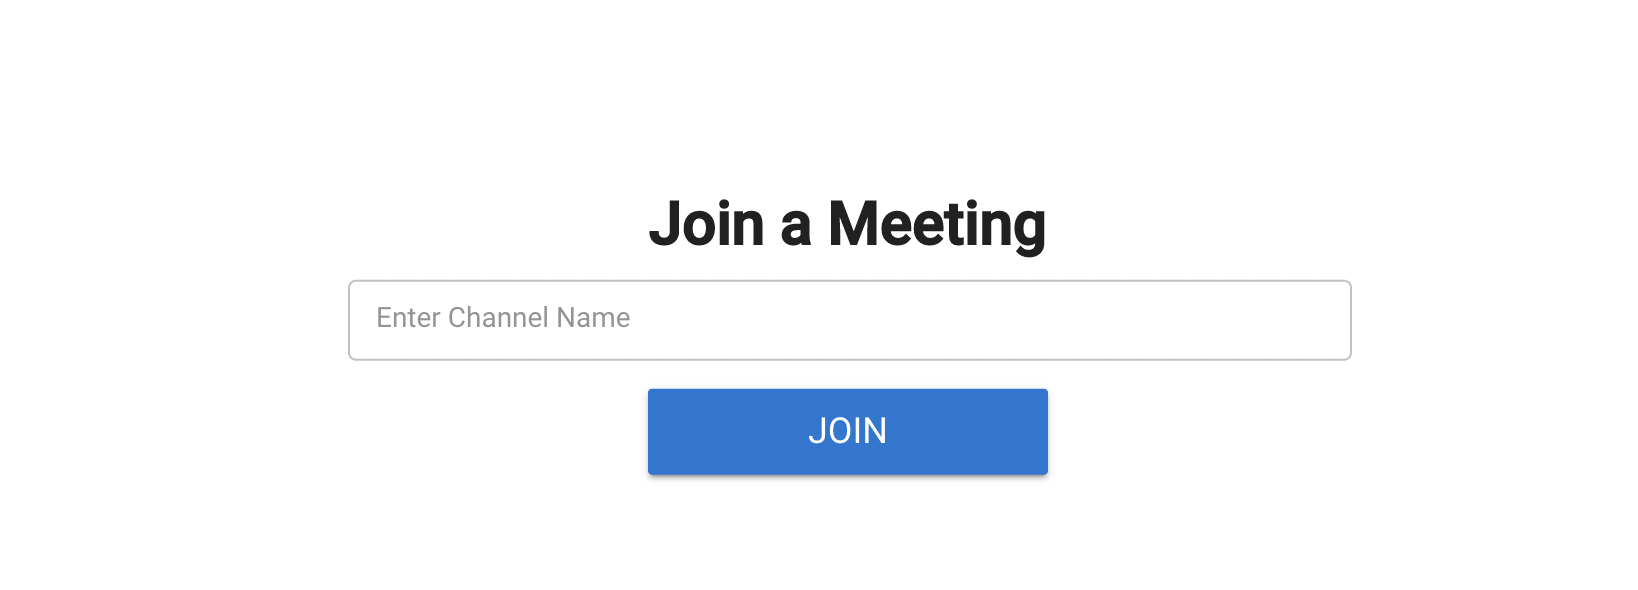 The page will have an input element and a button. The input element will accept the channel name, persist it in the state, and forward it to the video call component through which the current user joins the channel.
Syncfusion already has a rich set of buttons and input boxes that we are going to utilize here.
Also, we will maintain a flag just to determine if the current user has successfully joined the channel and then we can update the view.
ChannelForm.js
import React from "react";
import { TextBoxComponent } from "@syncfusion/ej2-react-inputs";
import { ButtonComponent } from "@syncfusion/ej2-react-buttons";
import "@syncfusion/ej2-base/styles/material.css";
import "@syncfusion/ej2-inputs/styles/material.css";
import "@syncfusion/ej2-buttons/styles/material.css";
import "@syncfusion/ej2-layouts/styles/material.css";

const ChannelForm = (props) => {
  const { setInCall, setChannelName } = props;

  return (
      <div className="e-card wrapper">
  	<div className="wrapper-inner">
    	 <h1 className="heading">Join a Meeting</h1>
    	 <form className="join">
      	  <TextBoxComponent
        	 type="text"
        	 placeholder="Enter Channel Name"
        	 floatLabelType="Auto"
        	 input={({ value }) => setChannelName(value)}
        	 cssClass="e-outline"
      	  />
      	  <ButtonComponent
        	 type="submit"
        	 cssClass="e-info"
        	 style={{ fontSize: "18px", padding: "10px 20px" }}
        	 onClick={(e) => {
          	 e.preventDefault();
          	 setInCall(true);
        	}}
      	   >
        	Join
      	   </ButtonComponent>
    	 </form>
       </div>
     </div>
  );
};

export default ChannelForm;
Video page
The video page is the main parent component where all the business logic is. This component has two subcomponents:
- Controls where the controls to mute, unmute, and leave the channel are.
- Dashboard where all the users who have joined the channel are shown.
We are also going to use two hooks provided by the Agora-React-SDK that help us do the following:
- Get the client details and join the channel.
- Get the camera and microphone details.
These hooks are the key to creating the video call service in React because they abstract all the logic.
Hook.js
We need to provide the basic configurations for initializing the client. They are the basic mode and codec specifications.
Refer to the following code:
import { createClient, createMicrophoneAndCameraTracks } from "agora-rtc-react";

const config = {
  mode: "rtc",
  codec: "vp8",
};

function useAgora() {
  const useClient = createClient(config);
  const useMicrophoneAndCameraTracks = createMicrophoneAndCameraTracks();

  return [useClient, useMicrophoneAndCameraTracks];
}

export default useAgora;
Now that we have the hooks in place, we can use the same client throughout the application.
Using these hooks, we’ll create a new instance for the current user and join the channel.
Refer to the following code example:
VideoCall.js
import React, { useEffect, useState } from "react";
import useAgora from "./Hook";
import Controls from "./Controls";
import WebDashboard from "./Dashboard";

const appId = ""; //ENTER APP ID HERE
const token = ""; // ENTER TOKEN HERE

const VideoCall = (props) => {
  const { setInCall, channelName } = props;
  const [useClient, useMicrophoneAndCameraTracks] = useAgora();
  const [users, setUsers] = useState([]);
  const [start, setStart] = useState(false);
  const client = useClient();
  const { ready, tracks } = useMicrophoneAndCameraTracks();

  useEffect(() => {
     // function to initialise the SDK
     let init = async (name) => {
       client.on("user-published", async (user, mediaType) => {
         await client.subscribe(user, mediaType);
    	 console.log("subscribe success");
    	 if (mediaType === "video") {
      	   setUsers((prevUsers) => {
             return [...prevUsers, user];
      	   });
    	 }
    	 if (mediaType === "audio") {
      	   user.audioTrack?.play();
    	 }
       });

       client.on("user-unpublished", (user, type) => {
    	 console.log("unpublished", user, type);
    	 if (type === "audio") {
      	   user.audioTrack?.stop();
    	 }
    	 if (type === "video") {
      	  setUsers((prevUsers) => {
            return prevUsers.filter((User) => User.uid !== user.uid);
      	  });
        }
     });

     client.on("user-left", (user) => {
       console.log("leaving", user);
       setUsers((prevUsers) => {
      	  return prevUsers.filter((User) => User.uid !== user.uid);
       });
     });

     await client.join(appId, name, token, null);
     if (tracks) await client.publish([tracks[0], tracks[1]]);
     setStart(true);
   };

   if (ready && tracks) {
     console.log("init ready");
     init(channelName);
   }
 }, [channelName, ready, tracks]);

 return (
   <div className="App">
    {ready && tracks && <Controls tracks={tracks} setStart={setStart} setInCall={setInCall} />}
    {start && tracks && <WebDashboard users={users} tracks={tracks} />}
   </div>
 );
};

export default VideoCall;
Using the app ID and token that we received from console.agora.io, we can join the channel when this component mounts.
We must publish the current user so that others can subscribe and listen to them and similarly subscribe to incoming streams that other users have already published.
Agora provides multiple events that we can listen to and do the necessary actions required. For example, whenever a user leaves the channel, the user-left event will be triggered and we can listen to it and remove that user from the stream.
We also store the user list, audio, and videoo that the video and audio can be streamed later for reference.
The final part is creating a component to show all the streams and controls to mute and unmute video and audio and leave the channel.
Controls
There is a set of methods available on provided through the SDK that we can use to toggle the audio and video.
For leaving the channel, we must leave the client and close the ongoing stream so that all the other users are notified that the user has left the channel.
Refer to the following code example:
Controls.js
import React, { useState } from "react";
import useAgora from "./Hook";

const Controls = (props) => {
  const [useClient] = useAgora();
  const client = useClient();
  const { tracks, setStart, setInCall } = props;
  const [trackState, setTrackState] = useState({ video: true, audio: true });

  const mute = async (type) => {
    if (type === "audio") {
       await tracks[0].setEnabled(!trackState.audio);
       setTrackState((ps) => {
    	return { ...ps, audio: !ps.audio };
       });
    } else if (type === "video") {
  	await tracks[1].setEnabled(!trackState.video);
  	setTrackState((ps) => {
    	   return { ...ps, video: !ps.video };
  	});
    }
  };

  const leaveChannel = async () => {
     await client.leave();
     client.removeAllListeners();
     tracks[0].close();
     tracks[1].close();
     setStart(false);
     setInCall(false);
  };

  return (
    <div className="controls">
        <p className={trackState.audio ? "on" : ""} onClick={() => mute("audio")}>
    	  {trackState.audio ? "MuteAudio" : "UnmuteAudio"}
  	</p>
  	<p className={trackState.video ? "on" : ""} onClick={() => mute("video")}>
    	  {trackState.video ? "MuteVideo" : "UnmuteVideo"}
  	</p>
  	{<p onClick={() => leaveChannel()}>Leave</p>}
    </div>
  );
};

export default Controls;
Dashboard
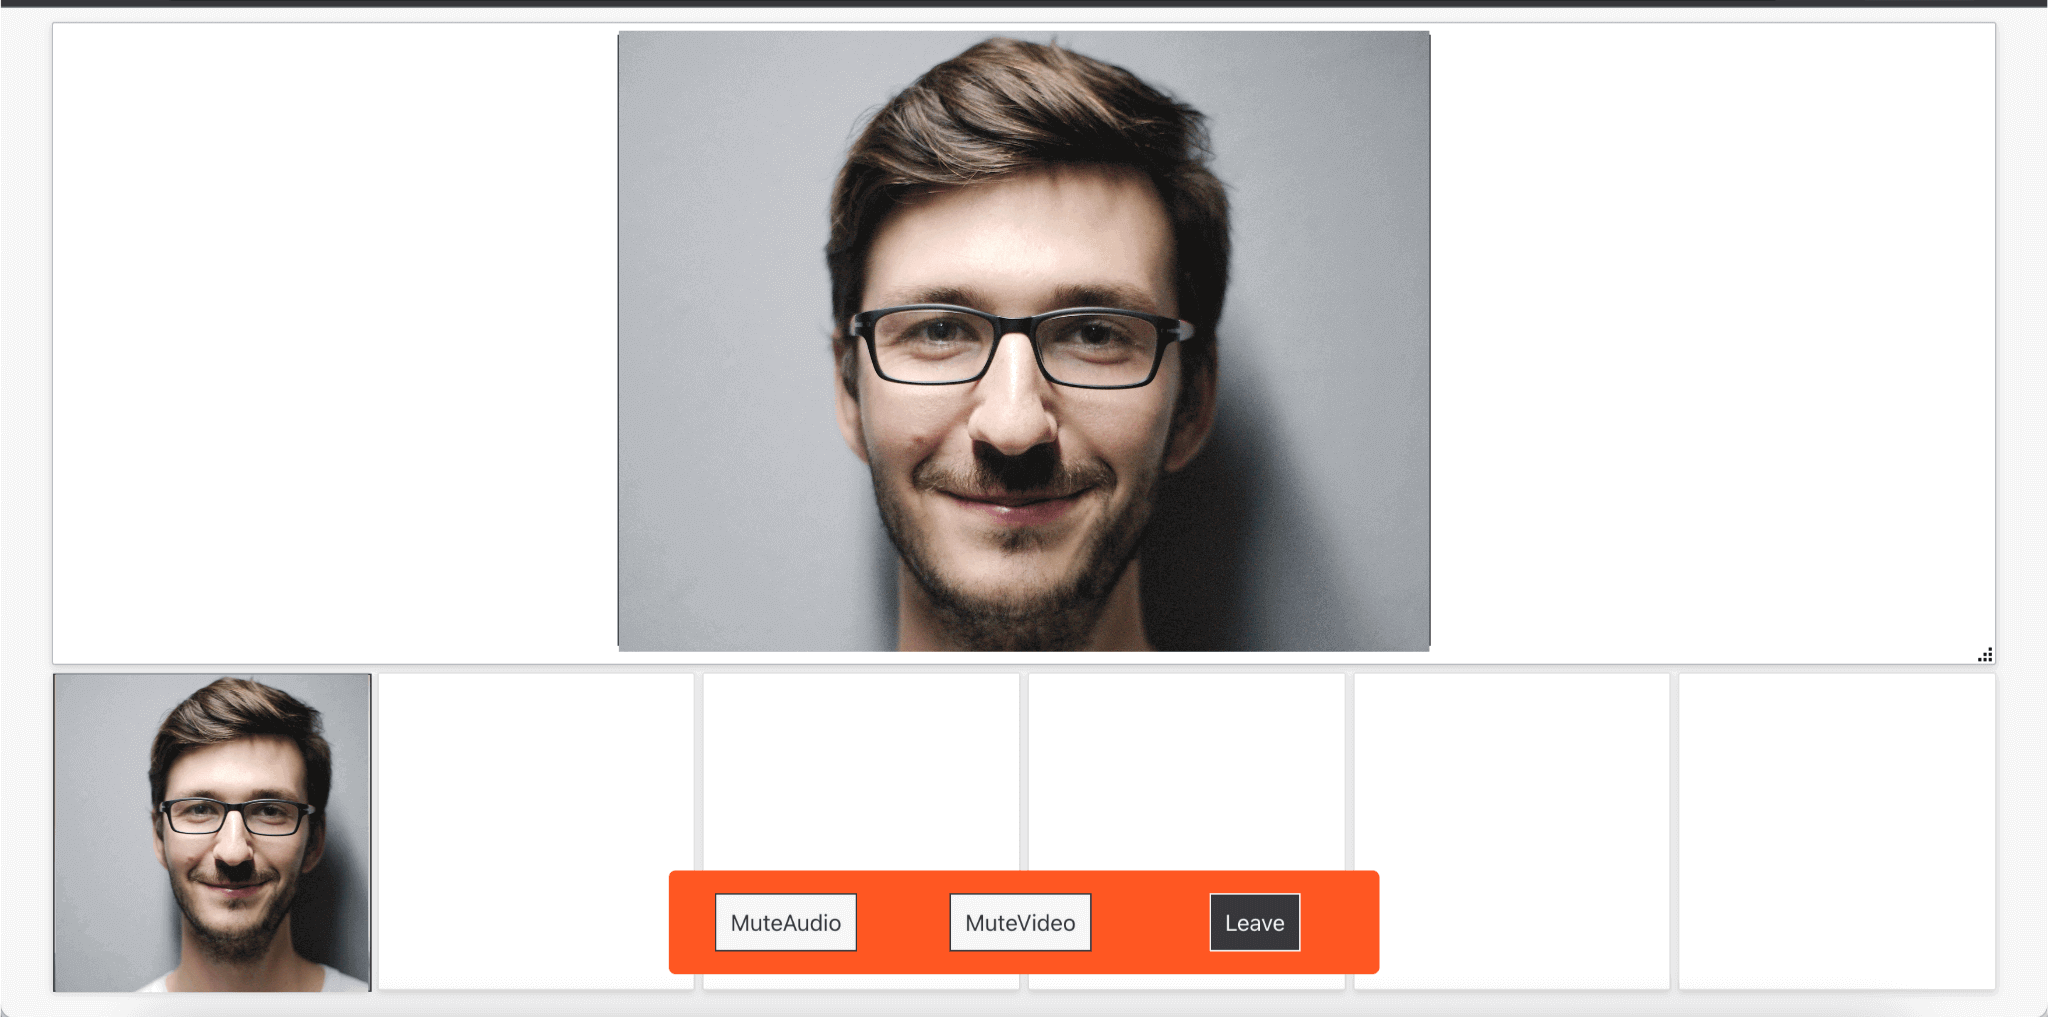
For running the streams, we are going to create a dashboard using the Dashboad component provided by Syncfusion. It is a resizable, draggable, and flexible card with APIs that are very user-friendly.
The current user stream will be shown at the top in a large size, while the other users will be listed at the bottom in smaller cards.
For this demo, I have created multiple empty user cards and I have joined the stream from two instances, one normal and one incognito.
All we must do is display the stream that we have published (the current user) in a large size and display all the incoming streams in the smaller cards.
Refer to the following code example:
Dashboard.js
import React from "react";
import { AgoraVideoPlayer } from "agora-rtc-react";
import { DashboardLayoutComponent } from "@syncfusion/ej2-react-layouts";

import "@syncfusion/ej2-layouts/styles/material.css";

const WebDashboard = (props) => {
  const { users, tracks } = props;

  const onPanelResize = (args) => {
    if (
      args.element &&
      args.element.querySelector(".e-panel-container .e-panel-content div div div")
    ) {
  	let chartObj = args.element.querySelector(".e-panel-container .e-panel-content div div div")
    	.ej2_instances[0];
  	const height = args.element.querySelector(".e-panel-container .e-panel-content").clientHeight;
  	chartObj.height = `${height - 20}`;
  	chartObj.width = "100%";
  	chartObj.refresh();

      }
  };

  const dummy = new Array(users.length < 6 ? 6 : users.length).fill(0);

  return (
     <div className="control-section" id="predefine_control">
      <div className="content-wrapper" style={{ maxWidth: "95%", margin: "10px auto" }}>
    	<DashboardLayoutComponent
      	  created={() => {}}
      	  columns={6}
      	  id="predefine_dashboard"
      	  cellSpacing={[5, 5]}
      	  resizeStop={onPanelResize}
      	  allowResizing={true}
      	  allowDragging={true}
        >
        <div id="one" className="e-panel" data-row="0" data-col="0" data-sizex="6" data-sizey="2">
         <span id="close" className="e-template-icon e-clear-icon" />
         <div className="e-panel-container">
           <AgoraVideoPlayer
              className="vid"
              videoTrack={tracks[1]}
              style={{ height: "95%", width: "570px", margin: "8px auto" }}
           />
         </div>
       </div>
       {dummy.map((e, index) => (
        <div
          id={`user-${index}`}
          className="e-panel"
          data-row="2"
          data-col={index}
          data-sizex="1"
          data-sizey="1"
          key={`user-${index}`}
        >
        <span id="close" className="e-template-icon e-clear-icon" />
        <div className="e-panel-container">
           {users[index]?.videoTrack && (
              <AgoraVideoPlayer
                  className="vid"
                  videoTrack={users[index].videoTrack}
                  key={users[index].uid}
                  style={{ height: "100%", width: "100%" }}
              />
           )}
        </div>
       </div>
      ))}
     </DashboardLayoutComponent>
   </div>
  </div>
 );
};

export default WebDashboard;
That’s all there is to it. The application is ready. On running the application, you will get an output similar to the following screenshot.
Resources
For more information, refer to the video-calling React application project on GitHub.
Conclusion
I hope you found this blog useful. Try creating your own video-calling application in React using Agora and Syncfusion React components and share your feedback in the comment section below.
The Syncfusion Essential Studio for React suite offers over 80 high-performance, lightweight, modular, and responsive UI components in a single package. It’s the only suite you’ll ever need to construct a complete app.
If you have questions, contact us through our support forum, support portal, or feedback portal. We are always happy to assist you!