---
title: "AI-Driven Smart Location Search in .NET MAUI Maps"
published_at: "2024-09-23T11:29:39+00:00"
modified_at: "2025-11-06T07:35:14+00:00"
url: "https://www.syncfusion.com/blogs/post/smart-location-search-in-maui-maps"
excerpt: "Let's see how to add AI-driven smart location searching feature in the Syncfusion .NET MAUI Maps control with code examples."
taxonomy_category:
- ".NET MAUI"
- "Desktop"
- "Mobile"
- "Smart AI components"
- "UI"
- "What's new"
taxonomy_post_tag:
- ".NET MAUI"
- "AI"
- "desktop"
- "Maps"
- "MAUI"
- "Mobile"
- "What's New"
---
# AI-Driven Smart Location Search in .NET MAUI Maps
[Muniappan Subramanian](https://www.syncfusion.com/blogs/author/muniappan-subramanian)
**TL;DR:** Let’s see how to integrate OpenAI with Syncfusion .NET MAUI Maps for AI-powered smart location search. We’ll use Azure OpenAI for generating map markers, set up .NET MAUI Autocomplete for user input, and design custom markers with tooltips. This integration enhances map-based searches with AI-generated geographic details.
Unlock the power of AI to effortlessly locate specific places or landmarks by integrating **OpenAI’s** advanced services into Syncfusion [.NET MAUI Maps](https://www.syncfusion.com/maui-controls/maui-maps)
.
In this blog, we will explore how to achieve this integration, making it easier for users to find exact locations on the map.
Let’s get started!
## Integrating Azure OpenAI with the .NET MAUI app
First, open [Visual Studio](https://visualstudio.microsoft.com/)
and [create a new .NET MAUI app](https://learn.microsoft.com/en-us/dotnet/maui/get-started/first-app?view=net-maui-7.0&tabs=vswin&pivots=devices-android)
.
Before unlocking the power of AI to locate specific places effortlessly, ensure that you have access to [Azure OpenAI](https://azure.microsoft.com/en-in/products/ai-services/openai-service)
and have set up a deployment in the **Azure** portal. You can find the [Azure.AI.OpenAI](https://www.nuget.org/packages/Azure.AI.OpenAI/1.0.0-beta.12)
NuGet package in the [NuGet Gallery](https://www.nuget.org/)
and install it in the project.
Once you get your key and endpoint, follow these steps:
### Step 1: Set up Azure OpenAI
To configure Azure OpenAI, we’ll use the **GPT-4O** model for text and the ** DALL-E** model for images. Set up the ** OpenAIClient** as shown in the following code example.
```
internal class AzureOpenAIService
{
const string endpoint = "https://{YOUR_END_POINT}.openai.azure.com";
const string deploymentName = "GPT-4O";
const string imageDeploymentName = "DALL-E";
string key = "API key";
OpenAIClient? client;
ChatCompletionsOptions? chatCompletions;
internal AzureOpenAIService()
{
}
}
```
### Step 2: Connect to the Azure OpenAI
Let’s set up the connection to Azure OpenAI. Refer to the following code.
```
// At the time of required.
this.client = new OpenAIClient(new Uri(endpoint), new AzureKeyCredential(key)
```
This connection allows you to send prompts to the model and **receive responses**, which can be used to generate map markers for .NET MAUI Maps.
### Step 3: Get the result from the AI service
Implement the **GetResultsFromAI** and ** GetImageFromAI** methods to retrieve responses from the ** OpenAI** API based on user input.
```
///
/// Retrieves an answer from the deployment name model using the provided user prompt.
///
/// The user prompt.
/// The AI response.
public async Task GetResultsFromAI(string userPrompt)
{
if (this.Client != null && this.chatCompletions != null)
{
// Add the system message and user message to the options.
this.chatCompletions.Messages.Add(new ChatRequestSystemMessage("You are a predictive analytics assistant."));
this.chatCompletions.Messages.Add(new ChatRequestUserMessage(userPrompt));
try
{
var response = await Client.GetChatCompletionsAsync(this.chatCompletions);
return response.Value.Choices[0].Message.Content;
}
catch
{
return string.Empty;
}
}
return string.Empty;
}
///
/// Retrieves an image from the image deployment name model using the provided location name.
///
/// The location name.
/// The AI response.
public async Task GetImageFromAI(string? locationName)
{
var imageGenerations = await Client!.GetImageGenerationsAsync(
new ImageGenerationOptions()
{
Prompt = $"Share the {locationName} image. If the image is not available share common image based on the location",
Size = ImageSize.Size1024x1024,
Quality = ImageGenerationQuality.Standard,
DeploymentName = imageDeploymentName,
});
var imageUrl = imageGenerations.Value.Data[0].Url;
return new Uri(imageUrl.ToString());
}
```
That’s it! The **AzureOpenAIService** class now offers a convenient way to interact with the ** OpenAI** API and retrieve completion results based on the provided ** prompt**.
## Integrating AI-powered smart location search in .NET MAUI Autocomplete
Let’s design the AI-powered smart location search UI using the [.NET MAUI Autocomplete](https://www.syncfusion.com/maui-controls/maui-autocomplete)
control and then map the selected location into the **.NET MAUI** ** Maps** control. Before proceeding, please refer to the getting started documentation for both Syncfusion [.NET MAUI Maps](https://help.syncfusion.com/maui/maps/getting-started)
and [Autocomplete](https://help.syncfusion.com/maui/autocomplete/getting-started)
controls.
### Step 1: Create a custom marker model
Create a custom marker model to define geographic location information for .NET MAUI **Maps tile layer markers**. The model can also include a name, details, address, and image to provide additional information for the ** marker tooltip**.
```
///
/// Represents information about a geographic location, including its name, details, coordinates, address and image.
///
public class CustomMarker : MapMarker
{
///
/// Gets or sets the name.
///
public string? Name { get; set; }
///
/// Gets or sets the details.
///
public string? Details { get; set; }
///
/// Gets or sets the image source.
///
public Uri? Image { get; set; }
///
/// Gets or sets the address.
///
public string? Address { get; set; }
///
/// Gets or sets the image name.
///
public string? ImageName { get; set; }
}
```
### Step 2: Add Maps tile layer in .NET MAUI Maps
Now, add a [tile layer](https://help.syncfusion.com/maui/maps/getting-started#add-tile-layer)
in the .NET MAUI Maps that can be used to search for and locate landmarks based on user input.
Refer to the following code example.
```
xmlns:maps="clr-namespace:Syncfusion.Maui.Maps;assembly=Syncfusion.Maui.Maps"
```
### Step 3: Customizing the .NET MAUI Maps marker and tooltips
In this step, we’ll customize the .NET MAUI Maps markers and tooltips to effectively display relevant information, thereby improving the overall user experience on the map.
```
xmlns:maps="clr-namespace:Syncfusion.Maui.Maps;assembly=Syncfusion.Maui.Maps"
```
Refer to the following code example to select the marker tooltip data template.
```
public class MarkerTemplateSelector : DataTemplateSelector
{
///
/// Gets or sets the normal template.
///
public DataTemplate? NormalTemplate { get; set; }
///
/// Gets or sets the detail template.
///
public DataTemplate? DetailTemplate { get; set; }
///
/// Selects a data template based on the properties of the given custom marker item.
///
/// The custom marker item.
/// The bindable object.
/// Return suitable template.
protected override DataTemplate? OnSelectTemplate(object item, BindableObject container)
{
var customMarker = (CustomMarker)item;
return customMarker.Address == null ? NormalTemplate : DetailTemplate;
}
}
```
### Step 4: Integrating .NET MAUI Autocomplete in searching UI
Then, we’ll add the .NET MAUI Autocomplete control to collect the user input, which can then be passed to an AI service to retrieve geometric details.
Refer to the following code example to add the .NET MAUI Autocomplete control and design a search button.
```
xmlns:editors="clr-namespace:Syncfusion.Maui.Inputs;assembly=Syncfusion.Maui.Inputs"
```
### Step 5: Enable AI-powered smart searching in .NET MAUI Maps
Finally, let’s add the **prompt** that requests the AI service to convert the user input into geographic locations in ** JSON** format. The ** JSON**data is then parsed into custom markers, which are added to the **.NET MAUI Maps** by using its ** Markers** property in the ** MapTileLayer** class.
````
///
/// Method to contain AI response and updates.
///
///
///
private async Task GetRecommendationAsync(string userQuery)
{
if (this.autoComplete == null || this.mapTileLayer == null || this.zoomPanBehavior == null)
{
return;
}
if (string.IsNullOrWhiteSpace(this.autoComplete.Text))
{
return;
}
if (this.busyIndicator != null)
{
this.busyIndicator.IsVisible = true;
this.busyIndicator.IsRunning = true;
}
//Prompt that requests the AI service to convert the user input into geographic locations.
string prompt = $"Given location name: {userQuery}" +
$"\nSome conditions need to follow:" +
$"\nCheck the location name is just a state, city, capital or region, then retrieve the following fields: location name, detail, latitude, longitude, and set address value as null" +
$"\nOtherwise, retrieve minimum 5 to 6 entries with following fields: location's name, details, latitude, longitude, address." +
$"\nThe return format should be the following JSON format: markercollections[Name, Details, Latitude, Longitude, Address]" +
$"\nRemove ```json and remove ``` if it is there in the code." +
$"\nProvide JSON format details only, No need any explanation.";
var returnMessage = await azureAIHelper.GetResultsFromAI(prompt);
var jsonObj = new JObject();
jsonObj = JObject.Parse(returnMessage);
this.customMarkers?.Clear();
foreach (var marker in jsonObj["markercollections"])
{
CustomMarker customMarker = new CustomMarker();
customMarker.Name = (string)marker["Name"];
customMarker.Details = (string)marker["Details"];
customMarker.Address = (string)marker["Address"];
customMarker.Latitude = StringToDoubleConverter((string)marker["Latitude"]);
customMarker.Longitude = StringToDoubleConverter((string)marker["Longitude"]);
if (this.azureAIHelper.Client != null)
{
customMarker.Image = await azureAIHelper.GetImageFromAI(customMarker.Name);
customMarker.ImageName = string.Empty;
}
//JSON data is then parsed into custom markers to add in .NET MAUI Maps.
this.customMarkers?.Add(customMarker);
}
this.mapTileLayer.Markers = this.customMarkers;
this.mapTileLayer.EnableCenterAnimation = true;
if (this.customMarkers != null && this.customMarkers.Count > 0)
{
var firstMarker = this.customMarkers[0];
this.mapTileLayer.Center = new MapLatLng
{
Latitude = firstMarker.Latitude,
Longitude = firstMarker.Longitude,
};
if (this.azureAIHelper.Client != null)
{
this.zoomPanBehavior.ZoomLevel = 10;
}
}
}
````
Refer to the following output image.
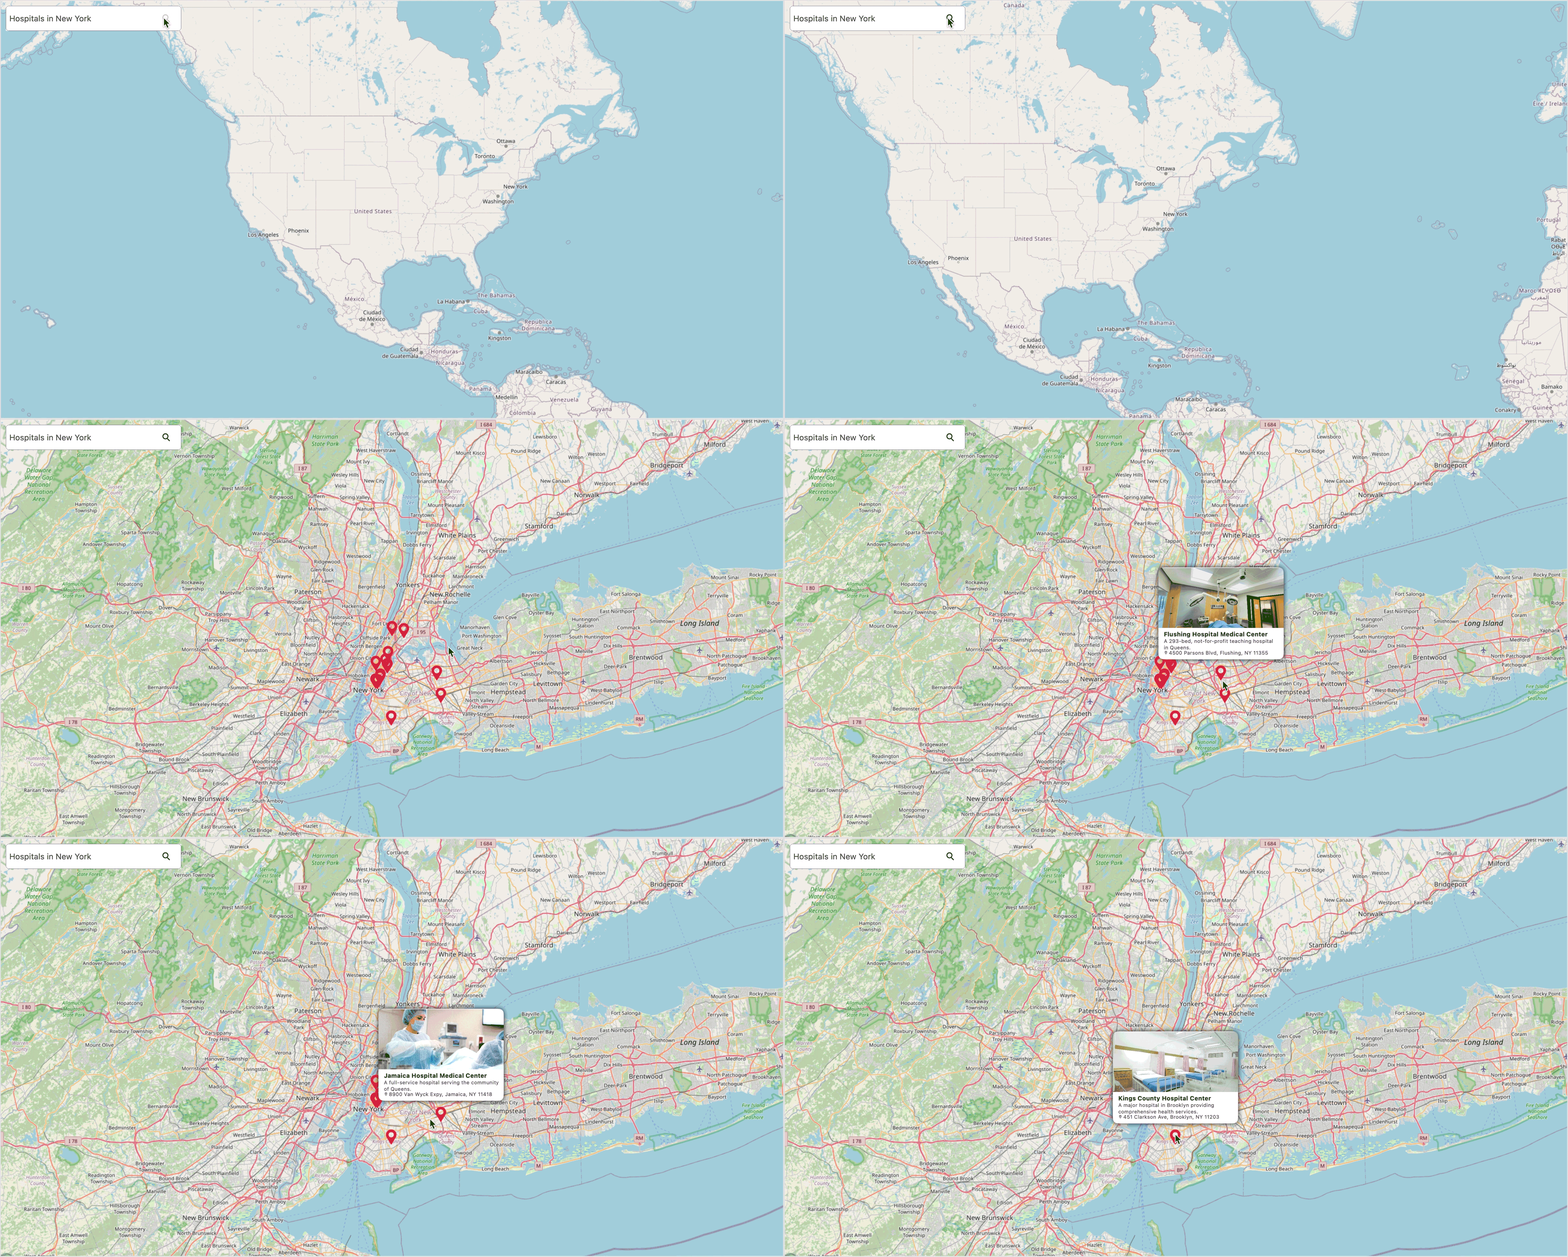
Integrating AI-driven smart location search in .NET MAUI Maps
## GitHub reference
For more details, refer to the [AI-driven smart search in the .NET MAUI Maps GitHub demo](https://github.com/SyncfusionExamples/Integrating-AI-Driven-Location-Search-into-.NET-MAUI-Maps)
.
## Conclusion
Thanks for reading! In this blog, we’ve explored how to integrate AI-driven smart location search in the Syncfusion [.NET MAUI Maps](https://www.syncfusion.com/maui-controls/maui-maps)
. This feature is available in the latest [2024 Volume 3](https://www.syncfusion.com/forums/194459/essential-studio-2024-volume-3-main-release-v27-1-48-is-available-for-download)
release. You can check out all the features in our [Release Notes](https://help.syncfusion.com/common/essential-studio/release-notes/v27.1.48)
and [What’s New](https://www.syncfusion.com/products/whatsnew)
pages.
Existing customers can download the latest version of Essential Studio® from the [License and Downloads](https://www.syncfusion.com/account)
page. If you are not yet a customer, you can try our 30-day [free trial](https://www.syncfusion.com/downloads)
to check out these new features.
If you have questions, you can contact us through our [support forum](https://www.syncfusion.com/forums)
, [feedback portal](https://www.syncfusion.com/feedback)
, or [support portal](https://support.syncfusion.com/)
. We are always happy to assist you!
## Related blogs
- [Syncfusion Essential Studio® 2024 Volume 3 Is Here!](https://www.syncfusion.com/blogs/post/syncfusion-essential-studio-2024-vol3)
- [AI-Powered Smart Searching in .NET MAUI Autocomplete](https://www.syncfusion.com/blogs/post/smart-ai-search-in-maui-autocomplete)
- [Integrating AI-Powered Smart Paste in .NET MAUI DataForm for Easy Data Entry](https://www.syncfusion.com/blogs/post/ai-powered-smart-paste-maui-dataform)
- [View 100+ Years of Economic Superpowers’ Exports with .NET MAUI Stacked Area Chart](https://www.syncfusion.com/blogs/post/view-exports-with-maui-stacked-area-chart)