---
title: "Seamlessly Save and Load Reports from SQL Server Database to Blazor Pivot Table"
published_at: "2023-05-24T11:47:31+00:00"
modified_at: "2026-01-14T09:40:20+00:00"
url: "https://www.syncfusion.com/blogs/post/save-load-report-sql-server-to-blazor-pivot-table"
excerpt: "This blog covers saving and retrieving reports in a SQL Server database to the Syncfusion Blazor Pivot Table at runtime."
taxonomy_category:
- "Blazor"
- "Development"
- "SQL"
- "Web"
taxonomy_post_tag:
- "Blazor"
- "Pivot Table"
- "SQL"
- "Web Development"
---
# Seamlessly Save and Load Reports from SQL Server Database to Blazor Pivot Table
[Sastha Prathap](https://www.syncfusion.com/blogs/author/sastha-prathap-selvamoorthy)

Syncfusion [Blazor Pivot Table](https://www.syncfusion.com/blazor-components/blazor-pivot-table)
is a powerful control used to organize and summarize business data and display the result in a cross-table format. Its rich feature set includes data binding, drilling up and down, Excel-like filtering and sorting, editing, and more. A high volume of pivot data can be loaded without any performance degradation using row and column virtualization.
[SQL Server](https://en.wikipedia.org/wiki/Microsoft_SQL_Server)
is a relational database management system. It can be used to store and manage a huge volume of data.
In this blog, we’ll see how to save and load reports from a SQL Server database using the [Microsoft SqlClient](https://learn.microsoft.com/en-us/sql/connect/ado-net/introduction-microsoft-data-sqlclient-namespace)
and load them into the Syncfusion Blazor Pivot Table at runtime.
## Getting started
To save a report to a SQL Server database, first you need to create a table in the database. Then, you can use SQL commands such as **INSERT**, ** UPDATE**, and ** MERGE** to populate or modify the table in the report. To load a report from a SQL Server database, you can use the ** SELECT** command to retrieve the report from the table and then assign it to the Blazor Pivot Table and update it as needed.
While saving a report in SQL Server, it’s better to save it in a denormalized (i.e. serialized) form so that the configurations inside the report will be maintained with privacy and loaded back in the Pivot Table. Our Blazor Pivot Table follows the same procedure to save and load a report from SQL Server.
Usually, a report contains configuration settings, such as rows, columns, values, filters, sorting, filtering, grouping, formatting, and calculated fields, that are used to render the Pivot Table. It also stores the current UI information related to both the table and chart UIs.
### Install Microsoft.Data.SqlClient NuGet package
To connect a SQL Server database using **Microsoft SqlClient** in your app, you need to install the [Microsoft.Data.SqlClient](https://www.nuget.org/packages/Microsoft.Data.SqlClient)
NuGet package. To do so, open [Visual Studio](https://visualstudio.microsoft.com/downloads/)
and then select the **NuGet Package Manager option** from the **Tools** tab. Search for the package ** Microsoft.Data.SqlClient** and install it.
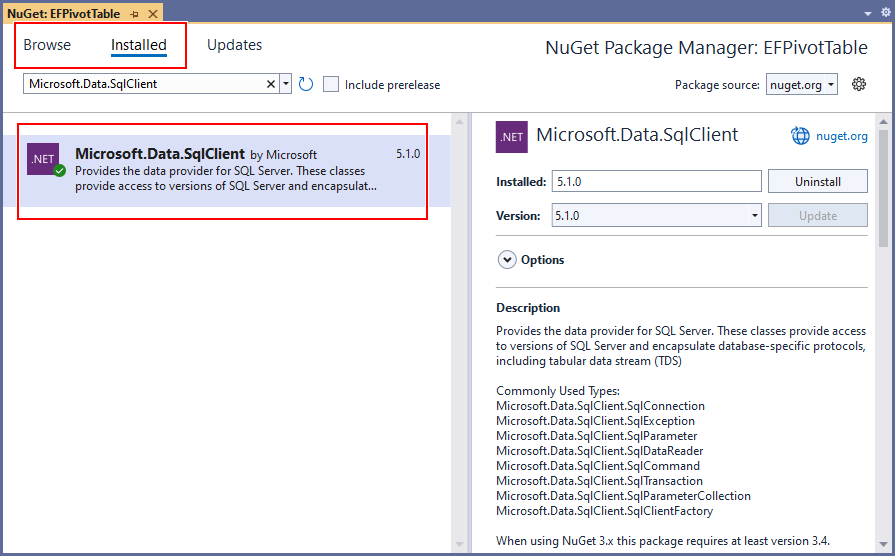
Installing Microsoft.Data.SqlClient from NuGet Package Manager
### Syncfusion Blazor Pivot Table’s toolbar
**Note:** If you’re new to the Syncfusion Blazor Pivot Table, please refer to [its getting started documentation](https://blazor.syncfusion.com/documentation/pivot-table/getting-started)
before proceeding.
The [Syncfusion Blazor Pivot Table](https://www.syncfusion.com/blazor-components/blazor-pivot-table)
has a [built-in toolbar](https://blazor.syncfusion.com/documentation/pivot-table/tool-bar)
UI with predefined report manipulation options. With the help of these options, you can easily perform operations like **save****,**** save as****,**** rename****,**** load****,**** delete****,** and** add**on reports dynamically at runtime.
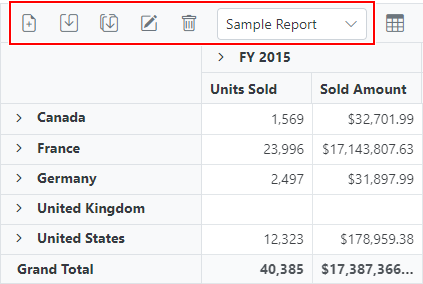
Report Manipulation Icons in Blazor Pivot Table Toolbar
Let’s explore how to utilize these built-in toolbar actions.
## Saving a report
Once the Pivot Table UI is loaded, select the **Save a report** icon in the toolbar to save the report settings in the SQL Server database.
When you click the **Save a report** icon, the [SaveReport](https://blazor.syncfusion.com/documentation/pivot-table/tool-bar#savereport)
event will be triggered. This event will pass the current report name and the current report in a serialized form to the SQL Server database.
The following code displays the report along with the report name **Sample Report** (the name ** Sample Report** comes from the source code by default, but you can rename it as explained later in this blog) that will be passed to the event to save them in the database.
```
@using System.Data
@using Microsoft.Data.SqlClient;
@using EFPivotTable.Data;
@code {
SfPivotView PivotRef { get; set; }
public List DataSource { get; set; }
public List PivotToolbar = new List {
ToolbarItems.New,
ToolbarItems.Save,
ToolbarItems.SaveAs,
ToolbarItems.Rename,
ToolbarItems.Remove,
ToolbarItems.Load,
ToolbarItems.Grid,
ToolbarItems.Chart,
ToolbarItems.Export,
ToolbarItems.SubTotal,
ToolbarItems.GrandTotal,
ToolbarItems.FieldList
};
protected override void OnInitialized()
{
this.DataSource = ProductDetails.GetProductData().ToList();
}
public void SaveReport(SaveReportArgs args)
{
SaveReportToDB(args.ReportName, args.Report);
}
public void SaveReportToDB(string reportName, string report)
{
SqlConnection sqlConn = OpenConnection();
bool isDuplicate = true;
SqlCommand cmd1 = null;
foreach (DataRow row in GetDataTable(sqlConn).Rows)
{
if ((row["ReportName"] as string).Equals(reportName))
{
isDuplicate = false;
cmd1 = new SqlCommand("UPDATE ReportTable set Report=@Report where ReportName like @ReportName", sqlConn);
}
}
if (isDuplicate)
{
cmd1 = new SqlCommand("INSERT into ReportTable (ReportName,Report) Values(@ReportName,@Report)", sqlConn);
}
cmd1.Parameters.AddWithValue("@ReportName", reportName);
cmd1.Parameters.AddWithValue("@Report", report.ToString());
cmd1.ExecuteNonQuery();
sqlConn.Close();
}
private SqlConnection OpenConnection()
{
// Use your connection string to access your own SQL database.
string connectionString = @"Data Source=(LocalDB)\ProjectModels;AttachDbFilename=" + Environment.CurrentDirectory + @"\App_Data\NORTHWND.mdf;Integrated Security=True";
SqlConnection sqlConn = new SqlConnection(connectionString);
sqlConn.Open();
return sqlConn;
}
private DataTable GetDataTable(SqlConnection sqlConn)
{
string xquery = "SELECT * FROM ReportTable";
SqlCommand cmd = new SqlCommand(xquery, sqlConn);
SqlDataAdapter da = new SqlDataAdapter(cmd);
DataTable dt = new DataTable();
da.Fill(dt);
return dt;
}
}
```
Refer to the following image.
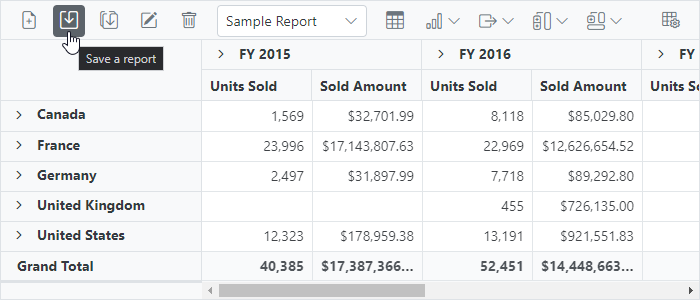
Saving the Pivot Table Report in SQL Server Database with the Name Sample Report
### Updating a saved report
You can later modify the current report, such as rearrange the countries in descending order and expand the United States in the row axis. To re-save the modified report to the same database with the same report name (Sample Report), simply click the **Save a report** icon in the toolbar once more, which will trigger the [SaveReport](https://blazor.syncfusion.com/documentation/pivot-table/tool-bar#savereport)
event. This event will pass the current report name (Sample Report) and the modified report in a serialized form to save it in the same database.
Refer to the following image.
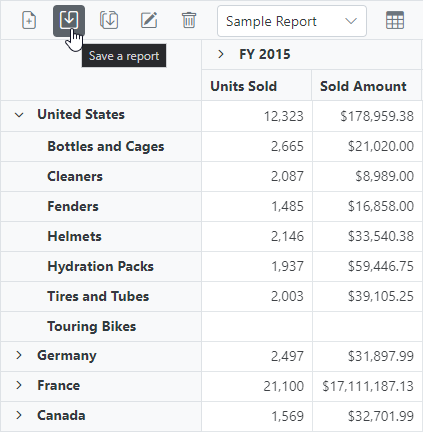
Saving the Modified Report with the Existing Report Name
### Saving a copy of a report with a different name
If you want to save a copy of the current report to the database with a different name, then use the **Save as current report** option in the toolbar UI.
Refer to the following image.
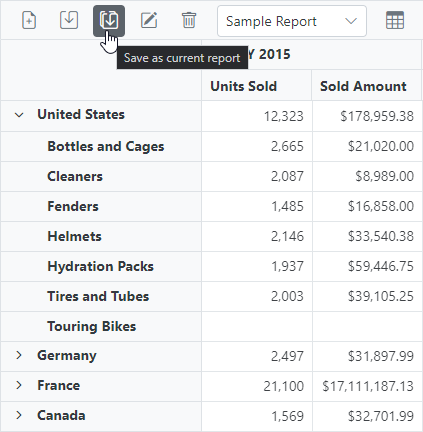
Save as Current Report Option in the Blazor Pivot Table
When you click the **Save as current report** icon, a dialog will appear in which you can provide a new name to the same report. In our ** example**, we give it the name** Sample Report 2**.
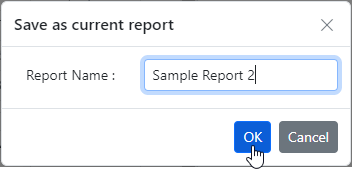
Save as Current Report Dialog in Blazor Pivot Table
After entering the report name, click **OK** to close the dialog. Now, the [SaveReport](https://blazor.syncfusion.com/documentation/pivot-table/tool-bar#savereport)
event will be triggered and it will save the report in serialized form with the new report name **Sample Report 2** in the SQL Server database.
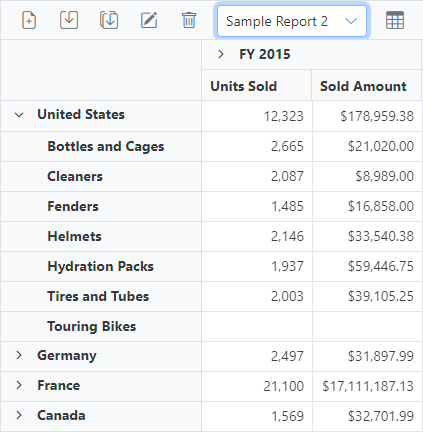
Saving a Copy of the Current Report with a Different Report Name
**Note:** The code examples for saving, saving a modified report, and saving a copy of the current report are all the same.
## Loading a report
The dropdown in the toolbar will be automatically loaded with a list of previously saved reports that have been retrieved from the SQL database using the [FetchReport](https://blazor.syncfusion.com/documentation/pivot-table/tool-bar#fetchreport)
event. This event is always triggered to retrieve the most recent report list from the SQL data whenever a report is saved, updated, removed, or added to the Blazor Pivot Table.
Refer to the following code example.
```
@using System.Data
@using Microsoft.Data.SqlClient;
@using EFPivotTable.Data;
@code {
SfPivotView PivotRef { get; set; }
public List DataSource { get; set; }
public List PivotToolbar = new List {
ToolbarItems.New,
ToolbarItems.Save,
ToolbarItems.SaveAs,
ToolbarItems.Rename,
ToolbarItems.Remove,
ToolbarItems.Load,
ToolbarItems.Grid,
ToolbarItems.Chart,
ToolbarItems.Export,
ToolbarItems.SubTotal,
ToolbarItems.GrandTotal,
ToolbarItems.FieldList
};
protected override void OnInitialized()
{
this.DataSource = ProductDetails.GetProductData().ToList();
}
public void SaveReport(SaveReportArgs args)
{
SaveReportToDB(args.ReportName, args.Report);
}
// To fetch saved reports from the SQL database.
public void FetchReport(FetchReportArgs args)
{
args.ReportName = FetchReportListFromDB().ToArray();
}
public List FetchReportListFromDB()
{
SqlConnection sqlConn = OpenConnection();
List reportNames = new List();
foreach (DataRow row in GetDataTable(sqlConn).Rows)
{
if (!string.IsNullOrEmpty(row["ReportName"] as string))
{
reportNames.Add(row["ReportName"].ToString());
}
}
sqlConn.Close();
return reportNames;
}
// To retrieve selected report from the SQL database and then load it to the pivot table.
public async Task LoadReport(LoadReportArgs args)
{
await this.PivotRef.LoadPersistDataAsync(LoadReportFromDB(args.ReportName).ToString());
}
public object LoadReportFromDB(string reportName)
{
SqlConnection sqlConn = OpenConnection();
string report = string.Empty;
foreach (DataRow row in GetDataTable(sqlConn).Rows)
{
if ((row["ReportName"] as string).Equals(reportName))
{
report = (string)row["Report"];
break;
}
}
sqlConn.Close();
return report;
}
private SqlConnection OpenConnection()
{
// Use your connection string to access your own SQL database.
string connectionString = @"Data Source=(LocalDB)\ProjectModels;AttachDbFilename=" + Environment.CurrentDirectory + @"\App_Data\NORTHWND.mdf;Integrated Security=True";
SqlConnection sqlConn = new SqlConnection(connectionString);
sqlConn.Open();
return sqlConn;
}
private DataTable GetDataTable(SqlConnection sqlConn)
{
string xquery = "SELECT * FROM ReportTable";
SqlCommand cmd = new SqlCommand(xquery, sqlConn);
SqlDataAdapter da = new SqlDataAdapter(cmd);
DataTable dt = new DataTable();
da.Fill(dt);
return dt;
}
```
Choose a report from the dropdown menu, say **Sample Report 2**.
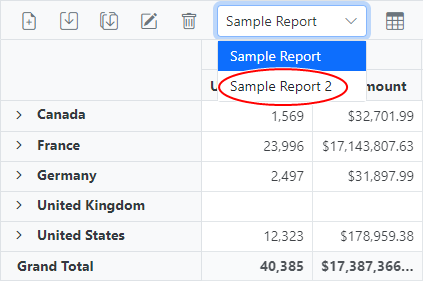
Choosing a Report from the Dropdown in the Blazor Pivot Table
Now, the [LoadReport](https://blazor.syncfusion.com/documentation/pivot-table/tool-bar#loadreport)
event will be triggered with the selected report name **Sample Report 2**. This event will search for and fetch the report from the SQL database and load it into the Blazor Pivot Table.
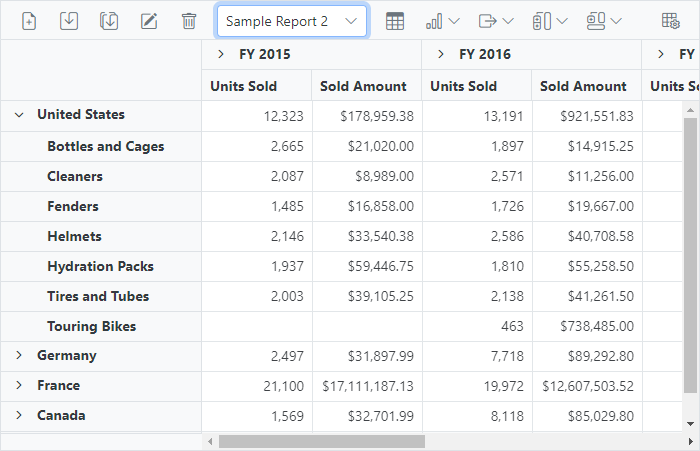
Loading a Report from SQL Server to the Blazor Pivot Table
## Renaming a report
You can use the **Rename a current report** icon in the toolbar to rename the current report and save it back to the SQL database.
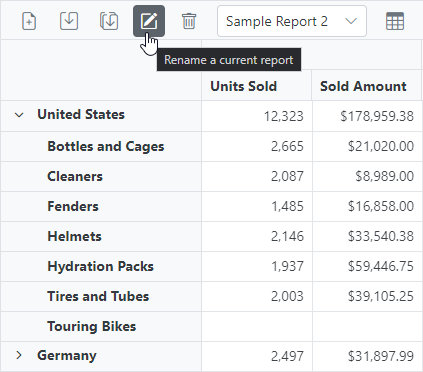
Rename a Current Report Icon in the Blazor Pivot Table Toolbar
As shown in the previous image, we’re going to rename the current report, **Sample Report 2**. To do so, click the ** Rename a current report** icon. A dialog will appear in which you can provide a new name to the current report **(for example, Global Trend Report)**.
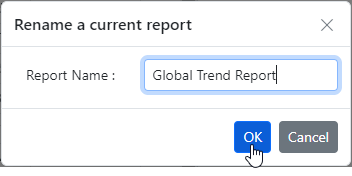
Rename a Current Report Dialog in the Blazor Pivot Table
If you specify a report name that is already in the report list, the Blazor Pivot Table will show the following alert. You can choose whether to replace that report.
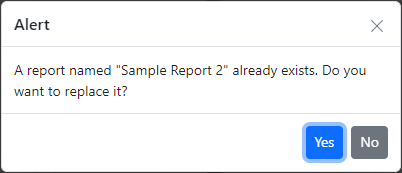
Blazor Pivot Table Showing an Alert Notification
Suppose you specify a report name that is not already in the report list. In that case, the dialog closes on clicking the **OK** button and the [RenameReport](https://blazor.syncfusion.com/documentation/pivot-table/tool-bar#renamereport)
event is triggered. This event will pass the current report name **Sample Report 2** and the modified report name **(Global Trend Report)**. Based on this information, the report name will be updated in the database.
Refer to the following code example.
```
@using System.Data
@using Microsoft.Data.SqlClient;
@using EFPivotTable.Data;
@code {
SfPivotView PivotRef { get; set; }
public List DataSource { get; set; }
public List PivotToolbar = new List {
ToolbarItems.New,
ToolbarItems.Save,
ToolbarItems.SaveAs,
ToolbarItems.Rename,
ToolbarItems.Remove,
ToolbarItems.Load,
ToolbarItems.Grid,
ToolbarItems.Chart,
ToolbarItems.Export,
ToolbarItems.SubTotal,
ToolbarItems.GrandTotal,
ToolbarItems.FieldList
};
protected override void OnInitialized()
{
this.DataSource = ProductDetails.GetProductData().ToList();
}
// To rename a report.
public void RenameReport(RenameReportArgs args)
{
RenameReportInDB(args.ReportName, args.Rename);
}
public void RenameReportInDB(string reportName, string renameReport)
{
SqlConnection sqlConn = OpenConnection();
SqlCommand cmd1 = null;
foreach (DataRow row in GetDataTable(sqlConn).Rows)
{
if ((row["ReportName"] as string).Equals(reportName))
{
cmd1 = new SqlCommand("UPDATE ReportTable set ReportName=@RenameReport where ReportName like '%" + reportName + "%'", sqlConn);
break;
}
}
cmd1.Parameters.AddWithValue("@RenameReport", renameReport);
cmd1.ExecuteNonQuery();
sqlConn.Close();
}
private SqlConnection OpenConnection()
{
// Use your connection string to access your own SQL database.
string connectionString = @"Data Source=(LocalDB)\ProjectModels;AttachDbFilename=" + Environment.CurrentDirectory + @"\App_Data\NORTHWND.mdf;Integrated Security=True";
SqlConnection sqlConn = new SqlConnection(connectionString);
sqlConn.Open();
return sqlConn;
}
private DataTable GetDataTable(SqlConnection sqlConn)
{
string xquery = "SELECT * FROM ReportTable";
SqlCommand cmd = new SqlCommand(xquery, sqlConn);
SqlDataAdapter da = new SqlDataAdapter(cmd);
DataTable dt = new DataTable();
da.Fill(dt);
return dt;
}
}
```
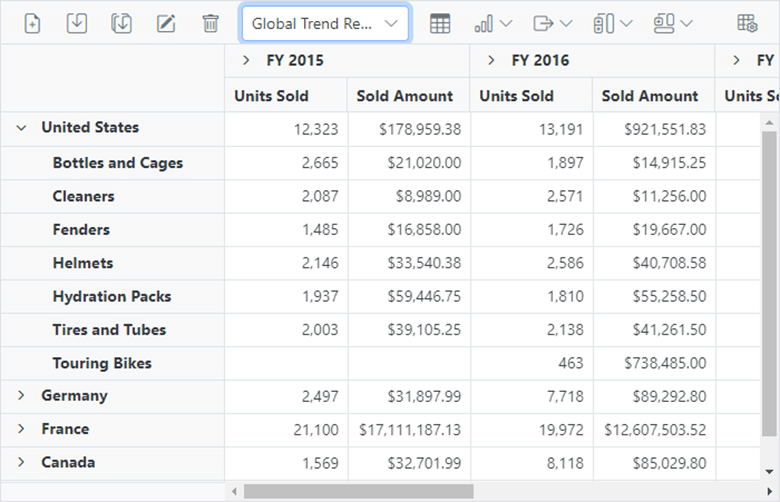
Renaming a Report in Blazor Pivot Table
## Deleting a report
You can easily delete a report from the Pivot Table and the SQL database using the **Delete a current report** icon in the toolbar. Just search for and delete the report using the report name. In this example, we will delete the currently loaded ** Global Trend Report**.
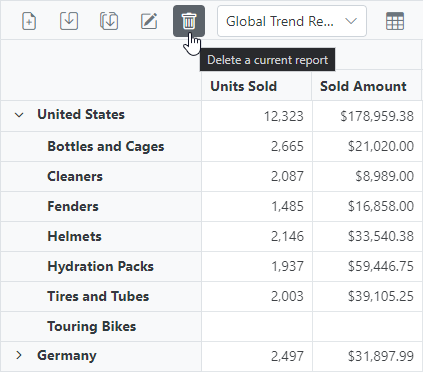
Delete a Current Report Icon in the Blazor Pivot Table Toolbar
When you click the **Delete a current report** icon, the following alert dialog will appear with the ** Yes** and ** No** options to delete the current report.

Alert Dialog to Confirm the Deletion of the Current Report
On choosing **Yes**, the [RemoveReport](https://blazor.syncfusion.com/documentation/pivot-table/tool-bar#removereport)
event will be triggered with the name of the selected report **(Global Trend Report)**. This will automatically delete the report for the Pivot Table.
Refer to the following code example.
```
@using System.Data
@using Microsoft.Data.SqlClient;
@using EFPivotTable.Data;
@code {
SfPivotView PivotRef { get; set; }
public List DataSource { get; set; }
public List PivotToolbar = new List {
ToolbarItems.New,
ToolbarItems.Save,
ToolbarItems.SaveAs,
ToolbarItems.Rename,
ToolbarItems.Remove,
ToolbarItems.Load,
ToolbarItems.Grid,
ToolbarItems.Chart,
ToolbarItems.Export,
ToolbarItems.SubTotal,
ToolbarItems.GrandTotal,
ToolbarItems.FieldList
};
protected override void OnInitialized()
{
this.DataSource = ProductDetails.GetProductData().ToList();
}
//To delete a report.
public void RemoveReport(RemoveReportArgs args)
{
RemoveReportFromDB(args.ReportName);
}
public void RemoveReportFromDB(string reportName)
{
SqlConnection sqlConn = OpenConnection();
SqlCommand cmd1 = null;
foreach (DataRow row in GetDataTable(sqlConn).Rows)
{
if ((row["ReportName"] as string).Equals(reportName))
{
cmd1 = new SqlCommand("DELETE FROM ReportTable WHERE ReportName LIKE '%" + reportName + "%'", sqlConn);
break;
}
}
cmd1.ExecuteNonQuery();
sqlConn.Close();
}
private SqlConnection OpenConnection()
{
// Use your connection string to access your own SQL database.
string connectionString = @"Data Source=(LocalDB)\ProjectModels;AttachDbFilename=" + Environment.CurrentDirectory + @"\App_Data\NORTHWND.mdf;Integrated Security=True";
SqlConnection sqlConn = new SqlConnection(connectionString);
sqlConn.Open();
return sqlConn;
}
private DataTable GetDataTable(SqlConnection sqlConn)
{
string xquery = "SELECT * FROM ReportTable";
SqlCommand cmd = new SqlCommand(xquery, sqlConn);
SqlDataAdapter da = new SqlDataAdapter(cmd);
DataTable dt = new DataTable();
da.Fill(dt);
return dt;
}
}
```
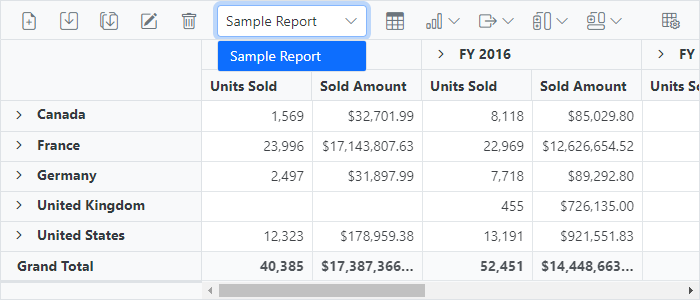
Global Trend Report Removed from the Pivot Table Dropdown
**Note:** If the current report is removed from the Pivot Table, then the next report from the report list will be automatically loaded into the Pivot Table.
**Note:** If there is only one report in the Pivot Table report list and it is removed, then the Pivot Table will display the removed report’s state until a new report is added to it.
## Adding a report
Use the **Create a new report** option in the toolbar to add a new report in the Pivot Table.
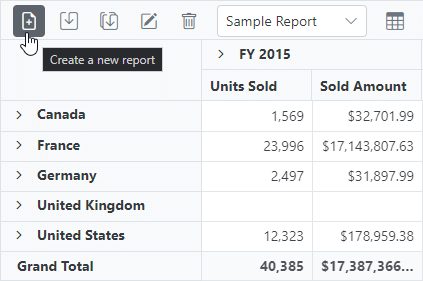
Create a New Report Option in the Blazor Pivot Table Toolbar
Selecting the **Create a new report** icon will display the following dialog in which you can provide name for your new report **(for example, Garment Report)**.
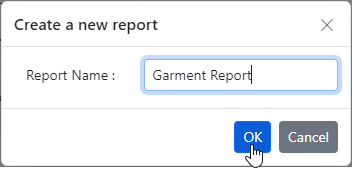
Create a New Report Dialog in the Blazor Pivot Table
Once you specify a new report name, click **OK**. A new empty report will be loaded into the Pivot Table as shown in the following image.

Creating a New Report with the Name Garment Report in the Blazor Pivot Table
Once you modify and update the report, you can then save, save as, rename, load, and remove the current report as mentioned in the previous sections of this blog.
## Points to remember
Keep the following points in mind when manipulating reports in the Blazor Pivot Table and storing them in a SQL Server database:
- **Data source****:** Both raw data and aggregated data won’t be saved and loaded from the database.
- **Conditional formatting****:** The appearance properties of the Pivot Table—such as background color, font color, font family, and font size—based on the specific conditions won’t be saved and loaded from the database.
- **Hyperlinks****:** Links to external resources in Pivot Table cells won’t be saved and loaded from the database.
While retrieving reports, all the reports will be displayed regardless of the data source model in which it was saved. However, you should load the report based on the data source model that is currently bound to the Blazor Pivot Table.
## GitHub reference
For more details, refer to the project [Save and load report from SQL Sever database to Blazor Pivot Table](https://github.com/SyncfusionExamples/Save-and-load-report-form-SQL-database-to-pivot-table)
on GitHub.
## Conclusion
Thanks for reading! In this blog, we learned how to easily connect to a SQL Server database to save reports and load them into the [Syncfusion Blazor Pivot Table](https://www.syncfusion.com/blazor-components/blazor-pivot-table)
. Try out the process and leave your feedback in the comments section below!
Try our Blazor components by downloading a [free 30-day trial](https://www.syncfusion.com/account/manage-trials/downloads)
to explore their features.
You can also contact us through our [support forum](https://www.syncfusion.com/forums/blazor-components)
, [support portal](https://support.syncfusion.com/)
, or [feedback portal](https://www.syncfusion.com/feedback)
. We are always happy to assist you!
## Related blogs
- [Preview Files in Blazor File Manager: A Comprehensive Guide](https://www.syncfusion.com/blogs/post/preview-file-blazor-file-manager.aspx)
- [Setting Up Real-Time Updates in a Blazor WebAssembly App Using SignalR [Webinar Show Notes]](https://www.syncfusion.com/blogs/post/real-time-updates-blazor-webassembly-signalr.aspx)
- [Create a PDF Digital Signature Web Service Using Azure Key Vault and the Syncfusion C# PDF Library](https://www.syncfusion.com/blogs/post/pdf-digital-signature-web-service-using-azure-key-vault-and-csharp-pdf-library.aspx)
- [Column Pinning: The Efficient Way to Organize Columns in the Blazor DataGrid](https://www.syncfusion.com/blogs/post/column-pinning-blazor-datagrid.aspx)