---
title: "Secure Document Editing with Role-Based Access in React Word Editor"
published_at: "2025-08-22T07:24:03+00:00"
modified_at: "2025-12-04T08:55:00+00:00"
url: "https://www.syncfusion.com/blogs/post/role-based-editing-react-word-editor"
excerpt: "Secure your documents with role-based editing in React using Syncfusion’s Word Editor and ASP.NET Core. Learn how to restrict editing by user roles."
taxonomy_category:
- "Document Editor"
- "Document Processing"
- "File Formats"
- "React"
- "Word"
- "Word Editor"
- "Word Processor"
taxonomy_post_tag:
- "Content Protection Document Security"
- "document editor"
- "Document Editor API"
- "Document Processing"
- "Edible Regions"
- "File Formats"
- "React"
- "React DOCX Editor"
- "Restrict Editing"
- "Role Based Editing Access"
- "Role-Based Access Control (RBAC)"
- "Role-Based UI"
- "Role-Based-Permissions"
- "Word"
- "Word Document Editing"
- "Word Editor"
- "Word Editor Customization"
---
# Secure Document Editing with Role-Based Access in React Word Editor
[Ramkumar Ravy](https://www.syncfusion.com/blogs/author/ramkumarr)
**TL;DR:** Learn how to implement role-based editing in a React Word Editor using Syncfusion® and ASP.NET Core. This guide shows how to restrict document sections and define editable regions in Word documents based on user roles, ensuring secure collaboration that only authorized users can modify specific content.
In today’s collaborative development environments, securing document workflows is more than a feature; it’s a necessity. But how do you ensure that only authorized users can edit specific sections of a document while keeping the rest locked down?
In this article, you’ll learn how to build a role-based document editor using [Syncfusion’s React Word Document Editor](https://www.syncfusion.com/react-components/react-docx-editor)
and [ASP.NET Core](https://www.syncfusion.com/aspnet-core-ui-controls)
. We’ll walk through implementing **Restrict Editing**, a feature that allows registered users to edit only designated regions of a Word document based on their roles. This approach helps maintain document integrity, enforce access control, and streamline collaboration in enterprise-grade applications.
## Use case: Vendor agreement workflow
To demonstrate the value of role-based editing, let’s consider a vendor agreement that typically includes terms related to pricing, delivery timelines, confidentiality, and liability. In a collaborative environment, different departments are responsible for various sections of the agreement. Allowing unrestricted editing can lead to accidental or unauthorized changes, potentially resulting in legal or operational issues.
## Role-based edit access
Here’s how editing access can be structured based on user roles:
| Role | Edit access level |
| --- | --- |
| HR team | Can edit the introduction, including vendor and buyer details, and the agreement date. |
| Legal team | Has access to sections on confidentiality, limitation of liability, termination, and jurisdiction & governing law. |
| Finance team | Can edit the payment terms and related financial details. |
| Project leader | Can modify the scope of work, deliverables, and timeline. |
Using [Syncfusion’s Restrict Editing](https://ej2.syncfusion.com/documentation/document-editor/restrict-editing)
feature, these access levels can be enforced to ensure that each role interacts only with the relevant sections of the document.
## Creating a role-based editing document in React
To implement role-based editing restrictions, follow the steps to create a restricted editing document using the **Syncfusion® React Word Processor**:
### Step 1: Create a React app
Start creating a React application and integrating the [Syncfusion® Word Document Editor](https://ej2.syncfusion.com/react/documentation/document-editor/getting-started)
component. This integration enables you to configure and manage restricted editing features within your application.
### Step 2: Load the input document
Prepare your sample Word document and load it into the Syncfusion® Word Processor. Navigate to the toolbar and click on the **Restrict Editing** option under the ** Review** tab. Then, choose the ** Protections** setting to begin configuring access controls, as illustrated below.
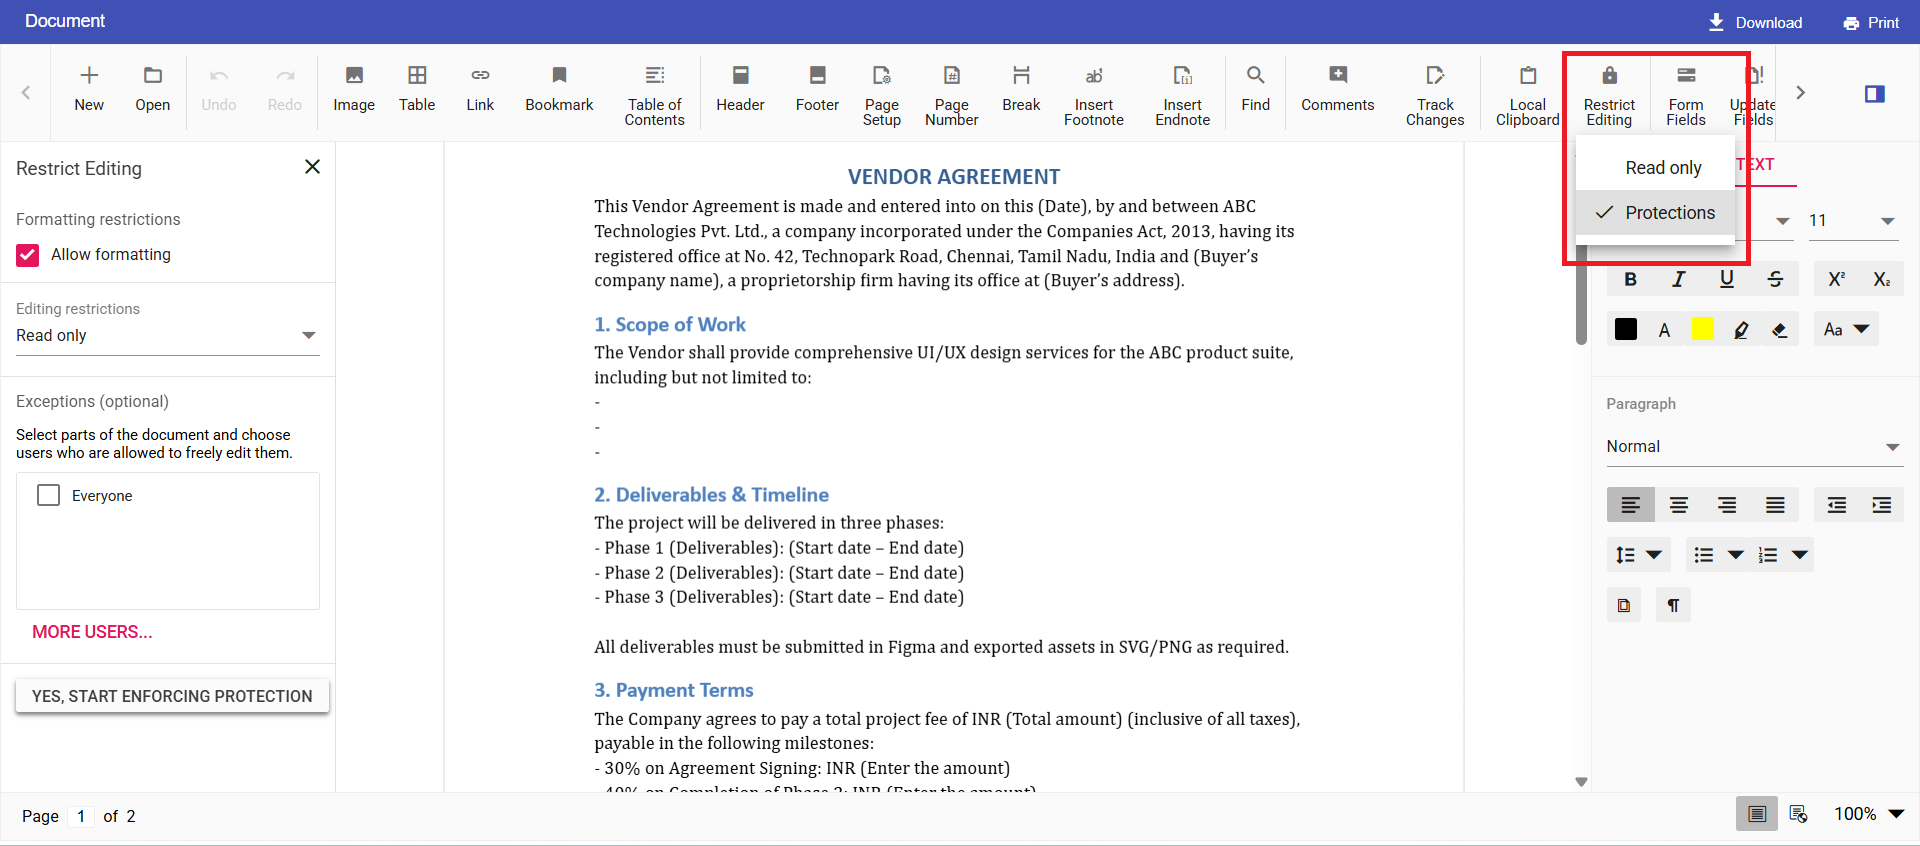
Restrict Editing option under the review tab in the Syncfusion Word Editor Toolbar
### Step 3: Add user roles
Click on **More Users** to define the roles or usernames with specific editing permissions. Then enter the desired usernames and add them to the user collection.
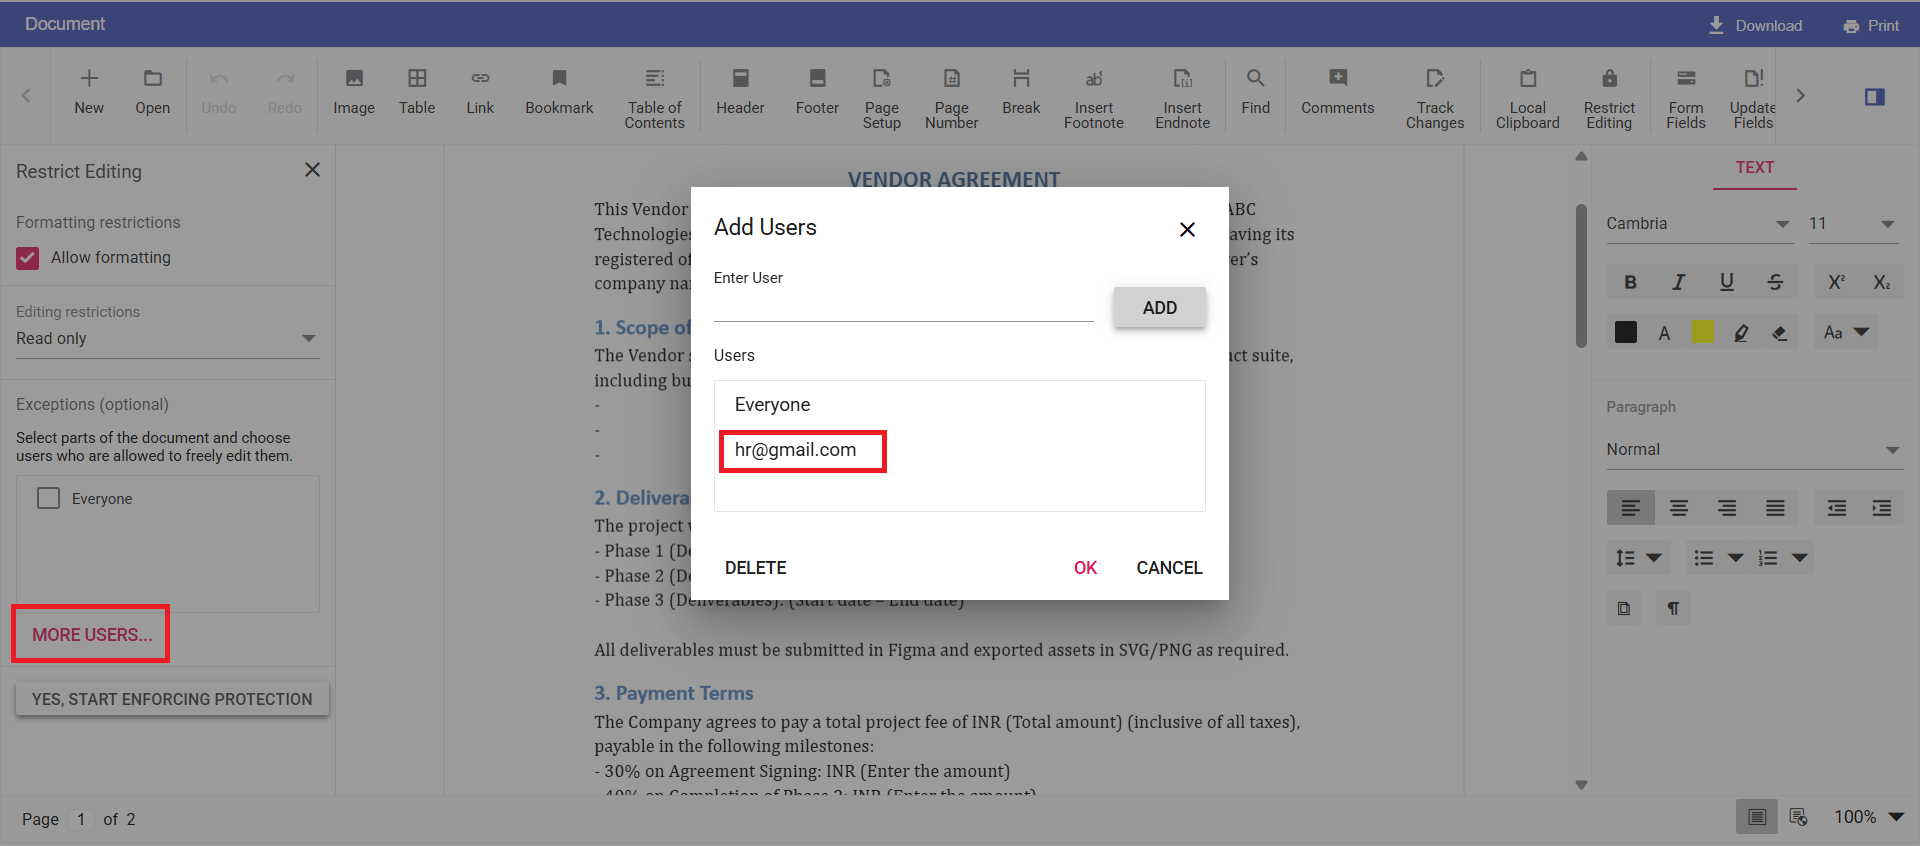
Dialog for adding users with editing permissions
### Step 4: Assign editable regions
Select the text region that should be editable by a particular user. Click the checkbox next to the corresponding user to assign editing rights for that section.
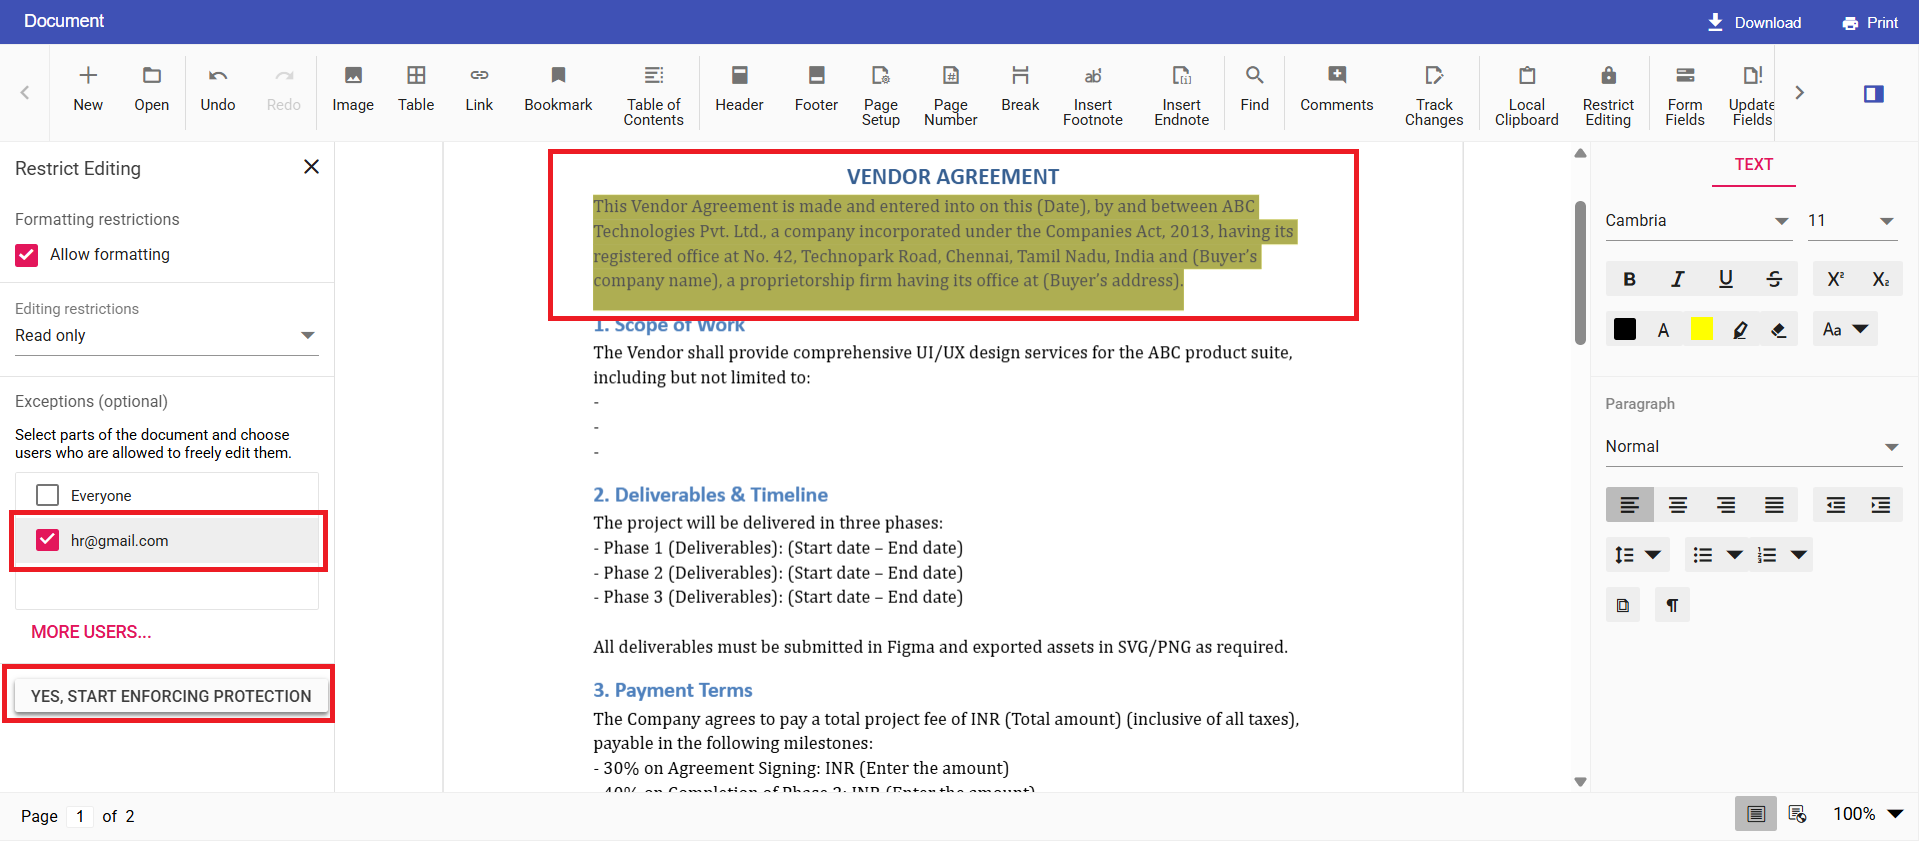
Assigning a text region to a specific user
### Step 5: Enable protection
Once all editable regions are assigned, click **Yes, Start Enforcing Protection** to activate restricted editing. You’ll need to provide a password for the user you added, which will be required to modify protected sections of the document.
You can then download the protected document and use it in your application or sample workflow.
**Note:** In this example, we have included the **Vendor_Agreement** document with restricted editing already applied. However, you can also use your document with predefined restrictions by opening it in the Document Editor.
## Setting up ASP.NET Core Backend
To manage user authentication and securely handle document access based on user roles, you’ll need a backend service. In this example, we’ll use ASP.NET Core Web API to implement the necessary endpoints.
### Step 1: Create a new ASP.NET Core Web API project
Create an [ASP.NET Core Web API](https://learn.microsoft.com/en-us/aspnet/core/tutorials/first-web-api?view=aspnetcore-6.0&tabs=visual-studio)
project using **Visual Studio** or the **.NET CLI**. This project will be the backend for managing user authentication and related operations.
### Step 2: Create API endpoints
Create a controller named **AuthenticationController.cs** with two key endpoints:
- **Register**: Allows new users to register by providing credentials such as username, email ID, and password.
- **Login**: Authenticates existing users using their email ID and password.
These endpoints will internally handle the logic for securely storing and retrieving user data from a [users.json](https://github.com/SyncfusionExamples/Role-Based-Access-and-Restrict-Editing-in-React-Word-Editor/blob/master/Server-side/users.json)
file.
**AuthenticationController.cs**
```
// Register the new user with the credentials like Username, Email ID and Password
[HttpPost("register")]
public IActionResult Register([FromBody] User newUser)
{
var Users = LoadUsers();
if (Users.Any(u => u.Username == newUser.Username))
{
return BadRequest(new { message = "Username already exists" });
}
if (Users.Any(u => u.Email == newUser.Email))
{
return BadRequest(new { message = "Email already registered" });
}
newUser.Password = BCrypt.Net.BCrypt.HashPassword(newUser.Password);
Users.Add(newUser);
var json = JsonSerializer.Serialize(Users, new JsonSerializerOptions { WriteIndented = true });
System.IO.File.WriteAllText(_userFilePath, json);
return Ok(new { message = "User registered successfully" });
}
// Existing user can login using the credentials such as Email ID and password
[HttpPost("login")]
public IActionResult Login([FromBody] User login)
{
var Users = LoadUsers();
var user = Users.FirstOrDefault(u => u.Email == login.Email);
if (user == null || !BCrypt.Net.BCrypt.Verify(login.Password, user.Password))
{
return Unauthorized(new { message = "Invalid credentials" });
}
return Ok(new { username = user.Username, email = user.Email });
}
```
## Setting up React Frontend
With the backend in place, let’s implement the frontend logic to authenticate users and apply role-based editing.
### Step 1: Implement the authentication form
Create a new JavaScript file named **Authentication.jsx** to implement the user authentication form and its associated operations. This component will handle both ** user registration**and ** login**, capturing credentials such as email and password, and communicating with the backend API for authentication.
**Authentication.jsx**
```
import { useState } from "react";
import "./index.css"; // Make sure this CSS file exists and is correctly styled
const hostURL = "https://localhost:44310/api/Authentication";
function Authentication({ onLogin }) {
const [isRegistering, setIsRegistering] = useState(false);
const [message, setMessage] = useState("");
const [username, setUsername] = useState("");
const validateEmail = (email) => /\S+@\S+\.\S+/.test(email);
const handleLogin = async (event) => {
event.preventDefault();
setMessage("");
const form = event.currentTarget;
const email = form.elements.email.value.trim();
const password = form.elements.password.value.trim();
if (!validateEmail(email)) {
setMessage("❌ Please enter a valid email.");
return;
}
try {
const response = await fetch(`${hostURL}/login`, {
method: "POST",
headers: { "Content-Type": "application/json" },
body: JSON.stringify({ email, password }),
});
if (response.ok) {
const userData = await response.json();
localStorage.setItem("user", JSON.stringify(userData));
onLogin(userData);
}
else {
setMessage("❌ Invalid email or password.");
}
} catch {
setMessage("⚠️ Server error during login.");
}
};
const handleRegister = async (e) => {
e.preventDefault();
setMessage("");
const form = e.currentTarget;
const email = form.elements.email.value;
const password = form.elements.password.value;
if (!validateEmail(email)) {
setMessage("❌ Please enter a valid email.");
return;
}
try {
const register = await fetch(`${hostURL}/register`, {
method: "POST",
headers: { "Content-Type": "application/json" },
body: JSON.stringify({ username, email, password }),
});
const data = await register.json();
if (register.ok) {
setMessage("✅ Registration successful. You can now log in.");
setIsRegistering(false);
setUsername("");
}
else {
setMessage(`❌ ${data.message || "Registration failed"}`);
}
} catch {
setMessage("⚠️ Server error during registration.");
}
};
return (
{isRegistering ? "Register" : "Login"}
{message &&
{message}
}
);
}
export default Authentication;
```
To demonstrate role-based editing, this example uses a **lightweight local authentication system**. User credentials, including ** username, email, and password,**are stored in a local ** users.json** file. When a user logs in via the browser interface, their credentials are validated against this file.
Once authenticated, the system identifies the user and dynamically unlocks only the **editable regions** assigned to them. All other sections remain ** read-only**, ensuring a secure and controlled editing experience.
**Note:** Ensure to register using the **same username and password** that were used to create the document with restricted editing.
This authentication flow can be customized and integrated with your application’s**user management system.** Doing so allows you to enforce ** role-based access control** post-login, ensuring users can interact only with the sections of the document relevant to their assigned roles.
The authentication form will appear as follows:
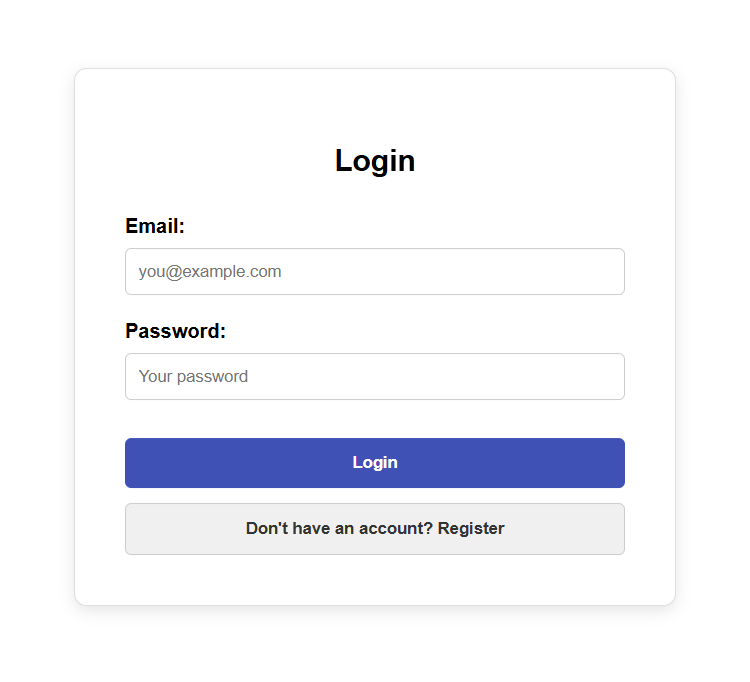
Login and registration interface
### Step 2: Implement Word Document operations
Create a new JavaScript file named **DocumentEditor.jsx** to implement the ** Word Document Editor** functionality. This includes restricting editing based on the role of the currently logged-in user.
**DocumentEditor.jsx**
```
function DocumentEditor() {
const [user, setUser] = useState(null);
const titleBarRef = useRef(null);
const containerRef = useRef(null);
useEffect(() => {
const saved = localStorage.getItem("user");
if (saved) {
setUser(JSON.parse(saved));
}
}, []);
useEffect(() => {
if (user && containerRef.current) {
convertDocxToSfdt();
containerRef.current.documentEditor.documentName = "Document";
containerRef.current.documentEditor.currentUser = user.email;
titleBarRef.current = new TitleBar(
document.getElementById("documenteditor_titlebar"),
containerRef.current.documentEditor,
true
);
titleBarRef.current.updateDocumentTitle();
containerRef.current.documentChange = () => {
titleBarRef.current.updateDocumentTitle();
containerRef.current.documentEditor.focusIn();
};
}
}, [user]);
// Convert GitHub Raw document to SFDT and load in Editor.
const convertDocxToSfdt = async () => {
try {
const docxResponse = await fetch('https://raw.githubusercontent.com/SyncfusionExamples/Role-Based-Access-and-Restrict-Editing-in-React-Word-Editor/master/Client-side/public/docs/Vendor_Agreement.docx');
const docxBlob = await docxResponse.blob();
const formData = new FormData();
formData.append('files', docxBlob, 'Vendor_Agreement.docx');
const importResponse = await fetch('https://ej2services.syncfusion.com/production/web-services/api/documenteditor/Import', {
method: 'POST',
body: formData,
});
if (importResponse.ok) {
defaultDocument = await importResponse.text();
containerRef.current.documentEditor.open(defaultDocument);
}
else {
console.error(`Failed to import document: ${importResponse.statusText}`);
}
} catch (error) {
console.error('Error converting document:', error);
}
};
const logout = () => {
localStorage.removeItem("user");
setUser(null);
};
if (!user) {
return ;
}
return (
Welcome, {user.username || user.email}
);
}
export default DocumentEditor;
```
To implement role-based editing, it’s essential to identify the active user within the document editor. This allows the application to manage user-specific changes, comments, and permissions effectively.
The key step is assigning the current user’s identity to the editor instance using the following line of code:
```
containerRef.current.documentEditor.currentUser = user.email;
```
This sets the **currentUser** property of the document editor to the logged-in user’s email. Once assigned, the editor uses this identity to determine which regions of the document the user is permitted to edit, based on predefined permissions embedded in the document.
By doing so, the editor ensures:
- **Only authorized sections** are editable by the user.
- **All other content** remains locked, preserving document integrity.
This simple assignment forms the bridge between your authentication logic and the document’s editing permissions, establishing the foundation of your**role-based access control system**.
Below are visual examples highlighting the editable content for each user role, illustrating how specific document sections appear based on assigned permissions.
**HR:**
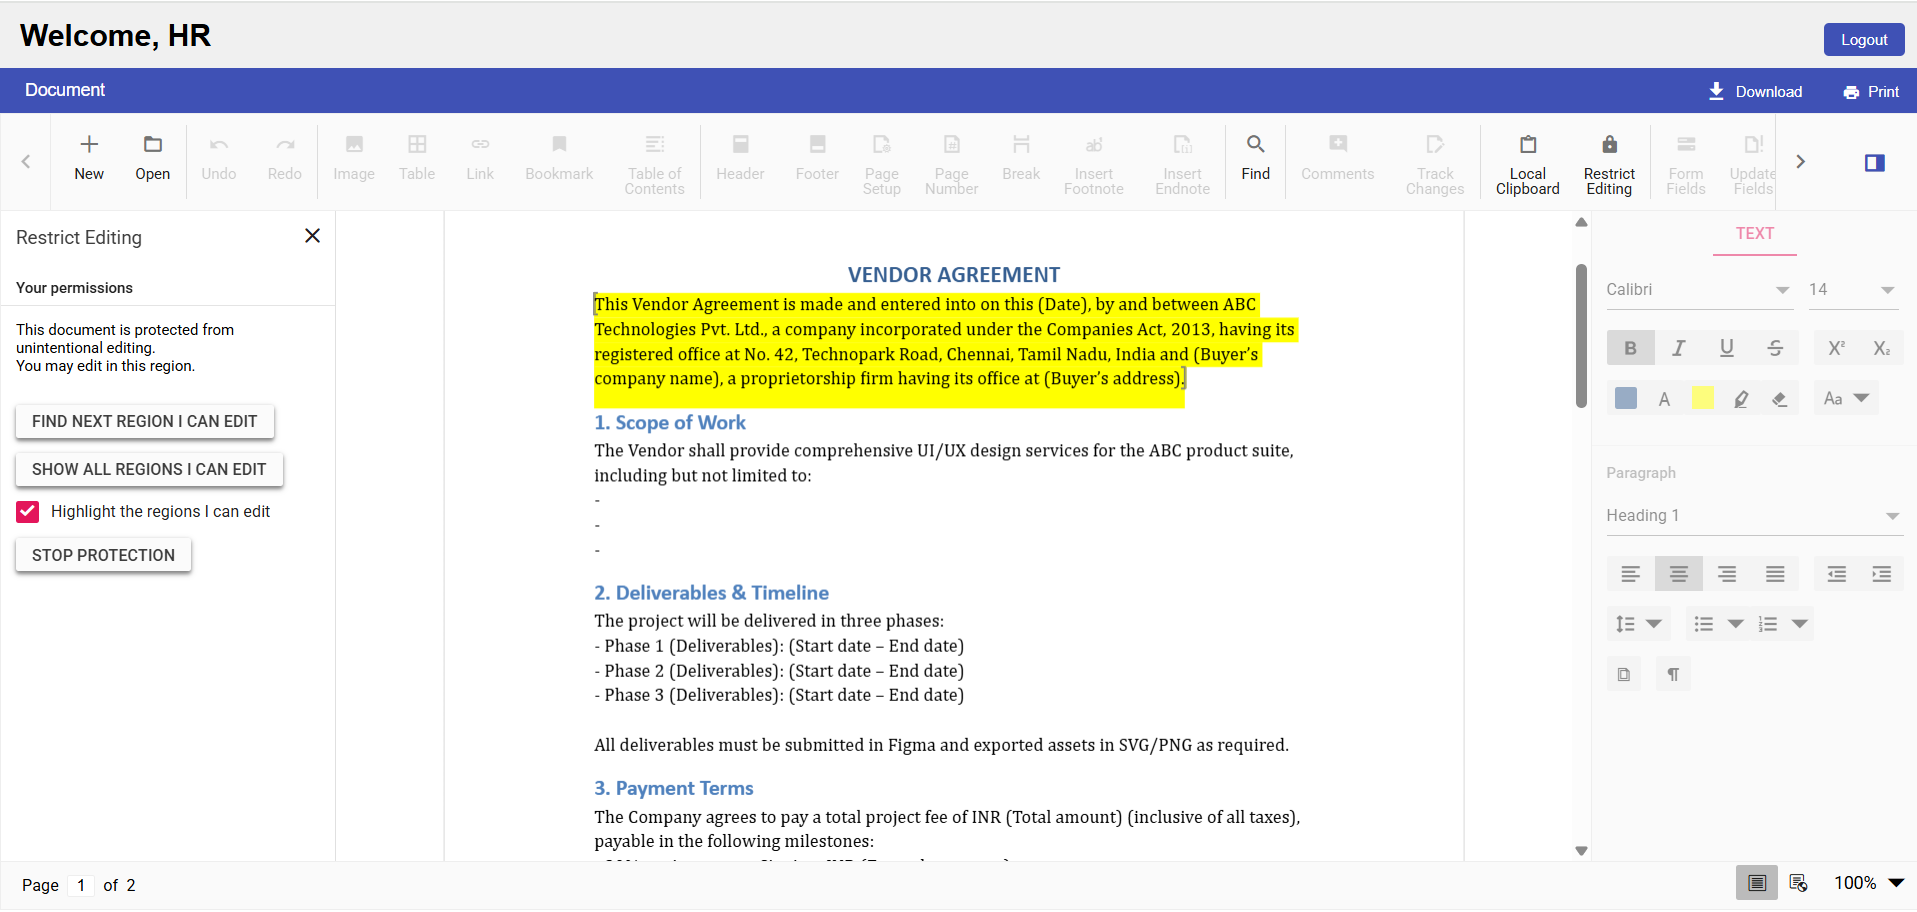
Editable sections for HR
**Project Leader:**
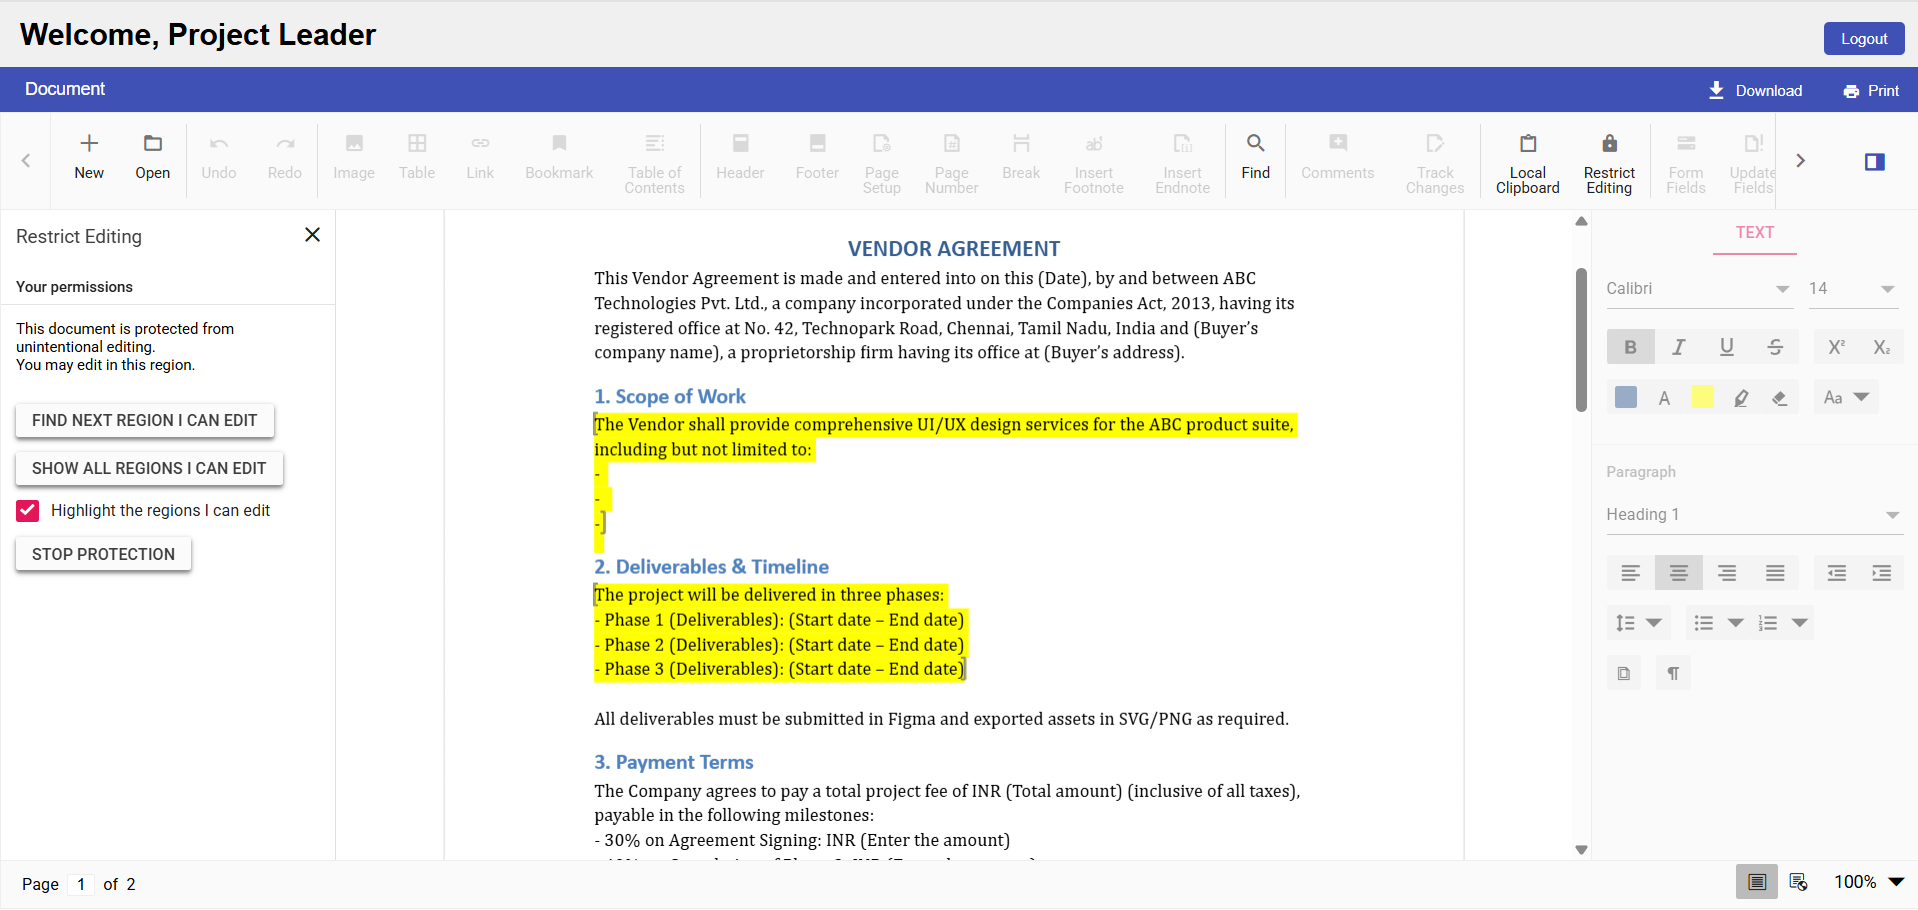
Editable sections for Project Leader
**Finance Team:**
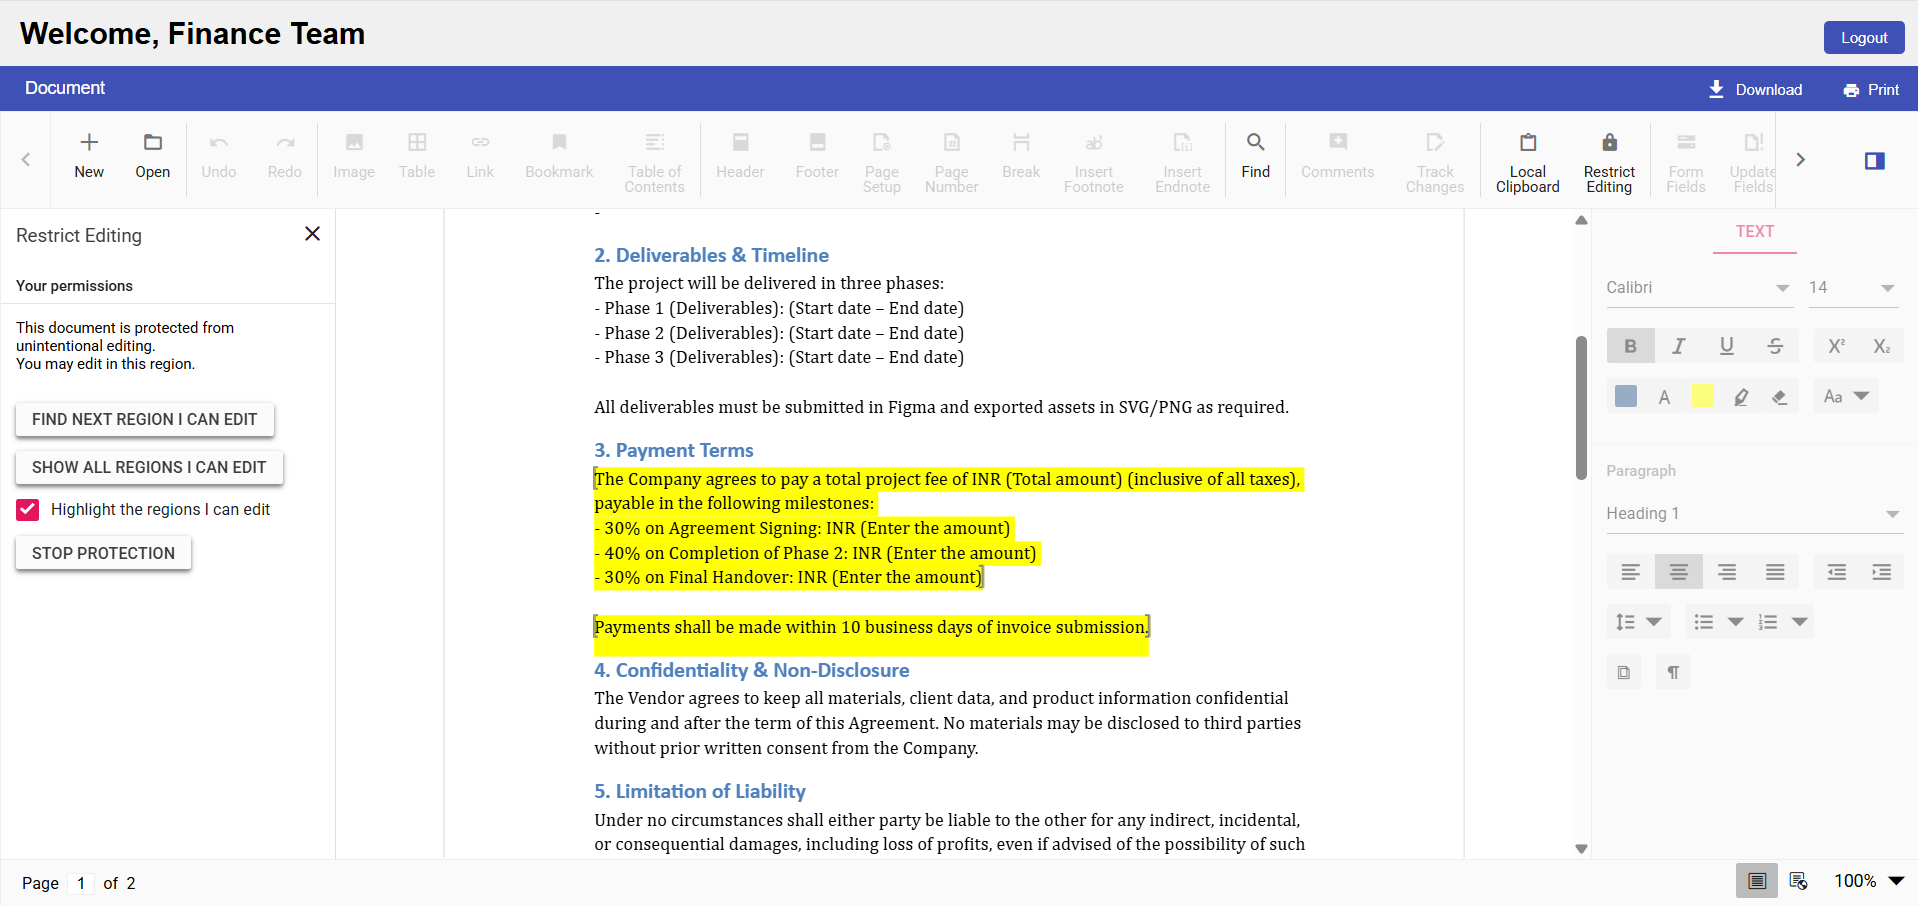
Editable sections for Finance Team
**Legal Team:**
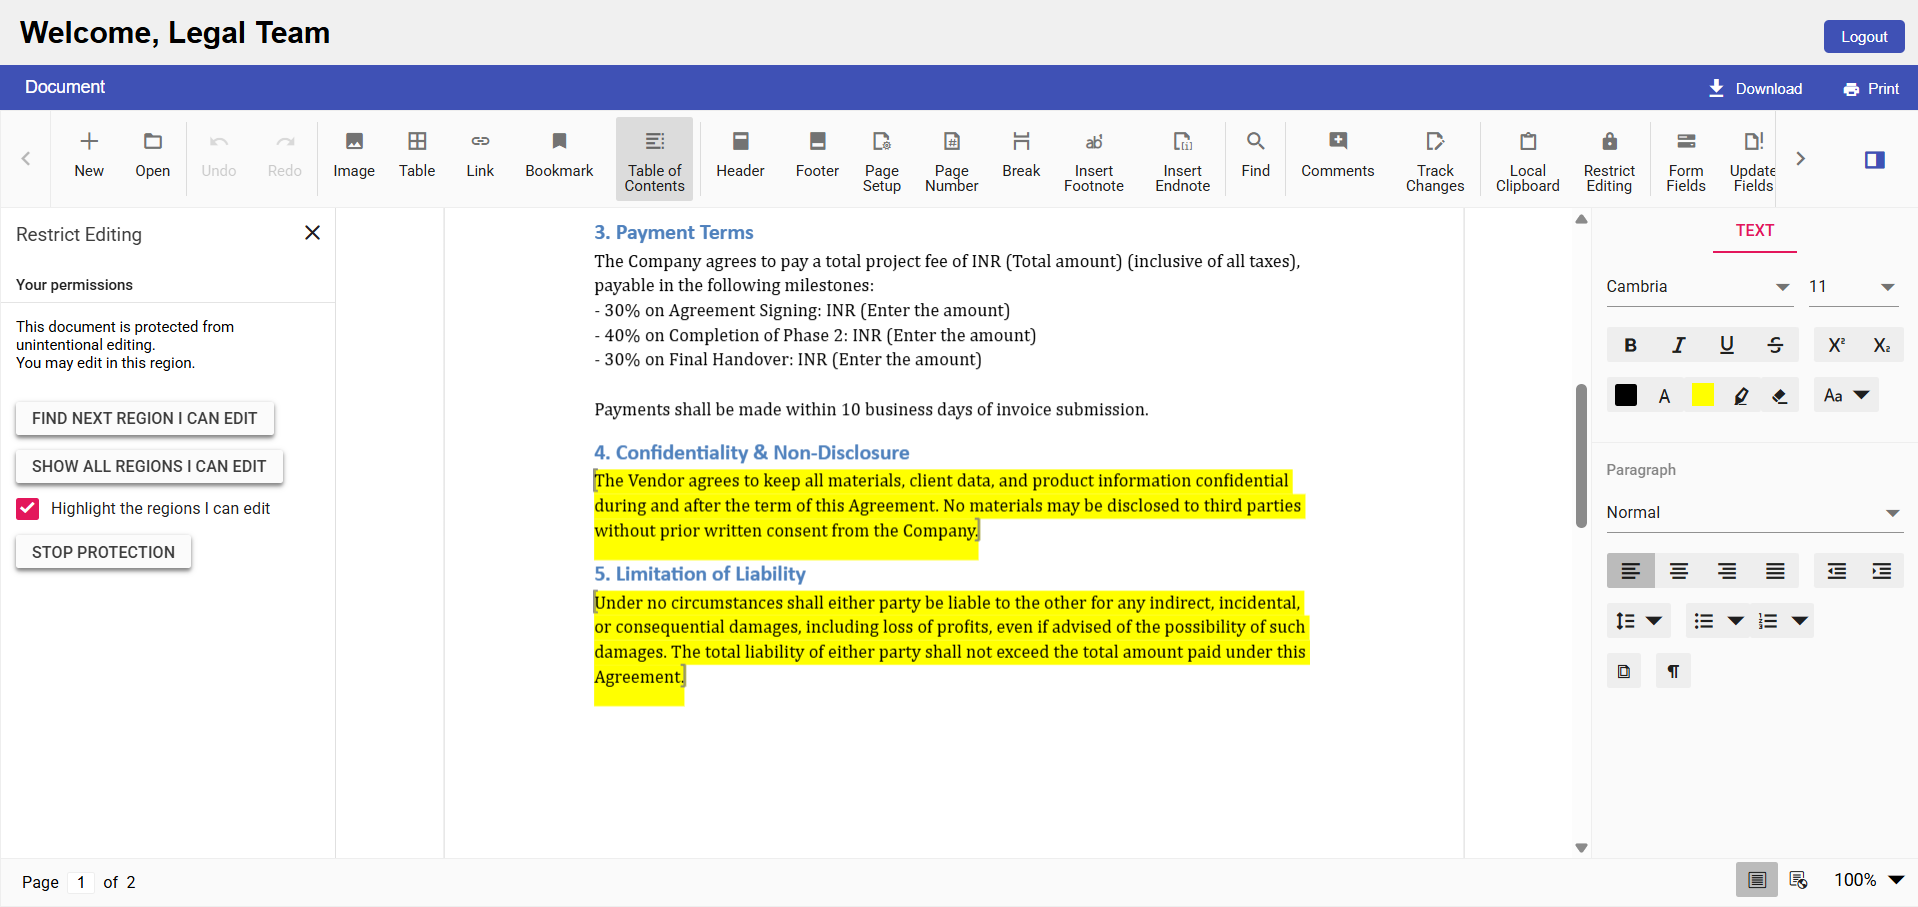
Editable sections for Legal Team
## Testing the user roles
To test the application, run the **server-side (ASP.NET Core API)** first, followed by the ** client-side (React)** application.
Use the following login credentials for each user role:
| Role | Email | Password |
| --- | --- | --- |
| HR | [email protected] | 123456 |
| Project leader | [email protected] | 123456 |
| Finance team | [email protected] | 123456 |
| Legal team | [email protected] | 123456 |
## GitHub reference
For the complete working projects, refer to the [GitHub](https://github.com/SyncfusionExamples/Role-Based-Access-and-Restrict-Editing-in-React-Word-Editor)
demo.
## Conclusion
By combining [Syncfusion’s Restrict Editing](https://ej2.syncfusion.com/documentation/document-editor/restrict-editing)
capabilities with [ASP.NET Core](https://www.syncfusion.com/aspnet-core-ui-controls)
authentication, developers can build secure, scalable document workflows. This approach not only enforces granular access control but also enhances operational efficiency, reduces the likelihood of unauthorized modifications, and ensures regulatory compliance.
As a result, teams can collaborate with confidence, knowing that sensitive content remains protected and workflows remain streamlined. This integration represents a forward-thinking solution for modern enterprises seeking to balance flexibility with security in their document processes.
The new version is available for current customers to download from the [license and downloads](https://www.syncfusion.com/account/downloads)
page. If you are not a Syncfusion® customer, you can try our [30-day free trial](https://www.syncfusion.com/downloads/essential-js2)
for our newest features.
You can also contact us through our [support forum](https://www.syncfusion.com/forums)
, [support portal](https://support.syncfusion.com/)
, or [feedback portal](https://www.syncfusion.com/feedback)
. We are always happy to assist you
## Related Blogs
[Secure Document Editing with Role-Based Toolbars in React Word Editor](https://www.syncfusion.com/blogs/post/role-based-toolbar-react-word-editor)
[Build a Word Document Editor in React with Auto-Save to Amazon S3](https://www.syncfusion.com/blogs/post/react-aws-s3-document-editor-autosave)
[Effortlessly Open, Edit, and Auto-Save Word Documents in React with Azure Blob Storage](https://www.syncfusion.com/blogs/post/azure-blob-storage-in-react)
[Syncfusion® Document Viewer for VS Code Now Supports Word Documents](https://www.syncfusion.com/blogs/post/vs-code-document-viewer-extension)