---
title: "Overview of Grid in Essential JS 2: Part 1"
published_at: "2018-04-24T13:06:00+00:00"
modified_at: "2021-09-13T11:35:57+00:00"
url: "https://www.syncfusion.com/blogs/post/overview-of-grid-in-essential-js-2-part-1"
excerpt: "The Essential JS 2 grid is a modern, lightweight, feature-rich, and open-source grid for Angular with blazing-fast performance. It has been built using TypeScript with modular architecture, which helps you load only the needed modules on demand. In this article,..."
taxonomy_category:
- "Essential Studio"
- "Grid"
- "JavaScript"
- "TypeScript"
taxonomy_post_tag:
- "Essential Studio"
- "Grid"
- "JavaScript"
- "TypeScript"
---
# Overview of Grid in Essential JS 2: Part 1
[Yogeshwaran R](https://www.syncfusion.com/blogs/author/yogeshr)
The Essential JS 2 grid is a modern, lightweight, feature-rich, and open-source grid for Angular with blazing-fast performance. It has been built using TypeScript with modular architecture, which helps you load only the needed modules on demand.
In this article, we are going to walk you through how to create a grid and inject features such as paging, sorting, filtering, grouping, and aggregation in an Angular application. The final code can be found at our [GitHub repository](https://github.com/SyncfusionSamples/ej2-grid-gettingstarted)
.
## Set Up the Development Environment
You need to set up the development environment before creating a grid. Since the source is available in GitHub and packages are available in npm, you can get started with grid in very few steps.
#### Creating an Angular Application
To create an Angular application, we need to install [Angular CLI](https://github.com/angular/angular-cli)
globally using the following command.
```
npm install -g @angular/cli
```
Then create a new Angular application using the following command.
```
ng new my-app
```
This will download all the files we need and initialize the npm install.
#### Grid Installation through Command Prompt
Once you have created the Angular application, you need to use the following command to install grid.
```
cd my-app
npm install @syncfusion/ej2-ng-grids --save
```
**–save** will save grid in the dependencies of package.json.
## Configuring Grid
Now all the configuration related to environment is completed. Next you need to configure grid. Before configuration, we need a component where grid will render. To create an Angular component, you need to use the following Angular CLI command.
```
ng generate component grid
```

The new component has been created successfully.
Themes provide life to components. Grid has different themes. They are:
- Material
- Office 365
- Bootstrap
- High Contrast
In this demo application, the material theme will be used for grid. To add the theme, you need to import **material.css** in ** styles.css**.
```
@import '../node_modules/@syncfusion/ej2-grids/styles/material.css';
```
After adding the theme, you need to import grid module in **app.module.ts**.
```
import { BrowserModule } from '@angular/platform-browser';
import { NgModule } from '@angular/core';
import { AppComponent } from './app.component';
import { GridComponent } from './grid/grid.component';
import { GridModule } from '@syncfusion/ej2-ng-grids';
@NgModule({
declarations: [
AppComponent,
GridComponent
],
imports: [
BrowserModule,
GridModule
],
providers: [],
bootstrap: [AppComponent]
})
export class AppModule { }
```
## Creating the Grid Component
We have successfully completed configuration related to grid. Now you need to define your first grid in **grid.component.html**.
```
```
Then add the grid component in **app.compnent.html**.
```
```
## Defining Row Data
After creating the grid component, you need to define an array of JavaScript objects in grid.component.ts.
```
this.data = [
{ OrderID: 10248, CustomerID: 'VINET', Freight: 32.38 },
{ OrderID: 10249, CustomerID: 'TOMSP', Freight: 11.61 },
{ OrderID: 10250, CustomerID: 'HANAR', Freight: 65.83 },
{ OrderID: 10251, CustomerID: 'VICTE', Freight: 41.34 },
{ OrderID: 10252, CustomerID: 'SUPRD', Freight: 51.3 },
{ OrderID: 10253, CustomerID: 'HANAR', Freight: 58.17 },
{ OrderID: 10254, CustomerID: 'CHOPS', Freight: 22.98 },
{ OrderID: 10255, CustomerID: 'RICSU', Freight: 148.33 },
{ OrderID: 10256, CustomerID: 'WELLI', Freight: 13.97 },
];
```
Bind the data to the grid using the dataSource property, which accepts an array of JavaScript objects.
```
```
## Defining Columns as Directives
Grid has an option to define columns as directives. In these column directives, we have properties to customize columns. Let’s check the properties used here:
- We have added **field** to map with a property name an array of JavaScript objects.
- We have added **headerText** to change the title of columns.
- We have used **textAlign** to change the alignment of columns. By default, columns will be left aligned. To change columns to right align, we need to define ** textAlign** as ** Right**.
- Also, we have used another useful property, **[format](https://ej2.syncfusion.com/angular/documentation/grid/columns.html#format)**. Using this, we can format number and date values to standard or custom formats. Here, we have defined it for the conversion of numeric values to currency.
For this demo, we are going to define columns like the following.
```
```
## Serve the Application
Go to the application directory and launch the server using the following commands.
```
ng serve –open
```
Once all the files are compiled successfully, it will serve the site.
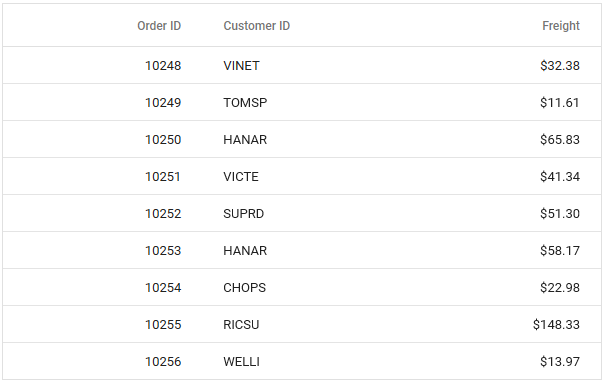
Grid should look something like this.
## Injecting Features
Now, you have the basic working grid with data populated. We are going to learn how to enable some more commonly used built-in features. Before adding these features, we need to define services in providers of **app.module.ts**. These services will provide a way to access their functionalities from grid.
```
import { GridModule, PageService, SortService, FilterService, GroupService, AggregateService } from '@syncfusion/ej2-ng-grids';
@NgModule({
declarations: [
AppComponent,
GridComponent
],
imports: [
BrowserModule,
GridModule
],
providers: [PageService, SortService, FilterService, GroupService, AggregateService],
bootstrap: [AppComponent]
})
export class AppModule { }
```
#### Paging
Once the **PageService** is injected in providers, we can gain access to paging functionalities. Also, we need to enable ** allowPaging** in grid to enable the pager.
As of now, default [paging](https://ej2.syncfusion.com/angular/documentation/grid/paging.html)
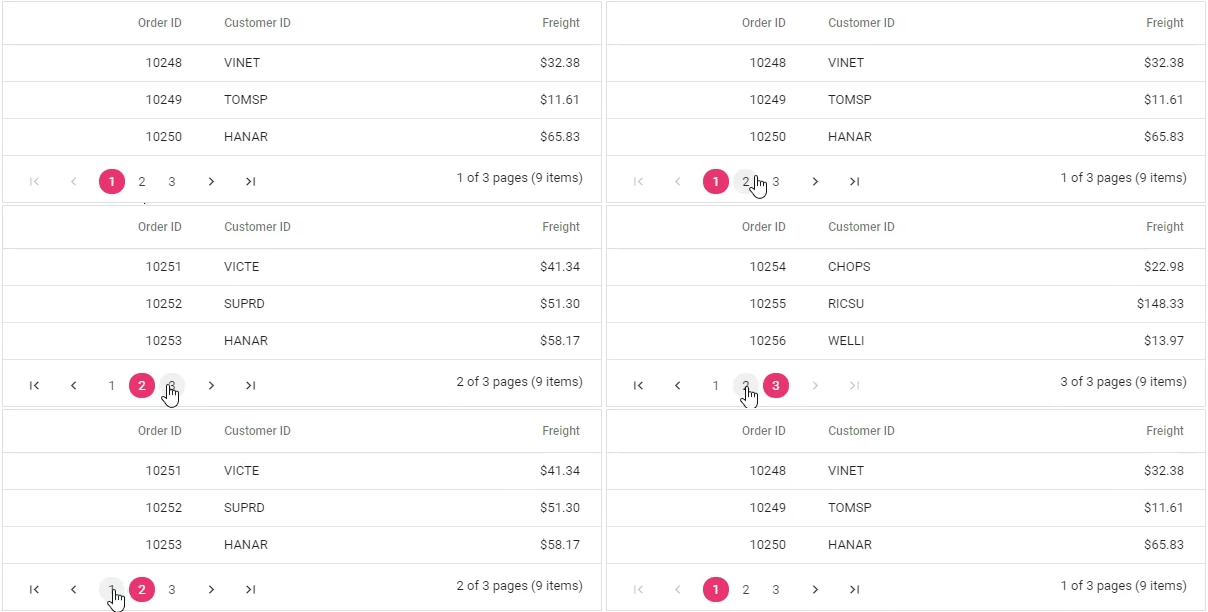
is enabled. Now I am going to customize the default pager with **pageSettings**. Here we defined the ** pageSettings.pageSize** as 3 to define the number of records to be displayed per page.
```
```
```
@Component({
selector: 'app-grid',
templateUrl: './grid.component.html',
styleUrls: ['./grid.component.css'],
encapsulation: ViewEncapsulation.None
})
export class GridComponent implements OnInit {
public data: Object[];
public pageSettings: Object;
constructor() { }
ngOnInit() {
this.data = [
{ OrderID: 10248, CustomerID: 'VINET', Freight: 32.38 },
{ OrderID: 10249, CustomerID: 'TOMSP', Freight: 11.61 },
{ OrderID: 10250, CustomerID: 'HANAR', Freight: 65.83 },
{ OrderID: 10251, CustomerID: 'VICTE', Freight: 41.34 },
{ OrderID: 10252, CustomerID: 'SUPRD', Freight: 51.3 },
{ OrderID: 10253, CustomerID: 'HANAR', Freight: 58.17 },
{ OrderID: 10254, CustomerID: 'CHOPS', Freight: 22.98 },
{ OrderID: 10255, CustomerID: 'RICSU', Freight: 148.33 },
{ OrderID: 10256, CustomerID: 'WELLI', Freight: 13.97 },
];
this.pageSettings = { pageSize: 3 };
}
}
```
After enabling paging, grid will be like this:
#### Sorting
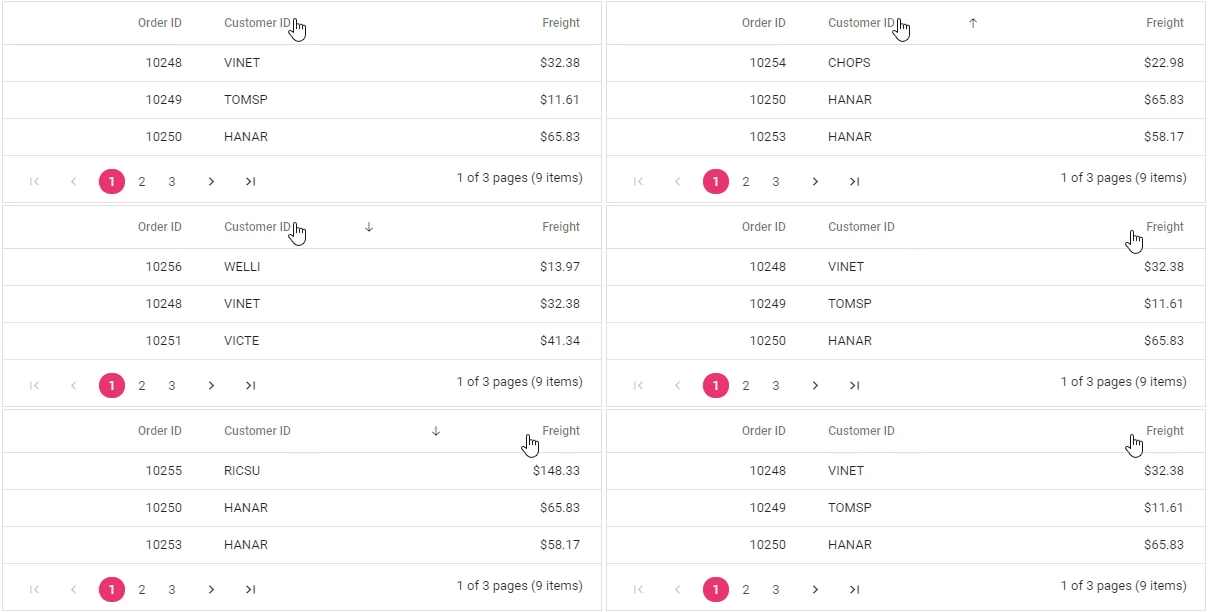
After **SortService** is injected in providers, we need to enable ** allowSorting** in grid to gain its functionalities.
```
```
Interact with column headers to sort rows based on columns in either ascending or descending order.
#### Filtering
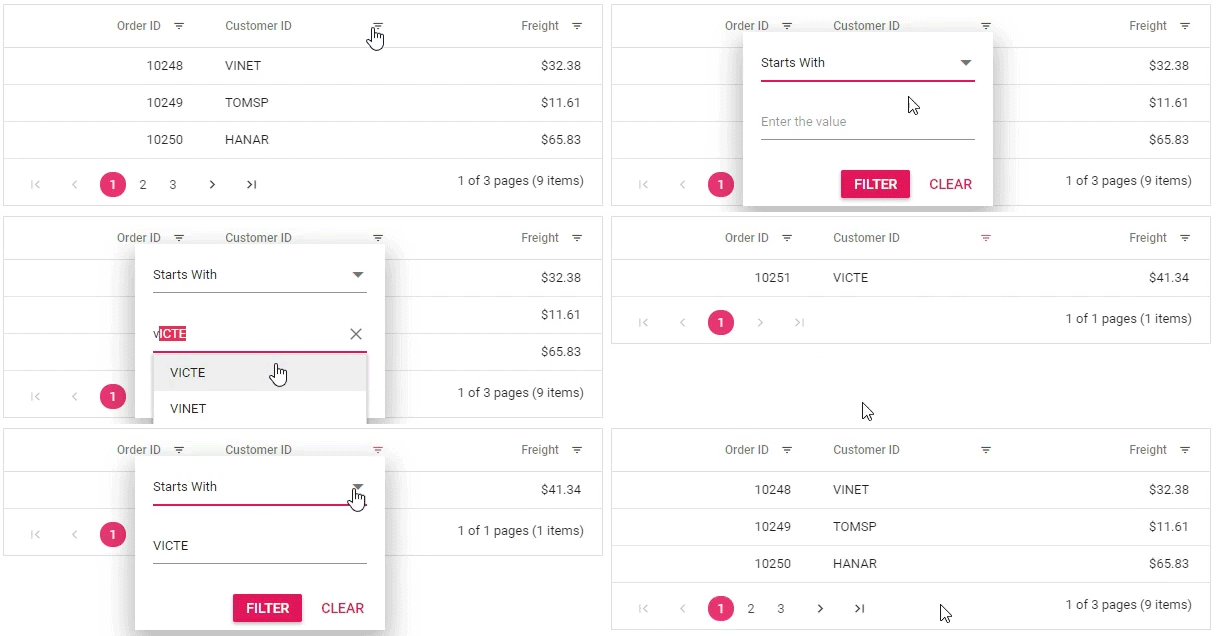
Grid has different filter UIs, such as filter bar, filter menu, check box, and Excel-like filters. In this demo application, we are going to use [filter menu](https://ej2.syncfusion.com/angular/documentation/grid/filtering.html#filter-menu)
to filter records. For injecting this filtering feature, we need to define **FilterService** in providers. Also, to gain filter functionalities and define the filter UI, we need to enable ** allowFIltering** and define ** filterSettings.type** as ** Menu**.
```
```
```
@Component({
selector: 'app-grid',
templateUrl: './grid.component.html',
styleUrls: ['./grid.component.css'],
encapsulation: ViewEncapsulation.None
})
export class GridComponent implements OnInit {
public data: Object[];
public pageSettings: Object;
public filterSettings: Object;
constructor() { }
ngOnInit() {
this.data = [
{ OrderID: 10248, CustomerID: 'VINET', Freight: 32.38 },
{ OrderID: 10249, CustomerID: 'TOMSP', Freight: 11.61 },
{ OrderID: 10250, CustomerID: 'HANAR', Freight: 65.83 },
{ OrderID: 10251, CustomerID: 'VICTE', Freight: 41.34 },
{ OrderID: 10252, CustomerID: 'SUPRD', Freight: 51.3 },
{ OrderID: 10253, CustomerID: 'HANAR', Freight: 58.17 },
{ OrderID: 10254, CustomerID: 'CHOPS', Freight: 22.98 },
{ OrderID: 10255, CustomerID: 'RICSU', Freight: 148.33 },
{ OrderID: 10256, CustomerID: 'WELLI', Freight: 13.97 },
];
this.pageSettings = { pageSize: 3 };
this.filterSettings = { type: 'Menu' };
}
}
```
After defining the filter menu, the filter UI would be like this:
#### Grouping
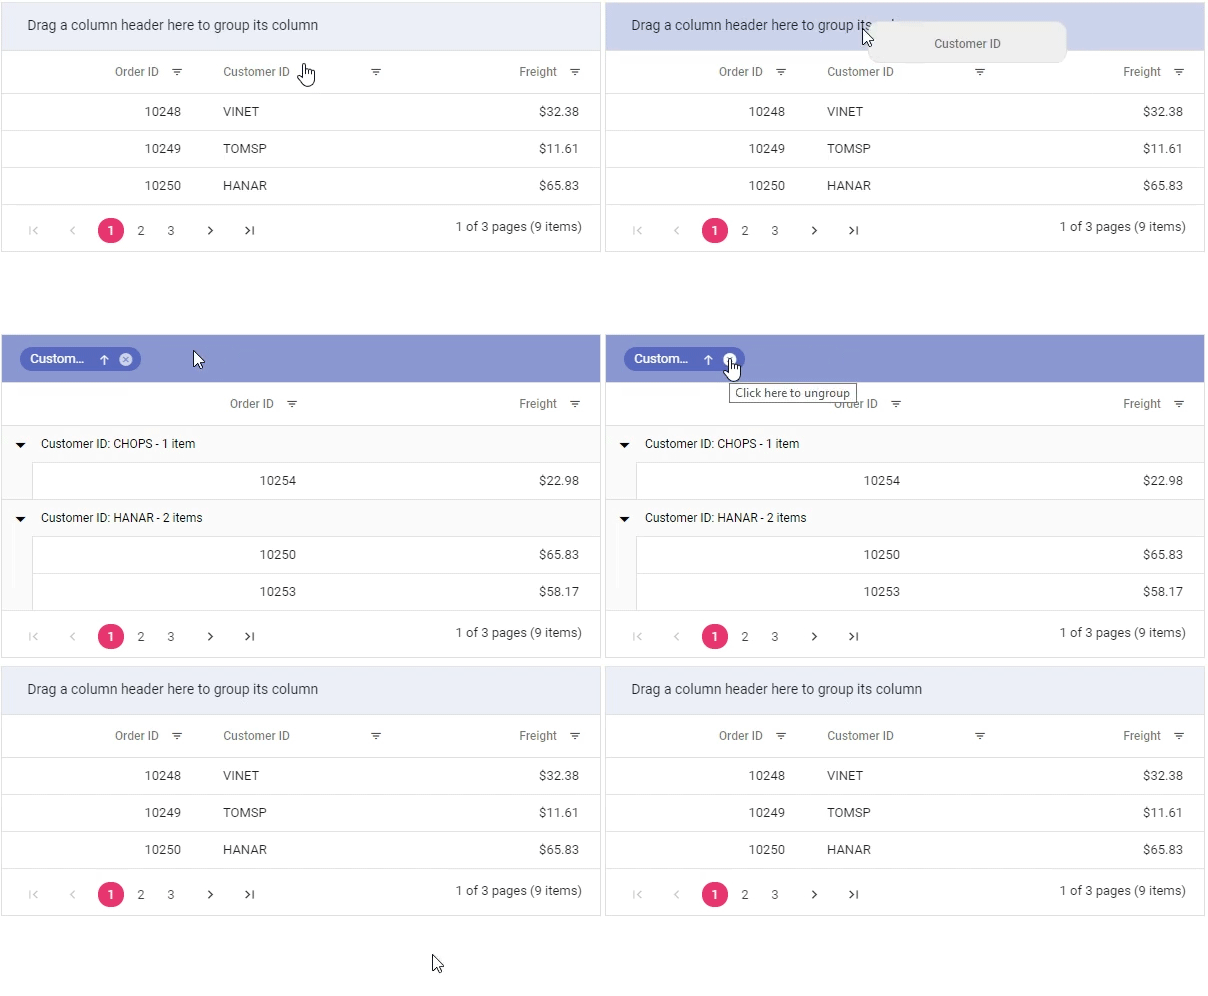
If **GroupService** is injected in providers, then we need to enable ** allowGrouping** in grid to access its functionalities.
```
```
#### Aggregation
To use [aggregation](https://ej2.syncfusion.com/angular/documentation/grid/aggregates.html)
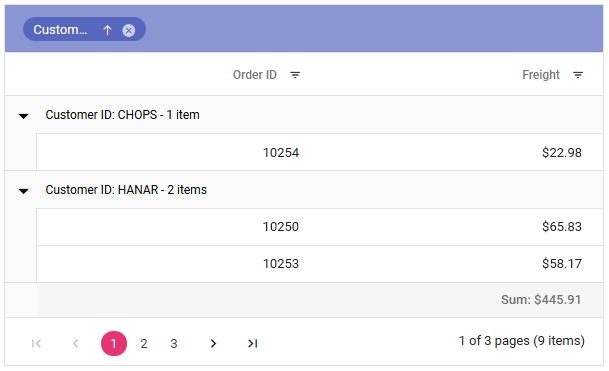
in grid, we need to inject **AggregateService**. After injecting the service, we need to define aggregations as directives to direct a child of grid. In this demo, we are going to use the ** Sum** built-in aggregate for freight column.
```
Sum: {{data.Sum}}
```
After defining aggregation, the total sum is rendered in the footer element of grid.
## Summary
In this blog, we have learned how to create a simple grid and enhance its fundamental features using Angular CLI and grid from a node package manager. Grid has a lot of other advanced features, such as data binding with different adaptors, data manipulation (CRUD), column resizing, column choosing, column menu, state persistence, copying to clipboard, responsiveness, and virtualization. There is a lot more we can do with grid! In our next blogs, we can see how easy it is to configure these advanced features.
Feel free to visit the grid [source in GitHub](https://github.com/syncfusion/ej2-ng-grids/)
, [sample browser](https://ej2.syncfusion.com/angular/demos/#/material/grid/default)
and [documentation](https://ej2.syncfusion.com/angular/documentation/grid/)
to explore live samples of its features and API. Also be sure to check out the [grid sample in GitHub](https://github.com/SyncfusionSamples/ej2-grid-gettingstarted)
, which is readily runnable, and see just how easy it is to create and configure grid.
If you have any questions or require clarification, please let us know in the comments section. You can also contact us through our [support forum](https://www.syncfusion.com/forums)
or [Direct-Trac](https://www.syncfusion.com/support/directtrac/)
. We are happy to assist you!