---
title: "Creating a Menu Bar UI with .NET MAUI Preview 14"
published_at: "2022-03-21T11:04:43+00:00"
modified_at: "2026-02-10T09:06:50+00:00"
url: "https://www.syncfusion.com/blogs/post/menu-bar-ui-net-maui-preview-14"
excerpt: "TL;DR: Build a powerful photo viewer and editor with .NET MAUI Preview 14, featuring a new menu bar UI perfect for desktop apps, seamless navigation with NavigationPage, customizable file operations and editing tools with MenuBarItems, fine-tune controls like rotation angles..."
taxonomy_category:
- ".NET MAUI"
- "Desktop"
- "Mobile"
- "Xamarin"
taxonomy_post_tag:
- ".NET MAUI"
- "desktop"
- "Mobile"
- "Xamarin.Forms"
---
# Creating a Menu Bar UI with .NET MAUI Preview 14
[Selva Ganapathy Kathiresan](https://www.syncfusion.com/blogs/author/selva-ganapathy-k)
**TL;DR:**
Build a powerful photo viewer and editor with .NET MAUI Preview 14, featuring a new menu bar UI perfect for desktop apps, seamless navigation with NavigationPage, customizable file operations and editing tools with MenuBarItems, fine-tune controls like rotation angles with cascading menus, and effortless photo viewing and editing with the Image control. Start creating amazing photo apps today!
On March 16, 2022, [Microsoft released .NET MAUI Preview 14](https://devblogs.microsoft.com/dotnet/dotnet-maui-preview-14/)
. With this new preview 14 release, .NET MAUI offers a menu bar UI, which is typically a menu that can be placed at the top of desktop apps on Windows. This menu bar can be seen as the title bar for macOS. I enjoyed working with this menu bar in my .NET MAUI application using .NET MAUI Preview 14.
In this blog, I will be creating a photo viewer and editor using the .NET MAUI desktop application and integrating the menu bar into it.
## Create a photo viewer and editor app
**Step 1:** First, create a simple [.NET MAUI Preview 14 application](https://docs.microsoft.com/en-us/dotnet/maui/get-started/first-app)
using Visual Studio.
**Step 2:** Menus can only appear on ** Shell** and ** NavigationPage**. For this example, I am choosing ** NavigationPage** to display the menu. So, load the ** MainPage** as the ** NavigationPage**.
```
public partial class App : Application
{
public App()
{
InitializeComponent();MainPage = new NavigationPage(new MainPage());
}
}
```
**Step 3:** Now, declare the ** MenuBarItems** collection on the Content page to display the menu.
```
```
**Step 4:** Then, add the necessary items to the ** MenuBarItems** collection to display them on the menu. In this photo viewer and editor application, I am going to add File and Edit menus. The** file** menu will contain the options ** Open**,** Save,**and** Exit,**and the ** Edit** menu will contain ** Rotate**,** Zoom**, and** Reset**.
Refer to the following code example.
```
```
**Step 5:** Now, let’s add cascading menu items to the ** MenuBarItem**. First, I add a submenu to the ** Rotate** menu Item. The Rotate menu will have the options ** Rotate 90**,** Rotate 180**,** Rotate 270**, and** Rotate 360** as cascading menus.
Refer to the following code.
```
```
**Step 6:** Now, add an Image control as the content of the ContentPage within a grid to clip the bounds. The Image control can be used to view and edit the photos.
Refer to the following code example.
```
```
**Step 7:** Last, add the code-behind logic for the MenuBarItems to perform their respective actions. I am using the FilePicker from .NET MAUI Preview 14, which offers a UI to pick files on desktop platforms. Also, I am using the ** ViewExtensions.RotateTo** and ** ViewExtensions.ScaleTo** methods of the Image control to perform rotate and zoom actions, respectively.
```
private async void MenuFlyoutItem_Clicked(object sender, EventArgs e)
{
var result = await OpenPicker(PickOptions.Images);
}async Task OpenPicker(PickOptions imageOption)
{
try
{
var value = await FilePicker.PickAsync(imageOption);
if (value != null)
{
if (value.FileName.EndsWith("png", StringComparison.OrdinalIgnoreCase) ||
value.FileName.EndsWith("jpg", StringComparison.OrdinalIgnoreCase))
{
var stream = await value.OpenReadAsync();
this.photoViewerImage.Source = ImageSource.FromStream(() => stream);
}
}return value;
}
catch (Exception ex)
{
}return null;
}private void MenuFlyoutItem_Clicked_1(object sender, EventArgs e)
{
this.photoViewerImage.RotateTo(90, 500, Easing.BounceIn);
}private void MenuFlyoutItem_Clicked_2(object sender, EventArgs e)
{
this.photoViewerImage.RotateTo(180, 500, Easing.BounceIn);
}
private void MenuFlyoutItem_Clicked_3(object sender, EventArgs e)
{
this.photoViewerImage.RotateTo(270, 500, Easing.BounceIn);
}
private void MenuFlyoutItem_Clicked_4(object sender, EventArgs e)
{
this.photoViewerImage.RotateTo(360, 500, Easing.BounceIn);
}
private void MenuFlyoutItem_Clicked_5(object sender, EventArgs e)
{
this.photoViewerImage.ScaleTo(2, 500, Easing.BounceOut);
}
private void MenuFlyoutItem_Clicked_6(object sender, EventArgs e)
{
this.photoViewerImage.ScaleTo(1, 500, Easing.BounceOut);
this.photoViewerImage.RotateTo(0, 500, Easing.BounceIn);
}
```
Now, the simple .NET MAUI Preview 14 Photo Viewer and Editor is ready, with menus using MenuBarItems.
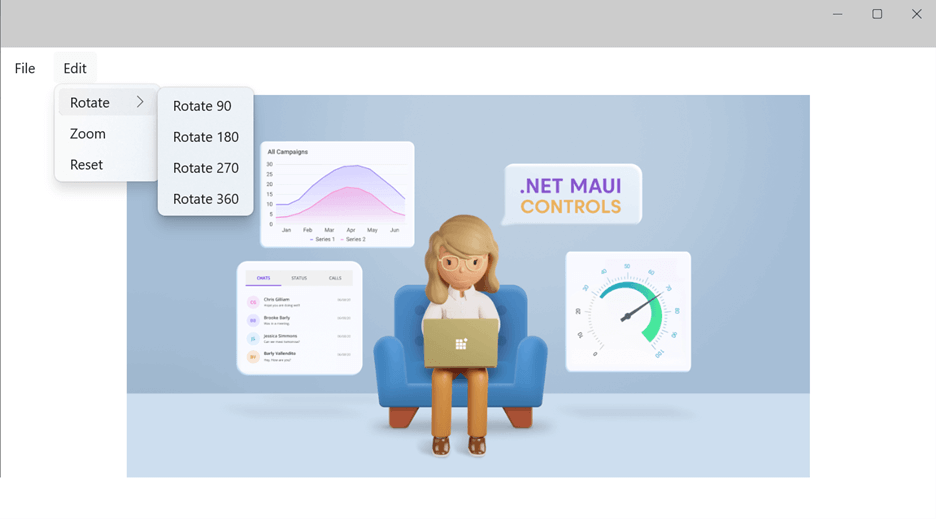
MenuBarItem using .NET MAUI Preview 14
## GitHub reference
Also, you can check out our full example of [Creating a Menu Bar UI with .NET MAUI Preview 14 on GitHub](https://github.com/SyncfusionExamples/maui-general-samples/tree/main/MenuBarUIApplication)
.
## Syncfusion compatibility with .NET MAUI Preview 14
Syncfusion [.NET MAUI controls](https://www.syncfusion.com/maui-controls)
will be compatible with .NET MAUI Preview 14 in our Essential Studio® for .NET MAUI 2022 Volume 1 release. This release is expected to be rolled out by the end of March. You can install our control package from [NuGet Gallery](https://www.nuget.org/packages?q=Syncfusion.maui)
and use it in your .NET MAUI Preview 14 application.
## Conclusion
I hope you enjoyed this blog and thanks for reading! For more details, refer to the article, [.NET MAUI Preview 14](https://devblogs.microsoft.com/dotnet/dotnet-maui-preview-14/)
. Also, check out the [.NET MAUI Preview 14 release notes](https://github.com/dotnet/maui/releases/tag/6.0.200-preview.14.2)
.
If you have any feedback, special requirements, or controls that you’d like to see in our .NET MAUI suite, please let us know in the comments section below.
Also, you can contact us through our [support forum](https://www.syncfusion.com/forums)
, [support portal](https://support.syncfusion.com/)
, or [feedback portal](https://www.syncfusion.com/feedback/xamarin-forms)
. We are always happy to assist you!
## Related blogs
- [Touching Base with .NET MAUI Essentials](https://www.syncfusion.com/blogs/post/touching-base-with-net-maui-essentials.aspx)
- [Create a Hyperlink UI in .NET MAUI Preview 13](https://www.syncfusion.com/blogs/post/create-a-hyperlink-ui-in-net-maui-preview-13.aspx)
- [5 Important Things to Make Your Cross-Platform (.NET MAUI) App Accessible](https://www.syncfusion.com/blogs/post/5-important-things-to-make-your-cross-platform-net-maui-app-accessible.aspx)
- [Learn How to Use Dependency Injection in .NET MAUI](https://www.syncfusion.com/blogs/post/learn-how-to-use-dependency-injection-in-net-maui.aspx)
- [4 Impressive Features of .NET MAUI in .NET 7](https://www.syncfusion.com/blogs/post/4-impressive-features-of-net-maui-in-net-7)