---
title: "Build a Stunning Book Library App with .NET MAUI ListView – Fast, Flexible & Cross-Platform"
published_at: "2025-07-03T12:45:40+00:00"
modified_at: "2025-07-03T15:55:19+00:00"
url: "https://www.syncfusion.com/blogs/post/maui-listview-book-library-app"
excerpt: "Effortlessly create a powerful .NET MAUI book library app! Learn to manage collections, display, and edit books using ListView and DataForm with CRUD operations and filtering."
taxonomy_category:
- ".NET MAUI"
- "Cross-Platform Development"
- "CRUD"
- "Data Form"
- "Data Management & CRUD"
- "ListView"
- "Software Development"
- "UI"
taxonomy_post_tag:
- ".NET"
- ".NET MAUI"
- "Cross-Platform"
- "CRUD operations"
- "DataForm"
- "listview"
- "ListView control"
- "Mobile Development"
---
# Build a Stunning Book Library App with .NET MAUI ListView – Fast, Flexible & Cross-Platform
[Jayaleshwari N](https://www.syncfusion.com/blogs/author/jayaleshwarin)

**TL;DR:** Learn how to build a powerful cross-platform .NET MAUI Book Library App using ListView and DataForm. This guide walks you through managing book collections with full CRUD operations, intuitive UI controls, and smart filtering, all from a single codebase for Android and iOS.
.NET MAUI simplifies cross-platform development, allowing you to build apps for Android and iOS with a single codebase. Its [ListView](https://www.syncfusion.com/maui-controls/maui-listview)
control is perfect for displaying book collections, while [DataForm](https://www.syncfusion.com/maui-controls/maui-dataform)
streamlines editing and viewing book details. This tutorial focuses on using these controls (with Syncfusion® enhanced versions) to create a feature-rich book management app.
**Note:** This guide uses Syncfusion® ListView and DataForm for advanced features**.** Install the **Syncfusion.Maui.ListView** and ** Syncfusion.Maui.DataForm** NuGet packages or use the standard **.NET MAUI ListView** with minor adjustments
[ListView](https://learn.microsoft.com/en-us/dotnet/maui/user-interface/controls/listview?view=net-maui-9.0)
is a versatile control in .NET MAUI for presenting lists of data. It supports features like data binding, item templates, and item selection, making it ideal for managing a collection of books in our library app. Here we have the sections to handle.
- [Displaying books with ListView](#Displaying)
- [Display book details in DataForm.](#Display)
- [Adding and Editing Books](#Adding%20)
## Displaying books with ListView
One of the most critical features when building a book library app is presenting book information in a clean and organized manner. **ListView** is a versatile control that simplifies the process of displaying and managing lists, making it an ideal choice for showcasing books.
Here, we have two steps to display books in a ListView.
- Implementing Model and ViewModel
- Designing the UI
## Step 1: Implementing Model and ViewModel
First, include the **Model class** to handle the book info properties and the view model class to populate the binding collection property to show the books list in the [ListView](https://help.syncfusion.com/cr/maui/Syncfusion.Maui.ListView.SfListView.html)
.
### Creating a model
Create a data model to bind it to the control. Create a simple data source in a new class file and save it as **BookInfo.cs** file, as shown in the code example below.
```
public class BookInfo : INotifyPropertyChanged
{
#region Fields
private string name;
private string desc;
private string author;
private string image;
#endregion
#region Constructor
public BookInfo()
{
}
#endregion
#region Properties
public string Name
{
get { return name; }
set
{
name = value;
OnPropertyChanged("Name");
}
}
public string Description
{
get { return desc; }
set
{
desc = value;
OnPropertyChanged("Description");
}
}
public string Author
{
get { return author; }
set
{
author = value;
OnPropertyChanged("Author");
}
}
[Display(AutoGenerateField = false)]
public string Image
{
get { return image; }
set
{
image = value;
OnPropertyChanged("Image");
}
}
#endregion
#region Interface Member
public event PropertyChangedEventHandler PropertyChanged;
public void OnPropertyChanged(string name)
{
if (this.PropertyChanged != null)
this.PropertyChanged(this, new PropertyChangedEventArgs(name));
}
#endregion
}
```
### Creating a view model
Create a model repository class with **BookInfo** collection property, initialized with the required number of data objects in a new class file and save it as a ** ViewModel.cs** file, as shown in the code example below.
```
public class ViewModel : INotifyPropertyChanged
{
#region Fields
private ObservableCollection bookInfo;
#endregion
#region Constructor
public ViewModel()
{
GenerateSource();
}
#endregion
#region Properties
public ObservableCollection Books
{
get { return bookInfo; }
set { bookInfo = value; }
}
}
```
The list of **Books** is now ready to be bound and shown in a ListView. We can design the UI now.
## Step 2: Designing the UI
Now, we will create the UI to show books using the**.NET MAUI ListView**. Install the necessary package to use the control in the application.
**Note:** To know more about ListView, please refer to the [.NET MAUI ListView](https://help.syncfusion.com/maui/listview/getting-started)
documentation.
### Binding data to the listview
The **BindingContext** for the main page is set with a ** ViewModel**to bind properties and commands to the ListView.
```
```
To populate the ListView, bind the item collection from the **BindingContext** to the [SfListView.ItemsSource](https://help.syncfusion.com/cr/maui/Syncfusion.Maui.ListView.SfListView.html#Syncfusion_Maui_ListView_SfListView_ItemTemplate)
property.
The code example below demonstrates how to bind the **Books** collection to the ** SfListView.ItemsSource** property:
```
```
### Defining the item template
To define the [ItemTemplate](https://help.syncfusion.com/cr/maui/Syncfusion.Maui.ListView.SfListView.html#Syncfusion_Maui_ListView_SfListView_ItemTemplate)
for a ListView, you can create a custom template with controls like labels for displaying book details and an image to show the book cover.
```
```
You will get the following output with the above code snippet,

Displaying books using ListView ItemTemplate
## Display the book details in DataForm
[DataForm](https://help.syncfusion.com/maui/dataform/overview)
is used to display the book using a [DataObject](https://help.syncfusion.com/cr/maui/Syncfusion.Maui.DataForm.SfDataForm.html#Syncfusion_Maui_DataForm_SfDataForm_DataObject)
bound to the**ViewModel’s** ** SelectedItem** property. The ** SelectedItem** object will be updated when you tap the books.
```
```
The **IsReadOnly** property is used here to determine whether we are showing the book alone or trying to edit the book.
```
public class ViewModel : INotifyPropertyChanged
{
#region Fields
private BookInfo selectBook;
private bool isReadOnly;
#endregion
#region Constructor
public ViewModel()
{
InitializeCommands();
}
#endregion
#region Properties
public BookInfo SelectedItem
{
get
{
return selectBook;
}
set
{
selectBook = value;
OnPropertyChanged(nameof(SelectedItem));
}
}
public bool IsReadOnly
{
get
{
return isReadOnly;
}
set
{
isReadOnly = value;
OnPropertyChanged(nameof(IsReadOnly));
OnPropertyChanged(nameof(IsVisible));
}
}
public Command TapCommand { get; set; }
#endregion
private void InitializeCommands()
{
TapCommand = new Command(OnTapCommand);
}
private async void OnTapCommand(object eventArgs)
{
var tappedEventArgs = eventArgs as Syncfusion.Maui.ListView.ItemTappedEventArgs;
if (tappedEventArgs != null)
{
SelectedItem = tappedEventArgs.DataItem as BookInfo;
if (SelectedItem == null)
return;
IsReadOnly = true;
var editPage = new BookPage();
editPage.BindingContext = this;
await App.Current.MainPage.Navigation.PushAsync(editPage);
}
}
}
```
When you tap the book, you can see detailed information about it. You will get the following output when you run the above code snippet.

Opening book details in DataForm
## CRUD operations with .NET MAUI DataForm
We will perform CRUD operations on the Books collection using .NET MAUI DataForm. Use the add icon and create a book entry using the **DataForm** with the bound property ** SelectedItem** from the ViewModel. The new ** Book** was created using the ** CreatedBookCommand**.
```
public class ViewModel : INotifyPropertyChanged
{
public ViewModel()
{
InitializeCommands();
}
#endregion
#region Properties
public Command CreateBookCommand { get; set; }
public Command SaveBookCommand { get; set; }
public Command CancelBookCommand { get; set; }
public Command EditBookCommand { get; set; }
public Command DeleteBookCommand { get; set; }
#endregion
private void InitializeCommands()
{
CreateBookCommand = new Command(OnCreateBook);
SaveBookCommand = new Command(OnSaveBook);
CancelBookCommand = new Command(OnCancelBook);
EditBookCommand = new Command(OnEditBookCommand);
DeleteBookCommand = new Command(OnDeleteBookCommand);
}
internal async void OnCreateBook()
{
SelectedItem = new BookInfo();
IsReadOnly = false;
var editPage = new BookPage();
editPage.BindingContext = this;
await App.Current.MainPage.Navigation.PushAsync(editPage);
}
internal async void OnCancelBook()
{
SelectedItem = null;
await App.Current.MainPage.Navigation.PopAsync();
}
internal async void OnSaveBook()
{
if (!Books.Contains(SelectedItem))
{
Books.Add(SelectedItem);
}
await App.Current.MainPage.Navigation.PopAsync();
}
internal void OnEditBookCommand()
{
IsReadOnly = false;
}
internal async void OnDeleteBookCommand()
{
Books.Remove(SelectedItem);
await App.Current.MainPage.Navigation.PopAsync();
}
}
```
### Adding book
The add icon is defined using a Label and a font icon. **ViewModel** ** CreateBookCommand** is assigned in Label gestures to create a new Book and show the fields in ** DataForm** to add the values.
```
```
You will see the following output when you click on the plus icon on the Books page.
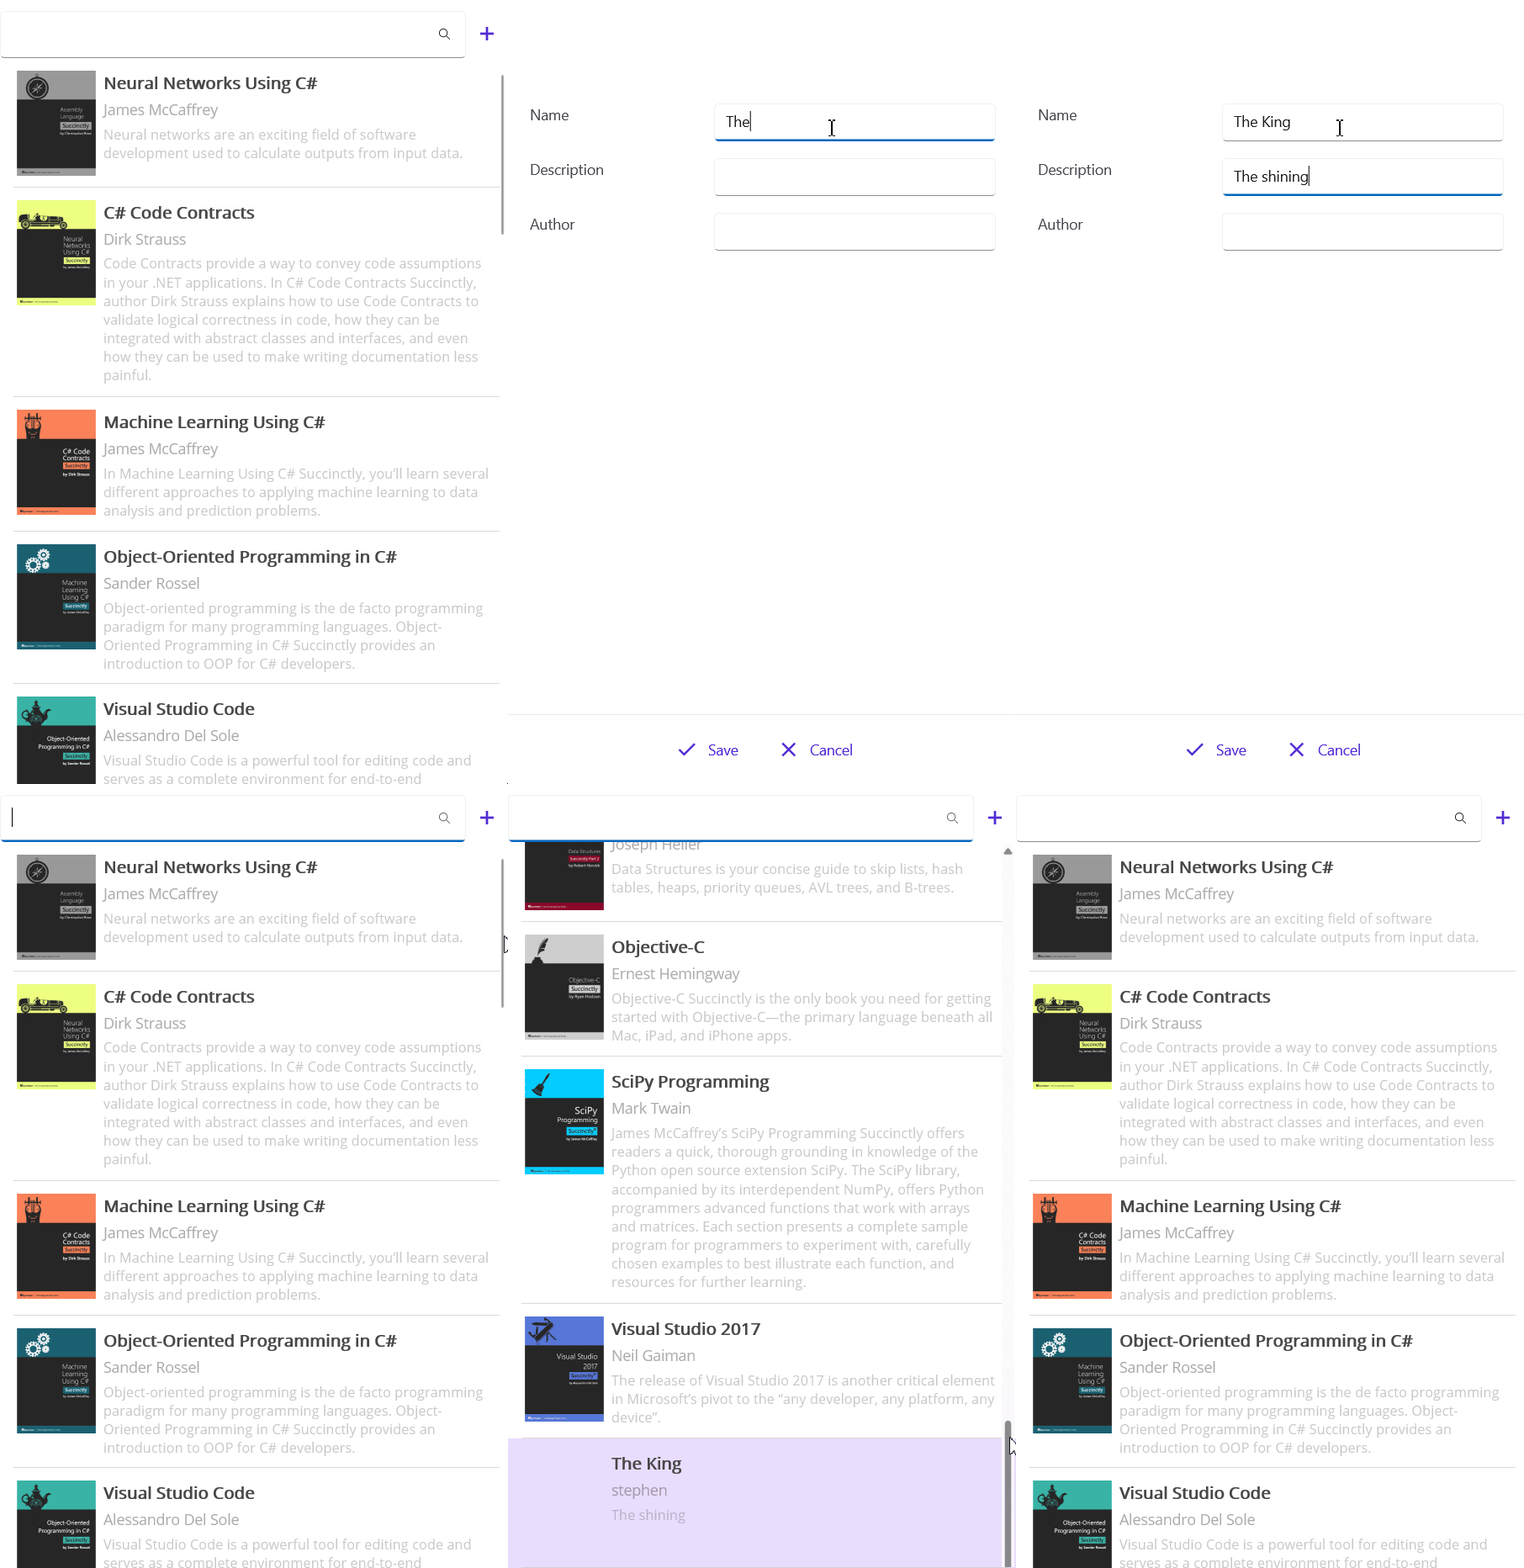
Adding a book detail in .NET MAUI ListView
On this page, you can add the new book to the list using the save button or discard the book using the cancel button.
### Editing book
You can edit the book when you tap the information about the book. When you tap on each book, you can see the book options.
You can edit the book using the **IsReadOnly** property as false. An edited value can be committed only on save, as we defined the commit mode as Manual for ** DataForm**. The value will be committed using the ** Commit** method.
```
bookForm.Commit();
```
### Deleting book
The tapped book can be deleted using the delete icon in the **DataForm** page. The book will be deleted from the list.
These edit, save, cancel, and delete icons are defined using **SfChipGroup**. You can find the code snippets here.
```
```
Based on the chip clicked, the associated action will be performed
```
private void OnChipClicked(object sender, EventArgs e)
{
var viewmodel = this.BindingContext as ViewModel;
var chip = (sender as SfChip);
var layout = chip.Children[0] as HorizontalStackLayout;
var action = (layout.BindingContext as BookOption).ActionName;
if (string.IsNullOrEmpty(action))
return;
switch(action)
{
case "Edit":
viewmodel.OnEditBookCommand();
break;
case "Delete":
viewmodel.OnDeleteBookCommand();
break;
case "Save":
viewmodel.OnSaveBook();
bookForm.Commit();
break;
case "Cancel":
viewmodel.OnCancelBook();
break;
}
}
```
## Add filtering
Creating a book library app isn’t just about functionality; it’s about delivering a seamless and intuitive experience that makes managing books effortless and enjoyable. A well-thought-out user experience can significantly improve user satisfaction and engagement. Here’s how to enhance your book library app.
Filtering is applied to the text changed event of the **SearchTextBox.**
```
public class ListViewSearchBehavior : Behavior
{
#region Fields
private Syncfusion.Maui.ListView.SfListView ListView;
private SearchBar searchBar = null;
#endregion
#region Overrides
protected override void OnAttachedTo(ContentPage bindable)
{
ListView = ListView = bindable.FindByName("listView");
searchBar = bindable.FindByName("searchBar");
searchBar.TextChanged += SearchBar_TextChanged;
base.OnAttachedTo(bindable);
}
protected override void OnDetachingFrom(ContentPage bindable)
{
ListView = null;
searchBar = null;
searchBar.TextChanged -= SearchBar_TextChanged;
base.OnDetachingFrom(bindable);
}
private void SearchBar_TextChanged(object sender, TextChangedEventArgs e)
{
searchBar = (sender as SearchBar);
if (ListView.DataSource != null)
{
ListView.DataSource.Filter = FilterBooks;
ListView.DataSource.RefreshFilter();
}
ListView.RefreshView();
}
private bool FilterBooks(object obj)
{
if (searchBar == null || searchBar.Text == null)
return true;
var bookInfo = obj as BookInfo;
return (bookInfo.Name.ToLower().Contains(searchBar.Text.ToLower()) ||
(bookInfo.Description.ToString()).ToLower().Contains(searchBar.Text.ToLower()));
}
#endregion
}
```
Behavior class added to content page. You can find the code snippet here.
```
```
You can find the output below.

Adding a Filter in the app
## GitHub reference
For more details, refer to the [GitHub demo](https://github.com/SyncfusionExamples/Creating-a-Book-Library-App-with-.NET-MAUI-ListView-Managing-Collections-Seamlessly)
.
## FAQs
**Q1: What makes Syncfusion controls special for this Book Library App?**
Syncfusion’s **SfListView** and ** SfDataForm** are enhanced versions of standard .NET MAUI controls. They provide advanced features and streamline development for the Book Library App, though you can use standard controls with minor adjustments.
**Q2: What makes this Book Library App user-friendly?**
The app focuses on a seamless and intuitive experience through:
– Organized book display using ListView templates
– Filtering capabilities based on text input
– Easy book management that’s both effortless and enjoyable
**Q3: How does the app handle user actions like tapping books or clicking buttons?**
User interactions are managed through Commands in the ViewModel:
– **Tapping a book**: Triggers ** TapCommand** to select the book and navigate to details
– **Action buttons**: Use ** SfChipGroup** clicks to execute commands like ** SaveBookCommand**, ** EditBookCommand**, or ** DeleteBookCommand.**
**Q4: Why is INotifyPropertyChanged important for data binding?**
**INotifyPropertyChanged** ensures the UI automatically updates when data changes. Both the ** BookInfo** model and ViewModel use this interface so that when properties change (like selecting a new book), the interface refreshes automatically through ** OnPropertyChanged**.
## Conclusion
In this blog post, we’ve explored how to create a cross-platform book library app using [.NET MAUI](https://www.syncfusion.com/maui-controls)
, focusing on leveraging the [ListView](https://www.syncfusion.com/maui-controls/maui-listview)
control to efficiently manage and display book collections. We’ve walked through the process of designing a model and view model to handle data, binding a collection of books to the ListView, and customizing the user interface for optimal display.
If you’re already a Syncfusion® user, you can download the product setup from the [license and downloads](https://www.syncfusion.com/account/login)
page. Otherwise, you can download a free [30-day trial](https://www.syncfusion.com/downloads/)
.
Please let us know in the comments section below if you have any questions. You can also contact us through our [support forum](https://www.syncfusion.com/forums)
, [support portal](https://support.syncfusion.com/)
, or [feedback portal](https://www.syncfusion.com/feedback)
. We are always happy to assist you!
## Related Blogs
[Create a Sleek Contact Management App in .NET MAUI Using ListView and DataForm](https://www.syncfusion.com/blogs/post/contact-app-maui-listview-dataform)
[Create a Beautiful Photo Gallery Using .NET MAUI Tab View and ListView](https://www.syncfusion.com/blogs/post/dotnet-maui-photo-gallery)
[Create AI-Powered Smart .NET MAUI Data Forms for Effortless Data Collection](https://www.syncfusion.com/blogs/post/ai-powered-smart-net-maui-data-forms)
[Build a Stunning Music Track UI Using .NET MAUI ListView](https://www.syncfusion.com/blogs/post/build-music-track-ui-in-dotnet-maui)