---
title: "Automate Email Distribution of Income Tax Reports from Excel using C#"
published_at: "2023-11-30T10:21:25+00:00"
modified_at: "2025-11-14T12:29:23+00:00"
url: "https://www.syncfusion.com/blogs/post/mail-automation-excel-csharp"
excerpt: "Let’s see how to fetch income tax reports based on Excel data and send them through email automatically using the Syncfusion Excel Library in C#."
taxonomy_category:
- "C#"
- "Excel"
- "File Formats"
- "Syncfusion"
- "XlsIO"
taxonomy_post_tag:
- ".NET"
- "C#"
- "Essential XlsIO"
- "File Formats"
- "Syncfusion"
---
# Automate Email Distribution of Income Tax Reports from Excel using C#
[Mohan Chandran](https://www.syncfusion.com/blogs/author/mohan-chandran)

The modernization of income tax report distribution has seen a significant shift towards automation and efficiency.
The [Syncfusion Excel Library (XlsIO)](https://help.syncfusion.com/file-formats/xlsio/overview)
is a C# library that provides a high-level API for creating and editing Excel files. Using this library, we’ll see how to fetch income tax reports from Excel data and send them through email automatically.
**Note:** If you are new to our Excel Library, it is highly recommended that you follow our [Getting Started guide](https://help.syncfusion.com/file-formats/xlsio/getting-started-create-excel-file-csharp-vbnet)
.
## Getting started
For this blog, we’ll use an Excel document with taxpayer details like the image below.
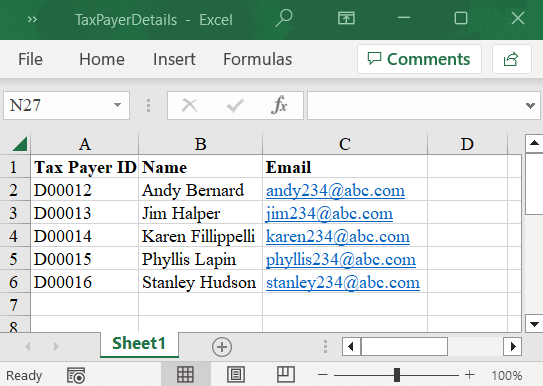
Excel document showing taxpayer data
Follow these steps to automate the income tax report email-sending process:
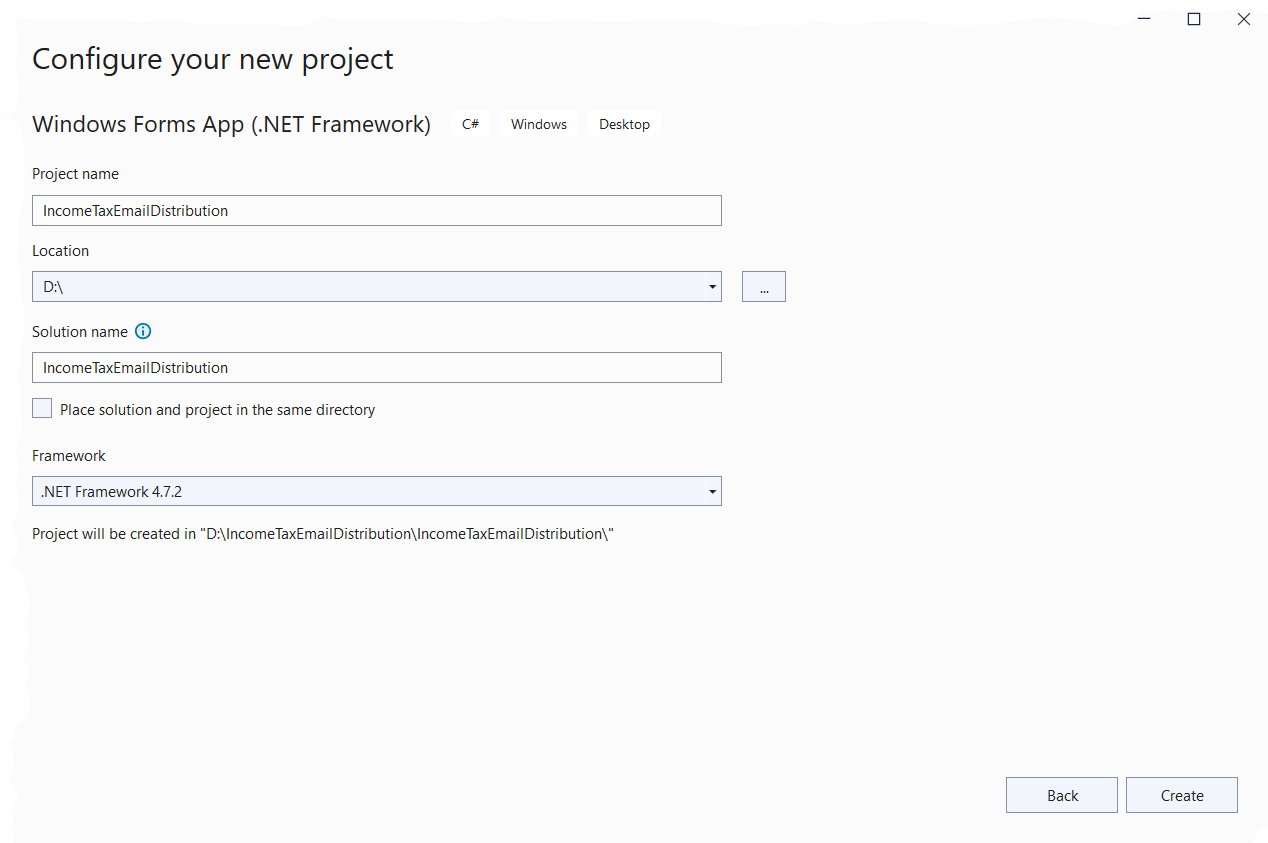
**Step 1**: First, let’s [create a Windows application](https://learn.microsoft.com/en-us/visualstudio/ide/create-csharp-winform-visual-studio?view=vs-2022)
using [Visual Studio](https://visualstudio.microsoft.com/)
.
**Step 2**: Install the [Syncfusion.XlsIO.WinForms](https://www.nuget.org/packages/Syncfusion.XlsIO.WinForms)
NuGet package from NuGet package manager.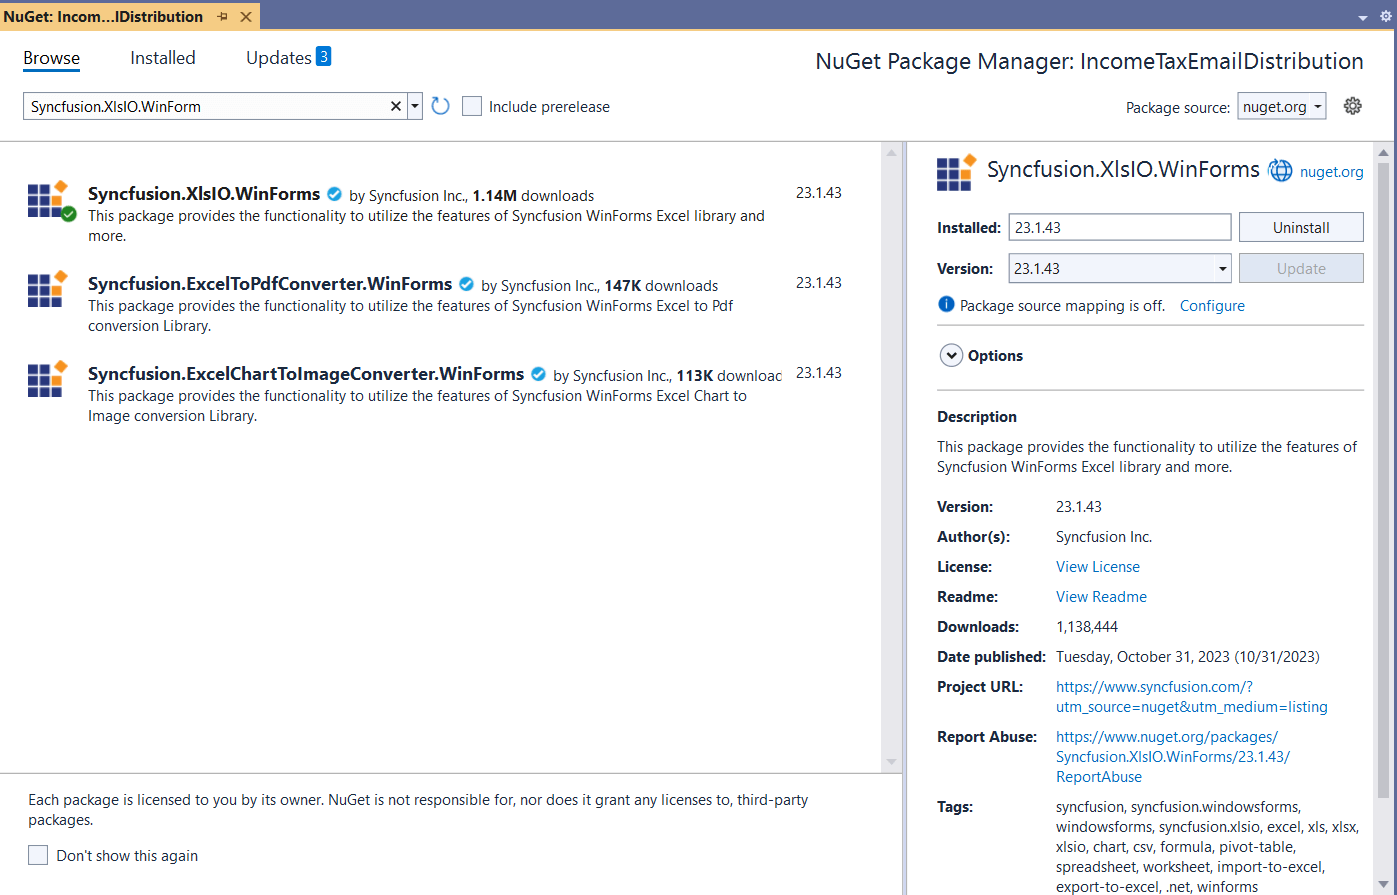
**Step 3**: Add labels and text boxes in the Windows Forms UI using the ** WinForms ToolBox** to get the input data from the Excel document.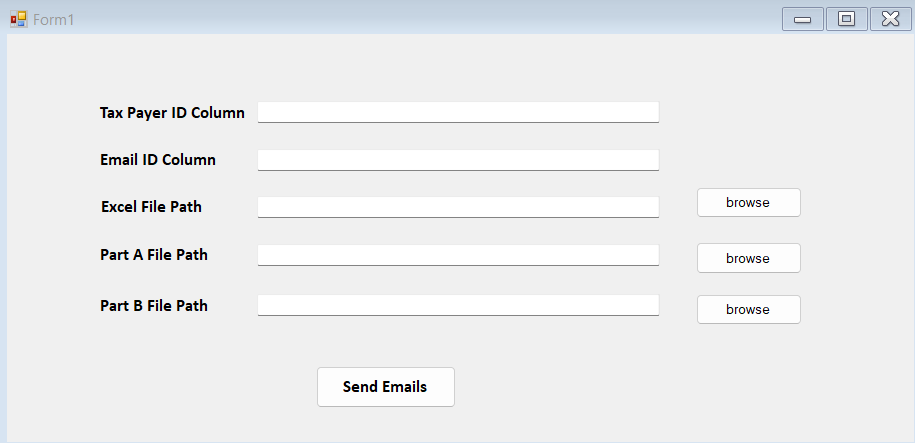
- The Taxpayer ID Column gets the column ID from the Excel document that contains the taxpayer ID.
- The Email ID Column gets the column ID from the Excel file that contains the taxpayer’s email address.
- The Excel File Path gets the file path of the Excel file containing the two previously listed details.
- The Part A File Path gets the folder path of the income tax report—part A documents.
- The Part B File Path gets the folder path of the income tax report—part B documents.
- The Send Emails button will distribute the emails with proper attachments using the Excel data and attachment folder path details.
**Step 4**: Now, add the following code in the ** Form1.Designer.cs** file to read the Excel documents and prepare an email with the income tax reports as attachments.
```
private void button1_Click(object sender, EventArgs e)
{
string tinColumnId = panColumnIdTxtBox.Text.Trim('"');
string emailColumnId = emailColumnIdTxtBox.Text.Trim('"');
string excelFilePath = excelPathTxtBox.Text.Trim('"');
string[] partAPathFiles = Directory.GetFiles(partAPathTxtBox.Text.Trim('"'));
string[] partBPathFiles = Directory.GetFiles(partBPathTxtBox.Text.Trim('"'));
if(partAPathFiles != null && partAPathFiles.Length == 0)
{
MessageBox.Show("No files found in Part A Path");
return;
}
if(partBPathFiles != null && partBPathFiles.Length == 0)
{
MessageBox.Show("No files found in Part B Path");
return;
}
if(!File.Exists(excelFilePath))
{
MessageBox.Show("Excel File not found");
return;
}
using(ExcelEngine excelengine = new ExcelEngine())
{
IApplication application = excelengine.Excel;
IWorkbook workbook = application.Workbooks.Open(excelFilePath);
IWorksheet worksheet = workbook.Worksheets[0];
IRange used = worksheet.UsedRange;
int startRow = used.Row + 1;
int endRow = used.LastRow;
int statusColumn = used.LastColumn + 1;
for(int row = startRow;row <= endRow;row++)
{
//Check the automation status of the tax payer report.
if (worksheet.Range[row, statusColumn].Value == "Sent")
{
continue;
}
//Converting the Column Id to Column Index.
IRange tinRange = worksheet[tinColumnId + row.ToString()];
string tinID = worksheet.Range[row, tinRange.Column].Value;
if(string.IsNullOrEmpty(tinID))
{
worksheet[row, statusColumn].Value = "TIN not found";
continue;
}
IRange emailRange = worksheet[emailColumnId + row.ToString()];
string emailId = worksheet.Range[row, emailRange.Column].Value;
string partAPath = partAPathFiles.Where(x => x.Contains(tinID + "_")).FirstOrDefault();
if (partAPath == null)
{
worksheet[row, statusColumn].Value = "Part A File not found";
continue;
}
string partBPath = partBPathFiles.Where(x => x.Contains(tinID + "_")).FirstOrDefault();
if (partBPath == null)
{
worksheet[row, statusColumn].Value = "Part B File not found";
continue;
}
try
{
//Your mail ID.
string from = "[email protected]";
string subject = "Form 16 for the financial year 2022- 2023";
string mailBody = "Hi,
\r\nThank you for your kind cooperation
\r\nWe have attached the form 16 document pertaining to the financial year (2022-2023) tax deduction. Employees are requested to review and file their Income tax return before due date.
\r\nThe last date of filing of Income Tax return is July 31, 2023.
\r\nFor further assistance, please feel free to get back to us.
\r\nThanks and Regards,
\r\nAccounts Team.
";
SendEMail(from, emailId, subject, mailBody, partAPath, partBPath);
worksheet[row, statusColumn].Value = "Sent";
}
catch(Exception ex){
worksheet[row, statusColumn].Value = ex.ToString();
}
}
Thread.Sleep(1000);
// Saving the workbook containing successful and failed records.
string filePath = Path.GetFileNameWithoutExtension(excelFilePath) + "_Updated_" + DateTime.Now.ToString().Replace(":", "-") + Path.GetExtension(excelFilePath);
workbook.SaveAs(filePath);
}
Close();
}
```
The following code example shows how to send emails using an Outlook [SMTP server](https://en.wikipedia.org/wiki/Simple_Mail_Transfer_Protocol)
with the help of the [MailMessage](https://learn.microsoft.com/en-us/dotnet/api/system.net.mail.mailmessage?view=net-8.0)
feature.
```
private static void SendEMail(string from, string recipients, string subject, string body, string attachmentPartA, string attachmentPartB)
{
//Creates the email message.
var emailMessage = new MailMessage(from, recipients);
//Adds the subject for email.
emailMessage.Subject = subject;
//Sets the HTML string as email body.
emailMessage.IsBodyHtml = true;
emailMessage.Body = body;
emailMessage.Attachments.Add(new Attachment(attachmentPartA));
emailMessage.Attachments.Add(new Attachment(attachmentPartB));
//Sends the email with prepared message.
using (var client = new SmtpClient())
{
//Update your SMTP Server address here.
client.Host = "outlook.office365.com";
client.UseDefaultCredentials = false;
//Update your email credentials here. Need to generate app password for your email ID.
client.Credentials = new System.Net.NetworkCredential(from, "apppassword");
client.Port = 587;
client.EnableSsl = true;
client.Send(emailMessage);
}
}
```
After executing the previous code examples, the automation status will be stored in the Excel document like in the following image.
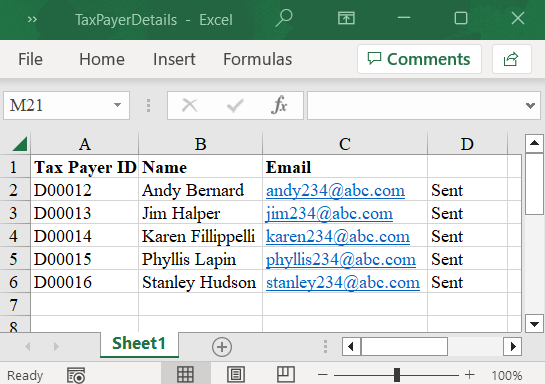
Automating income tax report email distribution using the Syncfusion Excel Library
The same Excel document can be reused as an input Excel document if there are any failures in the automation and you want to run the automation only for the failed cases. This program will check the status of each taxpayer and send emails if there is any status other than Sent in the last column of the report.
## GitHub reference
You can download the complete code example for automating income tax report distribution through email on [GitHub](https://github.com/SyncfusionExamples/XlsIO-Examples/tree/master/Real%20Time%20Examples%20in%20Excel/IncomeTaxEmailDistribution)
.
## Wrapping up
Thanks for reading! In this blog, we’ve seen how to automate income tax report distribution via email using the [Syncfusion Excel Library](https://www.syncfusion.com/excel-framework/net)
(XlsIO). Take a moment to peruse the [documentation](https://help.syncfusion.com/xlsio/overview)
, where you’ll find other options and features, all with accompanying code samples. Using the library, you can also export Excel data to [PDFs](https://help.syncfusion.com/xlsio/excel-to-pdf-conversion)
, [images](https://help.syncfusion.com/file-formats/xlsio/worksheet-to-image-conversion)
, [data tables](https://help.syncfusion.com/file-formats/xlsio/working-with-data#exporting-from-worksheet-to-data-table)
, [CSV](https://www.syncfusion.com/kb/9092/convert-excel-file-to-csv-in-c-vb-net)
, [TSV](https://www.syncfusion.com/kb/8556/does-xlsio-support-tsv-files)
, HTML, [collections of objects](https://help.syncfusion.com/file-formats/xlsio/working-with-data#exporting-from-worksheet-to-clr-objects)
, [ODS](https://help.syncfusion.com/file-formats/xlsio/excel-to-ods-conversion)
, and more.
Are you already a Syncfusion user? You can download the product setup [here](https://www.syncfusion.com/account/downloads/studio/)
. If you’re not yet a Syncfusion user, you can download a free, 30-day trial [here](https://www.syncfusion.com/downloads)
.
If you have any questions about these features, please let us know in the comments below. You can also contact us through our [support forum](https://www.syncfusion.com/forums)
, [support portal](https://support.syncfusion.com/)
, or [feedback portal](https://www.syncfusion.com/feedback/)
. We are happy to assist you!
## Related blogs
- [Export Data to a Predefined Excel Template in C#](https://www.syncfusion.com/blogs/post/export-data-to-a-predefined-excel-template-in-c.aspx)
- [6 Easy Ways to Export Data to Excel in C#](https://www.syncfusion.com/blogs/post/6-easy-ways-to-export-data-to-excel-in-c-sharp.aspx)
- [How to Export Data from SQL Server to Excel Tables in C#](https://www.syncfusion.com/blogs/post/export-data-from-sql-server-to-excel-in-c-sharp.aspx)
- [Export Data from a Collection to Excel and Group It in C#](https://www.syncfusion.com/blogs/post/export-data-from-collection-to-excel-and-group-csharp.aspx)
- [Easy Steps to Export HTML Tables to an Excel Worksheet in C#](https://www.syncfusion.com/blogs/post/easy-steps-to-export-html-tables-to-an-excel-worksheet-in-c.aspx)