---
title: "Create and Validate a Login Form in .NET MAUI"
published_at: "2023-05-08T11:28:32+00:00"
modified_at: "2026-01-12T12:09:58+00:00"
url: "https://www.syncfusion.com/blogs/post/login-form-in-net-maui"
excerpt: "In this blog, we will learn how to create and validate a login form using .NET MAUI DataForm control."
taxonomy_category:
- ".NET MAUI"
- "Desktop"
- "Mobile"
- "Syncfusion"
- "UI"
taxonomy_post_tag:
- ".NET MAUI"
- "desktop"
- "MAUI"
- "Mobile"
- "UI"
---
# Create and Validate a Login Form in .NET MAUI
[Jeyasri Murugan](https://www.syncfusion.com/blogs/author/jeyasrim)

A login form allows users to enter their credentials, such as an email address and password, to authenticate and gain access to a website or application.
The [.NET MAUI DataForm](https://www.syncfusion.com/maui-controls/maui-dataform)
can be used to create various data forms. In this blog, I will explain how to develop and validate a login data form using the .NET MAUI DataForm.
## Initialize the data from the control
1. Create a new [.NET MAUI application in Visual Studio](https://learn.microsoft.com/en-us/dotnet/maui/get-started/first-app?view=net-maui-7.0&tabs=vswin&pivots=devices-android) .
2. Syncfusion [.NET MAUI components](https://www.syncfusion.com/maui-controls) are available at [nuget.org](https://www.nuget.org/) . To add the SfDataForm to your project, open the NuGet package manager in Visual Studio, search for [Syncfusion.Maui.DataForm](https://help.syncfusion.com/cr/maui/Syncfusion.Maui.DataForm.html) , and then install it.
3. To initialize the control, import the control namespace [Syncfusion.Maui.DataForm](https://help.syncfusion.com/cr/maui/Syncfusion.Maui.DataForm.html) in XAML or C# code and initialize the [DataForm](https://help.syncfusion.com/cr/maui/Syncfusion.Maui.DataForm.SfDataForm.html) .
Refer to the following code to initialize the .NET MAUI DataForm.
**MainPage.xaml**
```
xmlns:dataForm="clr-namespace:Syncfusion.Maui.DataForm;assembly=Syncfusion.Maui.DataForm"
```
Register the **ConfigureSyncfusionCore** handler for Syncfusion core in the ** MauiProgram.cs** file.
**MauiProgram.cs**
```
using Syncfusion.Maui.Core.Hosting;
public static class MauiProgram
{
public static MauiApp CreateMauiApp()
{
var builder = MauiApp.CreateBuilder();
builder.ConfigureSyncfusionCore();
}
}
```
## Create login data from the model
Create a login form with the following fields to get email addresses and passwords.
**LoginFormModel.cs**
```
public class LoginFormModel
{
[Display(Prompt = "[email protected]", Name = "Email")]
public string Email{ get; set; }
[Display(Name = "Password")]
[DataType(DataType.Password)]
public string Password { get; set; }
}
```
## Create login form editors
By default, the data form auto-generates the [data editors](https://help.syncfusion.com/maui/dataform/editors)
based on primitive data types such as **string**, ** enumeration**, ** DateTime**, and ** TimeSpan** in the [DataObject](https://help.syncfusion.com/cr/maui/Syncfusion.Maui.DataForm.SfDataForm.html#Syncfusion_Maui_DataForm_SfDataForm_DataObject)
property.
You can change the editor layout default (label and editor) and floating label layout using the [LayoutType](https://help.syncfusion.com/cr/maui/Syncfusion.Maui.DataForm.SfDataForm.html#Syncfusion_Maui_DataForm_SfDataForm_LayoutType)
property.
Refer to the following code example. In it, we set the data form model (**LoginFormModel**) to the ** DataObject** property from the view model class to create the data editors for the login form with a floating label layout.
Please refer to the code to bind the **LoginFormModel** property from the ** DataFormViewModel** class.
**MainPage.xaml**
```
...
```
Refer to the code to initialize the **LoginFormModel** property.
**DataFormViewModel.cs**
```
public class DataFormViewModel
{
///
/// Initializes a new instance of the class.
///
public DataFormViewModel()
{
this.LoginFormModel = new LoginFormModel();
}
///
/// Gets or sets the login form model.
///
public LoginFormModel LoginFormModel { get; set; }
}
```
## Design the login form page
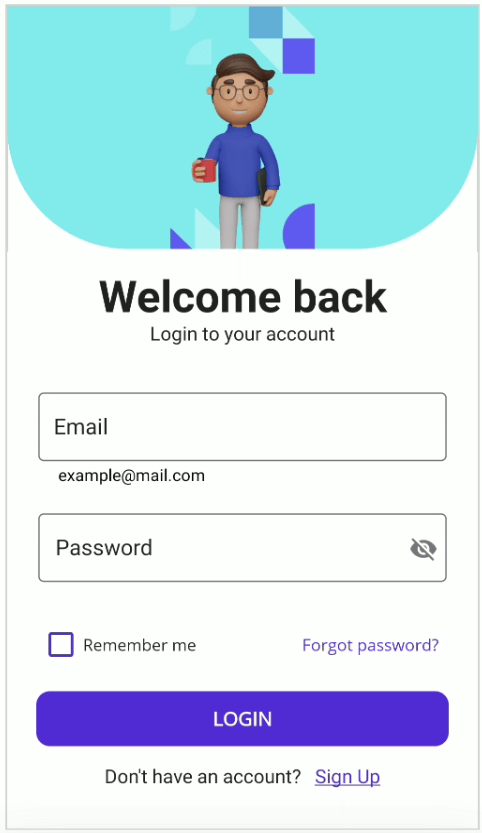
Let’s design the login page with images, buttons, checkboxes, and labels.
Refer to the following code to add an image to the login form.
**MainPage.xaml**
```
```
Next, add the **Remember Me** checkbox and ** Forgot password** label in the login form.
**MainPage.xaml**
```
```
Then, add the **LOGIN** button in the login form.
**MainPage.xaml**
```
```
Next, refer to the following code to add the **Don’t have an account? Sign Up** label in the login form. You can refer to [this blog for how to create a signup form](https://www.syncfusion.com/blogs/post/create-validate-sign-up-form-in-dotnet-maui.aspx)
.
**MainPage.xaml**
```
```

.NET MAUI login form on the desktop
.NET MAUI login form on the phone
## Change the keyboard for the email editor
Use the email field keyboard by updating the [keyboard](https://help.syncfusion.com/cr/maui/Syncfusion.Maui.DataForm.DataFormTextEditorItem.html#Syncfusion_Maui_DataForm_DataFormTextEditorItem_Keyboard)
property in the [GenerateDataFormItem](https://help.syncfusion.com/cr/maui/Syncfusion.Maui.DataForm.SfDataForm.html#Syncfusion_Maui_DataForm_SfDataForm_GenerateDataFormItem)
event.
Refer to the following code to change the keyboard for the email editor.
**MainPage.xaml**
```
```
**LoginFormBehavior.cs**
```
this.dataForm = bindable.FindByName("loginForm");
this.dataForm.GenerateDataFormItem += this.OnGenerateDataFormItem;
private void OnGenerateDataFormItem(object sender, GenerateDataFormItemEventArgs e)
{
if (e.DataFormItem != null && e.DataFormItem.FieldName == nameof(LoginFormModel.Email) && e.DataFormItem is DataFormTextEditorItem textItem)
{
textItem.Keyboard = Keyboard.Email;
}
}
```
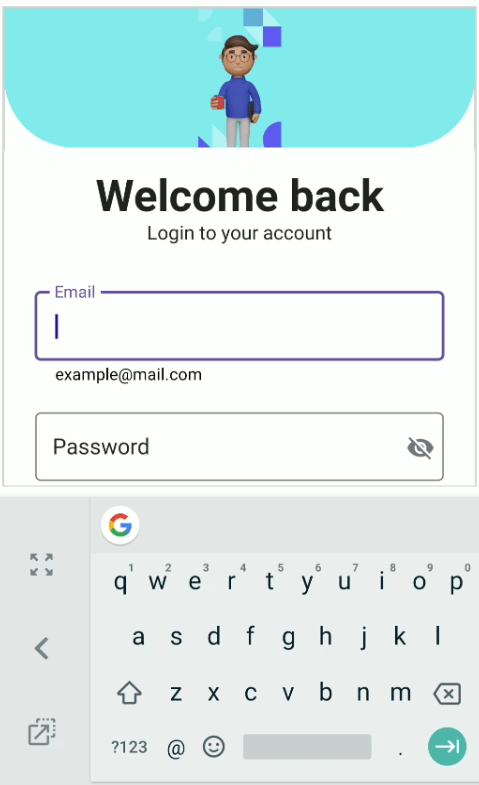
Email keyboard for the email editor
## Validate the login form
The email address and password fields must not be empty. If either field is left blank or has invalid data, an error message will be displayed, and the user cannot submit the form.
Please refer to the code to add [EmailAddress](https://learn.microsoft.com/en-us/dotnet/api/system.componentmodel.dataannotations.emailaddressattribute?view=net-7.0)
and [Required](https://learn.microsoft.com/en-us/dotnet/api/system.componentmodel.dataannotations.requiredattribute?view=net-7.0)
validation attributes.
**LoginFormModel.cs**
```
public class LoginFormModel
{
[Display(Prompt = "[email protected]", Name = "Email")]
[EmailAddress(ErrorMessage = "Enter your email - [email protected]")]
public string Email { get; set; }
[Display(Name = "Password")]
[DataType(DataType.Password)]
[Required(ErrorMessage = "Enter the password")]
public string Password { get; set; }
}
```
The data form supports validating the data by using the [ValidationMode](https://help.syncfusion.com/cr/maui/Syncfusion.Maui.DataForm.SfDataForm.html#Syncfusion_Maui_DataForm_SfDataForm_ValidationMode)
property.
Refer to the following code to set the validation mode to [PropertyChanged](https://help.syncfusion.com/cr/maui/Syncfusion.Maui.DataForm.DataFormValidationMode.html#Syncfusion_Maui_DataForm_DataFormValidationMode_PropertyChanged)
; the value will be validated immediately when changed.
**MainPage.xaml**
```
```

Validate the login form on data being changed on the desktop
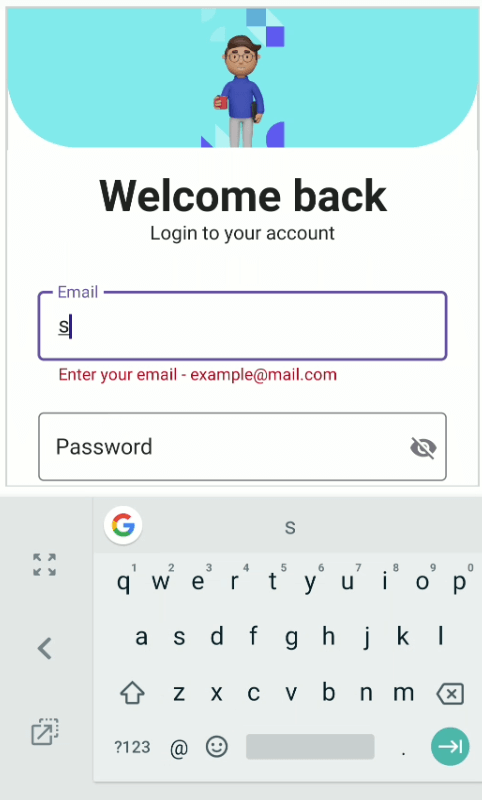
Validate the login form on data being changed in the phone
Login form validation can be handled while submitting the login button using the [Validate method](https://help.syncfusion.com/cr/maui/Syncfusion.Maui.DataForm.SfDataForm.html#Syncfusion_Maui_DataForm_SfDataForm_Validate)
.
**LoginFormBehavior.cs**
```
private async void OnLoginButtonCliked(object sender, EventArgs e)
{
if(this.dataForm != null && App.Current?.MainPage != null)
{
if(this.dataForm.Validate())
{
await App.Current.MainPage.DisplayAlert("", "Signed in successfully", "OK");
}
else
{
await App.Current.MainPage.DisplayAlert("", "Please enter the required details", "OK");
}
}
}
```
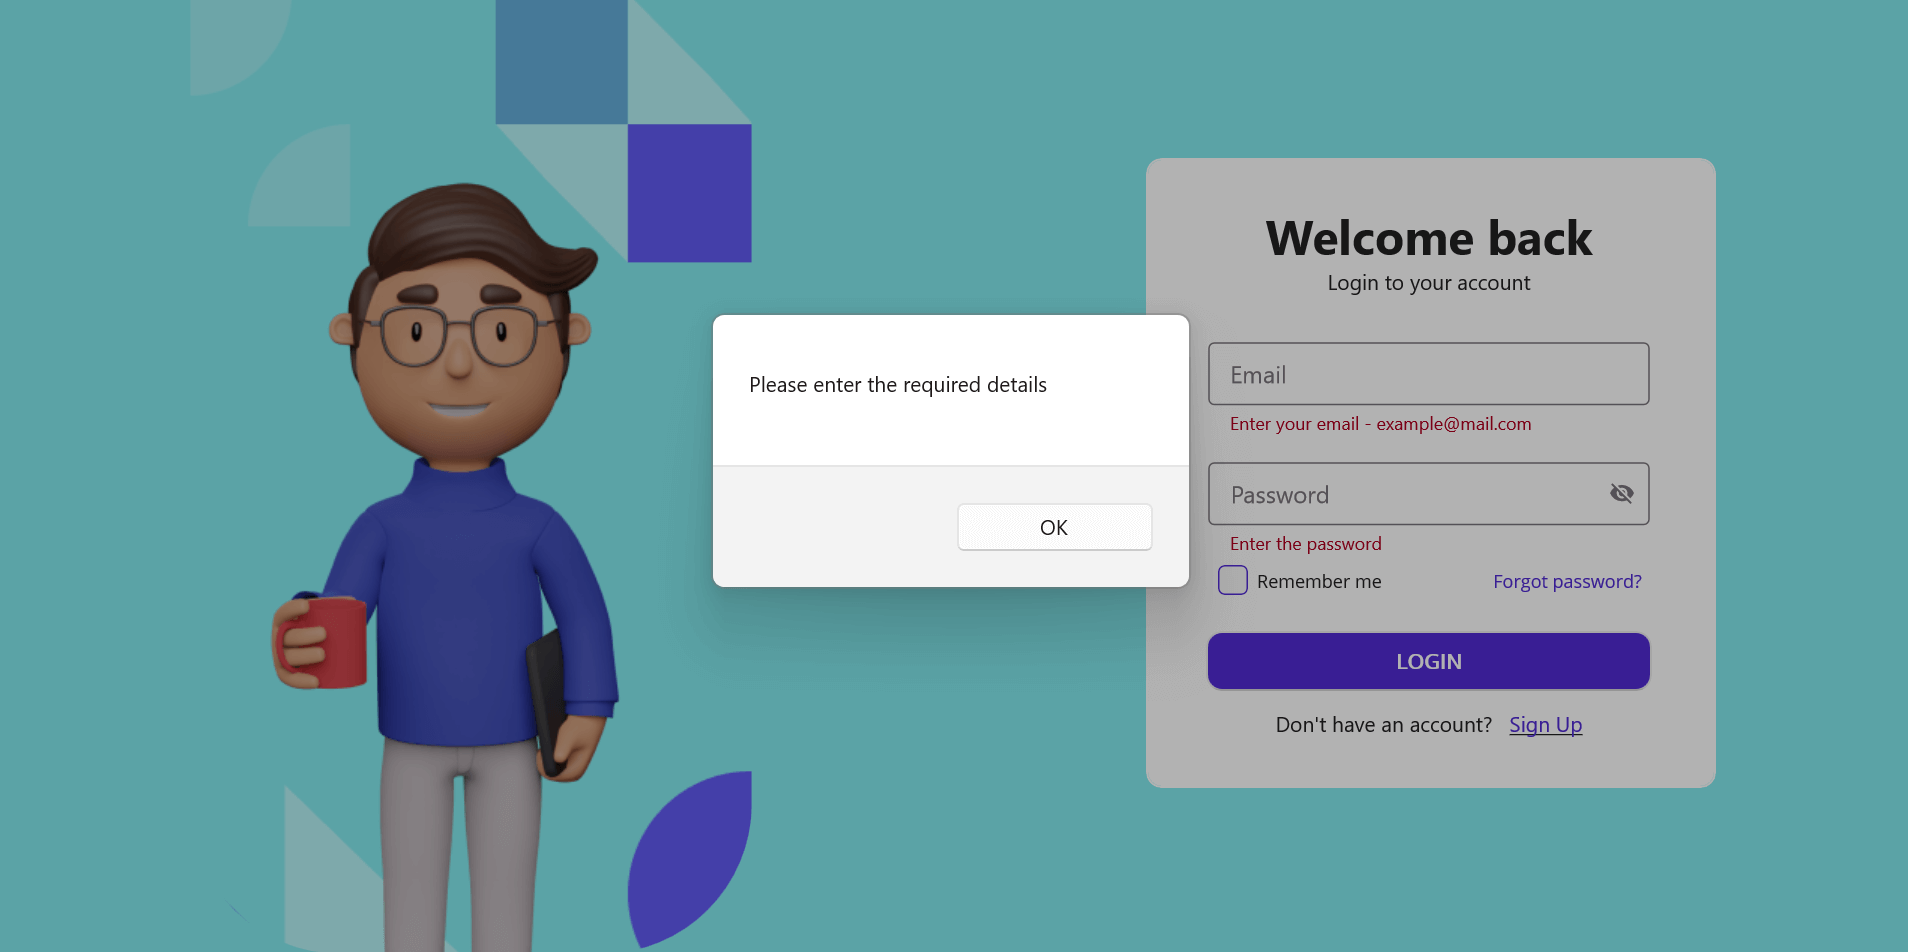
Validate the login form on the LOGIN button being clicked on the desktop
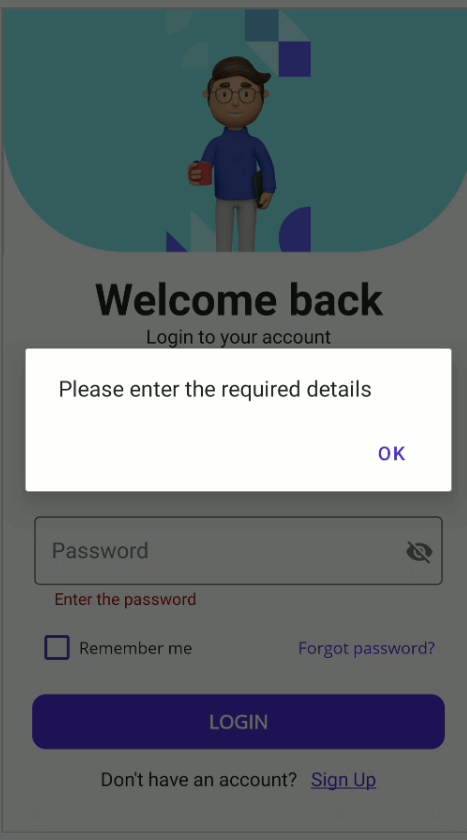
Validate the login form on the LOGIN button being clicked on the phone
## GitHub reference
Refer to the [GitHub demo](https://github.com/SyncfusionExamples/create-the-login-form-using-.NET-MAUI-DataForm)
on this topic.
## Conclusion
Thanks for reading. This blog demonstrated how to create and validate a login form using the [.NET MAUI DataForm](https://www.syncfusion.com/maui-controls/maui-dataform)
control. Try out the steps in this blog and leave your feedback in the comments section below.
For current Syncfusion customers, the newest version of Essential Studio® is available from the [license and downloads page](https://www.syncfusion.com/account/downloads)
. If you are not a customer, try our 30-day [free trial](https://www.syncfusion.com/downloads)
to check out these new features. If you have questions, contact us through our [support forums](https://www.syncfusion.com/forums)
, [feedback portal](https://www.syncfusion.com/feedback)
, or [support portal](https://support.syncfusion.com/)
. We are always happy to assist you!
## Related Blogs
- [Simplify Data Visualization with Multi-Axis Charts in .NET MAUI](https://www.syncfusion.com/blogs/post/simplify-data-visualization-with-multi-axis-charts-in-net-maui.aspx)
- [Building a Hijri Calendar with .NET MAUI Scheduler: A Beginner’s Guide](https://www.syncfusion.com/blogs/post/building-a-hijri-calendar-with-net-maui-scheduler-a-beginners-guide.aspx)
- [Elevate Your App’s User Experience with the New .NET MAUI Shimmer Control](https://www.syncfusion.com/blogs/post/dotnet-maui-shimmer-control.aspx)
- [Streamline MAUI Projects with the Syncfusion .NET MAUI Template Studio](https://www.syncfusion.com/blogs/post/dotnet-maui-template-studio.aspx)