
Building a CRUD application is a basic step to learning to integrate the front-end with a back-end database. CRUD stands for the four functions create, read, update, and delete in computer programming. They are used to implement persistent storage applications and relational database applications:
- Create: A create operation allows you to add a new record to a table.
- Read: A read operation allows you to read record details based on the primary key.
- Update: An update operation allows you to modify an existing record based on the primary key.
- Delete: A delete operation allows you to delete any specific record based on the primary key.
In this blog, we are going to learn how to build a CRUD application in Angular 12.
Prerequisites
To check if Node.js is already installed on your machine, check for its version using the following command. If it is already installed, it will return the version number.
node -v
Otherwise, it will return an error, as shown in the following screenshot.
 Similarly, check whether the npm and Angular CLI are already installed with the following command to check the version.
npm -v
If they’re not, it will return an error, as shown in the screenshot.

ng version
If they aren’t installed, install them with the details available in the following table.
| Node.js | https://nodejs.org/en/download/ |
| Npm | If you install node.js, it will install npm, too. |
| Angular CLI | Run the following command: npm i @angular/cli |

Create an Angular application
After ensuring that the Angular CLI is installed, create a new Angular application using the following command. For this example, I am naming this application AngularCRUDApplication.
Angular CLI provides complete support to set up routing using the routing keyword during the creation of an application. The router enables navigation among the pages using URLs.
ng new AngularCRUDApplication --routing
Now, the terminal will request we choose a stylesheet format, like in the following image. Make sure to choose SCSS.

Install Bootstrap
Now, install Bootstrap in your application using the following command.
npm install bootstrap –save
Then, import the CSS file for bootstrap from the location src/styles.scss.
@import "~bootstrap/dist/css/bootstrap.css";
Create a new component
After successfully creating the Angular application, we add new components to perform the CRUD operations.
So, use the following commands to create Home, AddEmployee, EditEmployee, and ViewEmployee components.
ng generate component Home
ng generate component AddEmployee
ng generate component EditEmployee
ng generate component ViewEmployee
After successful execution of the commands, the components will be created in the following folder structure.
- src/app/home
- src/app/add-employee
- src/app/edit-employee
- src/app/view-employee
Create routes
In this step, let’s create routes for the Home, AddEmployee, EditEmployee, and ViewEmployee components. Update the app-routing module file with the following code.
import { NgModule } from '@angular/core';
import { RouterModule, Routes } from '@angular/router';
import { AddEmployeeComponent } from './add-employee/add-employee.component';
import { EditEmployeeComponent } from './edit-employee/edit-employee.component';
import { HomeComponent } from './home/home.component';
import { ViewEmployeeComponent } from './view-employee/view-employee.component';

const routes: Routes = [
  { path: '', redirectTo: 'Home', pathMatch: 'full'},
  { path: 'Home', component: HomeComponent },
  { path: 'ViewEmployee/:employeeId', component: ViewEmployeeComponent },
  { path: 'AddEmployee', component: AddEmployeeComponent },
  { path: 'EditEmployee/:employeeId', component: EditEmployeeComponent }
];

@NgModule({
  imports: [RouterModule.forRoot(routes)],
  exports: [RouterModule]
})

export class AppRoutingModule { }
Create services
Create common services to invoke Web API calls and HTTPClient inside the Service folder using the following command.
ng generate service Service/WebApi
ng generate service Service/HttpProvider
Add the following code in the web-api.service.ts file in the following location.
src/app/Service/web-api.service.ts
import { Injectable } from '@angular/core';
import { Observable, throwError } from 'rxjs';
import { map } from 'rxjs/operators';
import { catchError } from 'rxjs/internal/operators/catchError';
import { HttpHeaders, HttpClient } from '@angular/common/http';

@Injectable({
  providedIn: 'root'
})

export class WebApiService {
  constructor(private httpClient: HttpClient) { }

  // Get call method
  // Param 1 : url
  get(url: string): Observable<any> {
    const httpOptions = {
      headers: new HttpHeaders({
        'Content-Type':  'application/json',
        'Cache-Control' : 'no-cache',
        'Pragma' : 'no-cache'
      }),
      observe: "response" as 'body'
    };
    return this.httpClient.get(
      url,
      httpOptions
    )
    .pipe(
        map((response: any) => this.ReturnResponseData(response)),
        catchError(this.handleError)
    );
  }

  // Post call method
  // Param 1 : url
  // Param 2 : model
  post(url: string, model: any): Observable<any> {
    const httpOptions = {
      headers: new HttpHeaders({
        'Content-Type': 'application/json'
      }),
      observe: "response" as 'body'
    };
    return this.httpClient.post(
      url,
      model,
      httpOptions)
      .pipe(
        map((response: any) => this.ReturnResponseData(response)),
        catchError(this.handleError)

    );
  }

  private ReturnResponseData(response: any) {
    return response;
  }

  private handleError(error: any) {
    return throwError(error);
  }
}
Replace the API solution URL with apiUrl inside HTTP-provider.service.ts and run the Employee API solution.
src/app/Service/http-provider.service.ts
import { Injectable } from '@angular/core';
import { Observable } from 'rxjs';
import { WebApiService } from './web-api.service';

var apiUrl = "http://localhost:8100/";

var httpLink = {
  getAllEmployee: apiUrl + "/api/employee/getAllEmployee",
  deleteEmployeeById: apiUrl + "/api/employee/deleteEmployeeById",
  getEmployeeDetailById: apiUrl + "/api/employee/getEmployeeDetailById",
  saveEmployee: apiUrl + "/api/employee/saveEmployee"
}

@Injectable({
  providedIn: 'root'
})

export class HttpProviderService {
  constructor(private webApiService: WebApiService) { }

  public getAllEmployee(): Observable<any> {
    return this.webApiService.get(httpLink.getAllEmployee);
  }
  public deleteEmployeeById(model: any): Observable<any> {
    return this.webApiService.post(httpLink.deleteEmployeeById + '?employeeId=' + model, "");
  }
  public getEmployeeDetailById(model: any): Observable<any> {
    return this.webApiService.get(httpLink.getEmployeeDetailById + '?employeeId=' + model);
  }
  public saveEmployee(model: any): Observable<any> {
    return this.webApiService.post(httpLink.saveEmployee, model);
  }
}
Update UI templates and logic
We have already created four components. Now, let’s update the CRUD components with new UI design with logic.
List page template and logic
In this section, we’ll get the employee list page using the Web API server. In the template, we’ll add an Employee button and View, Edit, and Delete icons for every individual record.
src/app/home.component.ts
import { Component, Input, OnInit, Type } from '@angular/core';
import { Router } from '@angular/router';
import { NgbModal, NgbActiveModal } from '@ng-bootstrap/ng-bootstrap';
import { ToastrService } from 'ngx-toastr';
import { HttpProviderService } from '../Service/http-provider.service';

@Component({
  selector: 'ng-modal-confirm',
  template: `
  <div class="modal-header">
    <h5 class="modal-title" id="modal-title">Delete Confirmation</h5>
    <button type="button" class="btn close" aria-label="Close button" aria-describedby="modal-title" (click)="modal.dismiss('Cross click')">
      <span aria-hidden="true">×</span>
    </button>
  </div>
  <div class="modal-body">
    <p>Are you sure you want to delete?</p>
  </div>
  <div class="modal-footer">
    <button type="button" class="btn btn-outline-secondary" (click)="modal.dismiss('cancel click')">CANCEL</button>
    <button type="button" ngbAutofocus class="btn btn-success" (click)="modal.close('Ok click')">OK</button>
  </div>
  `,
})

export class NgModalConfirm {
  constructor(public modal: NgbActiveModal) { }
}

const MODALS: { [name: string]: Type<any> } = {
  deleteModal: NgModalConfirm,
};

@Component({
  selector: 'app-home',
  templateUrl: './home.component.html',
  styleUrls: ['./home.component.scss']
})

export class HomeComponent implements OnInit {
  closeResult = '';
  employeeList: any = [];
  constructor(private router: Router, private modalService: NgbModal,
    private toastr: ToastrService, private httpProvider : HttpProviderService) { }

  ngOnInit(): void {
    this.getAllEmployee();
  }
  async getAllEmployee() {
    this.httpProvider.getAllEmployee().subscribe((data : any) => {
      if (data != null && data.body != null) {
        var resultData = data.body;
        if (resultData) {
          this.employeeList = resultData;
        }
      }
    },
    (error : any)=> {
        if (error) {
          if (error.status == 404) {
            if(error.error && error.error.message){
              this.employeeList = [];
            }
          }
        }
      });
  }

  AddEmployee() {
    this.router.navigate(['AddEmployee']);
  }

  deleteEmployeeConfirmation(employee: any) {
    this.modalService.open(MODALS['deleteModal'],
      {
        ariaLabelledBy: 'modal-basic-title'
      }).result.then((result) => {
        this.deleteEmployee(employee);
      },
        (reason) => {});
  }

  deleteEmployee(employee: any) {
    this.httpProvider.deleteEmployeeById(employee.id).subscribe((data : any) => {
      if (data != null && data.body != null) {
        var resultData = data.body;
        if (resultData != null && resultData.isSuccess) {
          this.toastr.success(resultData.message);
          this.getAllEmployee();
        }
      }
    },
    (error : any) => {});
  }
}
src/app/home.component.html
<div class="container-xl">
  <div class="table-responsive">
    <div class="table-wrapper">
      <div class="table-title">
        <div class="row">
          <div class="col-sm-6">
            <h4><b>Manage Employees</b></h4>
          </div>
          <div class="col-sm-6">
            <button class="btn btn-success" (click)="AddEmployee()">
              <i class='fas fa-plus-circle'></i><span> ADD</span>
            </button>
          </div>
        </div>
      </div>
      <table class="table table-striped table-hover table-bordered table-content">
        <thead>
          <tr class="center-align">
            <th>First Name</th>
            <th>Last Name</th>
            <th>Email</th>
            <th>Address</th>
            <th>Phone</th>
            <th>Actions</th>
          </tr>
        </thead>
        <tbody>
          <tr *ngFor="let employee of employeeList" class="center-align">
            <td>{{ employee.firstName }}</td>
            <td>{{ employee.lastName }}</td>
            <td>{{ employee.email }}</td>
            <td>{{ employee.address }}</td>
            <td>{{ employee.phone }}</td>
            <td>
              <a href="#" [routerLink]="['/ViewEmployee/', employee.id]" class="btn"><i class='fas fa-eye view'></i></a>
              <a href="#" [routerLink]="['/EditEmployee/', employee.id]" class="btn"><i class="fa fa-edit edit"></i></a>
              <button type="button" (click)="deleteEmployeeConfirmation(employee)" class="btn"><i class='fas fa-trash-alt delete'></i></button>
            </td>
          </tr>
          <tr>
            <td *ngIf="employeeList.length == 0" colspan="6">No Employee Found</td>
          </tr>
        </tbody>
      </table>
    </div>
  </div>
</div>
Let’s see the employee list page screenshot now.

Create page template and logic
In this section, we will insert new employee details using the Web API server.
Add all the basic validations like mandatory fields, email address validation, and phone number validation in the HTML file.
Refer to the following code.
src/app/add-employee.component.ts
import { Component, OnInit, ViewChild } from '@angular/core';
import { NgForm } from '@angular/forms';
import { Router } from '@angular/router';
import { ToastrService } from 'ngx-toastr';
import { HttpProviderService } from '../Service/http-provider.service';

@Component({
  selector: 'app-add-employee',
  templateUrl: './add-employee.component.html',
  styleUrls: ['./add-employee.component.scss']
})

export class AddEmployeeComponent implements OnInit {
  addEmployeeForm: employeeForm = new employeeForm();

  @ViewChild("employeeForm")
  employeeForm!: NgForm;
  isSubmitted: boolean = false;
  constructor(private router: Router, private httpProvider: HttpProviderService, private toastr: ToastrService) { }

  ngOnInit(): void {  }

  AddEmployee(isValid: any) {
    this.isSubmitted = true;
    if (isValid) {
      this.httpProvider.saveEmployee(this.addEmployeeForm).subscribe(async data => {
        if (data != null && data.body != null) {
          if (data != null && data.body != null) {
            var resultData = data.body;
            if (resultData != null && resultData.isSuccess) {
              this.toastr.success(resultData.message);
              setTimeout(() => {
                this.router.navigate(['/Home']);
              }, 500);
            }
          }
        }
      },
        async error => {
          this.toastr.error(error.message);
          setTimeout(() => {
            this.router.navigate(['/Home']);
          }, 500);
        });
    }
  }
}


export class employeeForm {
  FirstName: string = "";
  LastName: string = "";
  Email: string = "";
  Address: string = "";
  Phone: string = "";
}src/app/add-employee.component.html
<div class="container-xl">
<div class="table-responsive">
<div class="table-wrapper">
<div class="table-title">
<div class="row">
<div class="col-sm-6">
<h4><b>New Employee</b></h4>
</div>
<div class="col-sm-6">
<a href="#" routerLink="/Home" class="btn btn-success back"><i class='fas fa-arrow-circle-left'></i>
Back</a>
</div>
</div>
</div>
<form #employeeForm="ngForm">
<div class="table-content">
<div class="form-group p-10 row">
<div class="col-sm-3">
<label for="FirstName" class="p-t-b-10">First Name<span class="requiredStar">*</span></label>
</div>
<div class="col-sm-9">
<input type="text" class="form-control" id="FirstName" required maxlength="255"
[(ngModel)]="addEmployeeForm.FirstName" name="FirstName" #FirstName="ngModel">
<div *ngIf="FirstName.errors && isSubmitted" class="alert alert-danger validationError">
<div [hidden]="!FirstName.errors?.['required']">
First Name is required
</div>
</div>
</div>
</div>
<div class="form-group p-10 row">
<div class="col-sm-3">
<label for="LastName" class="p-t-b-10">Last Name<span class="requiredStar">*</span></label>
</div>
<div class="col-sm-9">
<input type="text" class="form-control" id="LastName" required maxlength="255"
[(ngModel)]="addEmployeeForm.LastName" name="LastName" #LastName="ngModel">
<div *ngIf="LastName.errors && isSubmitted" class="alert alert-danger validationError">
<div [hidden]="!LastName.errors?.['required']">
Last Name is required
</div>
</div>
</div>
</div>
<div class="form-group p-10 row">
<div class="col-sm-3">
<label class="p-t-b-10">Email<span class="requiredStar">*</span></label>
</div>
<div class="col-sm-9">
<input type="text" class="form-control" id="Email" required maxlength="255"
[(ngModel)]="addEmployeeForm.Email" name="Email" #Email="ngModel"
pattern="^[a-zA-Z0-9._-]+@[a-zA-Z0-9.-]+\.[a-zA-Z0-9]{2,3}$">
<div *ngIf="Email.errors && isSubmitted" class="alert alert-danger validationError">
<div [hidden]="!Email.errors?.['required']">
Email is required
</div>
<div [hidden]="!Email.errors?.['touched'] && !Email.errors?.['pattern']">
Email is invalid
</div>
</div>
</div>
</div>
<div class="form-group p-10 row">
<div class="col-sm-3">
<label class="p-t-b-10">Address<span class="requiredStar">*</span></label>
</div>
<div class="col-sm-9">
<textarea class="form-control" id="Address" required [(ngModel)]="addEmployeeForm.Address" name="Address"
#Address="ngModel">></textarea>
<div *ngIf="Address.errors && isSubmitted" class="alert alert-danger validationError">
<div [hidden]="!Address.errors?.['required']">
Address is required
</div>
</div>
</div>
</div>
<div class="form-group p-10 row">
<div class="col-sm-3">
<label class="p-t-b-10">Phone<span class="requiredStar">*</span></label>
</div>
<div class="col-sm-9">
<input type="text" class="form-control" id="Phone" required maxlength="10"
[(ngModel)]="addEmployeeForm.Phone" name="Phone" #Phone="ngModel" pattern="^\d{3}\d{3}\d{4}$">
<div *ngIf="Phone.errors && isSubmitted" class="alert alert-danger validationError">
<div [hidden]="!Phone.errors?.['required']">
Phone is required
</div>
<div [hidden]="!Phone.errors?.['touched'] && !Phone.errors?.['pattern']">
Phone is invalid
</div>
</div>
</div>
</div>
</div>
<div class="table-footer">
<button class="btn btn-success" (click)="AddEmployee(employeeForm.form.valid)">Submit</button>
</div>
</form>
</div>
</div>
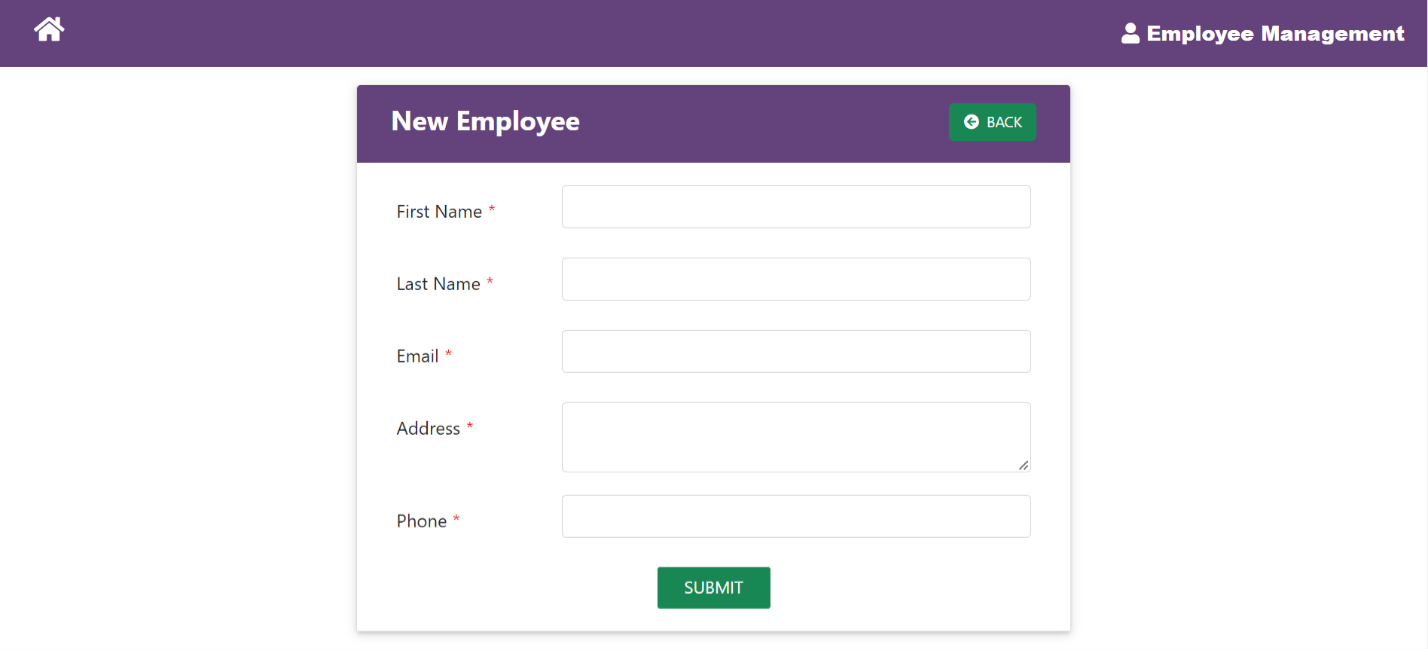
</div>The following is the screenshot of the add employee page.
Edit page template and component
In this section, let’s update the details of an existing employee using the Web API server. Add all the basic validations like mandatory fields, email address validation with disabled state, and phone number validation in the HTML file.
Refer to the following code example.
src/app/edit-employee.component.ts
import { Component, OnInit, ViewChild } from '@angular/core';
import { NgForm } from '@angular/forms';
import { ActivatedRoute, Router } from '@angular/router';
import { ToastrService } from 'ngx-toastr';
import { HttpProviderService } from '../Service/http-provider.service';

@Component({
  selector: 'app-edit-employee',
  templateUrl: './edit-employee.component.html',
  styleUrls: ['./edit-employee.component.scss']
})

export class EditEmployeeComponent implements OnInit {
  editEmployeeForm: employeeForm = new employeeForm();

  @ViewChild("employeeForm")
  employeeForm!: NgForm;

  isSubmitted: boolean = false;
  employeeId: any;

  constructor(private toastr: ToastrService, private route: ActivatedRoute, private router: Router,
    private httpProvider: HttpProviderService) { }

  ngOnInit(): void {
    this.employeeId = this.route.snapshot.params['employeeId'];
    this.getEmployeeDetailById();
  }
  getEmployeeDetailById() {
    this.httpProvider.getEmployeeDetailById(this.employeeId).subscribe((data: any) => {
      if (data != null && data.body != null) {
        var resultData = data.body;
        if (resultData) {
          this.editEmployeeForm.Id = resultData.id;
          this.editEmployeeForm.FirstName = resultData.firstName;
          this.editEmployeeForm.LastName = resultData.lastName;
          this.editEmployeeForm.Email = resultData.email;
          this.editEmployeeForm.Address = resultData.address;
          this.editEmployeeForm.Phone = resultData.phone;
        }
      }
    },
      (error: any) => { });
  }

  EditEmployee(isValid: any) {
    this.isSubmitted = true;
    if (isValid) {
      this.httpProvider.saveEmployee(this.editEmployeeForm).subscribe(async data => {
        if (data != null && data.body != null) {
          var resultData = data.body;
          if (resultData != null && resultData.isSuccess) {
            if (resultData != null && resultData.isSuccess) {
              this.toastr.success(resultData.message);
              setTimeout(() => {
                this.router.navigate(['/Home']);
              }, 500);
            }
          }
        }
      },
        async error => {
          this.toastr.error(error.message);
          setTimeout(() => {
            this.router.navigate(['/Home']);
          }, 500);
        });
    }
  }
}

export class employeeForm {
  Id: number = 0;
  FirstName: string = "";
  LastName: string = "";
  Email: string = "";
  Address: string = "";
  Phone: string = "";
}src/app/ edit -employee.component.html
<div class="container-xl">
<div class="table-responsive">
<div class="table-wrapper">
<div class="table-title">
<div class="row">
<div class="col-sm-6">
<h4><b>Update Employee</b></h4>
</div>
<div class="col-sm-6">
<a href="#" routerLink="/Home" class="btn btn-success back"><i class='fas fa-arrow-circle-left'></i>
Back</a>
</div>
</div>
</div>
<form #employeeForm="ngForm">
<div class="table-content">
<div class="form-group p-10 row">
<div class="col-sm-3">
<label for="FirstName" class="p-t-b-10">First Name<span class="requiredStar">*</span></label>
</div>
<div class="col-sm-9">
<input type="text" class="form-control" id="FirstName" required maxlength="255"
[(ngModel)]="editEmployeeForm.FirstName" name="FirstName" #FirstName="ngModel">
<div *ngIf="FirstName.errors && isSubmitted" class="alert alert-danger validationError">
<div [hidden]="!FirstName.errors?.['required']">
First Name is required
</div>
</div>
</div>
</div>
<div class="form-group p-10 row">
<div class="col-sm-3">
<label for="LastName" class="p-t-b-10">Last Name<span class="requiredStar">*</span></label>
</div>
<div class="col-sm-9">
<input type="text" class="form-control" id="LastName" required maxlength="255"
[(ngModel)]="editEmployeeForm.LastName" name="LastName" #LastName="ngModel">
<div *ngIf="LastName.errors && isSubmitted" class="alert alert-danger validationError">
<div [hidden]="!LastName.errors?.['required']">
Last Name is required
</div>
</div>
</div>
</div>
<div class="form-group p-10 row">
<div class="col-sm-3">
<label class="p-t-b-10">Email<span class="requiredStar">*</span></label>
</div>
<div class="col-sm-9">
<input type="text" class="form-control" id="Email" required maxlength="255"
[(ngModel)]="editEmployeeForm.Email" name="Email" #Email="ngModel"
pattern="^[a-zA-Z0-9._-]+@[a-zA-Z0-9.-]+\.[a-zA-Z0-9]{2,3}$" readonly>
<div *ngIf="Email.errors && isSubmitted" class="alert alert-danger validationError">
<div [hidden]="!Email.errors?.['required']">
Email is required
</div>
<div [hidden]="!Email.errors?.['touched'] && !Email.errors?.['pattern']">
Email is invalid
</div>
</div>
</div>
</div>
<div class="form-group p-10 row">
<div class="col-sm-3">
<label class="p-t-b-10">Address<span class="requiredStar">*</span></label>
</div>
<div class="col-sm-9">
<textarea class="form-control" id="Address" required [(ngModel)]="editEmployeeForm.Address" name="Address"
#Address="ngModel">></textarea>
<div *ngIf="Address.errors && isSubmitted" class="alert alert-danger validationError">
<div [hidden]="!Address.errors?.['required']">
Address is required
</div>
</div>
</div>
</div>
<div class="form-group p-10 row">
<div class="col-sm-3">
<label class="p-t-b-10">Phone<span class="requiredStar">*</span></label>
</div>
<div class="col-sm-9">
<input type="text" class="form-control" id="Phone" required maxlength="10"
[(ngModel)]="editEmployeeForm.Phone" name="Phone" #Phone="ngModel" pattern="^\d{3}\d{3}\d{4}$">
<div *ngIf="Phone.errors && isSubmitted" class="alert alert-danger validationError">
<div [hidden]="!Phone.errors?.['required']">
Phone is required
</div>
<div [hidden]="!Phone.errors?.['touched'] && !Phone.errors?.['pattern']">
Phone is invalid
</div>
</div>
</div>
</div>
</div>
<div class="table-footer">
<button class="btn btn-success" (click)="EditEmployee(employeeForm.form.valid)">Submit</button>
</div>
</form>
</div>
</div>
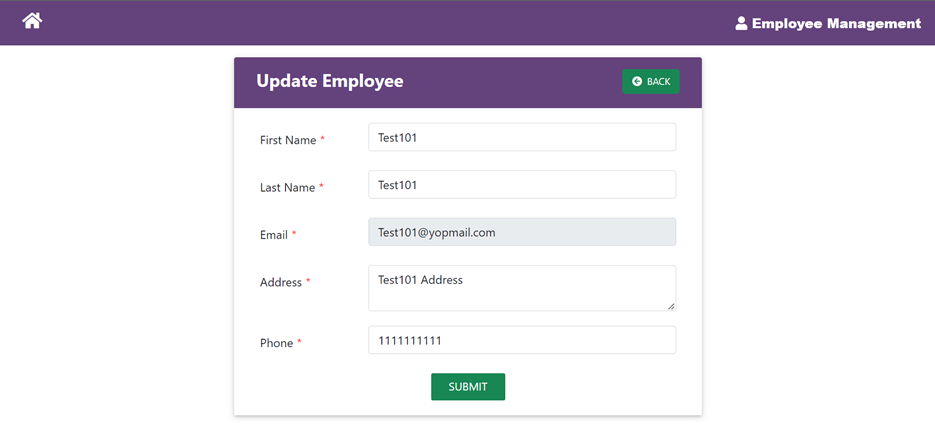
</div>The following is the screenshot of the edit employee page.
View detail page template and logic
In this section, let’s view employee details by ID using the Web API server.
Refer to the following code.
Src/app/view-employee.component.ts
import { Component, OnInit } from ‘@angular/core’;
import { ActivatedRoute, Router } from ‘@angular/router’;
import { HttpProviderService } from ‘../Service/http-provider.service’;
import { WebApiService } from ‘../Service/web-api.service’;

@Component({
  selector: ‘app-view-employee’,
  templateUrl: ‘./view-employee.component.html’,
  styleUrls: [‘./view-employee.component.scss’]
})

export class ViewEmployeeComponent implements OnInit {

  employeeId: any;
  employeeDetail : any= [];

  constructor(public webApiService: WebApiService, private route: ActivatedRoute, private httpProvider : HttpProviderService) { }

  ngOnInit(): void {
    this.employeeId = this.route.snapshot.params[‘employeeId’];
    this.getEmployeeDetailById();
  }

  getEmployeeDetailById() {
    this.httpProvider.getEmployeeDetailById(this.employeeId).subscribe((data : any) => {
      if (data != null && data.body != null) {
        var resultData = data.body;
        if (resultData) {
          this.employeeDetail = resultData;
        }
      }
    },
    (error :any)=> { });
  }

}
src/app/ view -employee.component.html
<div class=”container-xl”>
<div class=”table-responsive”>
<div class=”table-wrapper”>
<div class=”table-title”>
<div class=”row”>
<div class=”col-sm-6”>
<h4><b>View Employee</b></h4>
</div>
<div class=”col-sm-6”>
<a href=”#” routerLink=”/Home” class=”btn btn-success back”><I class’'fas fa-arrow-circle-lef’'></i> Back</a>
</div>
</div>
</div>
<table class”"table table-striped table-hover table-bordered table-conten”">
<tbody>
<tr>
<td><label><b>First Name</b></label></td>
<td><span>{{ employeeDetail.firstName }}</span></td>
</tr>
<tr>
<td><label><b>Last Name</b></label> </td>
<td><span>{{ employeeDetail.lastName }}</span></td>
</tr>
<tr>
<td> <label><b>Email</b></label></td>
<td> <span>{{ employeeDetail.email }}</span></td>
</tr>
<tr>
<td> <label><b>Address</b></label></td>
<td><span>{{ employeeDetail.address }}</span></td>
</tr>
<tr>
<td> <label><b>Phone</b></label></td>
<td> <span>{{ employeeDetail.phone }}</span></td>
</tr>
</tbody>
</table>
</div>
</div>
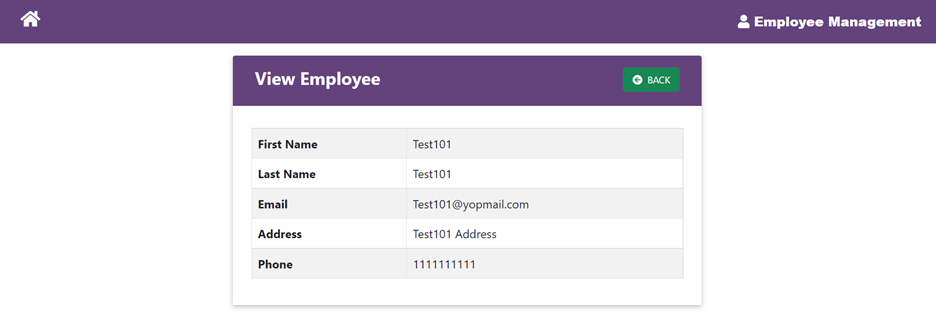
</div>The following is the screenshot of the view employee page.
Nav header
Now, let’s update the app.component with a common template.
Src/app/app.component.html
<nav class="navbar fixed-top navbar-expand-md navbar-light white double-nav scrolling-navbar">
   <div class="toolbar" role="banner">
    <div class="col-sm-6">
      <h4><i class='fas fa-home' (click)="HomeClick()"></i></h4>
    </div>
    <div class="col-sm-6">
      <span class="employee"><b><i class='fas fa-user'></i> Employee Management</b></span>
    </div>
  </div>
</nav>
<router-outlet></router-outlet>
Import modules
In this application, we used form support and HTTP client calls for API interaction in the add and edit employee sections. To use form and HTTP client support, import the form module and HTTP client module in app.module.ts.
Refer to the following code.
import { HttpClientModule } from '@angular/common/http';
import { FormsModule } from '@angular/forms';

@NgModule({
  declarations: […],
  imports: [
    HttpClientModule,
    FormsModule,
  ],
  providers: [],
  bootstrap: [AppComponent]
})
export class AppModule { }
Icons
In this application, we used Font Awesome icons to displays icons over many buttons. So, add following stylesheet reference in index.html to import Font Awesome.
<link rel="stylesheet" href="https://cdnjs.cloudflare.com/ajax/libs/font-awesome/5.9.0/css/all.css">
Modal
Modal is an important tool for interacting with users. In this section, we will work on creating a modal to perform the delete operation. Use the following command to install modal.
Npm install @ng-bootstrap/ng-bootstrap
Import module for ng-bootstrap in app.module.ts file.
import { NgbModule } from '@ng-bootstrap/ng-bootstrap';

@NgModule({
  declarations: […],
  imports: [
    …,
    NgbModule
  ],
  providers: […],
  bootstrap: […]
})
export class AppModule { }
You can find the modal creation codes in the home.component.html file.
import { NgbModal, NgbActiveModal } from '@ng-bootstrap/ng-bootstrap';

@Component({
  selector: 'ng-modal-confirm',
  template: `
  <div class="modal-header">
    <h5 class="modal-title" id="modal-title">Delete Confirmation</h5>
    <button type="button" class="btn close" aria-label="Close button" aria-describedby="modal-title" (click)="modal.dismiss('Cross click')">
      <span aria-hidden="true">×</span>
    </button>
  </div>
  <div class="modal-body">
    <p>Are you sure you want to delete?</p>
  </div>
  <div class="modal-footer">
    <button type="button" class="btn btn-outline-secondary" (click)="modal.dismiss('cancel click')">CANCEL</button>
    <button type="button" ngbAutofocus class="btn btn-success" (click)="modal.close('Ok click')">OK</button>
  </div>
  `,
})
export class NgModalConfirm {
  constructor(public modal: NgbActiveModal) { }
}
const MODALS: { [name: string]: Type<any> } = {
  deleteModal: NgModalConfirm,
};
Refer to the following screenshot of the confirmation modal.

Toasters
Toaster is another of the important tools for showing action results in an application. In this application, we are using toasters to provide notification on completion of every CRUD operation.
Use the following commands to install the toaster tool.
npm install ngx-toastr --save
npm install @angular/animations –save
After installation, open the angular.json file and update the following code in it.
.....
"styles": [
              "src/styles.css",
              "node_modules/ngx-toastr/toastr.css"
          ],
.....
Import the module in the app.module.ts file.
import { BrowserAnimationsModule } from '@angular/platform-browser/animations';
import { ToastrModule } from 'ngx-toastr';

@NgModule({
  declarations: […],
  imports: […,
    ToastrModule.forRoot(),
    BrowserAnimationsModule
  ],
  providers: [],
  bootstrap: [AppComponent]
})
export class AppModule { }
The following are the screenshots of the toasters displaying information about the actions performed in the application.


Deploy the Angular CRUD app
Run the Angular CRUD app using the following command.
ng serve
GitHub reference
For more details, refer to the build CRUD application in Angular project.
Conclusion
Thanks for reading! I hope this blog provided you with a clear idea about how to implement a CRUD application in Angular 12.
Syncfusion’s Angular UI component library is the only suite that you will ever need to build an application, containing over 65 high-performance, lightweight, modular, and responsive UI components in a single package.
For existing customers, the newest Essential Studio version is available for download from the License and Downloads page. If you are not yet a Syncfusion customer, you can try our 30-day free trial to check out the available features.
You can contact us through our support forums, support portal, or feedback portal. We are always happy to assist you!


Comments (2)
This tutorial is missing many parts. I managed to complete a few but in the end you only have an add button that doesn’t work and thats all.
Hi Pablo,
We tried the sample in the following GitHub repository and it is working as expected.
https://github.com/SyncfusionExamples/angular-crud-application
Can you please share the items missing in this tutorial, so that we will update the article?
Thanks,
Sangeetha P.
Comments are closed.