---
title: "Easy Steps to Synchronize JIRA Calendar Tasks with the Blazor Scheduler"
published_at: "2021-08-22T07:05:04+00:00"
modified_at: "2026-06-25T12:08:31+00:00"
url: "https://www.syncfusion.com/blogs/post/easy-steps-to-synchronize-jira-calendar-tasks-with-the-blazor-scheduler"
excerpt: "Dynamic tasks are vital when following the Scrum framework in developing a product. Properly managing different states of multiple tasks assigned to different members of the team might be a nightmare. To effectively handle these tasks, you need a versatile..."
taxonomy_category:
- "Blazor"
- "Scheduler"
- "Web"
taxonomy_post_tag:
- "Blazor"
- "Jira"
- "Scheduler"
- "UI Components"
- "Web"
---
# Easy Steps to Synchronize JIRA Calendar Tasks with the Blazor Scheduler
[Mahesh Palanisamy](https://www.syncfusion.com/blogs/author/mahesh-palanisamy)
Dynamic tasks are vital when following the [Scrum](https://en.wikipedia.org/wiki/Scrum_(software_development))
framework in developing a product. Properly managing different states of multiple tasks assigned to different members of the team might be a nightmare. To effectively handle these tasks, you need a versatile tool to effectively manage them.
Our Syncfusion [Blazor Scheduler component](https://www.syncfusion.com/blazor-components/blazor-scheduler)
is a fully featured event calendar that helps users manage their time and projects efficiently. It facilitates easy resource scheduling and the rescheduling of events or tasks (appointments) through editor pop-ups, drag-and-drop operations, and resizing actions.
In this blog post, I will quickly explain how to synchronize [Jira](https://en.wikipedia.org/wiki/Jira_(software))
calendar tasks and customizations with the Syncfusion Blazor Scheduler component for effective task management.
Let’s get started!
## Project setup
First things first, create a simple Blazor server-side Scheduler application. Refer to the [Getting Started with Blazor Scheduler Component](https://blazor.syncfusion.com/documentation/scheduler/getting-started/#getting-started)
documentation for an introduction to configuring the common specifications.
## Initialize the Syncfusion Blazor Scheduler component
Now, add the Syncfusion Blazor Scheduler component to the Index.razor page and set the value of the **TValue** property as ** AppointmentModel**. Then, define the Scheduler component’s ** AppointmentModel** class.
Refer to the following code example.
```
public class AppointmentModel
{
public int Id { get; set; }
public string Subject { get; set; }
public string Location { get; set; }
public DateTime StartTime { get; set; }
public DateTime EndTime { get; set; }
public string Description { get; set; }
public bool IsAllDay { get; set; }
public string RecurrenceRule { get; set; }
public string RecurrenceException { get; set; }
public Nullable RecurrenceID { get; set; }
public string CssClass { get; set; }
}
```
Make Appointment Planning Easier in Your Blazor Apps
Syncfusion Blazor Scheduler helps you create intuitive booking, event, and calendar experiences with built-in views, recurring appointments, editing, rescheduling, localization, and flexible customization.
[See Blazor Scheduler in Action](https://www.syncfusion.com/blazor-components/blazor-scheduler)
## Generate Jira API token
Now, generate the Jira API token. Refer to the [manage API tokens for your Atlassian account documentation](https://support.atlassian.com/atlassian-account/docs/manage-api-tokens-for-your-atlassian-account/)
to generate the token from your Atlassian account.
## Get tasks from Jira
Now, create an HTTP request and read the Jira tasks from the Rest API, as mentioned in the following code.
```
HttpClient client = new HttpClient();
var byteArray = new UTF8Encoding().GetBytes("mail:token");
client.DefaultRequestHeaders.Authorization = new AuthenticationHeaderValue("Basic", Convert.ToBase64String(byteArray));
var request = new HttpRequestMessage(HttpMethod.Get, "Rest API Url");
var response = await client.SendAsync(request);
```
## Synchronizing Jira Calendar tasks with the Blazor Scheduler
Next, deserialize the HTTP response and form the appointment data. Then, assign the resultant value to the **DataSource** property in the Blazor Scheduler.
Refer to the following code example.
```
protected override async Task OnInitializedAsync()
{
HttpClient client = new HttpClient();
var byteArray = new UTF8Encoding().GetBytes("mail:token");
client.DefaultRequestHeaders.Authorization = new AuthenticationHeaderValue("Basic", Convert.ToBase64String(byteArray));
var request = new HttpRequestMessage(HttpMethod.Get, "Rest api url");
var response = await client.SendAsync(request);
if (response.IsSuccessStatusCode && DataSource == null)
{
var responseStream = await response.Content.ReadAsStringAsync();
var data = JsonConvert.DeserializeObject(responseStream);
List events = new List();
foreach (var issue in data.Issues)
{
events.Add(new AppointmentModel()
{
Id = issue.Id,
Subject = issue.Fields.Summary,
Description = issue.Fields.Description,
StartTime = issue.Fields.Created,
EndTime = issue.Fields.Created.AddHours(1),
IsAllDay = true,
CssClass = GetCssClass(issue.Fields.Priority.Name)
});
}
DataSource = events;
}
else
{
getTasksError = true;
}
}
```
## Customize appointment cell header
You can customize a cell’s header by using the **CellHeaderTemplate** option in the ** ScheduleTemplates**.
Refer to the following code example to show the total number of issues created on a specific date in each cell’s header.
```
<>
<>
<>
<>
<><>
<>
<>
<>
@context.Date.Day
@{
var count = GetIssueCount(@context.Date);
if (count >> 0)
{
<> Issues: @GetIssueCount(@context.Date)<>
}
}
<>
<>
<>
```
## Customize appointment appearance
Also, you can apply custom colors to appointments based on the task’s priority. To do so, use the built-in field **CssClass** in which you can pass the class name to be applied to the specific appointments.
```
@code {
public string GetCssClass(string priority)
{
string css;
if (priority == "Release-Breaker")
{
css = "release-breaker";
}
else if (priority == "Normal")
{
css = "normal";
}
else if (priority == "High")
{
css = "high";
}
else if (priority == "Critical")
{
css = "critical";
}
else if (priority == "Ultra Critical")
{
css = "ultra-crtical";
}
else
{
css = "low";
}
return css;
}
}
```
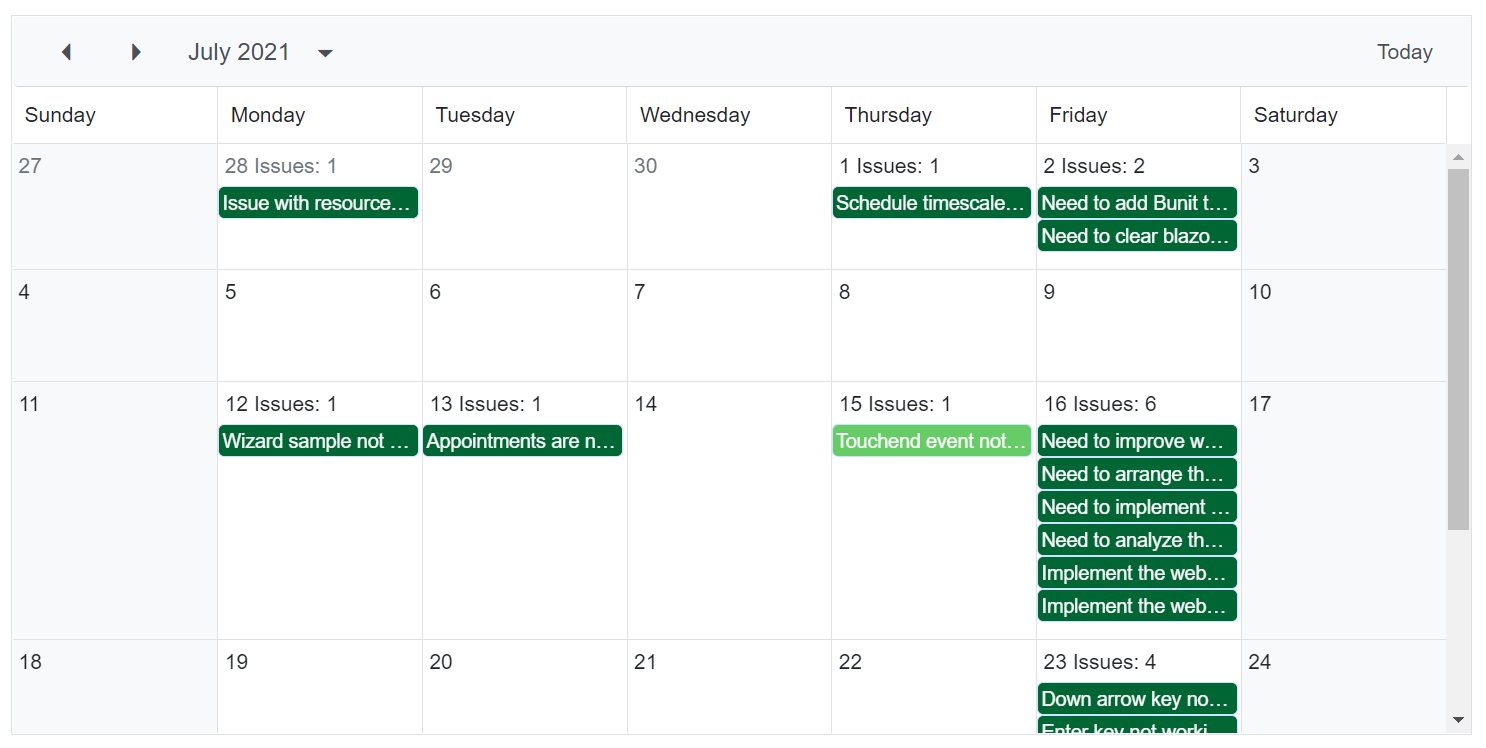
Applying Custom Colors to the Appointments
**Note:** For more information, refer to the [appointment customization in Blazor Scheduler documentation](https://blazor.syncfusion.com/documentation/scheduler/appointments#appointment-customization)
.
## Customize the appointment tooltip
You can also display the required tasks’ information on a tooltip using the **TooltipTemplate** option within the ** ScheduleEventSettings**.
Refer to the following code example.
```
@{
var data = (context as AppointmentModel);
@data.Subject
@data.Description
}
```
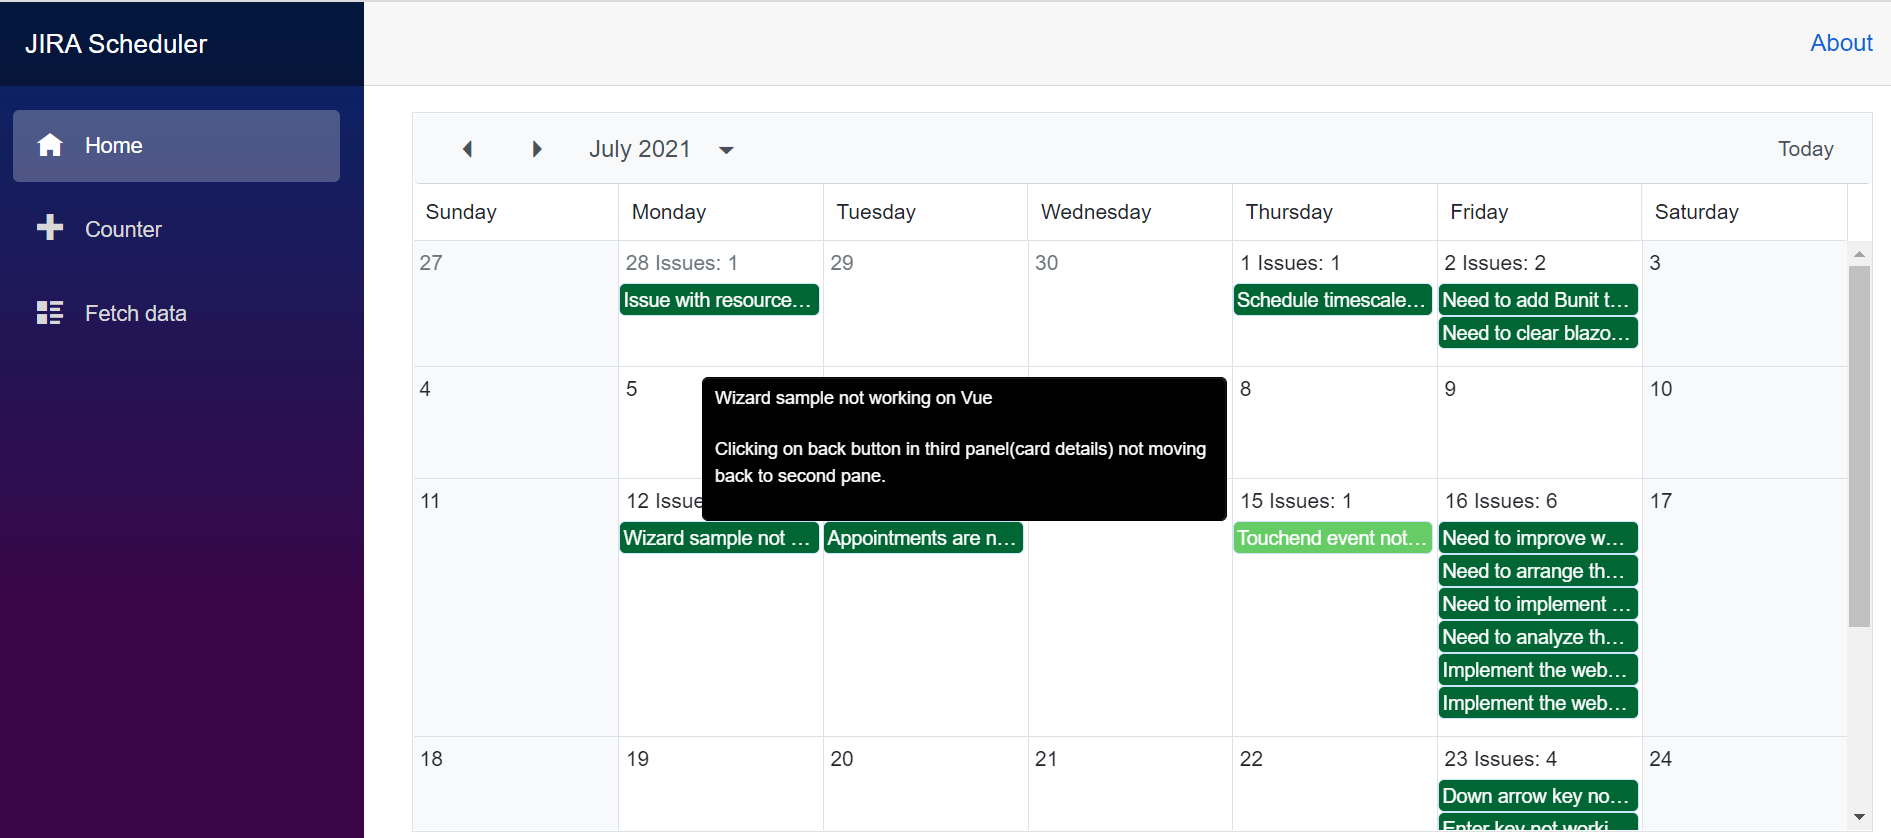
Custom Tooltip on an Appointment
**Note:** Also, refer to the documentation on [customizing event tooltips in a Blazor Scheduler using a template](https://blazor.syncfusion.com/documentation/scheduler/appointments#customizing-event-tooltip-using-template)
.
## Resource
For more details, check out the complete working example to [synchronize Jira calendar tasks with the Blazor Scheduler](https://github.com/SyncfusionExamples/blazor-scheduler-jira-calendar)
.
## **Summary**
Thanks for reading! This blog explained in detail how to synchronize Jira calendar tasks and how to customize headers, appointment colors, and tooltips with the Syncfusion [Blazor Scheduler](https://www.syncfusion.com/blazor-components/blazor-scheduler)
component. So, try out the steps and enjoy hassle-free project and resource management.
Our Syncfusion Scheduler control is also available in our [Xamarin](https://www.syncfusion.com/xamarin-ui-controls/xamarin-scheduler)
, [UWP](https://www.syncfusion.com/uwp-ui-controls/scheduler)
, [WinForms](https://www.syncfusion.com/winforms-ui-controls/scheduler)
, [WinUI](https://www.syncfusion.com/winui-controls/scheduler)
, [WPF](https://www.syncfusion.com/wpf-controls/scheduler)
, [Blazor](https://www.syncfusion.com/blazor-components/blazor-scheduler)
, ASP.NET ([Core](https://www.syncfusion.com/aspnet-core-ui-controls/scheduler)
, [MVC](https://www.syncfusion.com/aspnet-mvc-ui-controls/scheduler)
, and [Web Forms](https://www.syncfusion.com/jquery/aspnet-web-forms-ui-controls/scheduler)
), [JavaScript](https://www.syncfusion.com/javascript-ui-controls/js-scheduler)
, [Angular](https://www.syncfusion.com/angular-ui-components/angular-scheduler)
, [React](https://www.syncfusion.com/react-ui-components/react-scheduler)
, and [Vue](https://www.syncfusion.com/vue-ui-components/vue-scheduler)
platforms.
For current customers, the new version is available for download from the [License and Downloads](https://www.syncfusion.com/account/downloads)
page. If you are not yet a Syncfusion customer, you can start a [30-day free trial](https://www.syncfusion.com/downloads)
to check out these features.
Also, you can reach us through our [support forums](https://www.syncfusion.com/forums)
, [Direct-Trac](https://www.syncfusion.com/account/login)
, or [feedback portal](https://www.syncfusion.com/feedback/)
. We are always happy to assist you!
## Related blogs
- [What’s New in 2021 Volume 2: Blazor Scheduler](https://www.syncfusion.com/blogs/post/2021-volume-2-blazor-scheduler.aspx)
- [How to Synchronize Google Calendar with Syncfusion Blazor Scheduler](https://www.syncfusion.com/blogs/post/synchronize-google-calendar-with-syncfusion-blazor-scheduler.aspx)
- [How to Send Emails and Reminders for Events in Blazor Scheduler](https://www.syncfusion.com/blogs/post/how-to-send-emails-and-reminders-for-events-in-blazor-scheduler.aspx)
- [How to Access Microsoft Graph Calendar Events with Syncfusion Blazor Scheduler](https://www.syncfusion.com/blogs/post/how-to-access-microsoft-graph-calendar-events-with-syncfusion-blazor-scheduler.aspx)