---
title: "Designing Effective Data Entry Forms in .NET MAUI: A Step-by-Step Guide"
published_at: "2023-01-27T12:05:55+00:00"
modified_at: "2025-03-21T09:44:00+00:00"
url: "https://www.syncfusion.com/blogs/post/designing-effective-data-entry-forms-in-net-maui-a-step-by-step-guide"
excerpt: "This blog explains how to design a contact form using the Syncfusion .NET MAUI DataForm control in mobile and desktop apps from a single shared codebase."
taxonomy_category:
- ".NET MAUI"
- "Desktop"
- "Development"
- "Mobile"
- "Syncfusion"
- "What's new"
taxonomy_post_tag:
- ".NET MAUI"
- "desktop"
- "Mobile"
- "Syncfusion"
- "What's New"
---
# Designing Effective Data Entry Forms in .NET MAUI: A Step-by-Step Guide
[Jeyasri Murugan](https://www.syncfusion.com/blogs/author/jeyasrim)

The Syncfusion [.NET MAUI DataForm](https://www.syncfusion.com/maui-controls/maui-dataform)
(SfDataForm) is used to gather, edit, and display data in a user-friendly interface. It supports built-in and custom data editors to create data entry forms such as contact, employee, sign-in, and sign-up forms. This control is available with the [2022 Volume 4](https://www.syncfusion.com/forums/179561/essential-studio-2022-volume-4-main-release-v20-4-0-38-is-available-for-download)
release.
This blog will explain how to create a contact form using the .NET MAUI DataForm control and its basic features in mobile and desktop applications from a single shared codebase.
**Note:** Refer to the [.NET MAUI DataForm](https://help.syncfusion.com/maui/dataform/overview)
documentation before getting started.
## Step 1: Initializing the .NET MAUI DataForm control
1. First, create a new [.NET MAUI](https://learn.microsoft.com/en-us/dotnet/maui/get-started/first-app?view=net-maui-7.0&tabs=vswin&pivots=devices-android) application in [Visual Studio](https://visualstudio.microsoft.com/vs/) .
2. Syncfusion .NET MAUI controls are available in the [NuGet Gallery](https://www.nuget.org/) . To add the [SfDataForm](https://help.syncfusion.com/cr/maui/Syncfusion.Maui.DataForm.html) to your project, open the **NuGet package manager** in ** Visual Studio**, search for [Syncfusion.Maui.DataForm](https://www.nuget.org/packages/Syncfusion.Maui.DataForm) , and then install it.
3. Import the control namespace **Syncfusion.Maui.DataForm** in your XAML page.
4. Now, initialize the [SfDataForm](https://help.syncfusion.com/cr/maui/Syncfusion.Maui.DataForm.SfDataForm.html) .``` ….. xmlns:dataForm="clr-namespace:Syncfusion.Maui.DataForm;assembly=Syncfusion.Maui.DataForm" ….. ```
5. The [Syncfusion.Maui.Core](https://www.nuget.org/packages/Syncfusion.Maui.Core) NuGet is a dependent package for all [Syncfusion .NET MAUI controls](https://www.syncfusion.com/maui-controls) . So, in the **MauiProgram.cs** file, register the handler for the Syncfusion core assembly. Refer to the following code.``` builder.ConfigureSyncfusionCore(); ```
## Step 2: Adding a model class to create a contact form
Let’s create the data form model class (**ContactFormModel**), which contains fields that store specific information such as names, addresses, and phone numbers. You can also use [attributes](https://help.syncfusion.com/maui/dataform/data-annotations)
to the data model class properties to effectively handle data.
Refer to the following code example.
```
public class ContactFormModel
{
[DataFormDisplayOptions(ColumnSpan = 2, ShowLabel = false)]
public string ProfileImage { get; set; }
[Display(Prompt = "First name")]
public string Name { get; set; }
[Display(Prompt = "Last name")]
public string LastName { get; set; }
[Display(Prompt = "Mobile")]
public double? Mobile { get; set; }
[Display(Prompt = "Landline")]
public double? Landline { get; set; }
[Display(Prompt = "Address")]
[DataFormDisplayOptions(ColumnSpan = 2)]
public string Address { get; set; }
[Display(Prompt = "City")]
[DataFormDisplayOptions(ColumnSpan = 2)]
public string City { get; set; }
[Display(Prompt = "State")]
public string State { get; set; }
[Display(Prompt = "Zip code")]
[DataFormDisplayOptions(ShowLabel = false)]
public double? ZipCode { get; set; }
[Display(Prompt = "Email")]
public string Email { get; set; }
}
```
## Step 3: Defining the editors
By default, the .NET MAUI DataForm autogenerates editors based on primitive data types such as **string**, ** enumeration**, ** DateTime**, and ** TimeSpan** in the [DataObject](https://help.syncfusion.com/cr/maui/Syncfusion.Maui.DataForm.SfDataForm.html#Syncfusion_Maui_DataForm_SfDataForm_DataObject)
property.
Some of the [built-in editors](https://help.syncfusion.com/maui/dataform/editors)
are text, password, multi-line, combo box, autocomplete, date, time, checkbox, switch, and radio group.
Refer to the following code to set the data form model (**ContactFormModel**) to the ** DataObject** property.
**XAML**
```
```
**C#**
```
public ContactFormViewModel()
{
this.ContactFormModel = new ContactFormModel();
}
///
/// Gets or sets the contact form model.
///
public ContactFormModel ContactFormModel { get; set; }
```
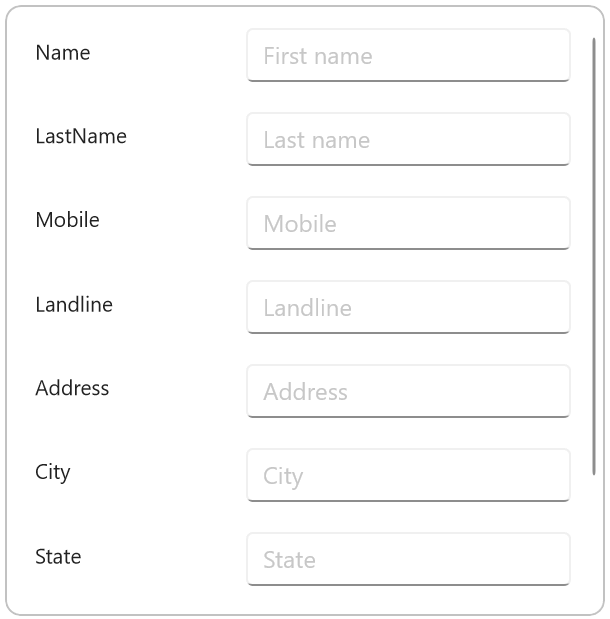
Creating a Contact Form Using the Built-in Editors in .NET MAUI DataForm Control
## Step 4: Grouping the editors in the contact form
The .NET MAUI DataForm allows you to [group](https://help.syncfusion.com/maui/dataform/grouping)
or categorize related data. For example, we can create a **Name** group with the first and last name fields.
Refer to the following code example. In it, we have created the Name and Address groups.
```
```
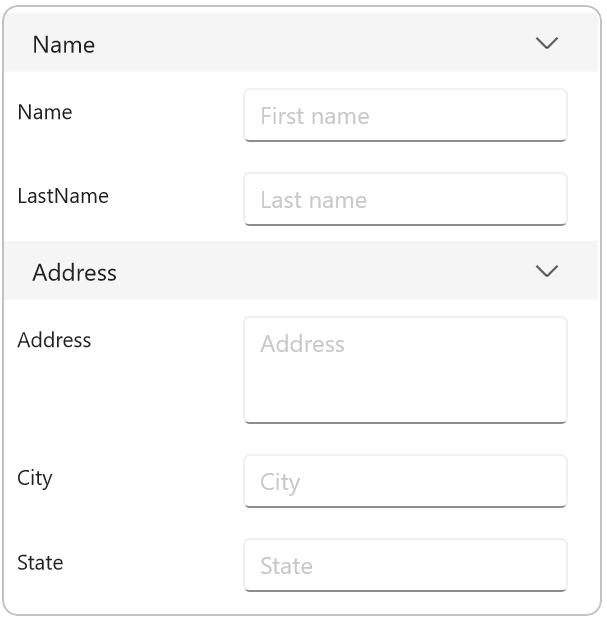
Grouping Editors in the Contact Form
## Step 5: Creating image-based labels
Let’s add custom fonts to the [labels](https://help.syncfusion.com/maui/dataform/layout#loading-images-for-label)
. To do so, we have to add the font file (**.ttf**) in the ** Fonts** folder. Then, register the custom font in the ** CreateMauiApp** method in the ** MauiProgram.cs** file.
Refer to the following code example.
**C#**
```
builder
.UseMauiApp()
.ConfigureFonts(fonts =>
{
fonts.AddFont(“OpenSans-Regular.ttf”, “OpenSansRegular”);
fonts.AddFont(“OpenSans-Semibold.ttf”, “OpenSansSemibold”);
//// Register custom font.
fonts.AddFont(“InputLayoutIcons.ttf”, “InputLayoutIcons”);
});
```
**XAML**
```
…
```
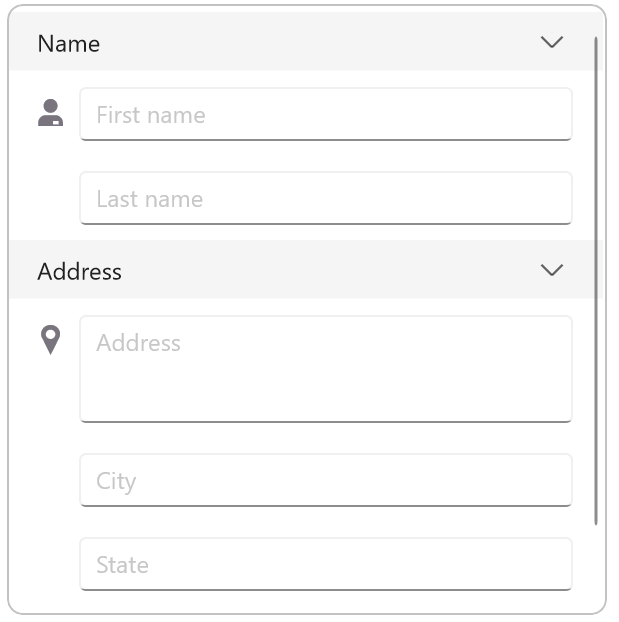
Adding Custom Image Fonts to Contact Form Labels
## Step 6: Adding a custom image editor
You can also add a custom image editor in the DataForm to display the person’s image in the contact form.
Refer to the following code example.
```
….
```
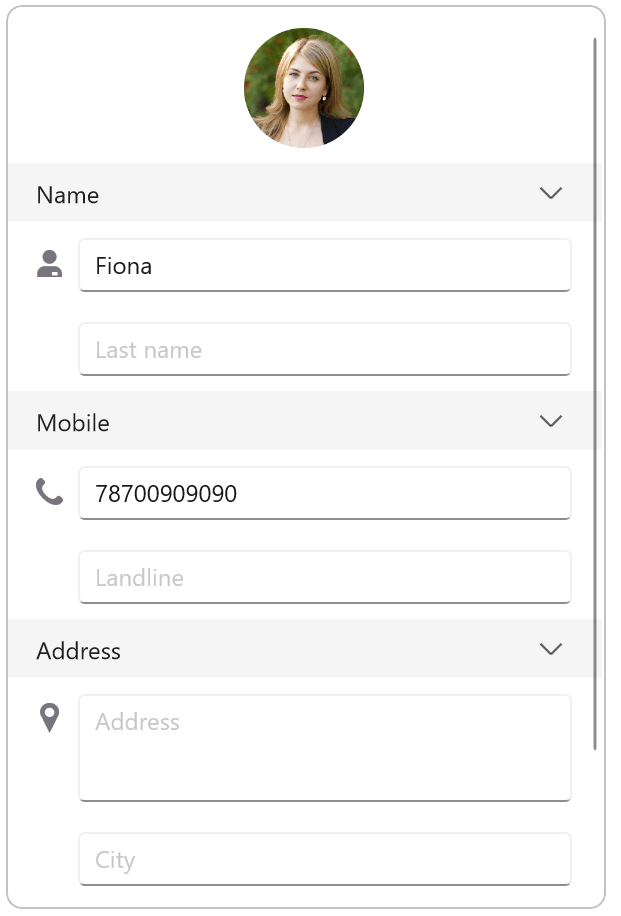
Adding Custom Image Editor to Contact Form
## Step 7: Validating the data fields
The .NET MAUI DataForm supports [validating](https://help.syncfusion.com/maui/dataform/validation)
the user input. Validation will make sure the users enter only correct values in the data form.
It supports the following data validations:
- **Required field validation**: To check whether all the required data has been entered. For example, the form can be submitted only after filling in all the data fields.
- **Input format validation:** To check that the data being entered is in the correct format. For example, email address data should include the @ character.
- **Date range validation**: To check that the data being entered is within the specific range. For example, dates should be selected within a specific date range.
We are going to add the required field validation to the phone**number** field in the contact form.
**XAML**
```
```
**C#**
```
dataForm.ValidateProperty += this.OnDataFormValidateProperty;
private void OnDataFormValidateProperty(object? sender, DataFormValidatePropertyEventArgs e)
{
if (e.PropertyName == nameof(ContactFormModel.Mobile) && !e.IsValid)
{
e.ErrorMessage = e.NewValue == null || string.IsNullOrEmpty(e.NewValue.ToString()) ? "Please enter the mobile number" : "Invalid mobile number";
}
}
```
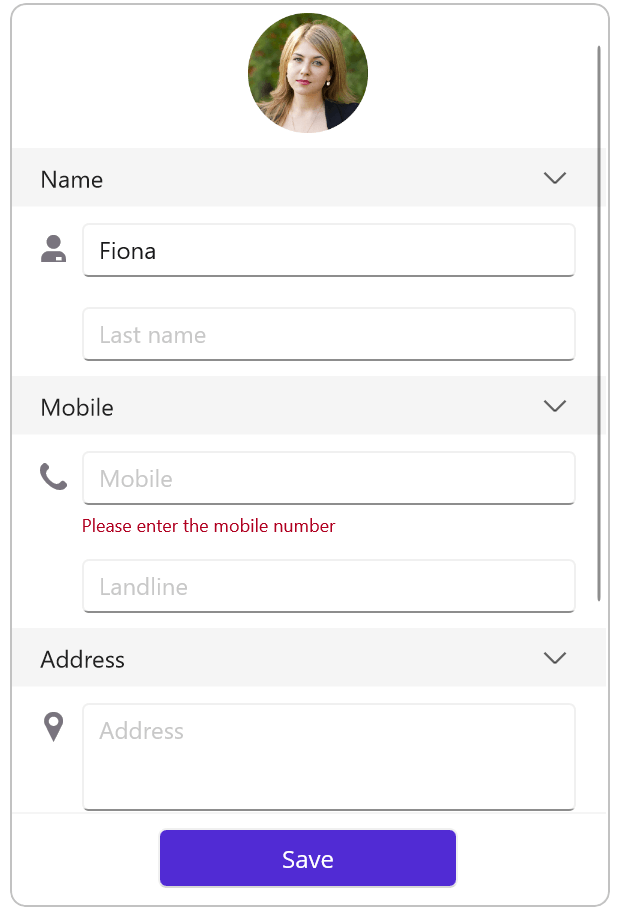
Validating Data in the Contact Form
## Step 8: Committing the data to the database
Now, you can save or submit the entered data in the underlying database with the help of the following commit modes in the .NET MAUI DataForm:
- **LostFocus**: The default commit mode, it commits the value to the underline data object when the editor loses focus.
- **PropertyChanged**: Immediately commits the value to the underline data object when the value changes.
- **Manual**: Manually commits the value by calling the [Commit](https://help.syncfusion.com/maui/dataform/editing#commit-mode) method.
**Note:** For more details, refer to the [data committing in the .NET MAUI DataForm](https://help.syncfusion.com/maui/dataform/editing#commit-mode)
control documentation.
## Step 9: Designing the contact form with layouts
You can elegantly design the contact form with the following layouts in the .NET MAUI DataForm control:
- **Grid layout:** To arrange the editors in the form in a grid-like pattern with rows and columns.
- **Linear layout:** To arrange the editors in a single column.
In this demo, I have added the grid layout to the **Address** group of the contact form.
```
```
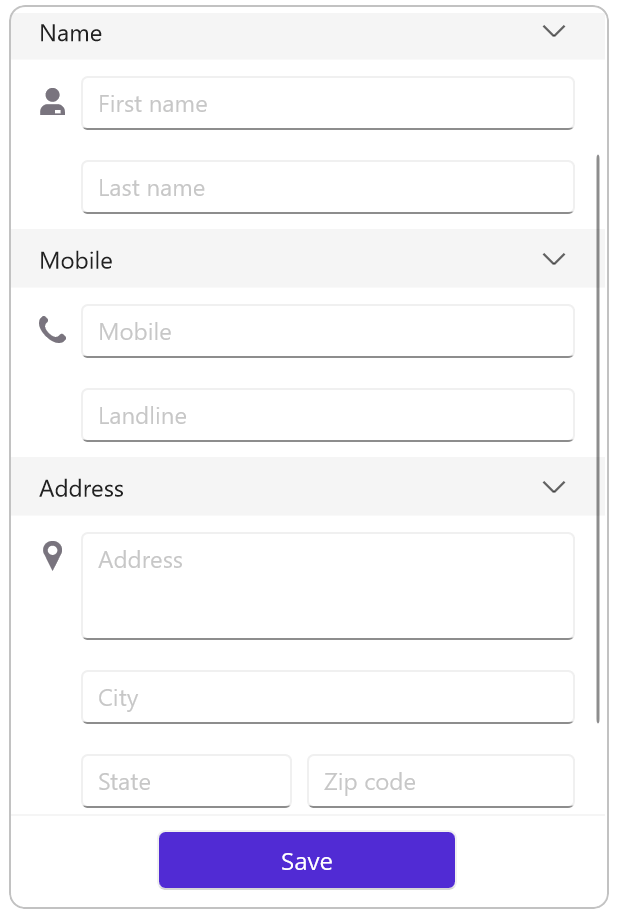
Adding Layouts to the Contact Form
## GitHub reference
For more details, refer to the [creating a contact form using the .NET MAUI DataForm control GitHub demo](https://github.com/SyncfusionExamples/create-contact-form-using-.net-maui-dataform)
.
## Conclusion
Thanks for reading! In this blog, we have seen how to create a contact form easily using the Syncfusion [.NET MAUI DataForm](https://www.syncfusion.com/maui-controls/maui-dataform)
control. Try out the steps in this blog and leave your feedback in the comments section below!
For current Syncfusion customers, the newest version of Essential Studio® is available from the [license and downloads page](https://www.syncfusion.com/account/downloads)
. If you are not yet a customer, you can try our 30-day [free trial](https://www.syncfusion.com/downloads)
to check out these features.
If you have any questions, you can contact us through our [support forums](https://www.syncfusion.com/forums)
, [feedback portal](https://www.syncfusion.com/feedback)
, or [support portal](https://support.syncfusion.com/)
. We are always happy to assist you!
## Related blogs
- [Create a Project Planning and Resource Management Calendar in .NET MAUI](https://www.syncfusion.com/blogs/post/create-project-planning-and-resource-management-calendar-in-net-maui.aspx)
- [Syncfusion .NET MAUI Control Demos Are Now Available at App Stores](https://www.syncfusion.com/blogs/post/syncfusion-net-maui-control-demos-are-now-available-at-app-stores.aspx)
- [Introducing the Sixth Set of .NET MAUI Controls](https://www.syncfusion.com/blogs/post/introducing-the-sixth-set-of-net-maui-controls.aspx)
- [OCR in .NET MAUI: Building an Image Processing Application](https://www.syncfusion.com/blogs/post/ocr-in-net-maui-building-an-image-processing-application.aspx)