
Extensions are an indispensable part of project development. They play a vital role in improving your productivity on a project, helping you customize your project, and more. Visual Studio Code extensions are add-ons that enhance your productivity and allow you to customize your project by adding new features or integrating existing tools into it. These extensions can customize existing or new projects by adding files, new palettes, menus, commands, and so on.
This post explains how to create a Visual Studio Code extension that creates a new project palette.
Let’s get started!
Prerequisites
Create a VSIX project
Follow these steps to create a VSIX project:
Step 1: Create a new VSIX project in Visual Studio Code through Terminal > New Terminal.
Step 2: Run the following command to install the Code Generator:
npm install -g yo generator-code |
Now the extension is ready for use with a TypeScript or JavaScript project.
Step 3: Run the following generator command and wait for some time (approximately 5 minutes) for the extension generator to be loaded.
yo code |
Step 4: Fill out all the fields for a TypeScript project as illustrated in the following screenshot.
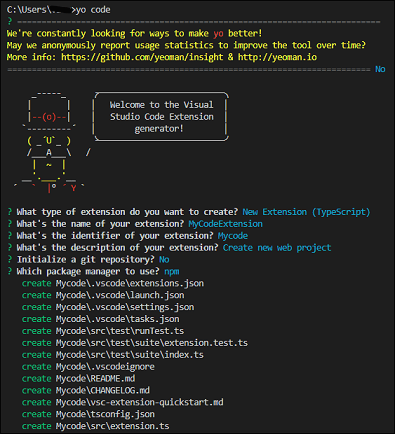
The extension project has been created successfully.
Step 5: Open the project by executing the following command:
cd Mycode //The Mycode is an extension identifier name. |
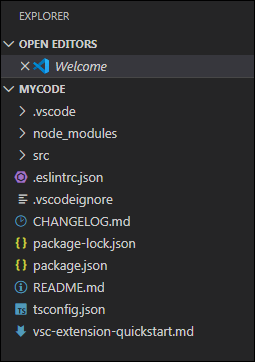
The project will be shown in the Explorer window as in the following screenshot.
Update the extension details
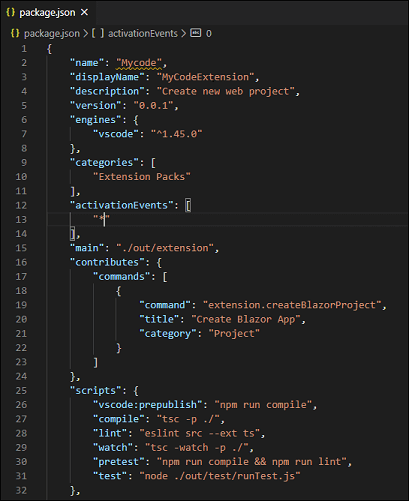
The package.json file has the VS Code extension name, description, author, license, and other details. Open the package.json file to edit the extension details as shown in the following screenshot.
Create a Visual Studio Code project template
We can create a project template for any project type available in the dotnet new command. Here, I am going to create a new Blazor project for demonstration purposes.
Step 1: Create a new folder in the following structure.
{VSIX Project Location}/templates/BlazorServer
Step 2: Open the Terminal (Terminal > New Terminal) and navigate to the BlazorServer location using cd command.
Step 3: Run the following command to create the Blazor server app.
dotnet new blazorserver |
The following screenshot shows the output on running the command.

Launch configuration
When running or debugging a simple app in VS Code, creating a launch configuration file is beneficial because it allows you to configure and save debugging setup details. VS Code keeps the debugging configuration information in the launch.json file located in the .vscode folder in your workspace (project root folder).
Follow this procedure to create a launch configuration file:
Step 1: Create a launch.json file for the template project. To do this, open the new Visual Studio Code instance and open the created Blazor server application
({VSIX Project Location}/templates/BlazorServer).
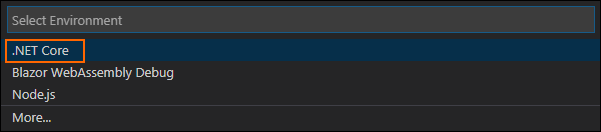
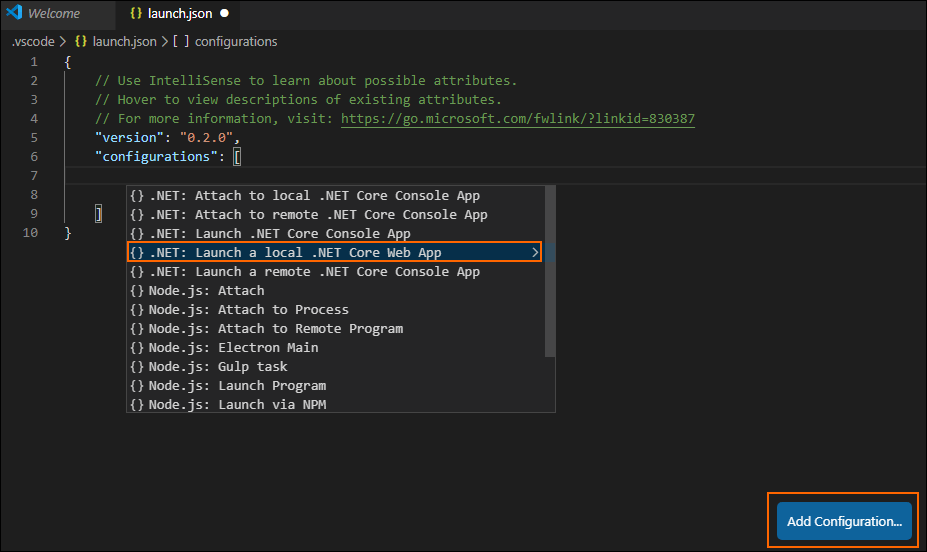
Step 2: Go to Run > Start Debugging and select the .NET Core environment like in the following screenshot.
 Step 3: Click the Add Configuration button to add the Debug configuration.
Step 4: Choose the .NET: Launch a local .NET Core Web App option as shown in the following screenshot.
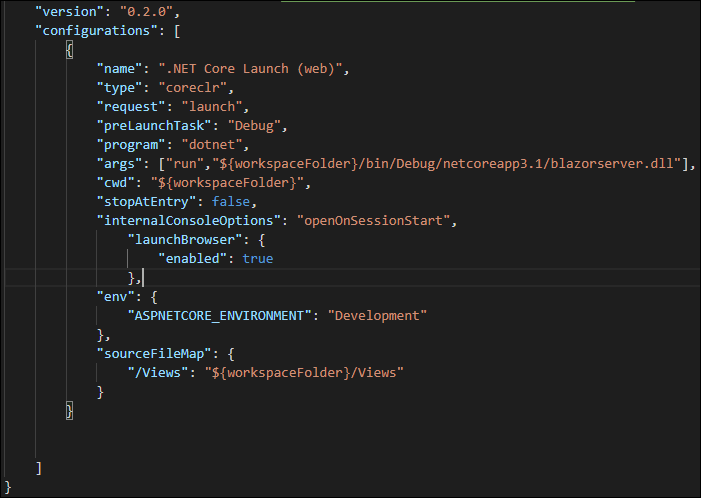
 Step 5: Then, add the target framework and project name in the configuration.
Step 6: Rearrange the configurations as shown in the following screenshot to run the output in the default web browser while debugging the application.
Tasks configuration
Now, we’ll create the tasks.json file with the task names debug, build, and NuGet restore since we need to perform these operations while creating a new project using our extension.
In VS Code, tasks can be configured to run scripts and start processes. Many tools that are already present in VS Code can be used to create tasks without having to write a command or new code. For a workspace, tasks are configured from the tasks.json file in the .vscode folder. The following are the steps to create and configure debug in the tasks.json file.
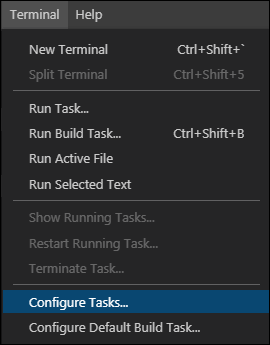
Step 1: Go to Terminal > Configure Tasks as shown in the following screenshot.
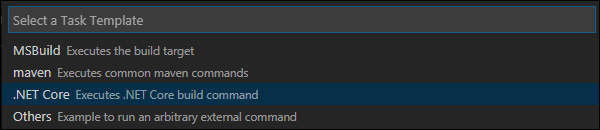
 Step 2: Create the tasks.json file by choosing the .NET Core option.
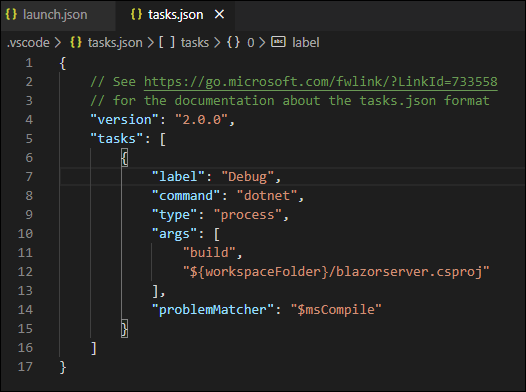
 Step 3: Modify the tasks.json file as shown in the following screenshot.
Palette command
Since VS Code does not support UI dialogs, we should create a palette command to get the project name and location from the user on creating a new project.
Adding the command
Step 1: Open the VS Code Extension project we already created.
Step 2: Open the package.json file and add the command shown in the following figure under the Contributes attribute to create a new command in the VS Code palette.
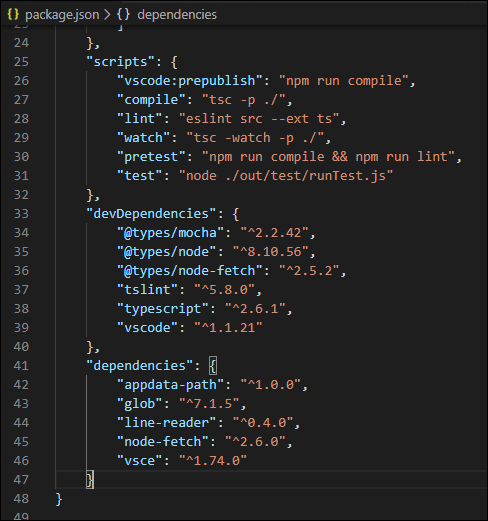
 Step 3: Then, add the required NPM packages in the packages.json file by adding its dependencies. As you can see in the following screenshot, I have added appdata-path, glob, line-reader, node-fetch, and vsce to perform actions in the back end.
 Step 4: Run the following command to restore the NuGet packages in the terminal at the root Extension project.
npm install |
Register the command
Register the created command to invoke the project creation process when clicking on the VS Code palette.
Step 1: Create new TypeScript files with the following names:
- projectcreationcommand.ts: Calls the project creation process when we click on the palette.
- ProjectCreation.ts: Has the logic for the project creation.
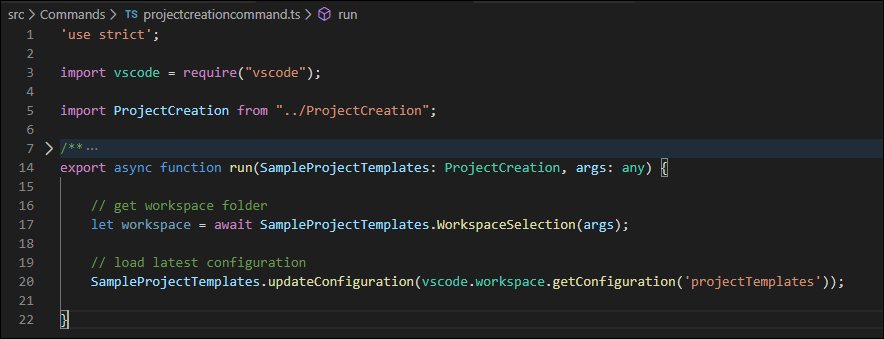
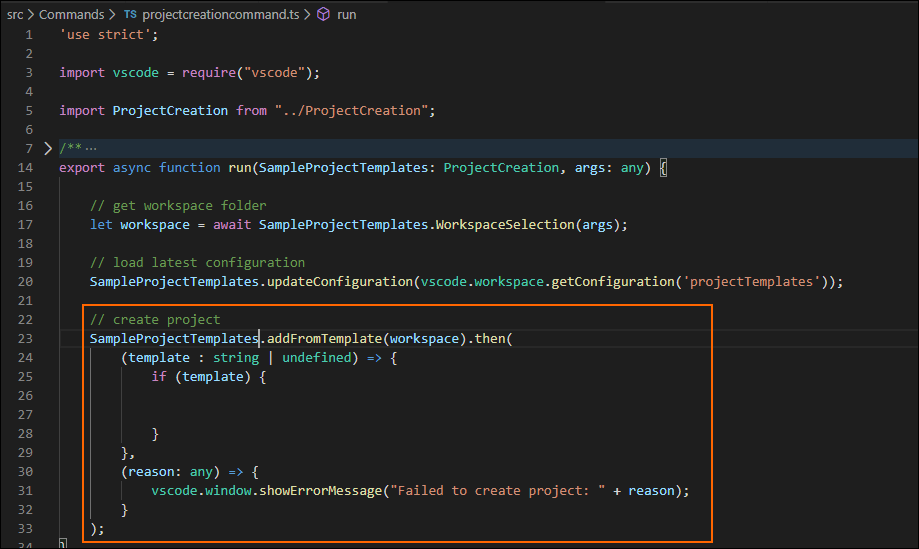
Step 2: Add the code to get the current workspace location and load the configuration in the projectcreationcommand.ts file as shown in the following screenshot.
Step 3: Then, add the code to register the command in the extension.ts file.
'use strict';

// The module 'vscode' contains the VS Code extensibility API
// Import the module and reference it with the alias vscode in your code below
import * as vscode from 'vscode';

// import manager
import ProjectCreation from './ProjectCreation';

// import commands
import CreateSampleBlazorProjectCommand = require('./commands/projectcreationcommand');

// this method is called when your extension is activated
// your extension is activated the very first time the command is executed
export function activate(context: vscode.ExtensionContext) {

    let projectCreation = new ProjectCreation(context, vscode.workspace.getConfiguration('projectTemplates'));

    // create project from template
    let createBlazorProjectFromTemplate = vscode.commands.registerCommand('extension.createSampleBlazorProject',
    CreateSampleBlazorProjectCommand.run.bind(undefined, projectCreation));
    context.subscriptions.push(createBlazorProjectFromTemplate);
}

// this method is called when your extension is deactivated
export function deactivate() {}
Step 4: In VS code, create a new project and copy the template files from the templates folder to this project location. Then, we can replace the project name in the required files.
Note:We can create a separate palette to get information from the user, like project name and project location, by using the vscode.window.showInputBox() method.
Project creation
In VS Code, we don’t have a default API to create a new project using our palette. So, we have to add the logic for the directory copying process.
Step 1: Create a new file named directoryUtilities.ts.
Step 2: Add the TypeScript code to create and copy the directory. Please refer to this source project to get the sample code for this process.
Step 3: Import this file in the project creation file to use these methods in the project creation.
import dirUtils = require("./directoryUtilities");
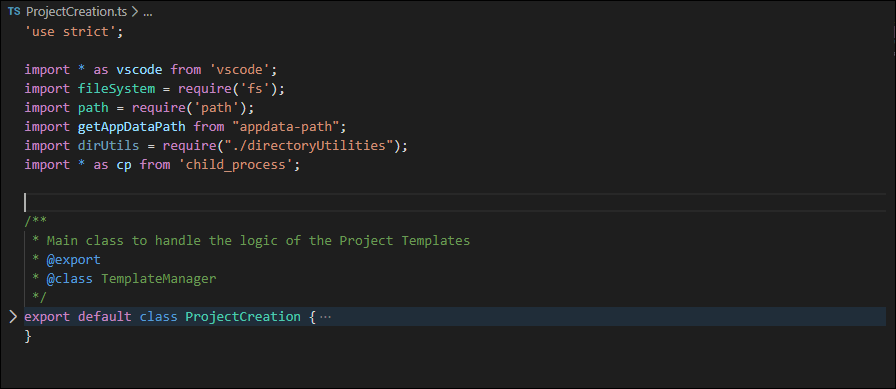
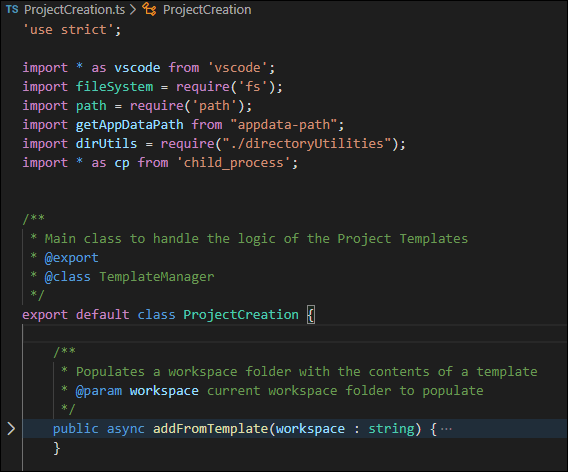
Step 4: Add a new method ProjectCreation in the ProjectCreation.ts file.
Step 5: Create a new method addFromTemplate() inside the ProjectCreation class as shown in the following screenshot.
Step 6: Get the project location from the user by using the following code inside of the addFromTemplate() method.
Note:In the input palette, you have to provide the default project location if you want to create the project there.
let userPath: string = path.join(path.dirname(path.dirname(getAppDataPath())), "source", "repos");
        let projectLocationInput = <vscode.InputBoxOptions> {
            prompt: `Project Location`,
            value: userPath
        };

        // get user's input
        let projectLocation : string = await vscode.window.showInputBox(projectLocationInput).then(
            value => {
                if (!value) {
                    return projectLocation;
                }
                return value;
            }

        );
Step 7: Get the project name from the user by using the following code inside of the addFromTemplate() method.
Note:In the input palette, we have to show the default project name if we want to create the project with it.
let defaultProjectName: string = "SampleBlazorApp1";

        let variableInput = <vscode.InputBoxOptions> {
            prompt: `Project Name`,
            value: defaultProjectName
        };

        // get user's input
        let projectName : string = await vscode.window.showInputBox(variableInput).then(
            value => {
                if (!value) {
                    return projectName;
                }
                return value;
            }

        );
        workspace = path.join(projectLocation, projectName);
Step 8: Now that we have the project location and project name, we should create the project using the provided information. We should copy the templates, change the project name to the name provided by the user, and place the project in the user-provided location.
Refer to the source code for the project creation logic.
Step 9: Call the addFromTemplate() method inside the command we created in the projectcreationcommand.ts file to run this project creation process when a project is created using the option we made in the VS Code palette.
Run the extension
Step 1: Press F5 to run the sample extension in the VS Code instance. This will open a new VS Code Extension Development host instance.
Step 2: Press Ctrl+Shift+P to open the palette.
Step 3: Choose the Create Blazor App option from the palette with the Blazor keyword.

Step 4: The Project Location palette will be displayed. Provide a location to create the project.

Step 5: The Project Name palette will appear next. Provide a name for the project.

The Blazor server application will be created in the provided location with the provided name.

Step 6: Run the created application by clicking Run > Start Debugging.
Create extension (VSIX) file
In VS Code, the VSIX file will not be created automatically, so we have to create one by using the VSCE command-line tool.
Step 1: Open the terminal in VS Code and then execute the following command.
npm install –g vsce |
Step 2: After VSCE is installed, create a VSIX file by using the following command.
vsce package |
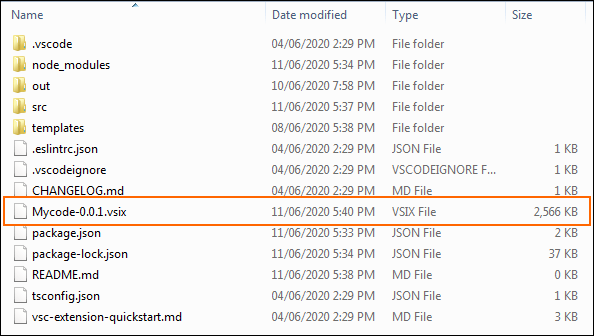
The VSIX file is now created in the VSIX project location as shown in the following screenshot.
Note:Before creating the VSIX file, make sure you have provided the necessary content in the README.md file.
Install the extension
You can manually install a VS Code extension packaged in a VSIX file. To do so, simply use the VS Code command line and provide the path to the VSIX file. For example:
code--install-extension myExtensionFolder\myExtension.vsix |
 The extension will be installed under your {user location}/.vscode/extensions folder.
Publish the extension to the Visual Studio Code Marketplace
Our VS Code extension can be published in the Visual Studio Code Marketplace to share it with the public. Refer to this documentation page for instructions on publishing the extension in the VS Code Marketplace.
Sample extension source code
You can download the complete source code of the sample extension we built from this location.
Conclusion
I hope you found this article useful. Now you know how to create a Visual Studio Code project template, build a palette extension to use that project template, and publish the extension on the VS Code Marketplace for other developers to use. Let’s continue to use these new tools and capabilities to boost our project productivity!
Syncfusion offers 1,600+ components and frameworks for Flutter, JavaScript, Angular, Blazor, Vue, React, ASP.NET (Web Forms, MVC, Core), UWP, Xamarin, WinForms, and WPF to boost your application development speed. If you’re already a Syncfusion user, you can download the product setup from our website. Otherwise, you can download a free, 30-day trial here.
If you have any questions, please let us know in the comments section below. You can also contact us through our support forums, Direct-Trac, or feedback portal. As always, we are happy to assist you!


Comments (4)
I want to express my love for your kind-heartedness supporting those who absolutely need guidance on the topic. Your special commitment to getting the message throughout became amazingly effective and have specifically enabled girls just like me to get to their ambitions. Your warm and helpful report signifies a lot a person like me and substantially more to my fellow workers. Thanks a lot; from everyone of us.
Source
Hi URLS,
We are glad that this article helped you.
Regards,
Ganesan Rengasamy.
I’m still learning from you, while I’m improving myself.
I absolutely enjoy reading all that is written on your blog.Keep the
tips coming. I enjoyed it!
I’m amazed, I have to admit. Seldom do I encounter a blog
that’s both educative and amusing, and without a doubt, you’ve
hit the nail on the head. The problem is something that too few people are speaking intelligently about.
Now i’m very happy that I found this during my
hunt for something relating to this.
Comments are closed.