“Good UX is good business.”
– Andrew Kucheriavy
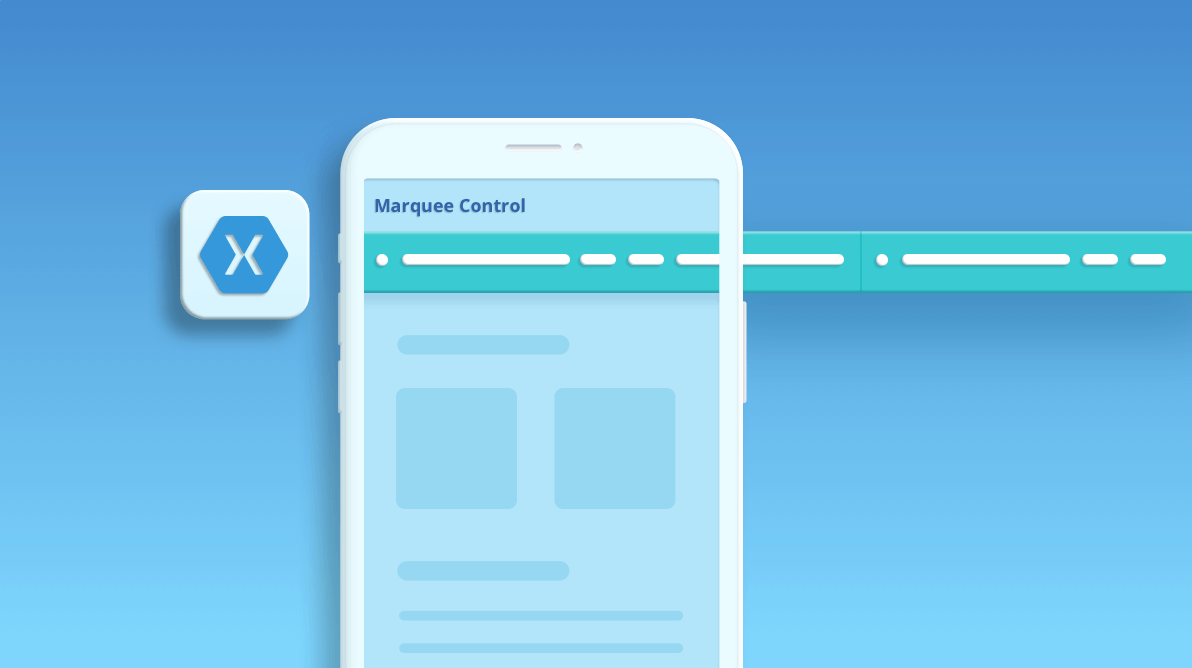
To provide a good user experience and appealing appearance, sometimes we need to show automatically scrolling text in our applications. For example, our cart item lists, alert information, notifications, and offers can be shown in our applications with auto-scrolling functionality.
For that, you need a marquee control in your application.
This blog will help you create scrolling text (also called a marquee) in your Xamarin.Forms application using Syncfusion’s ListView and Button controls. This marquee control will scroll your list content. You can show both text and images and also adjust the speed of the marquee control.
Let’s start to build it!
Required packages
Install the following required NuGet packages:
Marquee control implementation
Follow these steps to create a marquee control in your Xamarin.Forms application.
Step 1: UI design implementation
There is no separate control for a marquee in Xamarin.Forms. So, we can create our own UI for that. The following code will explain the marquee control UI implementation. We should send the page width to the marquee behavior to repeat the content scrolling.
<customControls:CustomScrollView
  Grid.Row="0"
  HeightRequest="45"
  HorizontalOptions="FillAndExpand"
  HorizontalScrollBarVisibility="Never"
  IsEnabled="{OnPlatform Android=False}"
  Orientation="Horizontal">
  <StackLayout
     Padding="0"
     BackgroundColor="{StaticResource SeparatorBackgroundColor}"
     Orientation="Horizontal"
     Spacing="0">
     <StackLayout.Behaviors>
        <behavior:MarqueeBehavior PageWidth="{Binding Path=Width, Source={x:Reference mainPage}}" />
     </StackLayout.Behaviors>
  </StackLayout>
</customControls:CustomScrollView>
We’ll create a custom scroll view to disable the manual scrolling in iOS. For that, we need to create a CustomScrollView in the portable project, as shown.
public class CustomScrollView : ScrollView
{
   public CustomScrollView()
   {

   }
}
Then, we have to create the CustomScrollViewRenderer.cs file in the iOS project. The following code explains how to disable the manual scrolling in iOS.
[assembly: ExportRenderer(typeof(CustomScrollView), typeof(CustomScrollViewRenderer))]

    public class CustomScrollViewRenderer : ScrollViewRenderer
    {
        protected override void OnElementChanged(VisualElementChangedEventArgs e)
        {
            base.OnElementChanged(e);
            ScrollEnabled = false;
        }
    }
Note: As there is no manual scrolling feature in Android, we don’t need to create a separate custom scroll view for it.
Step 2: Creating a model
Create a model class for the marquee content. Refer to the following code example.
public class Control
{
   public string Name { get; set; }
   public string Description { get; set; }
   public string PriorityId { get; set; }
   public string PreviewImage { get; set; }
}
In the code, the PriorityId property is used to change the background color of the marquee label. We can change the background color based on the priority.
Step 3: Creating a viewmodel
We have followed the MVVM (model-view-viewmodel) structure in this application. So, we should create the MainPageViewModel.cs file for the backend process.
In the viewmodel, we have generated the Xamarin controls collection to bind the data for the marquee control.
Refer to the following code example.
public class MainPageViewModel : BaseViewModel
{
#region Privates
private ObservableCollection<Control> controls;
#endregion
#region Constructor
public MainPageViewModel()
{
GetControls();
}
#endregion
#region Properties
public ObservableCollection<Control> Controls
{
get { return controls; }
set { controls = value; OnPropertyChanged(); }
}
#endregion
#region Methods
public void GetControls()
{
Controls = new ObservableCollection<Control>();
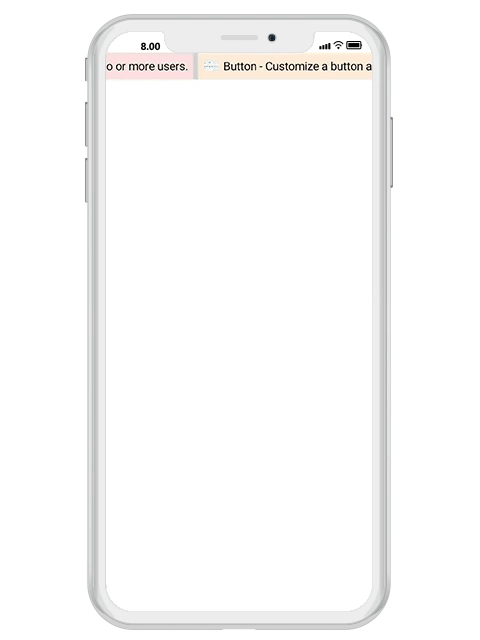
Controls.Add(new Control { Name = "Chat", Description = "Chat - Provides a modern conversational UI to facilitate conversation between two or more users.", PreviewImage = "https://help.syncfusion.com/xamarin/chat/sfchat_images/xamarin-forms-chat-timebreak-mode.png", PriorityId = "1" });
Controls.Add(new Control { Name = "Button", Description = "Button - Customize a button as an outline, flat, circle, or icon button.", PreviewImage = "https://help.syncfusion.com/xamarin/button/images/overview.png", PriorityId = "3" });
Controls.Add(new Control { Name = "TabbedView", Description = "TabbedView - It provides nested tab support with different header placement support.", PreviewImage = "https://help.syncfusion.com/xamarin/tabbed-view/images/getting-started/xamarin_forms_tabview.png", PriorityId = "2" });
Controls.Add(new Control { Name = "ListView", Description = "ListView - Easily arrange items in a vertical or horizontal manner.", PreviewImage = "https://help.syncfusion.com/xamarin/listview/sflistview_images/overview.png", PriorityId = "1" });
Controls.Add(new Control { Name = "Rotator", Description = "Rotator - Thumbnails display mode helps users preview all items.", PreviewImage = "https://help.syncfusion.com/xamarin-ios/sfrotator/images/rotator.png", PriorityId = "3" });
}
#endregion
}Step 4: Creating the marquee behavior
The marquee behavior is used to generate the scrolling marquee label based on the viewmodel collection. This behavior will start the scrolling animation and change the background color based on the priority. You can also customize the button to show only the text or text with images.
Refer to the following code.
public class MarqueeBehavior : Behavior<StackLayout>
    {
        #region Properties

        private StackLayout stack { get; set; }
        private bool isStartTimer;

        public double PageWidth
        {
            get { return (double)GetValue(PageWidthProperty); }
            set { SetValue(PageWidthProperty, value); }
        }

        // Using a BindableProperty as the backing store for PageWidth. This enables animation, styling, binding, etc.
        public static readonly BindableProperty PageWidthProperty =
            BindableProperty.Create("PageWidth", typeof(double), typeof(MarqueeBehavior));

        #endregion

        #region Methods

        protected override void OnAttachedTo(StackLayout stackLayout)
        {
            base.OnAttachedTo(stackLayout);
            this.stack = stackLayout;
            isStartTimer = true;
            stackLayout.BindingContextChanged += StackLayout_BindingContextChanged;
        }

        /// <summary>
        /// This event is invoked when stacklayout binding context is changed.
        /// </summary>
        /// <param name="sender"></param>
        /// <param name="e"></param>
        private void StackLayout_BindingContextChanged(object sender, EventArgs e)
        {
            StackLayout stackLayout = sender as StackLayout;
            if (stackLayout.BindingContext != null && stackLayout.BindingContext is MainPageViewModel mainPageViewModel && mainPageViewModel != null)
            {
                if (mainPageViewModel.Controls != null && mainPageViewModel.Controls.Count > 0)
                {
                    foreach (var control in mainPageViewModel.Controls)
                    {
                        stackLayout.Children.Add(GetNewButton((control.Description), int.Parse(control.PriorityId), control.PreviewImage));
                    }

                    StartAnimation();
                }
            }
        }

        /// <summary>
        /// This method is used for starting the marquee scrolling animation.
        /// </summary>
        private void StartAnimation()
        {
            Device.StartTimer(TimeSpan.FromMilliseconds(50), () =>
            {
                stack.TranslationX -= 5f;

                if (Math.Abs(stack.TranslationX) > stack.Width)
                {
                    stack.TranslationX = PageWidth;
                }
                return isStartTimer;
            });
        }

        /// <summary>
        /// This method is used for getting the marquee label content.
        /// </summary>
        /// <param name="content"></param>
        /// <param name="PriorityId"></param>
        /// <returns></returns>
        private SfButton GetNewButton(string content, int priorityId, string imageName)
        {
            var button = new SfButton()
            {
                FontSize = 16,
                Text = content,
                HeightRequest = 45,
                HasShadow = false,
                Margin = new Thickness(0, 0, 8, 0),
                Padding = new Thickness(12, 0, 18, 0),
                ImageSource = imageName,
                ShowIcon = true,
                HorizontalOptions = LayoutOptions.FillAndExpand,
                TextColor = (Color)Application.Current.Resources["ContentTextColor"],
                BackgroundColor = GetPriorityColor(priorityId),
                VerticalOptions = LayoutOptions.Center,

            };

            button.Clicked += (sender, args) =>
            {
                //Perform marquee selected item.
            };

            return button;
        }

        /// <summary>
        /// This method is used to return the color based on priority level.
        /// </summary>
        /// <param name="id"></param>
        /// <returns></returns>
        private Color GetPriorityColor(int id)
        {
            if (id == 1)
                return (Color)Application.Current.Resources["HighPriorityBackgroundColor"];
            else if (id == 2)
                return (Color)Application.Current.Resources["NormalPriorityBackgroundColor"];
            else
                return (Color)Application.Current.Resources["LowPriorityBackgroundColor"];
        }

        protected override void OnDetachingFrom(StackLayout stackLayout)
        {
            stackLayout.BindingContextChanged -= StackLayout_BindingContextChanged;
            isStartTimer = false;
            base.OnDetachingFrom(stackLayout);
        }

        #endregion
    }
Step 5: Style
Create a common style for the marquee control view. This way, we can use the same color in all the pages, if required.
<Application.Resources>
        <Color x:Key="SeparatorBackgroundColor">LightGray</Color>
        <Color x:Key="HighPriorityBackgroundColor">#FFDCE5</Color>
        <Color x:Key="NormalPriorityBackgroundColor">#DBEFFE</Color>
        <Color x:Key="LowPriorityBackgroundColor">#FFEADC</Color>
        <Color x:Key="ContentTextColor">#000000</Color>
        <Color x:Key="AppBackgroundColor">White</Color>
    </Application.Resources>
Output

Conclusion:
Thanks for reading! It’s this simple to create a marquee control in Xamarin.Forms. We hope you enjoyed this blog. This will help you to show the text in your applications with a customized auto-scrolling feature. If you would like to try the marquee control yourself, download the sample from this link.
Syncfusion Xamarin.Forms has 150 UI controls, from basic editors to powerful, advanced controls like DataGrid, Charts, ListView, and RTE. Use them to build charming cross-platform applications!
If you have any questions, you can post them in our support forum, Direct-Trac, or feedback portal. As always, we are happy to assist you!


Comments (2)
You are creating a hard dependency between the MainViewModel and your behaviour, might have as well put your code in the code behind
Hi Kareem Said,
Thanks for your comment. The intention of this sample was only to demonstrate the possibilities of creating a marquee control. However, I will move the viewmodel code from behaviour file soon. I appreciate your input and support for this blog.
Regards,
Yogeshwaran M
Comments are closed.