---
title: "Create and Validate a Sign-Up Form in .NET MAUI"
published_at: "2023-03-02T11:00:00+00:00"
modified_at: "2026-02-10T08:58:28+00:00"
url: "https://www.syncfusion.com/blogs/post/create-validate-sign-up-form-in-dotnet-maui"
excerpt: "This blog explains how to create and validate a sign-up form using the Syncfusion .NET MAUI DataForm control with code examples."
taxonomy_category:
- ".NET MAUI"
- "Data Validation"
- "Desktop"
- "Mobile"
- "Syncfusion"
- "UI"
taxonomy_post_tag:
- ".NET MAUI"
- "DataForm"
- "desktop"
- "Form Validation"
- "Mobile"
---
# Create and Validate a Sign-Up Form in .NET MAUI
[Jeyasri Murugan](https://www.syncfusion.com/blogs/author/jeyasrim)

A sign-up form allows users to create an account in an application by providing details such as name, email address, and password. Usually, such a form is used for registration or membership subscription.
The Syncfusion [.NET MAUI DataForm](https://www.syncfusion.com/maui-controls/maui-dataform)
allows developers to create data entry forms. This control also supports [validating](https://help.syncfusion.com/maui/dataform/validation)
user input. By validating the input, users will be prompted to provide only correct values into the form, maintaining the integrity and consistency of the data stored in the database to prevent errors, inconsistencies, and security threats.
In this article, we’ll see how to create a sign-up form and validate the data entered using the Syncfusion .NET MAUI DataForm control.
**Note:** Refer to the [.NET MAUI DataForm](https://help.syncfusion.com/maui/dataform/overview)
documentation before getting started.
## Creating a sign-up form using the .NET MAUI DataForm control
First, create a sign-up form using the .NET MAUI DataForm control.
### Initialize the .NET MAUI DataForm control
Follow these steps to initialize the .NET MAUI DataForm control:
1. [Create a new .NET MAUI application](https://learn.microsoft.com/en-us/dotnet/maui/get-started/first-app?view=net-maui-7.0&tabs=vswin&pivots=devices-android) in [Visual Studio](https://visualstudio.microsoft.com/vs/) .
2. Syncfusion .NET MAUI components are available in the [NuGet Gallery](https://www.nuget.org/) . To add the [DataForm](https://help.syncfusion.com/cr/maui/Syncfusion.Maui.DataForm.html) to your project, open the NuGet package manager in Visual Studio, search for [Syncfusion.Maui.DataForm](https://www.nuget.org/packages/Syncfusion.Maui.DataForm) , and then install it.
3. Import the control’s namespace **Syncfusion.Maui.DataForm** in the XAML or C# code.
4. Initialize the SfDataForm control in the XAML page.``` ….. xmlns:dataForm="clr-namespace:Syncfusion.Maui.DataForm;assembly=Syncfusion.Maui.DataForm" ….. ```
5. The NuGet package [Syncfusion.Maui.Core](https://www.nuget.org/packages/Syncfusion.Maui.Core) is a dependent package for all Syncfusion .NET MAUI controls. In the **MauiProgram.cs** file, register the handler for the Syncfusion core assembly.``` builder.ConfigureSyncfusionCore() ```
### Create the data form model
Let’s create the data form model for the sign-up form. This consists of fields to store specific information such as names, addresses, phone numbers, and more. You can also add [attributes](https://help.syncfusion.com/maui/dataform/data-annotations)
to the data model class properties for efficient data handling.
Refer to the following code example.
```
public class SignUpFormModel
{
[Display(Prompt = "Enter your first name", Name = "First name")]
public string FirstName { get; set; }
[Display(Prompt = "Enter your last name", Name = "Last name")]
public string LastName { get; set; }
[Display(Prompt = "Enter your email", Name = "Email")]
public string Email { get; set; }
[Display(Prompt = "Enter your mobile number", Name = "Mobile number")]
public double? MobileNumber { get; set; }
[Display(Prompt = "Enter your password", Name = "Password")]
public string Password { get; set; }
[Display(Prompt = "Confirm password", Name = "Re-enter Password")]
[DataType(DataType.Password)]
public string RetypePassword { get; set; }
[DataType(DataType.MultilineText)]
[Display(Prompt = "Enter your address", Name = "Address")]
public string Address { get; set; }
[Display(Prompt = "Enter your city", Name = "City")]
public string City { get; set; }
[Display(Prompt = "Enter your state", Name = "State")]
public string State { get; set; }
[Display(Prompt = "Enter your country", Name = "Country")]
public string Country { get; set; }
[Display(Prompt = "Enter zip code", Name = "Zip code")]
public double? ZipCode { get; set; }
}
```
### Create the sign-up form with editors
By default, the data form auto generates the data editors based on the primitive data types such as **string**, ** enumeration**, ** DateTime**, and ** TimeSpan** in the [DataObject](https://help.syncfusion.com/cr/maui/Syncfusion.Maui.DataForm.SfDataForm.html#Syncfusion_Maui_DataForm_SfDataForm_DataObject)
property.
The .NET MAUI DataForm supports [built-in editors](https://help.syncfusion.com/maui/dataform/editors)
such as text, password, multiline, combo box, autocomplete, date, time, checkbox, switch, and radio group.
Refer to the following code example. In it, we set the data form model (**SignUpFormViewModel**) to the ** DataObject** property to create the data editors for the sign-up form.
**XAML**
```
```
**C#**
```
public class SignUpFormViewModel
{
///
/// Initializes a new instance of the class.
///
public SignUpFormViewModel()
{
this.SignUpFormModel = new SignUpFormModel();
}
///
/// Gets or sets the sign-up model.
///
public SignUpFormModel SignUpFormModel { get; set; }
}
```
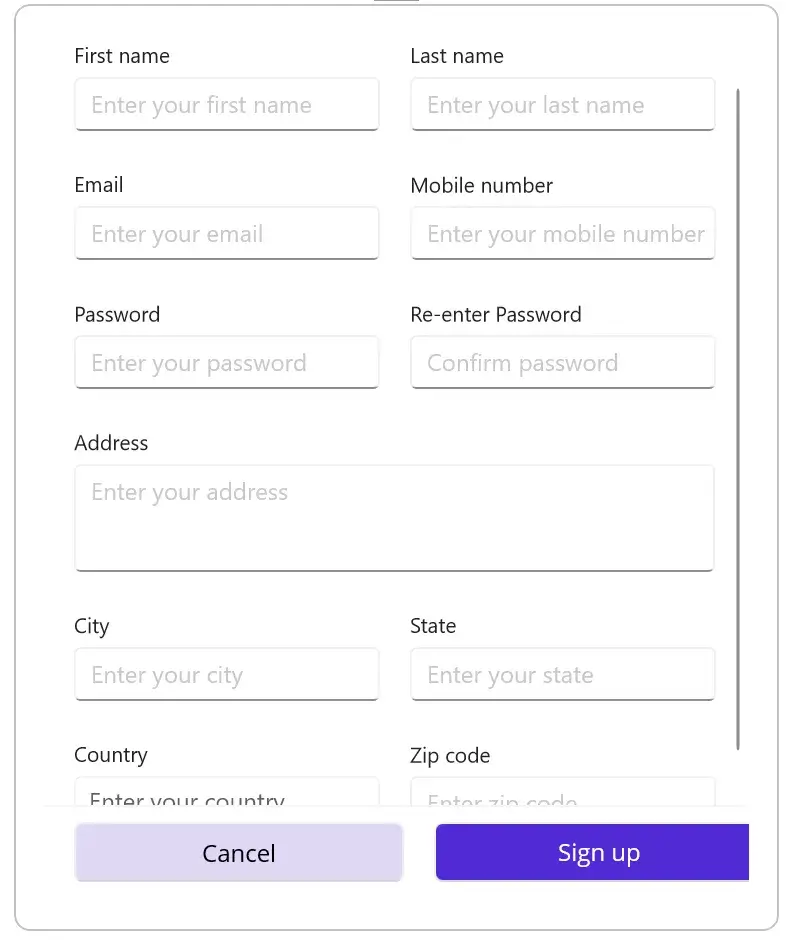
Sign-Up Form Created Using .NET MAUI DataForm Control
## Validating the data in the sign-up form using the .NET MAUI DataForm control
We have created the sign-up form. Let’s proceed with the validation processes.
### Validate the data using the validation attributes
The .NET MAUI DataForm control provides the attributes to handle data validation. In our example, we’ll add the following validation checks to our sign-up form:
- **Required fields validation**: Ensures that all required fields, such as name, email, and password, are filled out before submitting the form.
- **Email validation**: Checks whether the email data is in the correct format. The email data should include the **@** character (e.g., [[email protected]](/cdn-cgi/l/email-protection) ).
- **Password strength validation**: Ensures that the provided password satisfies certain criteria, such as minimum length and the inclusion of special characters.
- **Confirm password validation**: Ensures that the confirmed password matches the provided password.
- **Phone number validation**: Ensures that the phone number provided is valid and is in the correct format.
Refer to the following code example.
```
[Display(Prompt = "Enter your first name", Name = "First name")]
[Required(ErrorMessage = "Please enter your first name")]
[StringLength(20, ErrorMessage = "First name should not exceed 20 characters")]
public string FirstName { get; set; }
[Display(Prompt = "Enter your last name", Name = "Last name")]
[Required(ErrorMessage = "Please enter your last name")]
[StringLength(20, ErrorMessage = "First name should not exceed 20 characters")]
public string LastName { get; set; }
[Display(Prompt = "Enter your email", Name = "Email")]
[EmailAddress(ErrorMessage = "Please enter your email")]
public string Email { get; set; }
[Display(Prompt = "Enter your mobile number", Name = "Mobile number")]
[StringLength(10, MinimumLength = 6, ErrorMessage = "Please enter a valid number")]
public double? MobileNumber { get; set; }
[Display(Prompt = "Enter your password", Name = "Password")]
[DataType(DataType.Password)]
[DataFormDisplayOptions(ColumnSpan = 2, ValidMessage = "Password strength is good")]
[Required(ErrorMessage = "Please enter the password")]
[RegularExpression(@"^(?=.*[a-z])(?=.*[A-Z])[a-zA-Z\d]{8,}$", ErrorMessage = "A minimum 8-character password should contain a combination of uppercase and lowercase letters.")]
public string Password { get; set; }
[Display(Prompt = "Confirm password", Name = "Re-enter Password")]
[DataType(DataType.Password)]
[Required(ErrorMessage = "Please enter the password")]
public string RetypePassword { get; set; }
[DataType(DataType.MultilineText)]
[Display(Prompt = "Enter your address", Name = "Address")]
[Required(ErrorMessage = "Please enter your address")]
public string Address { get; set; }
[Display(Prompt = "Enter your city", Name = "City")]
[Required(ErrorMessage = "Please enter your city")]
public string City { get; set; }
[Display(Prompt = "Enter your state", Name = "State")]
[Required(ErrorMessage = "Please enter your state")]
public string State { get; set; }
[Display(Prompt = "Enter your country", Name = "Country")]
public string Country { get; set; }
[Display(Prompt = "Enter zip code", Name = "Zip code")]
[Required(ErrorMessage = "Please enter your zip code")]
public double? ZipCode { get; set; }
```
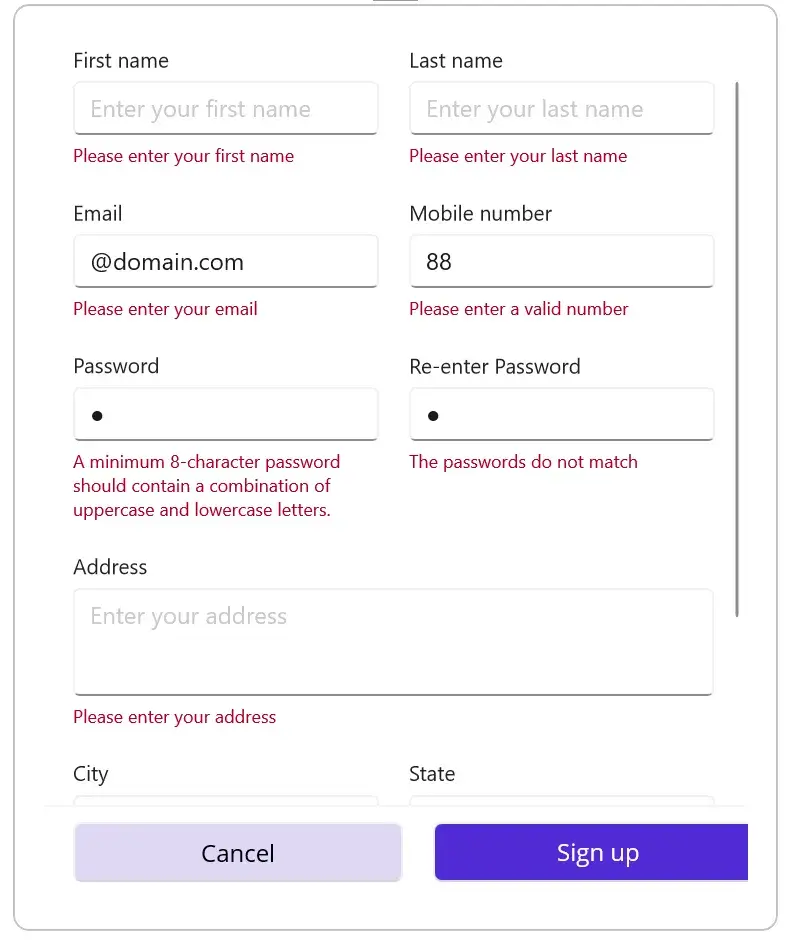
Validating the Sign-Up Form Using Validation Attributes
### Show validation success message
If the input values are correct, show the successful [validation message](https://help.syncfusion.com/cr/maui/Syncfusion.Maui.DataForm.DataFormDisplayOptionsAttribute.html#Syncfusion_Maui_DataForm_DataFormDisplayOptionsAttribute_ValidMessage)
. This will show the users that their provided data is in the required format.
Refer to the following code example. Here, we will display the valid message **Password strength is good** at the bottom of the ** Password**field upon successful validation.
```
[Display(Prompt = “Enter your password”, Name = “Password”)]
[DataType(DataType.Password)]
[DataFormDisplayOptions(ColumnSpan = 2, ValidMessage = “Password strength is good”)]
[Required(ErrorMessage = “Please enter the password”)]
[RegularExpression(@”^(?=.*[a-z])(?=.*[A-Z])[a-zA-Z\d]{8,}$”, ErrorMessage = “A minimum 8-character password should contain a combination of uppercase and lowercase letters.”)]
public string Password { get; set; }
```
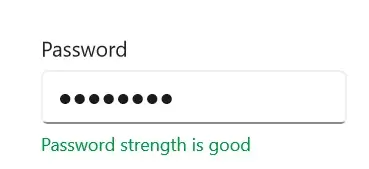
Displaying Validation Success Message in the Sign-Up Form
### Set validate modes in the DataForm
The .NET MAUI DataForm control supports the following [validation modes](https://help.syncfusion.com/cr/maui/Syncfusion.Maui.DataForm.SfDataForm.html#Syncfusion_Maui_DataForm_SfDataForm_ValidationMode)
to denote when the value should be validated:
- [LostFocus](https://help.syncfusion.com/cr/maui/Syncfusion.Maui.DataForm.DataFormValidationMode.html#Syncfusion_Maui_DataForm_DataFormValidationMode_LostFocus) : This is the default validation mode, and the input value will be validated when the editor loses focus.
- [PropertyChanged](https://help.syncfusion.com/cr/maui/Syncfusion.Maui.DataForm.DataFormValidationMode.html#Syncfusion_Maui_DataForm_DataFormValidationMode_PropertyChanged) : The input value will be validated immediately when it is changed.
- [Manual](https://help.syncfusion.com/cr/maui/Syncfusion.Maui.DataForm.DataFormValidationMode.html#Syncfusion_Maui_DataForm_DataFormValidationMode_Manual) : Use this mode to manually validate the values by calling the [Validate](https://help.syncfusion.com/cr/maui/Syncfusion.Maui.DataForm.SfDataForm.html#Syncfusion_Maui_DataForm_SfDataForm_Validate) method.
Refer to the following code example. Here, we have set the validation mode as **PropertyChanged**.
```
```
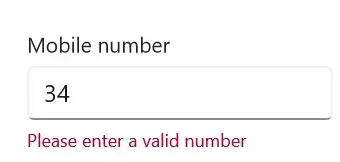
Validate the Data on Property Change in the Sign-Up Form
### Validate the data using IDataErrorInfo
We can implement the [IDataErrorInfo](https://learn.microsoft.com/en-us/dotnet/api/system.componentmodel.idataerrorinfo?view=net-7.0)
interface in the data object class to validate the sign-up form.
Refer to the following code example. Here, we implement the **IDataErrorInfo** validation in the ** RetypePassword** field.
```
public class SignUpFormModel : IDataErrorInfo
{
[Display(Prompt = "Enter your password", Name = "Password")]
[DataType(DataType.Password)]
[DataFormDisplayOptions(ColumnSpan = 2, ValidMessage = "Password strength is good")]
[Required(ErrorMessage = "Please enter the password")]
[RegularExpression(@"^(?=.*[a-z])(?=.*[A-Z])[a-zA-Z\d]{8,}$", ErrorMessage = "A minimum 8-character password should contain a combination of uppercase and lowercase letters.")]
public string Password { get; set; }
[Display(Prompt = "Confirm password", Name = "Re-enter Password")]
[DataType(DataType.Password)]
[Required(ErrorMessage = "Please enter the password")]
[DataFormDisplayOptions(ColumnSpan = 2)]
public string RetypePassword { get; set; }
[Display(AutoGenerateField = false)]
public string Error
{
get
{
return string.Empty;
}
}
[Display(AutoGenerateField = false)]
public string this[string name]
{
get
{
string result = string.Empty;
if (name == nameof(RetypePassword) && this.Password != this.RetypePassword)
{
result = string.IsNullOrEmpty(this.RetypePassword) ? string.Empty : "The passwords do not match";
}
return result;
}
}
}
```
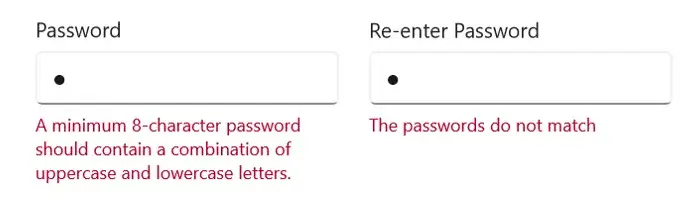
Validating the Sign-Up Form Field Using IDataErrorInfo Interface
### Validate the data using INotifyDataErrorInfo
You can also validate the data by implementing the [INotifyDataErrorInfo](https://learn.microsoft.com/en-us/dotnet/api/system.componentmodel.inotifydataerrorinfo?view=net-7.0)
interface in the data object class.
Refer to the following code example. Here we implemented **INotifyDataErrorInfo** validation in the ** Country**field.
```
public class SignUpFormModel : INotifyDataErrorInfo
{
[Display(Prompt = "Enter your country", Name = "Country")]
public string Country { get; set; }
[Display(AutoGenerateField = false)]
public bool HasErrors
{
get
{
return false;
}
}
public event EventHandler ErrorsChanged;
[Display(AutoGenerateField = false)]
public IEnumerable GetErrors(string propertyName)
{
var list = new List();
if (propertyName.Equals("Country") && string.IsNullOrEmpty(this.Country))
list.Add("Please select your country");
return list;
}
}
```
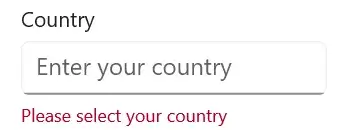
Validating the Sign-Up Form Using INotifyDataErrorInfo Interface
### Validate the form before signing up
Finally, we’ll validate the complete form when the **Sign-up** button is clicked by using the [Validate](https://help.syncfusion.com/cr/maui/Syncfusion.Maui.DataForm.SfDataForm.html#Syncfusion_Maui_DataForm_SfDataForm_Validate)
method.
Refer to the following code example.
```
private async void OnSignUpButtonClicked(object? sender, EventArgs e)
{
if (this.dataForm != null && App.Current?.MainPage != null)
{
if (this.dataForm.Validate())
{
await App.Current.MainPage.DisplayAlert("", "Signed up successfully", "OK");
}
else
{
await App.Current.MainPage.DisplayAlert("", "Please enter the required details", "OK");
}
}
}
```
After executing the previous code example, we will get the output shown in the following images.
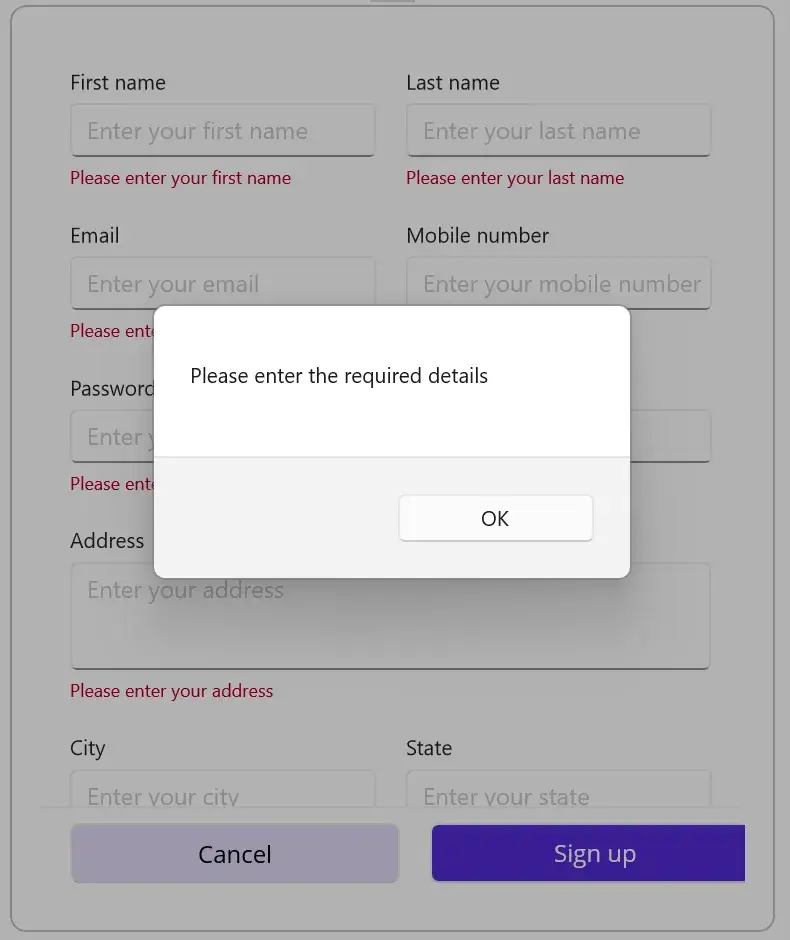
Validating the Entire Sign-Up Form Before Submitting
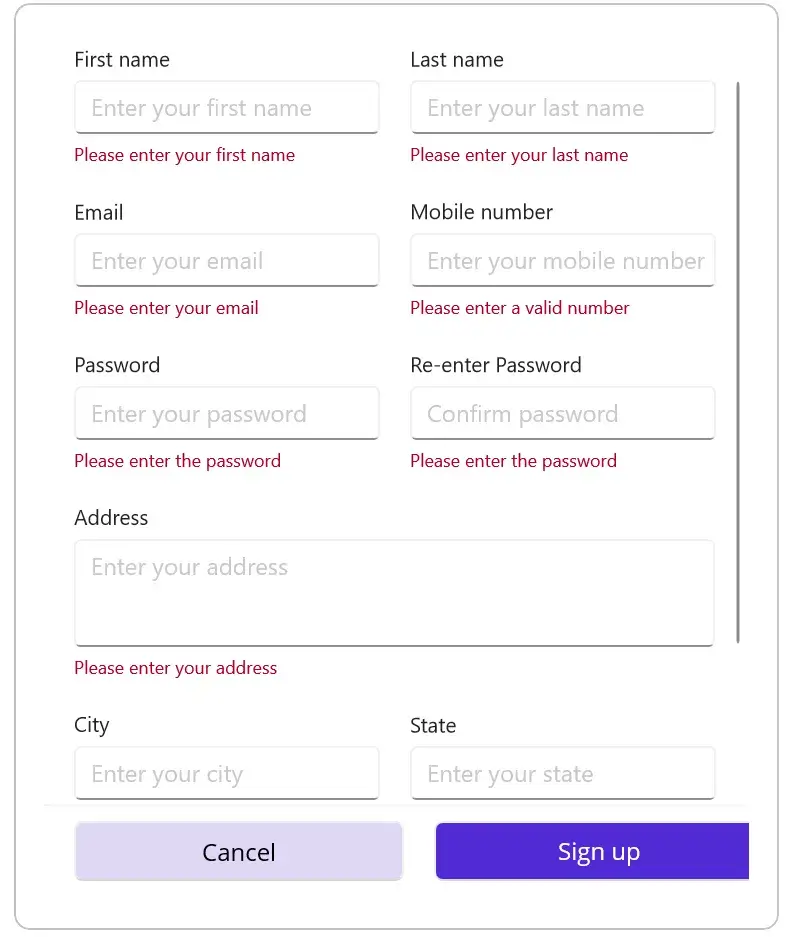
Sign-Up Form Showing Validation Messages
## GitHub reference
Check out the complete code example to [create and validate a sign-up form using the .NET MAUI DataForm on GitHub](https://github.com/SyncfusionExamples/create-and-validate-the-sign-up-form-using-.NET-MAUI-DataForm/tree/master)
.
## Conclusion
Thanks for reading! In this blog, we have learned how to create and validate a sign-up form using the [.NET MAUI DataForm](https://www.syncfusion.com/maui-controls/maui-dataform)
control. Try out the steps in this blog and leave your feedback in the comments section below.
For current Syncfusion customers, the newest version of Essential Studio® is available from the [license and downloads page](https://www.syncfusion.com/account/downloads)
. If you are not a customer, try our 30-day [free trial](https://www.syncfusion.com/downloads)
to check out these new features.
You can also contact us through our [support forums](https://www.syncfusion.com/forums)
, [feedback](https://www.syncfusion.com/feedback)
, or [support portal](https://support.syncfusion.com/)
. We are always happy to assist you!
## Related blogs
- [Authenticate the .NET MAUI App with Azure AD](https://www.syncfusion.com/blogs/post/authenticate-the-net-maui-app-with-azure-ad.aspx)
- [Designing Effective Data Entry Forms in .NET MAUI](https://www.syncfusion.com/blogs/post/designing-effective-data-entry-forms-in-net-maui-a-step-by-step-guide.aspx)
- [Easily Develop a Travel Destination Listing UI in .NET MAUI](https://www.syncfusion.com/blogs/post/travel-destination-listing-ui-in-dotnet-maui.aspx)
- [OCR in .NET MAUI: Building an Image Processing Application](https://www.syncfusion.com/blogs/post/ocr-in-net-maui-building-an-image-processing-application.aspx)